Pioneer 1/72 Sea Fury
| KIT #: | 4-4002 |
| PRICE: | $ |
| DECALS: | See review |
| REVIEWER: | Madoc Pope |
| NOTES: | A nicely rendered simple kit of a handsome aircraft. Basic details that comes together well. |
| HISTORY |
The Hawker Sea Fury was about as good as a piston engined fighter plane will ever get. In particular, as good as a radial piston engined fighter will ever get. The plane represented the pinnacle of Hawker's fighter plane development efforts in World War Two and it arrived just a hair's breadth too late to see service in the war. Still though, it is a handsome aircraft and some several are still flying today. A few of those are in private collector's hands while others are slicing up the pylons in the air racing circuit. The history of this aircraft has far more detail than just what I've typed out here and once again Greg Goebel's site has an excellent page on the Fury and its progenitors: The Hawker Typhoon, Tempest, & Se Fury. http://www.faqs.org/docs/air/avcfury.html
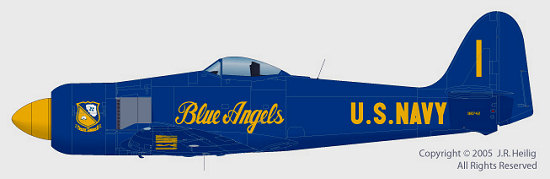 What got me going with this kit was
this bit of "What If" profile work done by Jennings Heilig:
What got me going with this kit was
this bit of "What If" profile work done by Jennings Heilig:
There's something about aircraft in sea blue schemes that I really like and this one really spoke to me. I thought about it a bit and realized it would be a very do-able build since the paint scheme was very simple (one color) and the Pioneer Models Sea Fury kit was one I had in hand already. All I needed was the appropriate decals for this bird. Superscale did a set of "Early Blue Angels" from back in the late 40's when the Blues first formed. Their first mounts were standard F6F Hellcats. They then went on to F8F Bearcats and did them up special. The standard sea blue was replaced with a custom mix which is now known as Blue Angel Blue. They also added a very royal yellow (called, what else? - Blue Angel Yellow) to their livery using that for the aircraft markings and highlights. The Blue Angels refined and changed their livery over the years and what is viewed as the standard Blue Angles scheme today is not what it was back in the 40's. Jennings worked up this profile as an exercise in "Whiffery" and not as a historically accurate duplication of the actual schemes. But it was close and in the spirit of the thing I pressed the Microscale set into service. Thus, with all the pieces in hand I started the build.
| THE KIT |
![]() This is a relatively simple kit. PM
produces a number of such kits. They're cleanly moulded, accurate in size and
shape and are also on the inexpensive side. They lack much in the way of
interior detail and are also rather basic on the whole. However, they are well
engineered, come together pretty readily, and are generally easy to build. Just
the thing for a Whiff. I wasn't concerned with the missing details or the lack
of any higher refinements. I just wanted a simple, inexpensive kit that would
be the appropriate canvas for the paint scheme and livery. That was the thing
which was what set this one apart - its paint scheme and markings. Higher
levels of detail would be beside the point. Thus the PM Sea Fury, in all its
basicness, was perfect.
This is a relatively simple kit. PM
produces a number of such kits. They're cleanly moulded, accurate in size and
shape and are also on the inexpensive side. They lack much in the way of
interior detail and are also rather basic on the whole. However, they are well
engineered, come together pretty readily, and are generally easy to build. Just
the thing for a Whiff. I wasn't concerned with the missing details or the lack
of any higher refinements. I just wanted a simple, inexpensive kit that would
be the appropriate canvas for the paint scheme and livery. That was the thing
which was what set this one apart - its paint scheme and markings. Higher
levels of detail would be beside the point. Thus the PM Sea Fury, in all its
basicness, was perfect.
| CONSTRUCTION |
Working from the inside out I
started with the aircraft interior. Here, the PM model more resembles the
Airfix kits of the 50's and 60's in its utter lack of interior detailing.
There's but a plank of plastic for the cockpit floor, a piece for the seat,
another for the cockpit front/ instrument panel, and a final one for the seat
back/ cockpit rear. That's it. No joystick, pedals, instrument panel
 facing,
etc.,. Also lacking was anything to cover the void left behind the seat back
and the rear fuselage. That wasn't acceptable even for this limited objectives
build. Not wanting to get too fancy, I simply cut a piece of thin plastic card
and bent it over so it attached to the seat back and cockpit floor.
facing,
etc.,. Also lacking was anything to cover the void left behind the seat back
and the rear fuselage. That wasn't acceptable even for this limited objectives
build. Not wanting to get too fancy, I simply cut a piece of thin plastic card
and bent it over so it attached to the seat back and cockpit floor.
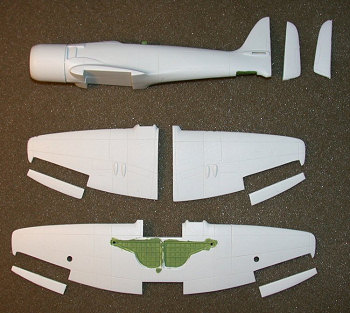
As the objective of this build was simple, so to was the construction. This is where the basic quality of the PM kit shines through. The pieces didn't exactly "fall together" but they did attach pretty well and with but a minimum of fuss. Soon enough I had the major subassemblies ready to go.
 As you can see, I decided to liven
the static display of the kit up a bit by "animating" its control surfaces.
Nothing fancy here either.
As you can see, I decided to liven
the static display of the kit up a bit by "animating" its control surfaces.
Nothing fancy here either.
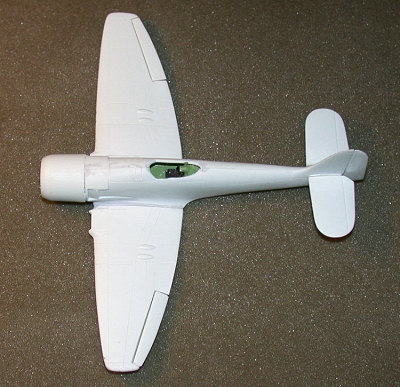
In short order I had it together.
Here you can see the rather small amount of filler I had to use. You can also make out that rear decking piece I put in behind the seatback in the cockpit. I think it tidied up that area well. With the basics good to go it was on to painting.
| COLORS & MARKINGS |
 It was at this point where I
frustrated. The Aztec airbrush I had been using really started crapping out on
me. So, I figured I'd try my hand at brushing the paint on. Any mess would
be simple to sand smooth and repeat. Good thing I wasn't going for perfection
on the first coat!
It was at this point where I
frustrated. The Aztec airbrush I had been using really started crapping out on
me. So, I figured I'd try my hand at brushing the paint on. Any mess would
be simple to sand smooth and repeat. Good thing I wasn't going for perfection
on the first coat!
I used some very fine sandpaper for smoothing this ugly mess out and applied another coat or two. Eventually, the qualities of the paint and the overall smoothness of the surface won out over my oh-so-skilled brushing abilities.
| MORE CONSTRUCTION |
Once I got the finish finished, I
moved on to the little bits. The prop was a centerpiece of the plane. It's a
monster of a thing with five blades to it and a very large spinner.
Surprisingly, the PM moulding of the big Rotol propeller seemed a bit better
than the Special Hobby rendering of the same (I also had the Special Hobby Sea
Fury kit on hand) so I was rather pleased with that. What
 wasn't pleasing was
the way the prop and spinner worked out. First off, the fit between the prop
and holes in the spinner for the blades was very, very tight. I was worried
that I'd break off the blades getting them in just to test the fit for the first
time. Unfortunately, I had to repeat this process several times as that first
test fit revealed a very revealing gap between the depth of the holes in the
spinner and the thickness of the prop hub. Looking at it from the side you
could clearly see through both in front of and behind the propeller. I had to
cut come several circular pieces of thick plastic card and glue them on to the
propeller hub, front and back, before I achieved enough of a sight line masking
so that you could no longer see through it all.
wasn't pleasing was
the way the prop and spinner worked out. First off, the fit between the prop
and holes in the spinner for the blades was very, very tight. I was worried
that I'd break off the blades getting them in just to test the fit for the first
time. Unfortunately, I had to repeat this process several times as that first
test fit revealed a very revealing gap between the depth of the holes in the
spinner and the thickness of the prop hub. Looking at it from the side you
could clearly see through both in front of and behind the propeller. I had to
cut come several circular pieces of thick plastic card and glue them on to the
propeller hub, front and back, before I achieved enough of a sight line masking
so that you could no longer see through it all.
The PM canopy piece was functional but comparing it to the Special Hobby vacuform one it just didn't measure up. As the SH kit came with two vac canopies I decided to try my hand at using it here. Surprisingly, for my first vacuform canopy effort, this one worked out perfectly. A bit of sanding and the thing was spot on.
The PM landing gear doors were drastically over scale so I used thin plastic sheet to replace them. This gives a much more scale effect and I didn't worry about the relative lack of detailing to them. I replaced all the gear doors this way - including the tailwheel doors.
Some careful decal work later and I now had myself a Blue Angels Sea Fury!
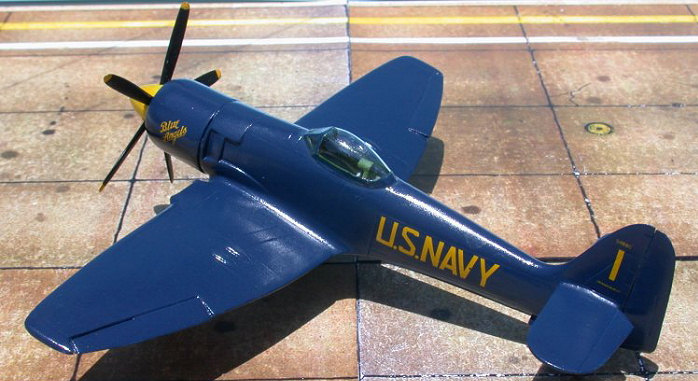
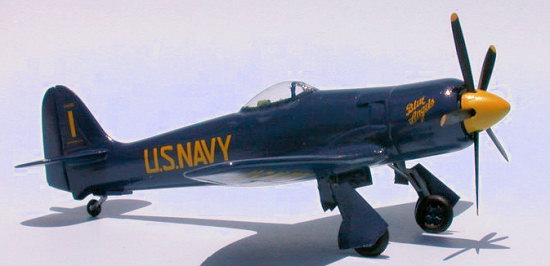
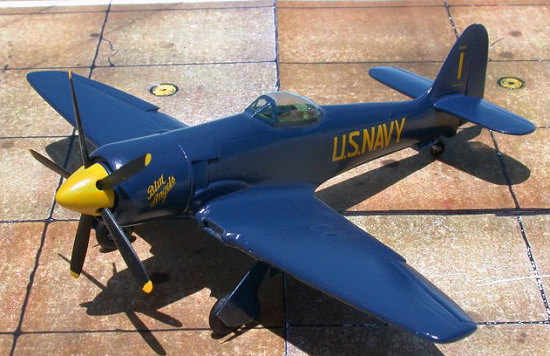 And there she is in all her blue
glory! Everything finally came together on Memorial Day '07. The sun had
finally burned through the marine layer and was giving its expected brilliant
hard edge illumination, I'd just finished spray gluing the Verlinden "Airfield
Tarmac" sections together onto a piece of foamcore to yield a suitable (and very
flat) base, and the batteries for my camera were fully charged. And away with
the beauty shots I went.
And there she is in all her blue
glory! Everything finally came together on Memorial Day '07. The sun had
finally burned through the marine layer and was giving its expected brilliant
hard edge illumination, I'd just finished spray gluing the Verlinden "Airfield
Tarmac" sections together onto a piece of foamcore to yield a suitable (and very
flat) base, and the batteries for my camera were fully charged. And away with
the beauty shots I went.
Those two whitish things immediately trailing the "U.S.Navy" markings are actually two small clear plastic bits. I believe them to be formation lights and I think that it's interesting that the very simplified PM kit would sport them whilst the much more advanced and detail Special Hobby Sea Fury kit does not. One difference that does favor the SH kit is the landing gear bay. On the PM kit it is far too shallow, being barely deep enough to allow the gear doors to be glued on, and thus leaving no scale room for the gear itself. At least the SH kit gets that right.
| CONCLUSIONS |
As I mentioned earlier, the Blue Angels have gone through several iterations of their livery. What Jennings worked up was based off a contemporary Blue Angels bird, the decal set which I had at hand was for the very first years the Blue Angels were flying and they marked their planes different then. The Blue Angels crest wasn't yet developed and the "Blue Angels" in script was both much smaller and only on the engine cowl, not the side of the fuselage. Still though, I think the inspiration is well served.
And that's that. A What If? profile-inspired Blue Angels Sea Fury.
September 2007
Copyright ModelingMadness.com
If you would like your product reviewed fairly and fairly quickly, please contact the editor or see other details in the Note to Contributors.