Whirlykits 1/72 Avro 707B
| KIT #: | WPX 72-002 |
| PRICE: | $ |
| DECALS: | Two options |
| REVIEWER: | Martin Pohl |
| NOTES: | Vacuformed kit with metal bits and decals |
| HISTORY |
The Avro 707 was a British experimental aircraft built to test the delta wing
design for the Avro 698 jet bomber (later to become the Vulcan), and was
effectively a one-third scaled-down version of that aircraft.
The prototypes were ordered by the Ministry to specification E.15/48. The
aircraft were produced cheaply and quickly using components from other aircraft.
Five prototypes were built in the end. Only the first three produced provided
useful information
 for the
Vulcan project, the last two flying too late to be of much relevance.
for the
Vulcan project, the last two flying too late to be of much relevance.
The first prototype, the Avro 707, crashed on 30 September 1949. Consequently
the second prototype was converted during building with the pointed nose planned
for the 707A to become the 707B. The B got a top mounted engine intake. The B
would eventually end up as spares for the others. The next one to fly was the
707A, a faithful copy of the Type 698's wingform including engine intakes, and
intended for high speed testing. In 1956 it was transferred to
The Avro 707 made its final public appearance at the Farnborough Air Show; the
four surviving examples of the aircraft flying alongside two Vulcan prototypes.
Two examples of the Avro 707C two-seat variant survive. One is located at the
| THE KIT |
| CONSTRUCTION |
 The
construction of a vac formed kit is always the same I think; lining the edges
with some pencil; separating them and then sanding them down to the size they
should have.
The
construction of a vac formed kit is always the same I think; lining the edges
with some pencil; separating them and then sanding them down to the size they
should have.
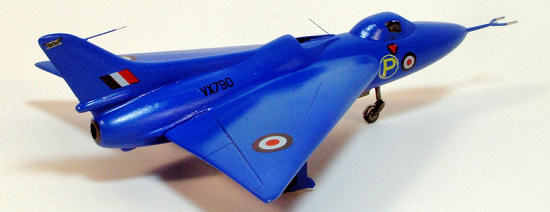
On this one I've scratched some detail for the wheel wells and I did a copy of
the pit of the ProResin 707 A. This copy I did as an experiment in using only
very cheap materials. For the molds I used bathroom silicone which worked pretty
well – if it only would smell a little nicer and for doing the copies I used a
water based ceramic – well a very fine kind of plaster I think. It all together
came out not that bad – the copied parts were for sure better than scratched
parts.
When trying to find the lines were to cut that intake piece I totally ruined
that part, so I had to scratch that. The outcome of this is quite OK I think, at
least for me.

The rest of the construction was pretty easy so there is not that much to tell
about.
If only – yes the canopy. I was not able to get the given canopy to settle to
what I cut out as cockpit. So I took a spare canopy from the ProResin 707 A.
This canopy is made to attach to the fuselage hump of the 707 A so I had to form
the humpback of the 707 B my self.
This I made with wax which is pretty easy to shape.
| COLORS & MARKINGS |
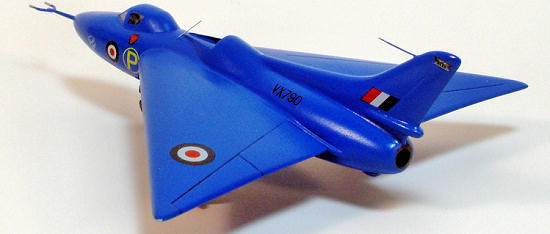
The cockpit was painted mid gray. The ejector seat did get the eject handle in
yellow black. This was it, because if you choose the canopy being closed, like
me, you can’t see that much of the cockpit then.
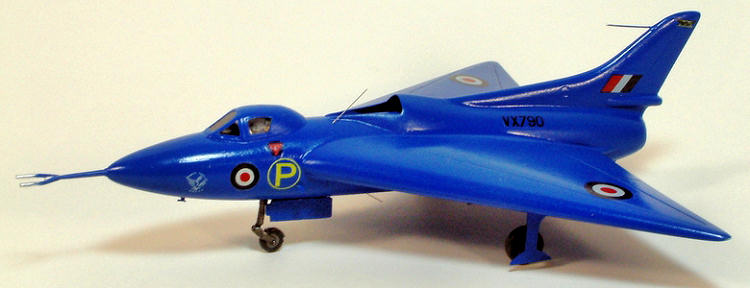
 It got a
base of Createx White Base and onto this a mixture of a mid blue was spayed.
I could not find any advice which blue to use so I guessed it by
comparing the gray values of the blue of the plane and the blue of the British
insignia as seen on the old pics. As Reference I only had what you all can find
in the internet.
It got a
base of Createx White Base and onto this a mixture of a mid blue was spayed.
I could not find any advice which blue to use so I guessed it by
comparing the gray values of the blue of the plane and the blue of the British
insignia as seen on the old pics. As Reference I only had what you all can find
in the internet.
The landing gear bays were painted medium gray, as the instruction stated. Some
minor washing was done too, but not that much, as this bird never get very dirty
I guess.
The decals offered by the kit also went on without any complains, so again I
can’t tell that much here.
In the end a coat of satin went on it – and finished.
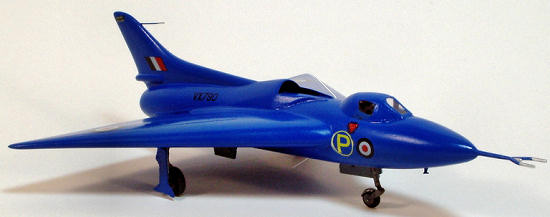
| CONCLUSIONS |
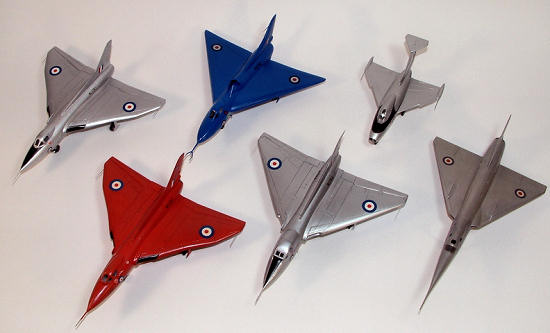 I enjoyed
this VAC kit, well actually I somehow like VAC kits, and I like the outcome. It
fits well into my collection of triangles I have and in blue it sets a colorful
dot among all those other silver ones.
I enjoyed
this VAC kit, well actually I somehow like VAC kits, and I like the outcome. It
fits well into my collection of triangles I have and in blue it sets a colorful
dot among all those other silver ones.
It is not an easy VAC
kit so I would not recommend it to anyone who did not do one before.
All the things which did not fit into place like the canopy and the
intake, well that is probably my fault. But on the other side, If I did not have
a resin kit of the 707 A to take pieces or copy pieces from, this kit would not
have seen the shelf, that's for sure.
ProResin brought out
a 707 B too, so go for that if you want one.
| REFERENCES |
Internet (Google for
Avro 707) and Wikipedia
If you would like your product reviewed fairly and fairly quickly, please contact the editor or see other details in the Note to Contributors.