Xtrakit 1/72 Meteor NF.Mk.11
| KIT #: | 72002 |
| PRICE: | $ |
| DECALS: | Three options |
| REVIEWER: | Nicolai Plesberg |
| NOTES: | Reboxed Matchbox kit. Stoppel decals. Airwaves etched set. |
| HISTORY |
As the role of night fighting at the end of World War II in the RAF had mostly been done by variants of the DeHavilland Mosquito and still was the case just after the war, the war-weary Mosquitos were, however, in need of replacement as their wooden construction began to make maintenance problems. After the Air Ministry had requested several aircraft companies for a replacement, Gloster responded, that it was possible to develop the Meteor into a night fighter.
 However,
Gloster was much preoccupied with the Meteor F.8 development and production, so
all responsibility with the development and production of the night fighter
variant was handed over to Armstrong Whitworth. The construction of the NF.11
was based on the T.7 trainer, but with the tail of the F.8, outer wings as they
appeared on the original Meteor design (before they got clipped on the F.Mk.4
and onwards) and the AI Mk 10 radar set in the lengthened nose. Due to that the
cannon armament had to be moved to the outer wing sections, since there was no
room for them to be retained in the nose section of the aircraft.
However,
Gloster was much preoccupied with the Meteor F.8 development and production, so
all responsibility with the development and production of the night fighter
variant was handed over to Armstrong Whitworth. The construction of the NF.11
was based on the T.7 trainer, but with the tail of the F.8, outer wings as they
appeared on the original Meteor design (before they got clipped on the F.Mk.4
and onwards) and the AI Mk 10 radar set in the lengthened nose. Due to that the
cannon armament had to be moved to the outer wing sections, since there was no
room for them to be retained in the nose section of the aircraft.
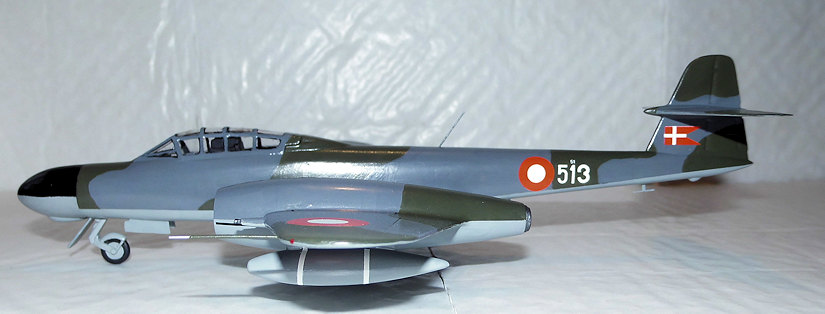
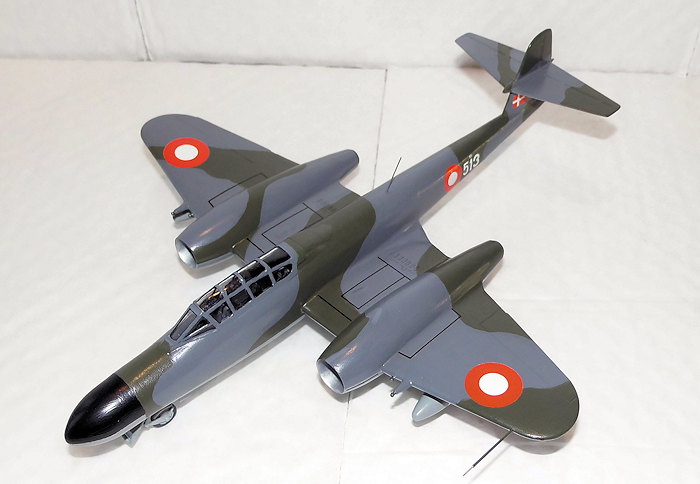
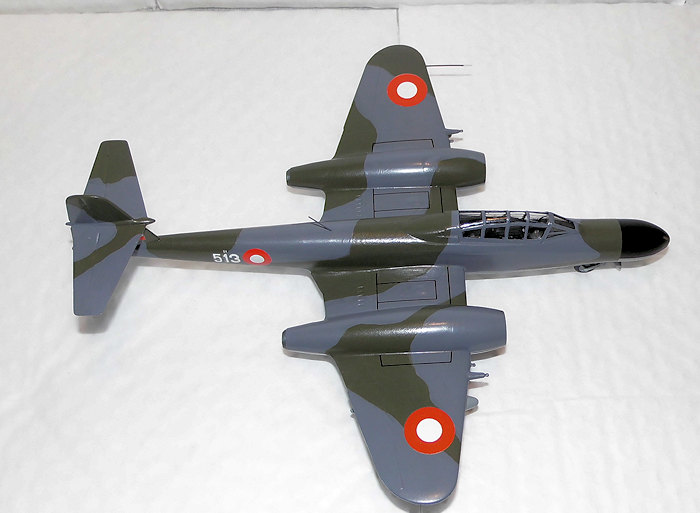
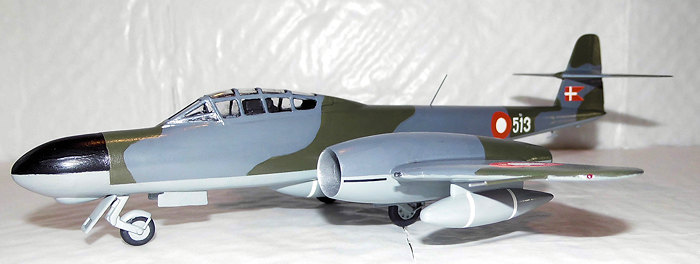
The Danish government bought 20 Meteor NF.11 with deliveries commencing in November 1952. The aircraft served with Eskadrille 723 (Squadron 723) at Aalborg. In the beginning they were painted as machines serving with the RAF, i.e. Medium Sea Grey all over with a disruptive Dark Green camouflage pattern on the upper surfaces. The aircrafts numbers were 51 as type numeral and individual numbers running from 501 to 520, all in RAF style numbers. When IRAN inspections came up they were repainted in the same scheme as the other Danish Meteor variants (Medium Sea Grey / Dark Sea Grey / Dark Green) and numerals were changed to Danish standard style.
Of the 20 delivered Meteor NF.11 four where lost in crashes, but the service time became rather short because they were already being replaced by the North American F-86 D Sabre in 1958-59. However, six of the NF.11s (the airframes with the lowest flight hours logged) survived to be converted into target tugs as TT.Mk.20s. The last flight of a Danish NF.11 took place on the 31st of May 1959. Surviving airframes (with exception of the TT.20s of course) were all scrapped.
| THE KIT |
 This kit
was originally tooled by Matchbox in 1987 and was praised as a gem at the time,
since it had petite raised panel lines except the control surfaces, which were
engraved although not as heavy as earlier Matchbox kits suffered from due to the
so called Matchbox “mad trencher”. Luckily for this kit, the “mad trencher”
apparently had retired by that time, but that can only be seen as a gift to
modelers around the world, not to have another new Matchbox kit to complain
about heavy trench panel lines.
This kit
was originally tooled by Matchbox in 1987 and was praised as a gem at the time,
since it had petite raised panel lines except the control surfaces, which were
engraved although not as heavy as earlier Matchbox kits suffered from due to the
so called Matchbox “mad trencher”. Luckily for this kit, the “mad trencher”
apparently had retired by that time, but that can only be seen as a gift to
modelers around the world, not to have another new Matchbox kit to complain
about heavy trench panel lines.
| CONSTRUCTION |
I began
construction by gluing the tail pieces, the nose cone and drop tanks together.
After filling / sanding the seams I glued the pylons to the drop tanks and some
suitable brass tube to the exhaust end of the engine nacelles to improve their
looks. Then it was time to paint a bit; the intakes and main gear bays went
Silver, the engine fronts Flat Black and the exhausts got some burned metallic
look. After two coats and
 drying time in between I glued the wings together. The
intake pieces were also added at this stage the whole shebang sanded and filled
(as always) by the seams when dry.
drying time in between I glued the wings together. The
intake pieces were also added at this stage the whole shebang sanded and filled
(as always) by the seams when dry.
The next item was the assembling of the interior by gluing the seats in place. I had bought the Airwaves etched set to enhance the looks of the cockpit, but frankly it’s really only in the rear cockpit something can be seen, as it all went Flat Black and the canopy is heavily framed, so…
One piece of advice though; the side panels, especially in the front cockpit needs to have the lower front corner cut down or else it will be very difficult to achieve an acceptable fit when the fuselage parts are glued together. The instructions that Airwaves provide are only a guide line; to achieve an actual fit, the modeler is advised to consult reference material (pictures) of the real thing. Well I had nothing like that, so I had to figure out the best way to get things fit, but it wasn’t that difficult. I found out that the best way to fit the side panels were to glue them to the upper fuselage part with their upper edge in flush with the canopy sill line. Before gluing the fuselage halves together, I filled the nose in front of the interior with lead; the nose cone was also filled up with lead to make sure of a non tail-sitting model. Upon having glued the fuselage together, it was time for sanding / filling of the seams.
 When the
main fuselage had been finished I glued the nosecone in place, but be careful
here, as the fit is a bit sloppy. To aid the alignment of the nose I fastened
the windscreen and canopy to the fuselage with adhesive tape. At this stage I
realised, that I had made an error. The intake pieces of the engine nacelles
were the small bore, as the instructions had shown, but in reality all Danish
Meteor NF.11s were equipped with large bore intakes(so I found out later!). If I
had known that in time, I would of course have used the large bore intakes.
However, it was no big deal to modify the small bore to large bore intakes
simply by removing 3 mm of the edges and sanding them to shape.
When the
main fuselage had been finished I glued the nosecone in place, but be careful
here, as the fit is a bit sloppy. To aid the alignment of the nose I fastened
the windscreen and canopy to the fuselage with adhesive tape. At this stage I
realised, that I had made an error. The intake pieces of the engine nacelles
were the small bore, as the instructions had shown, but in reality all Danish
Meteor NF.11s were equipped with large bore intakes(so I found out later!). If I
had known that in time, I would of course have used the large bore intakes.
However, it was no big deal to modify the small bore to large bore intakes
simply by removing 3 mm of the edges and sanding them to shape.
After retouching the intakes with silver paint, the wings were prepared (ensuring a perfect fit as possible) to be attached to the fuselage, as was the complete tail unit. Regarding the tail unit, I found out, that by gluing a piece of sheet at the end of the main fuselage and trimming the edge very precisely, I could achieve that the tail section would literally “slip” on and at the same time be perfect aligned with the rest of the aircraft seen from all angels. When all this was accomplished the wings and tail section were glued to the fuselage. The last action done on the airframe was the filling and sanding of all wing / fuselage / tail seams plus the inevitably other imperfections still around the airframe.
 The next
issue around was the landing gear units; parts removed form the sprues, cleaned
up and assembled. The gear was painted Medium Sea Grey (Humbrol 165), the tires
went Black (Xtracolor X505). I also added the supporting struts for the splash
guards made from stretched sprue, which also were painted grey.
The next
issue around was the landing gear units; parts removed form the sprues, cleaned
up and assembled. The gear was painted Medium Sea Grey (Humbrol 165), the tires
went Black (Xtracolor X505). I also added the supporting struts for the splash
guards made from stretched sprue, which also were painted grey.
I then removed the windscreen / canopy (which to at this point have still been taped to the fuselage to prevent dirt going into the cockpit as well as aiding alignment of the nose cone) and glued in the remaining parts and painting them flat black. I discovered at this point that the rear stations equipment was too wide for the canopy to sit properly (or the canopy is too slim / too thick), so I shaved off a bit of material, touching it up with flat black and after the last detail painting, I cleaned and glued the clear parts in place using Humbrol Gloss Cote. Eventual gaps were also filled with Gloss Cote and given a light sanding down when dry.
The next step was a complete clean up of the airframe removing all sanding dust / fingerprints. Then the drop tanks / pylons and the belly tank were glued in place; also filling the gaps from these items. The gear was then attached with slow setting CA glue and the last thing done, before the model went to the paint shop, was to paint the canopy frames flat black.
| COLORS & MARKINGS |
The
painting was pretty much done in the same manner as my
F.4
/
T.7
/
F.8
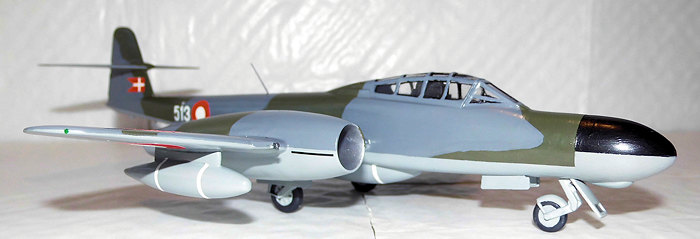
builds so no need to repeat myself here. Well the nose section was indeed a bit
different from my other builds; the upper half of the nose cone was painted
satin black and the lower part painted grey (Humbrol 126) , which was in fact a
bit 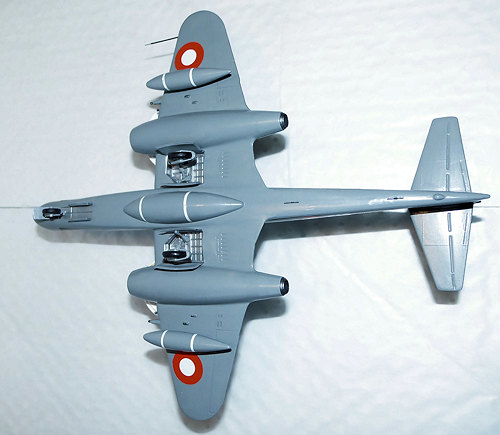 darker than the remaining under surfaces, but that was exactly the case in
real life, so it could not be better.
darker than the remaining under surfaces, but that was exactly the case in
real life, so it could not be better.
The decals went down with pretty much ease; as I had chosen to make 51-513 the decals came from various sheets, most notably 72-137, even though this sheet is in fact for the delivery scheme, so I had to find myself some “late style” numbers, but luckily I had an old DMC sheet for Danish NF.11s with late style numbers – at least most of them.
As I began decaling with the white stripes for the drop tanks and belly tank which also came from the DMC sheet, I discovered that they broke in several pieces but still useable. However, I wouldn’t have the same trouble with the numbers, so they got a coat of Mr Metal Primer and applied them the next day. I was still one digit short; I had the 51-51 by cutting them out and rearranging them as they were applied; the last digit, “3”, was still missing. However, by cutting out some parts of the “8” from the Stoppel sheet (which was the early style numbers remember!) and applied them carefully, I got, if not 100% correct but close enough for me, a late style “3”.
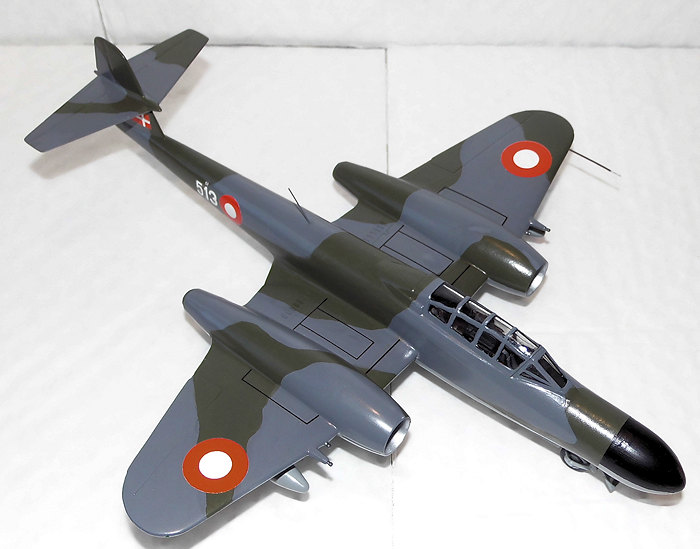
The kit decals provided the walkways, which were prominent on the real planes. Regarding the walkways; Matchbox had actually done a quite genius job here. On all the Meteors, that I have build, only the Matchbox walk ways had a hole in the carrier film, because there is a nasty bulge (related to the retracted gear) on the upper surface of the inner wing, which the Matchbox decal went over with ease, while on the other kits, I had to remove the carrier film with a sharp (new!) scalpel blade, because it was impossible for me to get the carrier film over the bulges to conform perfect (with the exception on my Meteor F.4).
 In this
case, I also noticed that the roundels and flags were slightly off register, but
I managed partly to reduce it by applying the appropriate colors to the edges of
especially the roundels (where the off register was most visible) with a very
fine brush and steady hand.
In this
case, I also noticed that the roundels and flags were slightly off register, but
I managed partly to reduce it by applying the appropriate colors to the edges of
especially the roundels (where the off register was most visible) with a very
fine brush and steady hand.
When the decals had dried they got a coat of gloss to ensure a uniform surface before giving the final coat of Humbrol Satin Cote for the satin sheen I was looking for.
The final bits consisted of attaching the gear doors and various antennas with CA-glue and painted their respective colors when the CA-glue had set. The last thing to do was to mark the position lights and the model was finished.
| CONCLUSIONS |
 What can I say else than this kit is the only injection molded of the Meteor NF
variants, so until some one comes out with a completely new tooling, this is the
only game in town to this scale. As this kit has its hassles with fit /
alignment issues some experience is definitely needed, but if the skills are
present it builds into a beautiful model of one of the pioneer night fighter
jets.
What can I say else than this kit is the only injection molded of the Meteor NF
variants, so until some one comes out with a completely new tooling, this is the
only game in town to this scale. As this kit has its hassles with fit /
alignment issues some experience is definitely needed, but if the skills are
present it builds into a beautiful model of one of the pioneer night fighter
jets.
| REFERENCES |
The publication Forsvarets fly efter 1945 (Planes of the Danish armed forces after 1945) published by RDAF / tinbox, 1987 edition, was very helpful, but also various photos found on the web was helpful.
Also an article of IPMS-nyt no 119 (the Danish IPMS branch’s membership magazine) provided some inspiration, among them a photo of 51-513 taken from the left hand side:www.ipms.dk/IPMS-nyt/IPMS-Nyt%20119.pdf
April 2016
Copyright ModelingMadness.com
If you would like your product reviewed fairly and fairly quickly, please contact the editor or see other details in the Note to Contributors.