| KIT #: | 72005 |
| PRICE: | $ |
| DECALS: | Two options |
| REVIEWER: | Nicolai Plesberg |
| NOTES: | Xtrakit boxing of MPM kit. Added Stoppel decal sheet no 72-128 for proper Danish markings and some etched parts from Airwaves. |
| HISTORY |
The Gloster Meteor was the first operational British jet fighter, which entered service in July 1944 with the primary task of chasing flying bombs (the V1) and in the more developed Mk. III variant also ground attack. The two aircraft that might be considered as the F.Mk IV (later F.Mk.4) prototypes was two specially build Mk. IIIs, EE 454 and EE 455, fitted with the prototypes of the Derwent 5 engine, which became the standard power plant for the production machines. In the late 1940s the F.Mk.4 became widely exported. Argentina, Belgium, Denmark, Egypt and The Netherlands took delivery of some 240 aircraft altogether.
 However,
as the crash of the Meteor F.Mk.4 demonstrator, G-AIDC, during a Belgian pilot’s
first solo flight and the fact that flying a jet powered aircraft was a very
different experience from propeller driven aircraft, Gloster decided privately
to develop a two seat trainer based on the F.4 airframe. It was accomplished by
inserting a 30 inch stretch forward of the wing containing a fully equipped
cockpit for the instructor and both covered by a heavily framed canopy hinging
to the right when on the ground. The T.7 was also exported to several countries,
most of which were already good Meteor customers, but could also see the good
reason for investing in the trainer variant.
However,
as the crash of the Meteor F.Mk.4 demonstrator, G-AIDC, during a Belgian pilot’s
first solo flight and the fact that flying a jet powered aircraft was a very
different experience from propeller driven aircraft, Gloster decided privately
to develop a two seat trainer based on the F.4 airframe. It was accomplished by
inserting a 30 inch stretch forward of the wing containing a fully equipped
cockpit for the instructor and both covered by a heavily framed canopy hinging
to the right when on the ground. The T.7 was also exported to several countries,
most of which were already good Meteor customers, but could also see the good
reason for investing in the trainer variant.
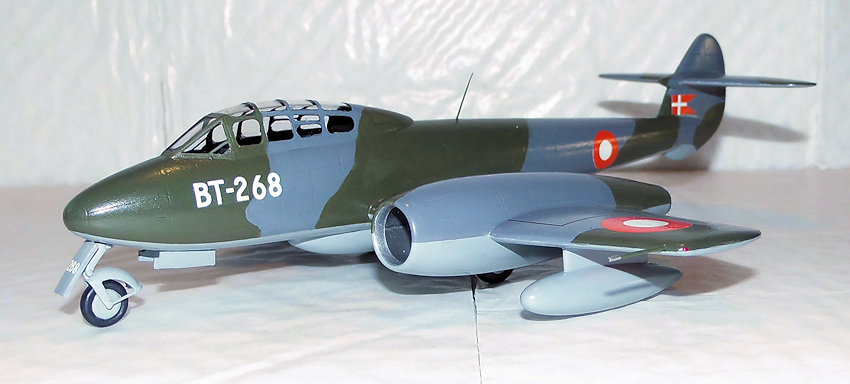
Denmark bought 9 Meteor T.7 of which five were delivered in 1950 and the rest in 1952. They were not only used for converting pilots to fly the Meteor, but also the other types which served with the Royal Danish Air Force (RDAF) at that time, such as the F-84G Thunderjet and from 1956 also the Hawker Hunter, even though the Hunter F.51s were supplied with two Hunter T.53s. The two seat Hunters didn’t, however, provide enough capacity to train pilots, so therefore the Meteor trainers were heavily involved in this, too. In the twelve years the Meteor T.7 served with the RDAF 7 out of the 9 aircraft crashed, one was written off, and the last Meteor T.7, 22-268, lived long enough to get renumbered when RDAF changed its numeral system in 1960, to get the new registration BT-268. This aircraft had its last flight on December 31st 1962, the very last Meteor flight of the RDAF.
| THE KIT |
 This kit,
I believe, is the first injection molded kit of the Meteor T.7, sharing the
sprue with the wing, gear and intake / exhaust parts with the Meteor F.8 kit
also tooled by MPM. All parts are cleanly molded with fine recessed panel lines.
Very little flash is present here and there and some sink marks present on
especially the gear parts. However, with some experience this should be a
relatively trouble free build. As with all short-run kits I suspect a great deal
of filling / sanding sessions will be needed, but if you will know how it all
turned out, you must read the next sections of this review!
This kit,
I believe, is the first injection molded kit of the Meteor T.7, sharing the
sprue with the wing, gear and intake / exhaust parts with the Meteor F.8 kit
also tooled by MPM. All parts are cleanly molded with fine recessed panel lines.
Very little flash is present here and there and some sink marks present on
especially the gear parts. However, with some experience this should be a
relatively trouble free build. As with all short-run kits I suspect a great deal
of filling / sanding sessions will be needed, but if you will know how it all
turned out, you must read the next sections of this review!
| CONSTRUCTION |
The construction of this kit went quite along the same lines as my F.4 build, so I will only be mentioning things that deviated from that build here.
As I assembled the cockpit section, I
noticed that the side panels, especially in the rear cockpit needed some sanding
on their outside in order to fit when the cockpit section was located between
the fuselage halves. The rear instrument panel also needs slight sanding in
order to fit perfectly as intended. The cockpit was also beefed up with etched
parts leftover from my Meteor NF builds and I added seat belts made fr om
Tamiya tape. As all the photos of Danish T.7s, that I have seen, the gun sight
was not used, so I omitted that part; however, its locating hole in the
instrument panel shroud was filled with a piece of plastic glued in place.
om
Tamiya tape. As all the photos of Danish T.7s, that I have seen, the gun sight
was not used, so I omitted that part; however, its locating hole in the
instrument panel shroud was filled with a piece of plastic glued in place.
One note on the canopy or rather its attachment point on the clear sprue: due to its shape it’s almost impossible to avoid damaging the windscreen when cutting it from the sprue. My advice is to cut at the main runner and then removing the sprue gate bit by bit until it’s removed from the windscreen edge completely in order to avoid any cracks or other damage to the windscreen. The engineering here could have been better! There is also included a paint mask to the canopy, but the masks have a somewhat stiff appearance (feeling). By that I mean that they don’t conform as well as masks made from Tamiya tape. It’s also difficult to remove them again without risking damage to the canopy, as I found out that only a pointed object, such as a no. 11 blade or a needle could be used to lift the masks post painting; the risk of scratching the canopy was very much present!
One last thing; I chose to use the large bore air intakes as they appeared to have been retrofitted probably due to using more powerful engines from the mid 1950s.
| COLORS & MARKINGS |
The painting was pretty much done in the same manner as my Meteor F.4 so no need to repeat myself here.
 The
decals went down with pretty much ease; as I had chosen a different sheet with
the late appearance it only contained the national insignia and the code for the
nose, so walkways were taken from the kit sheet even though they were not
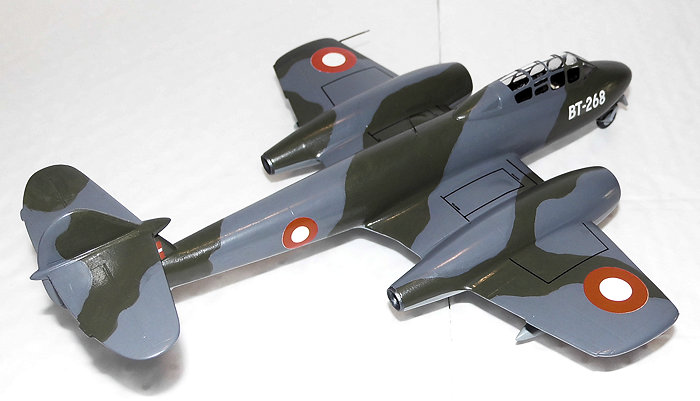
strictly correct. I also noticed in this case that the roundels and flags were
slightly off register, but I managed partly to reduce it by applying the
appropriate colors to the edges of especially the roundels (where the off
register was most visible) with a very fine brush and steady hand. On the
roundels on the underside of the wings it was very easy, since I discovered, I
had to cut off some of the edge, so they would fit against the tank pylons,
which had been glued in place before painting.
The
decals went down with pretty much ease; as I had chosen a different sheet with
the late appearance it only contained the national insignia and the code for the
nose, so walkways were taken from the kit sheet even though they were not
strictly correct. I also noticed in this case that the roundels and flags were
slightly off register, but I managed partly to reduce it by applying the
appropriate colors to the edges of especially the roundels (where the off
register was most visible) with a very fine brush and steady hand. On the
roundels on the underside of the wings it was very easy, since I discovered, I
had to cut off some of the edge, so they would fit against the tank pylons,
which had been glued in place before painting.
When the decals had dried they got a coat of gloss to ensure a uniform surface before giving the final coat of Humbrol Satin Cote for the satin sheen I was looking for.
The final bits consisted of attaching the gear doors and various antennas with CA-glue and painted in their respective colors when the CA-glue had set. The last thing to do was to mark the position lights and the model was finished.
| CONCLUSIONS |
 What can I
say else than this kit is a worthy successor to the former ways modelers had to
go by when wanting a model of the Meteor trainer. As this kit has no locating
pins / holes some experience is definitely needed, but if the skills are present
it builds into a beautiful model of one of the pioneer jet trainers.
What can I
say else than this kit is a worthy successor to the former ways modelers had to
go by when wanting a model of the Meteor trainer. As this kit has no locating
pins / holes some experience is definitely needed, but if the skills are present
it builds into a beautiful model of one of the pioneer jet trainers.
| REFERENCES |
The publication Forsvarets fly efter 1945 (Planes of the Danish armed forces after 1945) published by RDAF / tinbox, 1987 edition, was very helpful.
Also various pictures I found on the web were useful.
March 2016
Copyright ModelingMadness.com
If you would like your product reviewed fairly and fairly quickly, please contact the editor or see other details in the Note to Contributors.