
Airfix 1/72 Bristol 192 Belvedere
| KIT #: | 03002 |
| PRICE: | £5.99 from KingKit http://www.kingkit.co.uk/kingkit/ |
| DECALS: | Two options |
| REVIEWER: | Steven S. Pietrobon |
| NOTES: |
| HISTORY |
The Bristol 192 Belvedere is a tandem rotor general purpose helicopter which
first flew in preproduction form (XG447) on 5 July 1958 with manual control and
wooden rotor blades. Later airccraft had power contol and metal blades. It was
developed from the earlier Bristol 173 tandem rotor helicopter. The Belvedere
uses two 686 kW (1230 kW emergency) Napier Gazelle Mk.101 turboshaft engines,
interconnected so that if any one engine fails, the other engine can power both
rotors. A total of 26
 Belvederes were built, the first 10 being preproduction,
with production aircraft being delivered from 1961. The first preproduction
aircraft had anhedral tailplanes with fins, with three aircraft (XG453, XG454
and XG456) having the fins removed. Production aircraft had "double-anhedral"
extended tailplanes, of which the preproduction aircraft were subsequently
modified to. Production aircraft also had different air inlets while early
preproduction aircraft had bare landing gear legs.
Belvederes were built, the first 10 being preproduction,
with production aircraft being delivered from 1961. The first preproduction
aircraft had anhedral tailplanes with fins, with three aircraft (XG453, XG454
and XG456) having the fins removed. Production aircraft had "double-anhedral"
extended tailplanes, of which the preproduction aircraft were subsequently
modified to. Production aircraft also had different air inlets while early
preproduction aircraft had bare landing gear legs.
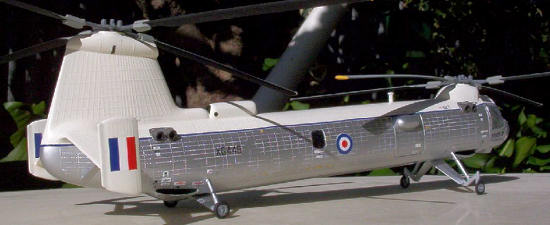
Operational Belvederes had the designation HC.1. The Belvedere was operated by two crew and could carry internal payloads of 2720 kg, 2360 kg underslung, 18 troops, 12 stretcher cases with two attendants or up to 30 passengers in search and rescue. The Belvedere were first operated by No.66 Squadron in September 1961 and later by No. 26 and 72 squadrons until 1969, when the aircraft was retired.
| THE KIT |
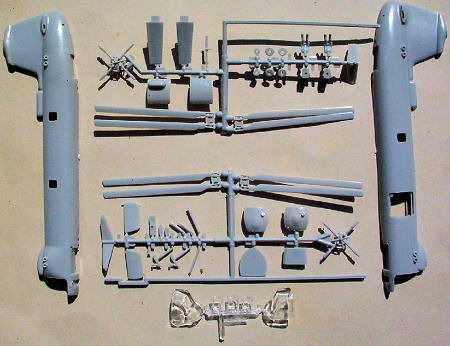
The Airfix kit is as far as I know, the only plastic kit of the Belvedere. It
was first issued in 1959 (making it 50 years old this year!) and represents an
early preproduction aircraft with tailplane fins and bare landing legs. Decals
are provided for the second preproduction aircraft XG448 in late 1959 (the same
as the first release, but with extra stencils) and eighth preproduction aircraft
 XG454. The kit indicates that the fins are not attached for XG454, but the only
photo I could find of one of these finless aircraft shows a much wider
tailplane, so this configuration may not be correct. The kit was in continuous
production up to 1978, with a short reissue in 1980 and a longer reissue from
1997 to 2001.
XG454. The kit indicates that the fins are not attached for XG454, but the only
photo I could find of one of these finless aircraft shows a much wider
tailplane, so this configuration may not be correct. The kit was in continuous
production up to 1978, with a short reissue in 1980 and a longer reissue from
1997 to 2001.
I first built this kit without paint in the early 1970s.
 Thanks to the 1997
reissue, I can now have another go. As per kits of this vintage the fuselage is
covered in rivets. The part quality was actually quite good with only some minor
sink marks, scratches and other imperfections. The only difficult part of the
kit is the canopy which is split in two halves. This will result in a visible
join line at the front of the canopy. There are also two door options, a normal
transport door and a winch door, which can be displayed open or closed. The
early Airfix box art seemed to show the winch door, so I chose that, but in the
closed position.
Thanks to the 1997
reissue, I can now have another go. As per kits of this vintage the fuselage is
covered in rivets. The part quality was actually quite good with only some minor
sink marks, scratches and other imperfections. The only difficult part of the
kit is the canopy which is split in two halves. This will result in a visible
join line at the front of the canopy. There are also two door options, a normal
transport door and a winch door, which can be displayed open or closed. The
early Airfix box art seemed to show the winch door, so I chose that, but in the
closed position.
I of course chose XG448, the same as when I last built the kit.
| CONSTRUCTION |
Assembly of the kit was fairly straight forward, the only difficult part being
the two canopy pieces. I thought long and hard of how to make a strong smooth
join with the seam as least visible as possible. After rejecting superglue as
being too visible and clear drying glue as too weak I decided on using carefully
applied liquid glue. I first polished the canopy pieces to get a nice clear
finish. The pieces were then joined together with Tamiya tape and test fit
against the fuselage to make sure the fit would be OK, which it was. I then
removed tape from the top half of the canopy and carefully applied liquid glue
to the join with a small brush. Capillery action would draw the glue into the
join, minimizing the amount of glue in surrounding areas. Aft er that had dried,
I repeated the same process to the bottom of the canopy. I then sanded the join
with fine wet and dry paper which I then polished to get clear again. Of course,
you can still see the join, but I think I achieved my aim of minimizing the
visibility of the join line. It could have been much worse!
er that had dried,
I repeated the same process to the bottom of the canopy. I then sanded the join
with fine wet and dry paper which I then polished to get clear again. Of course,
you can still see the join, but I think I achieved my aim of minimizing the
visibility of the join line. It could have been much worse!
For the cockpit interior I made it straight out of the box with no added
details. Of course, the Airfix pilots were included, ready for takeoff! In order
to fit the canopy I had to sand down the sides of pilot's shoes. I left the
fuselage sides fully riveted as I could not be bothered sanding everything down
and rescribing. In any case, I like the "detail" that rivets give!
For the rotor blades, I sealed the bottom of the holes at the base of the blades
with plastic rod, sanding down to get a smooth finish. I had to drill the holes
a little wider, in order to fit the blades to the rotor hubs. After attaching
all the blades in final assembly, I accidently released the model where two of
the blades broke off, one for each rotor. The rotor hub rod is only about 1 mm
diameter so just using glue will not work, as the weight of the blade will
easily break the join. I used a very small drill to drill tiny holes into the
hub and blade, joining the hub and blade using a short piece of wire and
superglue. I had to prebend the wire first to compensate for the weight of the
blade. This gave a strong join. The only problem was that I drilled the holes a
bit offset from the centre, so that there a now a bit of a kink where the join
is. I applied putty to the join and after drying, sanded the join to minimize
the effect of this offset.
I used a very small drill to drill tiny holes into the
hub and blade, joining the hub and blade using a short piece of wire and
superglue. I had to prebend the wire first to compensate for the weight of the
blade. This gave a strong join. The only problem was that I drilled the holes a
bit offset from the centre, so that there a now a bit of a kink where the join
is. I applied putty to the join and after drying, sanded the join to minimize
the effect of this offset.
For the front wheels the hole diameter was a bit large, so I inserted a piece of
plastic card and redrilled a smaller hole. For the the bottom air inlets, I cut
off the lugs that connect to the bottom of the fuselage. This allows you to see
straight though the sides of the air inlets. I also drilled holes in these air
intakes into what I believe are drainage holes. The exhaust outlets were also
drilled to make them wider.
| COLORS & MARKINGS |
 As with my previous RAF white and silver schemes, the first step is to get a
nice overall finish using grey primer. This is followed with two coats of gloss
white on the upper surfaces and after masking and a couple of coats of Klear
floor polish, Humbrol polished aluminium H27002 straight from the tin to the
lower surfaces. After the decals were applied, a coat of Klear is applied to
seal everything in. I really like H27002 as it is so easy to use and gives a
very nice finish.
As with my previous RAF white and silver schemes, the first step is to get a
nice overall finish using grey primer. This is followed with two coats of gloss
white on the upper surfaces and after masking and a couple of coats of Klear
floor polish, Humbrol polished aluminium H27002 straight from the tin to the
lower surfaces. After the decals were applied, a coat of Klear is applied to
seal everything in. I really like H27002 as it is so easy to use and gives a
very nice finish.
The decals have a great many additional stencils compared to the first issue,
which helps to bring out the model I think.
| CONCLUSIONS |
Another Airfix kit that I wanted to make again. I'm very pleased with how this turned out. Apart from the canopy, the kit was pretty easy to put together. I wonder if we'll ever see a Belvedere from another kit maker, or if this will be the only kit for the next 50 years!
| REFERENCES |
Friends of the The Helicopter Museum, "Restoring the Bristol Belvedere XG452," http://www.hmfriends.org.uk/restorbelv.htm
July 2009
Copyright ModelingMadness.com
If you would like your product reviewed fairly and quickly, please contact the editor or see other details in the Note to Contributors.