Academy 1/48 Hunter FGA.9
| KIT #: | 2169 |
| PRICE: | $26.95 |
| DECALS: | Two options |
| REVIEWER: | Dan Lee |
| NOTES: | Cutting Edge Replacement Cockpit and Aeroclub Landing Gear added. |
| HISTORY |
The Hawker Hunter family of fighters
proved to be the most successful British jet of the 50s and 60s. The Hunter was
designed by Sidney Camm for an RAF day fighter spec and was based on a proposed
swept back version of the Hawker Sea Hawk. It first flew in 1954, but
unfortunately the first Hunters suffered performance glitches including short
range, compressor stalls and flameouts
 due to cannon exhaust fumes. There were
a lot of redesigns, engine changes and gradual improvements to the Hunter
leading to the successful F.6 day fighter which served the RAF till 1963 when it
was replaced by the Lightning.
due to cannon exhaust fumes. There were
a lot of redesigns, engine changes and gradual improvements to the Hunter
leading to the successful F.6 day fighter which served the RAF till 1963 when it
was replaced by the Lightning.
The Hunter final version was the FGA.9 which was an F.6 modified for ground attack including strengthened wings for increased underwing ordinance and external fuel tank capacity. Many F.6s were modified to this standard and exported around the world to many Commonwealth countries and other nations like Sweden and Switzerland.
The Hunters proved to be rugged fighters with a successful combat record as a ground attack plane (air combat, not so much.) Many of these fighters served till the mid 90s (like Oman and Switzerland) and (according to wiki who we all know is uber accurate) several Lebanese Hunters were being returned to service in 2007.
Oman received a number of ex RAF F.6s and obtained an additional 31 various marks from Jordan. Apparently only 15 were flyable while the rest were used as hulks for spare parts. They were flown by detached RAF pilots and mercenaries for combat missions against Yemen in various border fights. The last Omani Hunters were retired in 1993.
From Wikipedia and wingweb.co.uk (for the Omani information.)
| THE KIT |
The Academy kit consists of five sprues of Academy’s standard smooth grayish green plastic and one clear sprue. The detail on the parts is pretty good, but I’m no Hunter expert so I don’t know enough to comment about its accuracy. As for flash, well not much apparent on my copy .
| CONSTRUCTION |
 Construction began with the cockpit.
One of the major gripes about the Academy Hunter is its shallow cockpit and 1/72
scale seat. Having seen the parts and test fitted them, I have to say that if
you want a cockpit that looks scale then a resin replacement is necessary.
Construction began with the cockpit.
One of the major gripes about the Academy Hunter is its shallow cockpit and 1/72
scale seat. Having seen the parts and test fitted them, I have to say that if
you want a cockpit that looks scale then a resin replacement is necessary.
A couple of years earlier, I read the preview of the kit on MM and decided that if I ever build one then I’d use an aftermarket cockpit. About the same time, Meteor Productions had a sale and I took advantage of it to purchase some stuff that I would use later. Among them was the Cutting Edge Hunter cockpit replacement which replaces all the cockpit parts. Cutting Edge’s resin parts were rather easy to remove from the casting blocks including removing part of the forward cockpit (so the wheel well can fit.)
After cleaning the resin parts, I took a curved wood carving blade to shave away the interior fuselage locator rails for the old cockpit. I bought these carving blades after I nearly sliced off a significant part of my pinkie finger with a #15 blade off while trying to remove surface details. I find that wood carving tools do an effective job of removing sidewall detail with less of my blood being spilt.
The cockpit was painted a base coat combination of RLM66 and flat black and then dry brushed with Talon Aluminum to bring out the details. A few buttons and panels were painted red and yellow with a sharp toothpick while the dials were brush painted with gloss black.
 The engine exhaust was painted with
Talon Dark Aluminum and then glued in place on one fuselage half.
The engine exhaust was painted with
Talon Dark Aluminum and then glued in place on one fuselage half.
One thing I really don’t like about jet models is the intakes. I don’t like having to fill and sand in really tight places. I’m not saying I can’t, just saying I don’t like it and not really enthusiastic working on them. The intakes on the Hunter are no exception, but not as troublesome as a Crusader or Sabre intake as the filling and sanding are done before closing it up. Academy tried to add more detail by adding the turbine facing, but it’s rather pointless as it can only be barely seen even with a flashlight pointed right at it. I’d have rather they split off the intakes into separate components that could be added to each wing instead of the way they put it in the fuselage so that they can be glued without gaps from the inside without having telekinesis powers. The way Academy puts the intakes of the Hunter in, it is virtually impossible to assemble both intakes without any gaps minus the aforementioned telekinesis powers.
I glued in the sidewalls first to each fuselage half. It took some careful fitting to get the cockpit in as I aligned the cockpit in and it was secured with a thin bead of CA glue on the starboard side. Unfortunately, the Hunter’s fuselage is slightly warped at the bottom and seems to be a common problem with this kit. The situation is exacerbated by the fact that Academy molded the antennas on the fuselage which makes sanding difficult if you don’t want to cut off the antennas (which I eventually had to for proper sanding.)
 The nose proved to be a bit more
problematic. I glued some lead BB fish weights (approx 10g) around the
nosewheel well, but not packed tight at the sides so that plastic would warp and
create gaps when I glued it onto the fuselage. I had to use the BB fish weights
as the resin cockpit reduced the internal space so that they wouldn’t fit.
Finally I glued the nose cap on and discovered that the parts didn’t fit flush
and would require a bit of filler to smooth out the nose.
The nose proved to be a bit more
problematic. I glued some lead BB fish weights (approx 10g) around the
nosewheel well, but not packed tight at the sides so that plastic would warp and
create gaps when I glued it onto the fuselage. I had to use the BB fish weights
as the resin cockpit reduced the internal space so that they wouldn’t fit.
Finally I glued the nose cap on and discovered that the parts didn’t fit flush
and would require a bit of filler to smooth out the nose.
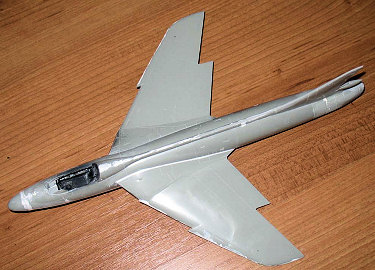
I usually install the wings before filling and sanding as I prefer to do it all in one big task. However, I didn’t realize that I had to do both just to get the wings to fit. The starboard wing went on without very little hassle. Any gaps were filled in with Mr Surfacer and removed with lacquer thinner. The port wing, well, it was another story. During test fitting, I knew there would be a gap, but when I glued the wing in place and aligned it, I had a much bigger gap than I observed during dry fitting (and the swearing and yelling commenced.)
 I ended up making a shim from a
sheet of 20 thou plastic card and used it to plug most of the seam as I poured a
lot of glue onto it. Then I ran quite a bit of Tamiya surface primer (I ran out
of Mr Surfacer halfway thru the build) along the seam and then let it sit in the
garage for a couple of days. I ended up wet sanding and filling several times
to remove all the bubbles (it was easier to type out the sentence than actually
doing the work which took a couple of hours.) The panel lines were rescribed
with a hobby knife and the “rivets” were redone with a pin.
I ended up making a shim from a
sheet of 20 thou plastic card and used it to plug most of the seam as I poured a
lot of glue onto it. Then I ran quite a bit of Tamiya surface primer (I ran out
of Mr Surfacer halfway thru the build) along the seam and then let it sit in the
garage for a couple of days. I ended up wet sanding and filling several times
to remove all the bubbles (it was easier to type out the sentence than actually
doing the work which took a couple of hours.) The panel lines were rescribed
with a hobby knife and the “rivets” were redone with a pin.
The remaining seams were sanding and filled with a combination of plastic card shims, Tamiya Surface Primer and in a couple of areas with CA glue. The nose required a lot of attention as it took several coats of Surface Primer to relatively smooth. Afterwards, the model was washed and the lost surface detail was redone.
The stabs, ailerons and rudder were assembled and glued on at this point.
| COLORS & MARKINGS |
The first thing I did was spray the gear wheel wells with Tamiya AS-12 bare metal aluminum and the fuselage nozzle interior was sprayed with Talon Dark Aluminum (to try the paint out.) When dry, these areas were stuffed with wet tissues. The model was then sprayed (rather sloppily) with flat black along the panel lines.
Among other things I had bought from
Meteor was a Cutting Edge Hunter sheet. The real reason I had purchased it was
because it had Saudi markings that I was going to use for my F-20 Tigershark
build but the markings were oversized so I did not use the
 sheet. Turns out
they were not a waste of money as I found out during the 1/72 F-86 Sabre group
build that Academy decals are awful so the sheet came in rather handy.
sheet. Turns out
they were not a waste of money as I found out during the 1/72 F-86 Sabre group
build that Academy decals are awful so the sheet came in rather handy.
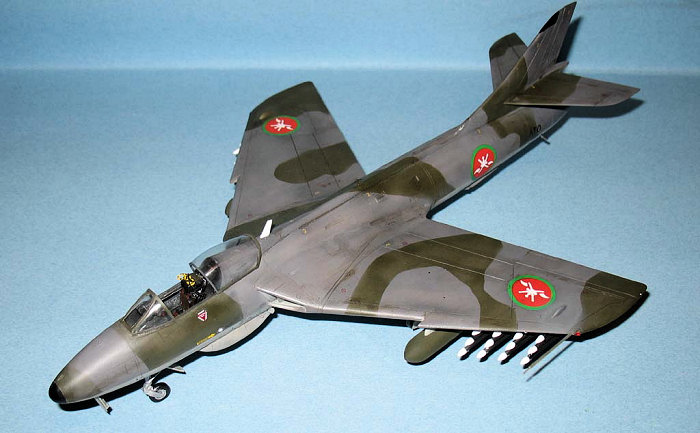
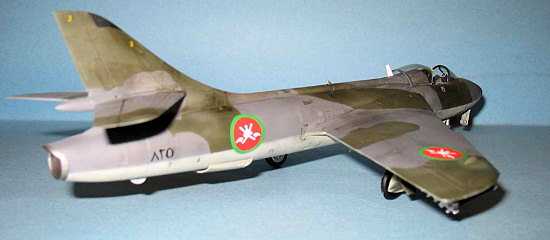
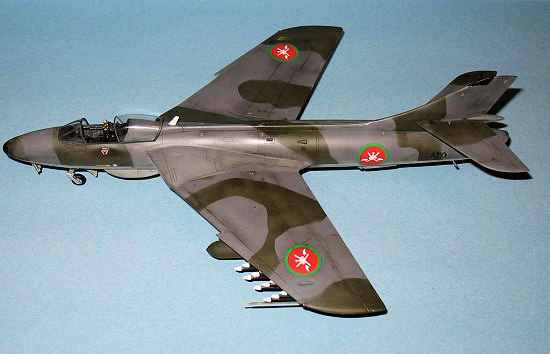
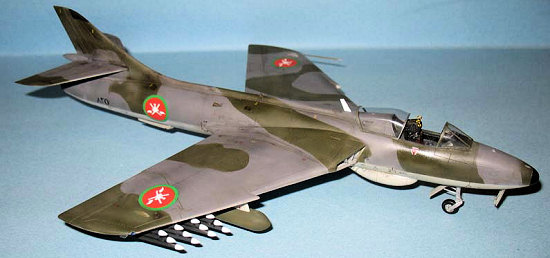
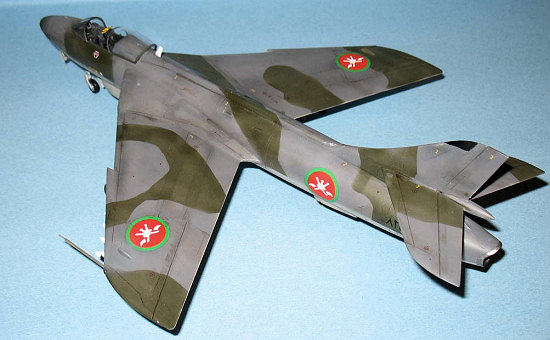
I ended up selecting an Omani FGA9 Hunter (the other choice was a Rhodesian/Zimbabwe FGA9 which I don’t really care for) and the remaining ones on the sheet are for the F6 which I found out was significantly different than the FGA9.
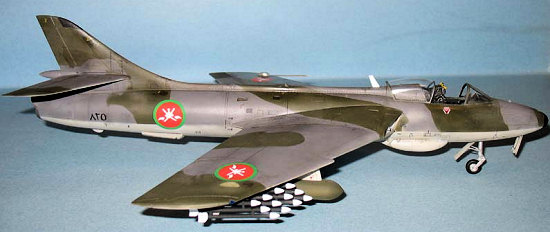
The Oman Hunter had the late 60s/early 70s UK scheme of Dark Sea Grey, Dark Green and Light Grey (equivalent of Lt Gull Grey.) I used the Gunze equivalent colors of H331, H330 and H315. As with all UK planes, the paint demarcation lines were rather sharp so hard masks were used from cut 3M blue tape using the info in the Academy paint guide. The Light Grey underside was painted first in two thin light coats, left to dry and then masked. The Dark Sea Grey (the Gunze paint a touch too purple but it was what I had available) was sprayed on several light coats to get the mottled look of a well used jet. Once dry, the 3M masks were secured to place and the Dark Green was sprayed. As it happens each time I use hard masks, I had to do touchups.
Once dry, I sprayed on a gloss coat and let the model sit for a couple of days before starting on the decals. I cut out the insignia and Arabic lettering for the Sultan of Oman plane.
I’ve never had any problems with Cutting Edge Decals and Micro Set/Sol, but the Academy decals were still awful… Ugh. Since my own experience with the Academy 1/72 Sabre decals, I’ve dreaded using the Hunter Stencils. As aftermarket Hawker Hunter stencils were few and far between, I was stuck with them. The decals were awful and silvered. To remove as much of it as possible required lots of knife slashes and liberal amounts of Solvaset. I’m just glad it was not a NMF plane. I don’t recommend the kit decals at all (aftermarket decals all the way.)
| FINAL BITS |
Based on a suggestion by Tom Cleaver,
I purchased an Aeroclub metal landing gear set as the Academy legs are too
spindly and wheels are under sized. However, the plastic bits that represented
retraction arms were easily broken when I attempted to remove
 them regardless of
the tool I used, so I just cut some lengths of steel wire and used them
instead. I spent an evening working on the landing gear as it is very fiddly
whether one uses Aeroclub replacements or not. Fortunately, the Aeroclub
landing gear has the mounting holes and it made assembly a touch easier than
some other replacement landing gear.
them regardless of
the tool I used, so I just cut some lengths of steel wire and used them
instead. I spent an evening working on the landing gear as it is very fiddly
whether one uses Aeroclub replacements or not. Fortunately, the Aeroclub
landing gear has the mounting holes and it made assembly a touch easier than
some other replacement landing gear.
The Academy weapons were pretty straight forward to assemble and paint. I selected the 3 inch rockets on the outboard wing positions and 500lb bombs on the inboard pylons. The rockets were painted flat black with flat white warheads and fins while the bombs were painted with Gunze H330 Dark Green.
The remaining resin bits (stick, ejection seat and gunsight) were glued on using a tiny drop of superglue. I cut a small sheet of clear styrene and glued it to the gunsight using Elmer’s glue along with the canopy. Also a length of wire was bent into shape and painted to represent the ejection handles.
The last styrene bits including the pitot tube were painted and glued on and I had my Hunter.
| CONCLUSIONS |
If you are a fan of British Cold War aviation and/or Hawker Hunter then this is the only game in town for 1/48 scale (the best Hunter in any scale that is available is the 1/32 Revell kit.) Don’t expect it to be as easy as a Tamiya/Hasegawa kit and if you like having some semblance of accuracy then aftermarket parts (landing gear and cockpit) are a necessity. One of the accuracy issues I did not deal with was that it is supposedly 3mm (around 6 scale inches) longer in the nose and needs to be shortened.
Even if you decide to build one OOB, the Hunter requires some modeling skill and work to make a decent model as the Academy kit has quite a few issues that need attention.
Copyright ModelingMadness.com. All rights reserved. No reproduction in part or in whole without express permission.
Dan Lee
October 2007 If you would like your product reviewed fairly and quickly, please
contact
the editor or see other details in the
Note to
Contributors.