Glencoe 1/59 Venom FB.4
| KIT #: | 05107 |
| PRICE: | @10 Euros |
| DECALS: | Two options |
| REVIEWER: | Spiros Pendedekas |
| NOTES: | Labelled as 1/48, actually is 1/59. A lot of scratchbuilding |
| HISTORY |
The de Havilland DH 112 Venom is a British post-war single-engined jet aircraft developed and manufactured by the de Havilland Aircraft Company. Much of its design was derived from the de Havilland Vampire, the firm's first jet-powered combat aircraft.
The Venom entered service with the Royal Air Force (RAF), where it was used as a
single-seat fighter-bomber and two-seat night fighter. A dedicated model for
aerial reconnaissance was also operated by the Swiss Air Force. The Venom
functioned as an interim stage between the first generation of British jet
fighters – straight-wing aircraft powered by centrifugal flow engines such as
the Gloster Meteor and the Vampire – and later swept wing, axial flow-engined
combat aircraft, such as the Hawker H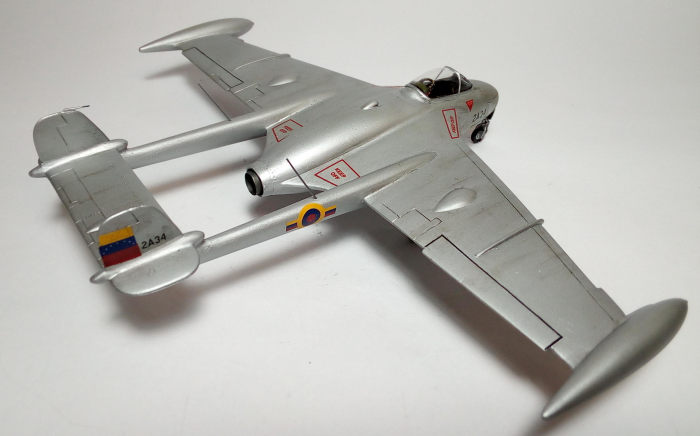 unter and de Havilland Sea Vixen.
Accordingly, the type had a relatively short service life in the RAF, being
withdrawn from frontline operations by the service in 1962 as a result of the
introduction of more capable designs. However, it was used in combat during the
Suez Crisis, the Malayan Emergency, and the Aden Emergency.
unter and de Havilland Sea Vixen.
Accordingly, the type had a relatively short service life in the RAF, being
withdrawn from frontline operations by the service in 1962 as a result of the
introduction of more capable designs. However, it was used in combat during the
Suez Crisis, the Malayan Emergency, and the Aden Emergency.
The Venom proved to be popular on the export market, being sold in substantial numbers to Iraq, New Zealand, Sweden, Switzerland and Venezuela. The Swiss Air Force was the last active military operator of the Venom, retiring their last examples during 1983. Large numbers of ex-military Venoms have since been acquired by private entities and several have continued to fly, performing aerial displays at various air shows, while many examples have been preserved in static display conditions in museums and as gate guardians. A specialized derivative, the Sea Venom, was produced as a nasalized version of the aircraft suitable for carrier operations.
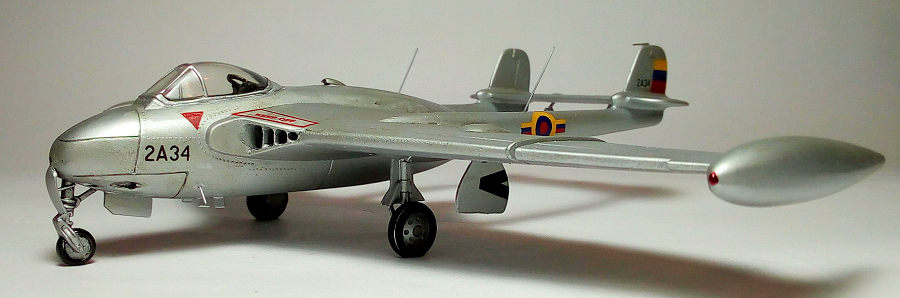
In 1955, the Venezuelan Air Force received the first Venom FB.Mk.54 from a batch of twenty-two (22), which formed a new unit, the C-34 “Los Indios” Fighter Squadron. With the Venom planes, the aerobatic team "Los Caciques" was also formed, which represented Venezuela in the Dominican Republic. These bombing fighters participated on the 1st. January 1958, in the uprising of the FAV against the government of General Marcos Pérez Jiménez, one of them being hit over Caracas by anti-aircraft fire, and then making an emergency landing in Maiquetía.
| THE KIT |
Glencoe has reboxed other manufacturers’ old and classic kits over the years. Their 1/48 Venom appeared sometime in the 80s, as an Fb Mk.1/Mk.50 and was reboxed sometime in the 90s as an Mk.4/Mk.54. A good friend did a thorough research and concluded that this kit is indeed a rebox of the ….1956 Lincoln International 1/59 Venom! The kit comes in top opening box with a very attractive boxart, depicting two RAF Venoms flying over some light clouding during sunset, tempting you to open the box and dig inside…
Upon opening the box, the high hopes are somehow diminished, as what you get is some plastic parts loosely floating in a sealed bag, together with the one piece clear part. Unsealing the bag reveals some thick styrene parts. External details are very generic, with a combination of heavily raised rivets and equally heavy recessed lines to represent moving surfaces borders and some panels.
The fuselage is split horizontally in two parts. There’s a big rectangular opening under the belly, for attaching the completed model on a base, but no base is provided. The modeler would then have to construct or modify another base to mount it on, or close the opening with thick sheet styrene, should he wish to display the model standing on its landing gear. Also, the fuselage has an unexplainable width increase from midwards to the back. This has to be eliminated.
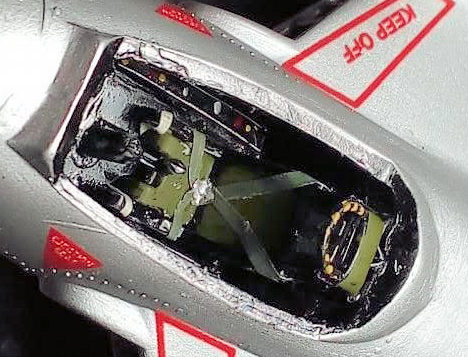
There’s absolutely no cockpit, not even a floor, but, interestingly, inner lugs
for a cockpit floor are provided! The wheel wells are very shallow and
unrealistic. The main wheels and the one piece front leg with the wheel and
front door look toy-ish. However, the main la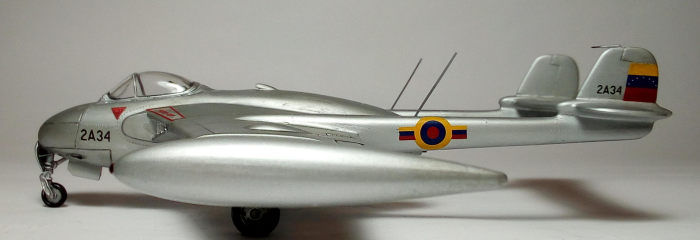 nding gear legs are quite busy,
including what seem to be brake lines and calipers!
nding gear legs are quite busy,
including what seem to be brake lines and calipers!
No exhaust nozzle, fin pitot tube, underbelly spent cartridge chutes and radio antenna or the characteristic elevator mass balances are provided. The one piece clear canopy is wrong, as its rear solid part is not molded on it, but at the fuselage halves. It is thick and scratched, but not foggy and with well defined framing. Two external tanks are provided. The general shape looks Venom-ish to a good degree
The two piece decal sheet is an unexpected surprise and a “star” that boosts the value of the otherwise simplistic kit: made by the much missed Lloyd Jones’s Scalemaster, the decals are well printed and provide nice options for three RAF, a Swiss and a Venezuelan bird.
The instructions are printed on a two-sided B4 size paper. At one side there is a one step affair building “sequence” (not a problem, as the kit is basic), together with a nice small history. Reverse side has the external painting and decaling instructions. Color call outs are generic, but an average modeler can easily find the corresponding shades.
This kit was bought back in 2005 for about 10 euros. It was found abandoned at one dusty corner of an Athens hobby shop, together with two other Glencoes: an 1/32 XV-1 Convertiplane and a 1/35 ZV-8P Airgeep. I grabbed them all, built the Convertiplane and the Airgeep immediately and in 2020 decided to build the Venom as those gorgeous looking Fuerza Aérea Venezolana NMF birds!
| CONSTRUCTION |
Having decided from the start to scratchbuild whatever I could, I (net) studied a lot of detail and walkaround pics of the plane, in order to use them as reference for my scratchbuilds. I started by gluing appropriately styrene sheets to form the cockpit floor, front and side walls, rear bulkhead and front wheel well. Venoms, as Vampires, are severe tail sitters, so a hefty lead weight was trapped in the “created” space over the front wheel well, secured with my sons’ modeling clay.
I then attached the two fuselage halves together. Fit was manageable (remember,
this is a 1956 mold…). I inserted and glued an appropriately thick styrene sheet
to fill the above mentioned underbelly base attachment rectangular opening. Upon
curing, I cut it to shape. A nice (if not a tad crude) Vampirenom fuselage
emerged!
I glued side “consoles” at the cockpit sidewalls, all made with sheet styrene.
The dashboard is an…1/72 C-47 one, heavily modified, of course! The cockpit was
painted black, raised details drybrushed with silver and red/yellow/silver
“knobs” done with a 10/0 brush. I used a leftover
 Vampire stick, also painted
black with a red “knob” at its top.
Vampire stick, also painted
black with a red “knob” at its top.
Fuerza Aérea Venezolana Venoms were equipped with a MB Mk2 ejection seat. I had an 1/48…..Mk10, leftover from an Esci Mirage F-1kit. If one recalls, that seat representation was a tad on the simple side; well, what a great start as to modify that oversimplification of a Mk10 into a Mk2, with a bit of scratchbuilding. So, using net pics as reference, I attached (from leftover parts) a one piece top ejection handle/parachute housing. I also added parachute back holding rods and a side quick release handle from stetched sprue.
Seat was painted black, drybrushed with silver, with dark green cushions and parachute top, dark gray headrest and black/yellow striped ejection and quick release handles. Seat belts, including parachute and foot restrain ones were added, made of khaki drab doped masking tape, with main buckle made with my PILOT silver pen. I then had a busy looking MB Mk2-ish!
I glued the wing halves, the tip tanks and the wing tanks together (the usual less than perfect fit also here). The separate ailerons were attached as well, but their fit was so awful, that I had to fill and smooth sand their hinge lines. Then I turned my attention to the MLG wells. I started by carefully removing the shallow top wall with my Excel blade. To my joy the characteristic bulge was now visible from the inside. Then I cut suitable “styrene-ish” pieces from my sons’ endless supply of ice cream trays and glued them vertically all around the wheel well perimeter. Upon glue curing, I carefully cut the excesses and filled any missed spots with my homemade brew of liquefied styrene. Pieces of stretched sprue were glued at the top wall, in order to add, together with the emerged bulge, some interest to the wheel well. The end result was satisfactory and a definite step ahead of the offending kit provision. The NLG well received the same “ice cream tray sheet styrene” treatment, with its top wall looks augmented by attaching an appropriately cut piece of micromesh. The neighboring gun openings and top fuselage air scoop were drilled out at this time, for a more realistic look.
I then turned my attention to the characteristic intakes. They are provided as
serrated solid plates by t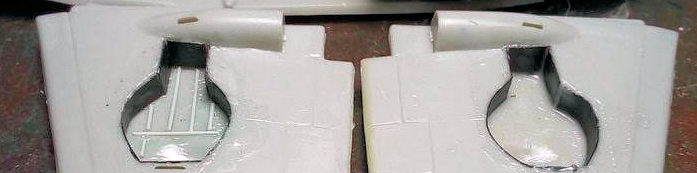 he kit and they look totally out of place. Having
initially decided to blank them off with some kind of scratchbuilt FOD covers, I
changed my mind and decided to carefully carve them, retaining the two struts
that each one sports in real life. I started by microdrilling, then by careful
cutting of the “excess” styrene with my Excel knife and finally by sanding with
some kind of custom made sanding stick. After about an hour’s work, I called the
result satisfactory and painted the intake innards Modelmaster Steel.
he kit and they look totally out of place. Having
initially decided to blank them off with some kind of scratchbuilt FOD covers, I
changed my mind and decided to carefully carve them, retaining the two struts
that each one sports in real life. I started by microdrilling, then by careful
cutting of the “excess” styrene with my Excel knife and finally by sanding with
some kind of custom made sanding stick. After about an hour’s work, I called the
result satisfactory and painted the intake innards Modelmaster Steel.
I then glued the wings to the fuselage and attached the tip tanks at them. The booms were glued onto the wings and the one piece inner stabilator part was trapped between them. The ailerons and outer stabilator parts were attached too. Fit was not good, leaving a lot of gaps and mismatches, especially at the wing roots and the boom attachment wing areas. I had to use liquefied styrene as gluing/filling agent there. Before glue setup, I took my time adjusting and correcting the attaching angles of all above parts, in order to have a reasonably aligned Venom.
After glue curing, many areas looked really crude. Armed with my Excel knife, I scraped the excessive styrene, and gave those areas an initial coarse (220 grit) sanding, followed by 400 grit at all joints. Finally an application of Squadron Green filler and a progressive 800 to 1500 grit sanding produced a smooth result.
Since the camo would be aluminum, I decided to attach all landing gear parts (sans the separate main wheels) and paint the complete model. In order to beef up the simplified looks I added some scratchbuilt details,:
 I added two pieces of stretched sprue at the inner side of each outer main
gear door. I also fabricated from stretched sprue their quite intricate “H”
shaped retraction struts. I added retraction actuators at the main gear legs (stretched sprue). The main wheels had their toy looking rims drilled circumferentially to look
busier and their bottom side a tad filed for a weighted look. I drilled the inner side of the NLG side door as per reality and added a small
retraction rod (stretched sprue). I fabricated a proper looking front NLG door from sheet styrene and added two
small rods that connect the NLG front door to the leg. The NLG retraction cylinder was too short, so I added an extension made out of
stretched sprue.
I added two pieces of stretched sprue at the inner side of each outer main
gear door. I also fabricated from stretched sprue their quite intricate “H”
shaped retraction struts. I added retraction actuators at the main gear legs (stretched sprue). The main wheels had their toy looking rims drilled circumferentially to look
busier and their bottom side a tad filed for a weighted look. I drilled the inner side of the NLG side door as per reality and added a small
retraction rod (stretched sprue). I fabricated a proper looking front NLG door from sheet styrene and added two
small rods that connect the NLG front door to the leg. The NLG retraction cylinder was too short, so I added an extension made out of
stretched sprue.
The front wheel is one piece with the NLG leg. Sadly, it does not sport the characteristic Vampirenom deep central thread look. Nothing more to do there but left it “as is”… Surprisingly, the MLG legs were well detailed, with a representation of brake lines and calipers! I did not use the extra wing tanks, as Venoms did not always carry them and, to my opinion, they degrade the lovely look of the Venom.
After the above items were attached, checked for alignment and glue cured, the model headed to the paint shop.
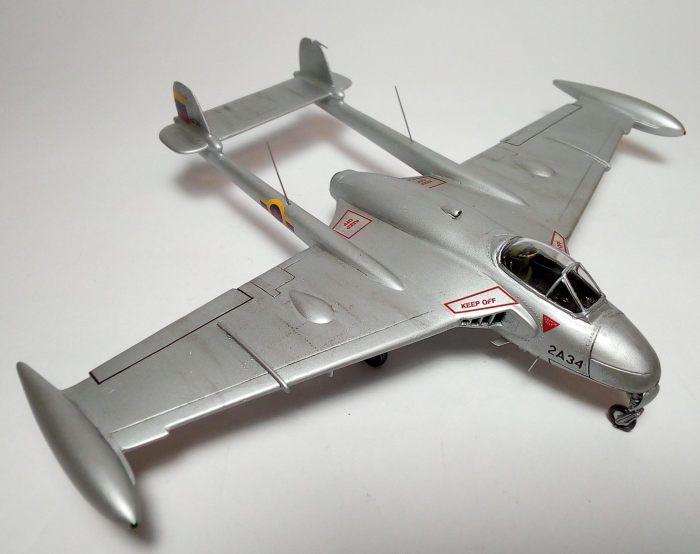
| COLORS & MARKINGS |
Fuerza Aérea Venezolana Venoms sported a beautiful all around aluminum finish. To replicate it, I sprayed the whole model with my favorite good (?) old Humbrol 11 Silver enamel. Upon drying, I gave it a coat of Future, in order to protect the delicate Silver and add some extra “deep” shine. The main wheel rims also received the same color.
The Scalemaster decals behaved very well. They came off their backing paper easily and adhered well. They even behaved well upon cutting two of them, in order to attach the cut pieces to the external MLG doors. Kudos to Scalemaster and Lloyd Jones! We miss you buddy! A coat of Future sealed them.
I installed the seat, stick and a gunsight (made from styrene sheet, painted black) with an acetate “glass” attached on it with white glue. I then had a “nice’n’busy’, towards fictitious cockpit! The ailerons hinge lines looked a lot unreal, so, I decided to breathe some life to them, using black stripe decals.
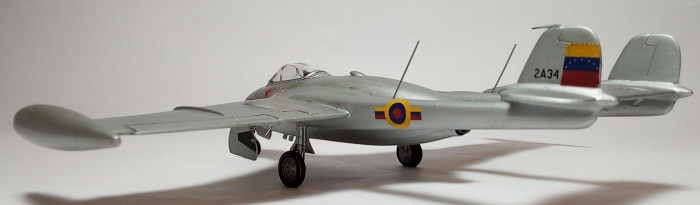 Based on the Classic Airframes 1/48 Venom instructions and also on actual FAV
Venoms pics, I added a number of additional parts. A port fin pitot tube (stretched sprue, painted silver, with “burned metal”
tip). A wire antenna at each boom middle top (stretched sprue, instead of the kit
thick and short ones, painted gun metal). Two seemingly pullout steps below each cockpit side, painted silver. A VHF antenna beside the starboard pullout step (sheet styrene, painted
silver). Four spent cartridge case chutes beside the guns (block styrene, painted
silver). An engine exhaust, made from an appropriate width and depth piece of my sons’
straws, painted Testors Burned Metal and inserted in the otherwise uninspiring
fuselage back empty hole. Two stabilator mass balances, made of stretched sprue, painted silver.
I attached the main wheels and had the Venom standing properly on its feet. Its
posture was not bad, though I wouldn’t mind it to lean a bit more backwards!
Based on the Classic Airframes 1/48 Venom instructions and also on actual FAV
Venoms pics, I added a number of additional parts. A port fin pitot tube (stretched sprue, painted silver, with “burned metal”
tip). A wire antenna at each boom middle top (stretched sprue, instead of the kit
thick and short ones, painted gun metal). Two seemingly pullout steps below each cockpit side, painted silver. A VHF antenna beside the starboard pullout step (sheet styrene, painted
silver). Four spent cartridge case chutes beside the guns (block styrene, painted
silver). An engine exhaust, made from an appropriate width and depth piece of my sons’
straws, painted Testors Burned Metal and inserted in the otherwise uninspiring
fuselage back empty hole. Two stabilator mass balances, made of stretched sprue, painted silver.
I attached the main wheels and had the Venom standing properly on its feet. Its
posture was not bad, though I wouldn’t mind it to lean a bit more backwards!
FAV Venoms pics show them to be in almost pristine external condition. I have every reason to believe that my FAV Venom was kept in very good external condition, too. I, thus, went to do a light all-around weathering/dirtying. A satin (towards gloss) coating sealed everything in and gave the Venom its final shiny look.
The previously hand painted canopy was glued in place, trimmed as best as possible, faired-in with white glue and touched up with silver paint. (As stated above, the back part of the canopy is totally wrong: it is supposed to go all the way and touch the fuselage, as it is sliding back to open. The kit provided the last bit of the canopy as fuselage part (!), making me wondering what the kit designers were thinking....).
I finally “added” the wingtip lights with blobs of clear paint and called the Venom done!
| CONCLUSIONS |
This is an absolutely basic kit, definitely on the toy side, with no internal details whatsoever. The 1/59 scale is also a bit odd, the excellent decal sheet being its only shining part. A big rectangular underbelly cut is there, but no base is provided. Putting it together out of the box can be done by a novice modeler, the only extra requirement being the closure of the base opening, or the construction of a suitable base. An adequate representation of a Venom can be thus produced, the good decals being a great boost to the looks. An experienced modeler will not even consider tackling this kit, but, should he do so, he will go a bit further and scratchbuild many missing details with good results.
If you want an accurate 1/48 Venom, your only option would be the nice, but difficult (due to its “short run” nature) Classic Airframes kit, if you are lucky to find one, since CA are out of business for some years now and no one else has re-released the kit. An Aeroclub Venom vac existed in the 90s, but it seems to be a real rarity.
I went my usual lonely road and scratchbuilt everything I could, in order to diminish the toy looks in as many areas as possible and take this 1956 Lincoln International mold to places it had never gotten before. I had a lot of fun doing it and surely looks like a Venom if not a tad on the fictitious side!
Happy Modeling!
| REFERENCES |
Wikipedia
Scalemates
Various internet sites (pics, info and models built)
25 June 2021
Copyright ModelingMadness.com. All rights reserved. No reproduction in part or in whole without express permission.
If you would like your product reviewed fairly and fairly quickly, please contact the editor or see other details in the Note to Contributors.