| KIT #: | HC1550 |
| PRICE: | 11 Euros |
| DECALS: | Two options |
| REVIEWER: | Spiros Pendedekas |
| NOTES: |
| HISTORY |
The de Havilland Vampire is a British jet fighter which was developed and manufactured by the de Havilland Aircraft Company. It was the second jet fighter to be operated by the RAF, after the Gloster Meteor, and the first to be powered by a single jet engine.
Development of the Vampire as an experimental aircraft began in 1941 during the Second World War, to exploit the groundbreaking innovation of jet propulsion. From the company's design studies, it was decided to use a single-engine, twin-boom aircraft, powered by the Halford H.1 turbojet (later produced as the "Goblin"). Aside from its propulsion system and twin-boom configuration, it was a relatively conventional aircraft. In May 1944 it was decided to mass-produce the aircraft as an interceptor for the Royal Air Force (RAF). In 1946 the Vampire entered operational service with the RAF, only months after the war had ended.
The Vampire quickly proved to be effective and was adopted as a replacement of wartime piston-engined fighter aircraft. During its early service it accomplished several aviation firsts and achieved various records, such as being the first jet aircraft to cross the Atlantic Ocean. The Vampire remained in front-line RAF service until 1953 when it was progressively reassigned to various secondary roles, such as ground attack and pilot training, for which specialist variants were produced. The RAF retired the Vampire in 1966 when its final role of advanced trainer was filled by the Folland Gnat. The Royal Navy had also adapted the type as the Sea Vampire, a nasalized variant suitable for operations from aircraft carriers. It was the service's first jet fighter.
 The
Vampire was exported to a wide variety of nations and was operated worldwide in
numerous theatres and climates. Several countries deployed the type in combat
during conflicts, including the Suez Crisis, the Malayan Emergency, and the
Rhodesian Bush War. By the end of production, almost 3,300 Vampires had been
manufactured, a quarter of these having been manufactured under license in
several other countries. In addition, de Havilland pursued the further
development of the type; major derivatives produced include the DH.115, a
dedicated dual-seat trainer, and the more advanced DH.112 Venom, a refined
variant furnished with a swept wing (instead of the straight wing of the
Vampire) and oriented towards conducting ground attack and night fighter
operations.
The
Vampire was exported to a wide variety of nations and was operated worldwide in
numerous theatres and climates. Several countries deployed the type in combat
during conflicts, including the Suez Crisis, the Malayan Emergency, and the
Rhodesian Bush War. By the end of production, almost 3,300 Vampires had been
manufactured, a quarter of these having been manufactured under license in
several other countries. In addition, de Havilland pursued the further
development of the type; major derivatives produced include the DH.115, a
dedicated dual-seat trainer, and the more advanced DH.112 Venom, a refined
variant furnished with a swept wing (instead of the straight wing of the
Vampire) and oriented towards conducting ground attack and night fighter
operations.
Iraq initially bought in 1953 six single seat Vampires FB52 and a single T55 dual seater, followed, in 1955, by a second batch of another six single seaters and nine dual seaters, one of which crashed during delivery. It was Iraq’s first jet fighter unit. After the British pullout of Iraq that year, the machines’ fate, in terms of spare parts availability, might not have been so sporty, resulting in the slow but steady process of them phasing out. It has been reported that the ones in flying condition were used against Kurdish rebels by 1961, totally fading away the following years.
| THE KIT |
Hobbycraft quarterscale Vampires appeared in 1993 in six versions, dual seaters included. They were all “black box” versions, meaning better decals.They haven’t been reboxed since then by anyone, except the FB5 version, which was reboxed by the Japanese Company IDEA, sometime in the 90s.
The kit comes in a sturdy top-opening box with a nice dramatic boxart of a beautiful Iraqi Vamp, flying low over a seemingly desert landscape, leaving an impressive cloud of sand behind as it pulls up…
Upon opening the box, you are greeted with two crisply molded sprues in gray styrene, plus one clear sprue. Sadly, all three of them are packed together, so some scratches will be inevitable, especially at the small clear sprue that floats freely, within the two main sprues, scratching and being scratched…
The cockpit is a par on the simp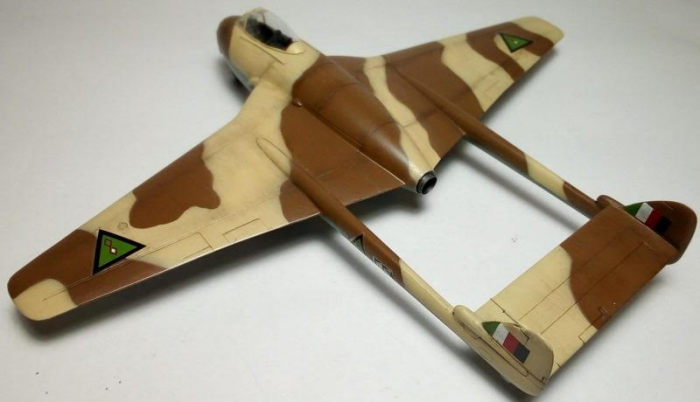 listic
side, consisting of side walls and instrument panel with molded in details,
gunsight, stick, trim wheel, and a simplistic but correct looking seat with a
fictitious looking “cushion” at its back. Wheel wells are uninspiring, lacking
any detail, but have the correct depth. Main gear legs are well represented, but
the nose one has the wheel brackets molded horizontally, which is not correct:
they should be at an angle, unless your Vamp lost its front suspension! The
characteristic air intake faces are well represented, though some thinner
fillets wouldn’t hurt. The intakes could be deeper, but maybe I ask too much!
The exhaust duct is simple, as at the real plane. Mass balances for the elevator
are provided (another feature of the Vamp – and the Venom).
listic
side, consisting of side walls and instrument panel with molded in details,
gunsight, stick, trim wheel, and a simplistic but correct looking seat with a
fictitious looking “cushion” at its back. Wheel wells are uninspiring, lacking
any detail, but have the correct depth. Main gear legs are well represented, but
the nose one has the wheel brackets molded horizontally, which is not correct:
they should be at an angle, unless your Vamp lost its front suspension! The
characteristic air intake faces are well represented, though some thinner
fillets wouldn’t hurt. The intakes could be deeper, but maybe I ask too much!
The exhaust duct is simple, as at the real plane. Mass balances for the elevator
are provided (another feature of the Vamp – and the Venom).
The fuselage is split horizontally, as are the wing halves, with extra one piece wingtips. The booms are a left/right affair each. The horizontal stabilizer is one piece, trapped in between the booms. This will be a sub assembler’s mini paradise! I’ve read complaints about the general shape (that may be right anyway), but the general shape looks like a Vampire shape to me.
Instructions are simple and clear – no complaints here! Decals are provided for an Iraqi and a Zimbabwe machine. Both schemes are beautiful and “exotic”, the Iraqi one being the most colorful. Decals look acceptable, following the above stated “black” Hobbycraft boxing good decals reputation.
This kit was bought back in 2006, during my “Shelf of Doom” augmentation process. It was cheap and the striking scheme immediately caught my attention. I then let it sit quietly in my stash, opening the box frequently to sneak a glance in, as I was mysteriously attracted to it. Finally, after 14 years, it was cleared to be built!
| CONSTRUCTION |
I started by assembling the cockpit, which consists of a tub, seat, seat rear attaching plate, two well detailed sidewalls, stick and instrument panel with molded raised detail. The cockpit was given a base coat of extra dark gray (Humbrol 123). The instrument panel and sidewall items were painted black, dry brushed in silver and decorated with red, yellow and white “knobs” by a 10/0 brush. A silver painted trimming wheel was attached at the port sidewall. The stick was painted as the base cockpit color with black grip and a red fire knob on top. The seat, which was correct for an Iraqi Vamp, had its cushion painted light green and seat belts added, made of green doped masking tape, the buckles done with my PILOT silver pen. I left the seat and control stick out, in order to add them at later stages of construction.
 I
then glued the cockpit tub and the nose wheel bay from the inner side of top and
bottom fuselage halves respectively. Instructions wanted me to trap the delicate
exhaust between the two halves. I preferred to add it at later stages, meaning
the exhaust’s rear protrusion would have to be cut, so I glued two pieces of
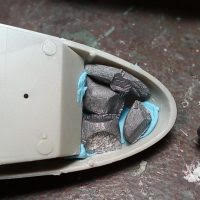
styrene at both fuselage halves, to act as stoppers. Vamps (and venoms) are
severe tail sitters, so I stuffed as many lead pieces as I could in the space
left between in front of the cockpit tub, “wrapped” with my son’s modeling clay.
This resulted in a nicely enclosed ballast that will be secured by the top part
of the nose wheel well, upon joining the two fuselage parts, an operation that
took place immediately afterwards! Fit of the two fuselage halves was average
and had to be clamped at the rear.
I
then glued the cockpit tub and the nose wheel bay from the inner side of top and
bottom fuselage halves respectively. Instructions wanted me to trap the delicate
exhaust between the two halves. I preferred to add it at later stages, meaning
the exhaust’s rear protrusion would have to be cut, so I glued two pieces of
styrene at both fuselage halves, to act as stoppers. Vamps (and venoms) are
severe tail sitters, so I stuffed as many lead pieces as I could in the space
left between in front of the cockpit tub, “wrapped” with my son’s modeling clay.
This resulted in a nicely enclosed ballast that will be secured by the top part
of the nose wheel well, upon joining the two fuselage parts, an operation that
took place immediately afterwards! Fit of the two fuselage halves was average
and had to be clamped at the rear.
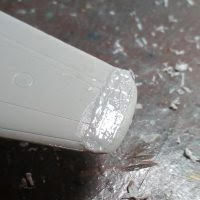
I then assembled the wings and booms. Fit was average here too, with the wingtips fitting really badly, their attaching angles being totally wrong and inconsistent. A surgery had to be performed there, aided by the use of my home made liquefied styrene, in order to fill the resulting big gaps. Looks like the kit wingtips were designed by a different team than the ones who designed the actual kit!
The wings were then attached to the fuselage, as was the one piece
horizontal stabilizer between the booms, which, in turn, were glued onto the
wing corresponding positions. General fit was average,
 with the
wings tending to have a slight anhedral (they should be “neutral”) and the
booms/wings locating pins to be more trouble than aid (I cut them off and butt
fitted them). Since a misaligned Vamp is a discouraging view, I spent some
quality time here, aligning and checking before the glue cured and the result
was a reasonably aligned assembly.
with the
wings tending to have a slight anhedral (they should be “neutral”) and the
booms/wings locating pins to be more trouble than aid (I cut them off and butt
fitted them). Since a misaligned Vamp is a discouraging view, I spent some
quality time here, aligning and checking before the glue cured and the result
was a reasonably aligned assembly.
Tropicalized Vampires sported an A/C system at a fuselage extension bulge, ahead of the starboard air intake. This is supplied as an extra part, leaving quite some gaps upon attaching that have to be treated.
The Vampire has two very characteristic supporting fillets at each air
intake. The supplied parts from the Hobbycraft kit were a bit thick and narrow,
so I resorted to my beloved childrens’ ice cream plastic cups: I cut four
fillets and glued them at the intakes, at a slight inwards angle, as per the
Vampire 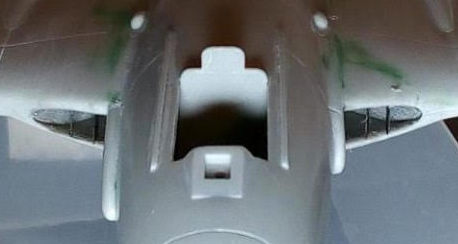 pics.
The intake trunking was then carefully hand-painted silver.
pics.
The intake trunking was then carefully hand-painted silver.
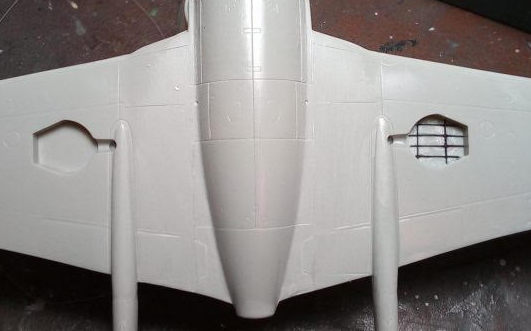
I then turned my attention to the wheel wells. They were boxed and had
the correct depth, but no detail inside, so I glued pieces of stretched sprue to
represent some ribbing. Similar pieces of stretched sprue were added to the
inner part of the external MLG doors, whereas the NLG side door was narrowed, as
it was too high, and her inner side was drill-niched, to represent the real
look, as per
 reference
pics. Wells and door innards were painted Humbrol 11 Silver, in order, after a
final matt coat, to look like dull aluminum. Two kit supplied small air scoops
were attached at the midwing topside roots. Their holes, as well as the four
front guns holes, were microdrilled out for more attractive looks.
reference
pics. Wells and door innards were painted Humbrol 11 Silver, in order, after a
final matt coat, to look like dull aluminum. Two kit supplied small air scoops
were attached at the midwing topside roots. Their holes, as well as the four
front guns holes, were microdrilled out for more attractive looks.
After having all above “main” components assembled, I gave the whole model an initial coarse sanding to even things and then applied (with a toothpick) my homemade brew of liquefied styrene to the gaps, followed by another sanding upon curing. A final filling (with my preferable Squadron “green” putty) and sanding (400 to 1500 grit) session took place and I was off to the paint shop!
| COLORS & MARKINGS |
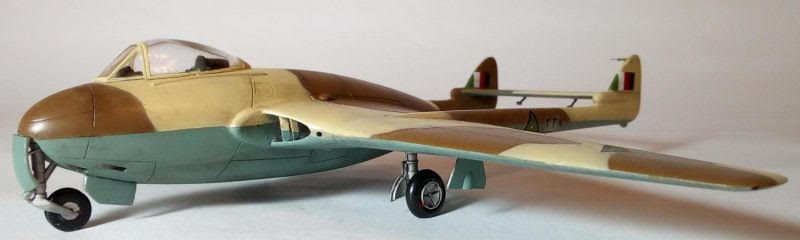
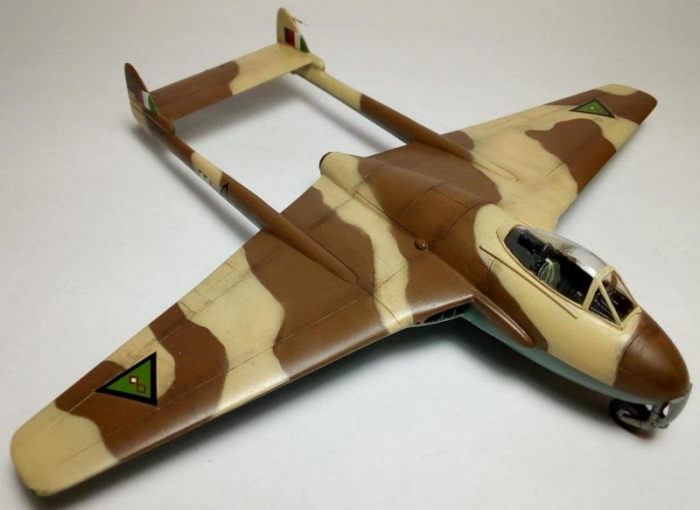
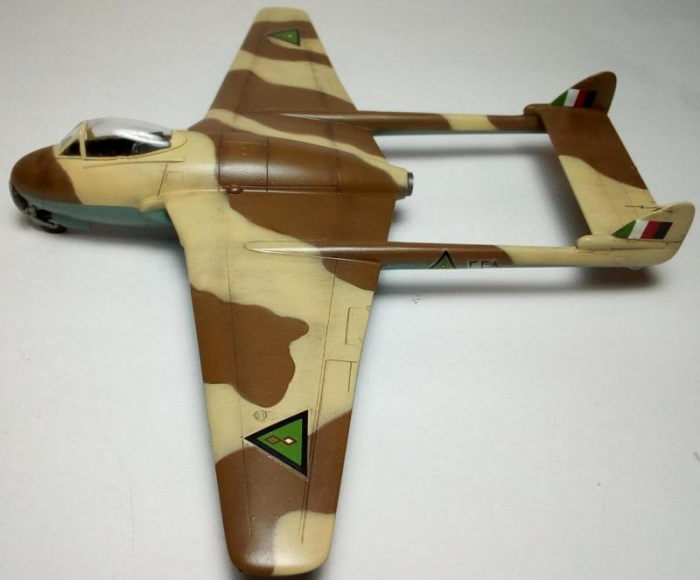
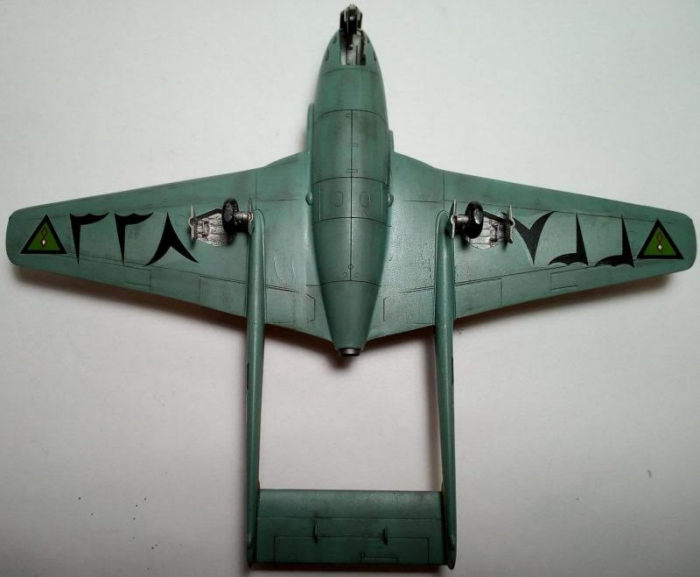
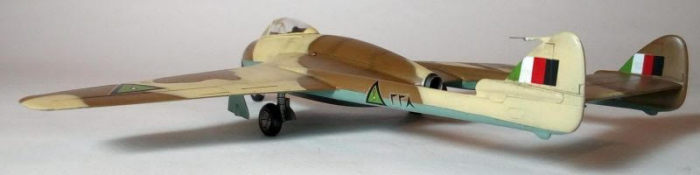
Iraqi Vamps sported a beautiful desert camo of disruptive brown/sand
tops over light blue, much like the RAF WWII desert one. To replicate it, I
first shot the undersides with Humbrol 65 Aircraft Blue, which dries to a nice
light blue shape. The gear doors were painted at this time, as well. After a
protective coat of Future, I carefully masked the undersides and gave the
topsides a coat of Humbrol 29 Dark Earth, followed by a Future protective
coating. Since the photo reference showed that the two
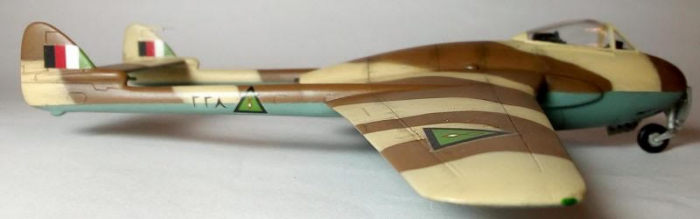 top colors
demarcation lines are on the hard side, I used tac (UHU Patafix) to define the
camo borders and headed to the paint shop again, to apply the final “light sand”
color (Humbrol 103 Cream). After removing the tac, I carefully wiped out any
sand oversprays to the brown with a lint free cloth, moistened with thinner.
Finally, the usual protective (and decal preparation) coat of Future was
applied, resulting in a nice glossy surface.
top colors
demarcation lines are on the hard side, I used tac (UHU Patafix) to define the
camo borders and headed to the paint shop again, to apply the final “light sand”
color (Humbrol 103 Cream). After removing the tac, I carefully wiped out any
sand oversprays to the brown with a lint free cloth, moistened with thinner.
Finally, the usual protective (and decal preparation) coat of Future was
applied, resulting in a nice glossy surface.
The kit decals, though old, behaved satisfactorily. I had some suspicions of silvering and, to minimize them, I applied each one after I had wetted the area with a drop of Future. A part of each of the two big black underside ID decals had to be cut and attached to the corresponding external MLG door. This was also performed without incidents. A generous application of Mr Mark Softer helped the decals to conform, followed by a coat of Future to seal them in.
| FINAL CONSTRUCTION |
Seat and stick were added to the cockpit. There’s a “cushion looking” cylindrical device behind the pilot’s headrest, connected with wiring that ends in two small “boxes” at both sides of the rear cockpit wall. Hobbycraft provided a very generic rectangular box, to be glued behind the pilot’s headrest, which I found too simplistic. So, I cut a piece of cylindrical styrene and glued it behind the headrest. I also attached two smallish flat styrene pieces bilaterally of the pilot’s headrest. Those boxes were connected with the cylinder by appropriately cut and bent stretched sprue, resembling the real thing more than before. The whole rear area under the canopy was also painted extra dark grey.
The gunsight (including its “glass” part), is wrongly provided as a non-clear styrene piece, so I only kept its base and added a “glass” made of clear acetate. I attached it at the front of the cockpit and painted the whole “anti-glare” area black.
I then proceeded to the landing gear….
Hobbycraft parts are solid, but are simplified and/or fictitious looking, like
the front door retraction mechanism. To present a passable result, I studied
some detail walk around pics and proceeded as follows:
 – I cut the
main landing gear struts about 3mm short (as they were too long, resulting in an
unnatural Vampire posture) and glued them at a slight outward angle, as per
reference pics. Retraction struts and brake lines were added from stretched
sprue.
– I cut the
main landing gear struts about 3mm short (as they were too long, resulting in an
unnatural Vampire posture) and glued them at a slight outward angle, as per
reference pics. Retraction struts and brake lines were added from stretched
sprue.
– I glued the MLG dragged doors lower than Hobbycraft recommended.
– The outer MLG doors were glued with a slight inward angle, again as per
references. Beforehand, I had drilled two holes at each of them, in order to
attach a scratch built “H” shaped retracting strut (from stretched sprue pieces)
that is prominent in reality.
– As stated above, the front wheel holding brackets are vertical to the cylinder, which is wrong, resulting in an even more unnatural (for a Vamp) nose down look. They were carefully cut and glued at an angle to the cylinder.
– I reduced the front door height and glued it at a position as indicated at the reference pics. The kit supplied retraction strut was not used, as it had nothing to do with reality; instead, rods, made of stretched sprue, were added at the correct positions.
– The NLG side door was glued in place and a mini retraction strut (again, from stretched sprue) was added at the front.
All landing gear parts, including wheel rims, were painted silver and were given a black wash for bringing out the details and also to look weathered.
I filed a tad the main wheels to provide for a weighted look and a more natural Vamp posture. Tires were painted black and weathered with “earth” dry pastels. Finally, I glued the wheels in place and, upon glue curing, I had my Vampire resting on its feet!
The characteristic port top fin pitot was not well represented: it was
short and fat. So I fabricated a new one from two stretched sprue pieces of
different thickness, glued it in place, painted its tip gun
 metal and
its body as per the surrounding camo color. The two elevator underside mass
balances were nicely represented; they were glued in place and painted underside
blue. Three characteristic air inlet holes were drilled: one at the forefront of
the nose and one at each wing leading edge, right after the end of the intakes.
The exhaust nozzle (or, better, exhaust tube…) was painted Testors Burned Metal,
buffed with a soft cloth (looked nice!) and glued in place.
metal and
its body as per the surrounding camo color. The two elevator underside mass
balances were nicely represented; they were glued in place and painted underside
blue. Three characteristic air inlet holes were drilled: one at the forefront of
the nose and one at each wing leading edge, right after the end of the intakes.
The exhaust nozzle (or, better, exhaust tube…) was painted Testors Burned Metal,
buffed with a soft cloth (looked nice!) and glued in place.
I then gave the whole model a black wash to bring out whatever engraved detail possible, wiping it to the direction of the airflow (as to simulate any leaks or so…). I used dark brown and black dry pastels to simulate stains and dirt wherever I judged they would accumulate (such as guns, underbelly and aft wheels area). I also added some minimum grease stains at the moving surfaces hinges with artist’s oils. I was subtle on my weathering, since Iraq seemed to having kept them in pristine condition, judging from the photo evidence.
I then gave the model a final satin clear coat, to seal everything in. The hand painted canopy was attached in place with spots of styrene glue. Fit was adequate, the resulting gaps taken care of applying small quantities of white glue, carefully faired with a moistened cotton bud and touched up as required. I then called this Iraqi beauty done!
| CONCLUSIONS |
The 1/48 Hobbycraft Vampires, to quote Tom Cleaver’s words, are “largely been relegated to “door stop” by most people”. I can understand this, since they may present some oversimplifications, fictitious implementations and possible shape issues. However, they are solid kits that can be put together quite easily, the result may not be an accurate Vampire, but definitely looking Vampire-ish! They have not been reboxed since before the millennium and I doubt if they ever will.
 The
Classic Airframes Vampire (and Venom) releases were definitely improvements, but
they seemed to have their shape issues too. Moreover, CA are out of business and
their kits have not been reissued by anyone till now.
The
Classic Airframes Vampire (and Venom) releases were definitely improvements, but
they seemed to have their shape issues too. Moreover, CA are out of business and
their kits have not been reissued by anyone till now.
There’s a nice accurate resin kit with PE and white metal by Alley Cat, reasonably priced, but its nature will attract experienced modelers only.
The recent Trumpeter releases are nice offerings, let down by the usual (!) glitches, but here seem to be easily workable (check here). As they are also reasonably priced, they will be the obvious choice for anyone wanting to build an accurate quarter scale Vamp, with a tad of extra effort to correct the glitches.
Having said all above, I really enjoyed putting together my Hobbycraft Vamp, scratch building and improving some key areas, in order to present a Vampire-ish with busy looking cockpit and landing gear. I gave this overlooked kit a chance to be seen built!
And what a lovely scheme!
Happy Modeling!
28 May 2021
Copyright ModelingMadnes.com. All rights reserved. No reproduction
without express permission. If you would like your product reviewed fairly and fairly quickly, please
contact
the editor or see other details in the
Note to
Contributors.