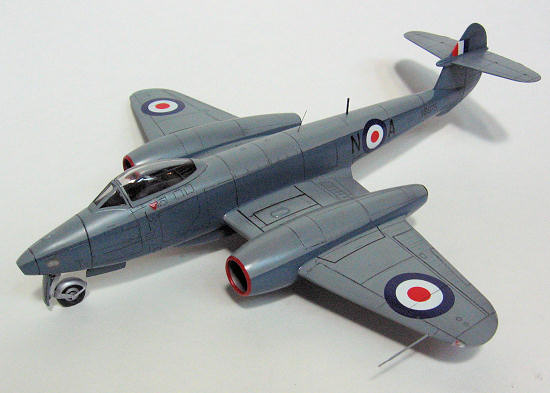
C.A./Tamiya 1/48 Meteor PR.10
| KIT #: | ?/61083 |
| PRICE: | $? |
| DECALS: | See review |
| REVIEWER: | Pat Earing |
| NOTES: | Kit Bash. Decals: Freightdog Decals Brits Abroad Immediate Post War #FSD 48001 |
| HISTORY |
 The
Gloster Meteor was the first
British jet fighter and the Allies first operational jet aircraft.
Designed by George Carter it first flew in 1943 and commenced operations
on
The
Gloster Meteor was the first
British jet fighter and the Allies first operational jet aircraft.
Designed by George Carter it first flew in 1943 and commenced operations
on
The
Gloster Meteor PR Mk.10 was a high level reconnaissance aircraft. It was
something of a hybrid aircraft, with the long wings of the Mk 3 the tail of the
Mk 4, the central fuselage of the Mk 8 and the nose of the FR Mk 9 fighter
reconnaissance aircraft, but without the four cannon. The PR Mk.10 carried three
cameras, one F.24 in the nose and two F.52s in the rear fuselage. The PR.10 was
developed at the same time as the FR Mk.9, and made its first flight on
| THE KIT |
No information provided
| CONSTRUCTION |
How do we
as modelers choose what model to build?
In my case, a build generally starts with a particular aircraft of
interest-the more obscure the better-and I see if a kit and time exists to get
it on my shelf. In the case of a
particularly obscure, unkitted Meteor, it was an unrepentant case of l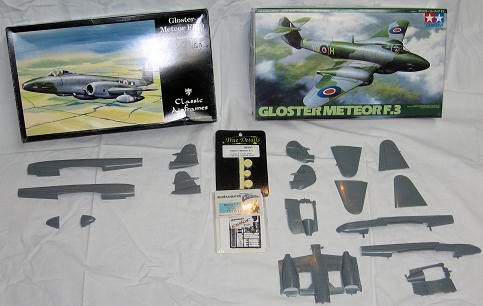 ove
at first sight! Having purchased a
set of Freightdog Models decals for a Spitfire project, I came across a
blue/grey vixen of a Meteor that I could not put out of my head.
Having no real interest in the Gloster Meteor, I did not have any kits
waiting in my queue, but with perseverance an elusive Classic Airframes FR Mk 9
kit and Tamiya Mk III kit were procured.
ove
at first sight! Having purchased a
set of Freightdog Models decals for a Spitfire project, I came across a
blue/grey vixen of a Meteor that I could not put out of my head.
Having no real interest in the Gloster Meteor, I did not have any kits
waiting in my queue, but with perseverance an elusive Classic Airframes FR Mk 9
kit and Tamiya Mk III kit were procured.
Starting
this build was nontraditional in that I began by making all of the necessary
cuts to both the Classic Airframes (CA) and Tamiya kits to create a Meteor PR Mk
10 from Mk 9 and Mk 3-4 kits first.
I was concerned that the Tamiya and CA kits might be too dissimilar for this
conversion to work based on my skills; and I did not want to waste a lot of
construction time only to toss the mess into the someday locker because of a
seemingly insurmountable mismatch.
The swapping included cutting the Classic Airframes and Tamiya tail
sections off at the panel line forward of the vertical tail, using the clear
Classic Airframes nose sections for the PR version on the Mk 8 fuselage, and
also swapping the Classic Airframes wings outboard of the engines for the Tamiya
parts. Fortunately, all of the
cutting was accomplished without incident if not without problems
The first
problem I encountered was that the cross sections of the two kits were not a
match at the tail and I had to put some thought into how to solve the problem.
Ultimately, the fix was simple: I taped the fuselage halves and tail halves
together and measured the difference (the step).
Using a black marker on the top and bottom of the fuselage, I marked the
¾ mm that needed to be removed from each of the Classic Airframes fuselage
halves 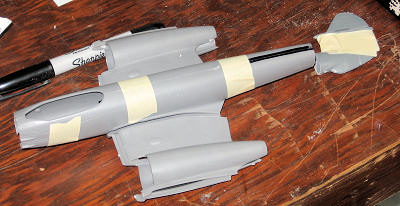 at
the cut for the tail, top and bottom, and sanded a taper from the cut to near
the cockpit opening in order to narrow the CA fuselage to match the Tamiya tail
section, effectively removing any step between the sections.
Satisfied that what I thought was the most visible part of the conversion
was going to work, I began painting the resin cockpit parts and engine fronts
Floquil engine black.
at
the cut for the tail, top and bottom, and sanded a taper from the cut to near
the cockpit opening in order to narrow the CA fuselage to match the Tamiya tail
section, effectively removing any step between the sections.
Satisfied that what I thought was the most visible part of the conversion
was going to work, I began painting the resin cockpit parts and engine fronts
Floquil engine black.
Lacking
inspiration for detailing the cockpit, I began to clean and assemble another
perceived problem area, the wing center section.
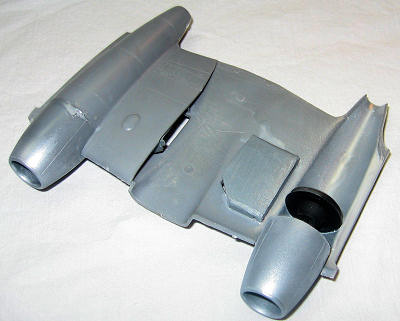
Having looked over the two kits, I decided to use the Tamiya landing gear
as I felt it had better overall detail; however, as a result of that decision I
also took the time to cutout and modify the main wheel bays from the Tamiya wing
to be fit into the Classic Airframes wing section to ease mounting the gear
legs. This required extensive
scraping and sanding to thin the deeper Tamiya parts to fit as well as some
plastic card to fill a missing ‘wall’ of the wheel bay.
Next I assembled the large engine intakes and front wing spar pieces to
the lower wing section, using some filler and primer to remove the rather
visible seams.
 Next
I spent some time fitting and checking that the top wing sections would fit
without gaps. Once satisfied with
the fit in this area I attached the upper panels and airbrushed a coat of
Floquil old silver on to all of the intake components.
Next
I spent some time fitting and checking that the top wing sections would fit
without gaps. Once satisfied with
the fit in this area I attached the upper panels and airbrushed a coat of
Floquil old silver on to all of the intake components.
Needing
to assemble the fuselage, I began painting and assembling the resin cockpit
parts from the CA kit. The ejection
seat was painted first following the kit instructions and best guesses from the
few cockpit photographs that I had access to, and then given a dry brush with
pastels for contrast and weathering.
Next I detail painted the cockpit side walls, floor, and back wall giving
each a dry brush with dark grey paint as well as pastels.
Beginning assembly of the resin cockpit parts required minor trimming as
the back wall was wider than the floor.
Once glued up, I tried a test fit of the assembly into the taped up
fuselage and discovered two problems: first, the tub assembly was too wide, and
second I had attached the front cockpit/landing gear bulkhead in the wrong
place. Additionally, upon closer
inspection it was also apparent that the cockpit tub would not sit low enough in
the fuselage to allow the nose gear bay molded on the bottom of the cockpit
floor to meet with the lower fuselage gear bay opening.
Rather than risk disassembling the rather fragile resin cockpit parts, I
opted for an aggressive regiment of scraping the inner fuselage areas with a #10
blade to thin the plastic, therefore allowing the whole assembly to drop and fit
more accurately at the nose gear bay opening.
I did, however, need to remove the front bulkhead which promptly broke
and split the flimsy nose gear attachment into multiple pieces.
Patience and judicious glue saved the day.
Once things had been
 repaired
and a decent fit achieved, I felt it prudent to check the PR photo nose section
to the fuselage for fit issues before committing them to each other.
repaired
and a decent fit achieved, I felt it prudent to check the PR photo nose section
to the fuselage for fit issues before committing them to each other.
Unfortunately, the finely molded clear parts included by Classic Airframes to
make the PR version are smaller in cross section than the fuselage resulting in
a large step, just like what I encountered with the tail assembly.
As a result, I was forced to sand the forward fuselage in a similar
manner to what I had with the rear of the fuselage to achieve a descent fit…
making the fuselage even narrower for the cockpit tub-gads!
Continued fussing resulted in all the parts eventually fitting well
enough, and I attached the nose sections to each fuselage half.
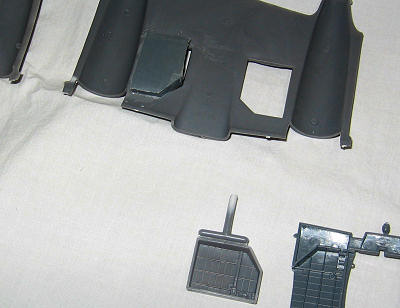
Because Classic Airframes chose not to provide any details for the camera
bay, even with those three prominent windows, I decided to try and recreate some
of the camera bay details. Using
photographic resources, I built a camera bay floor and aft bulkhead, some small
camera apertures and all the appropriate wiring assemblies.
All of this work also promptly created serious fit problems for the
cockpit tub again! Trimming and
fiddling eventually resulted in the attached clear nose sections separating from
the fuselage, which in turn allowed access for a more determined scraping with a
#10 blade to thin the plastic.
Once things, again, fit properly, I reattached the nose sections, which
required a considerable amount of filler to correct, and permanently attached
the cockpit tub. At this time I
also added the large metal weight that Tamiya includes for the Mk 3 kit into the
empty space just behind the cockpit tub.
With the
fuselage assembled it was time to consider how I was going attach the tail
section. I created a fuselage plug using a leftover resin casting block
appropriately shaped to fit the
dissimilar wall thicknesses of the two kits. Satisfied that a great fit could be
achieved I began working on the wings so that I could attach them prior to the
tail to ensure that everything lined up corre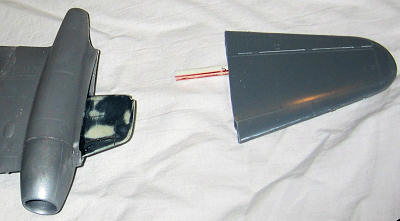 ctly
when viewed from the front or back of the model.
Using donor resin wing tips shaped to fit into each wing section cavity,
I was able to achieve not only ease of alignment but also a great deal of
strength for the wing joints.
Watching closely the fit and angles of the outer wing panels, I used super glue
to attach and fill the sizable gaps. At
this time I also sanded all of the remaining glue seams in the wing assembly and
fuselage, mounted the panel behind the ejection seat and attached the entire
wing assembly to the fuselage.
Ready to attach the tail section I glued on the Tamiya horizontal stabilizers
and using a carpenters square to ensure a 90 degree relationship to the wings, I
glued the tail section onto the fuselage.
The model was now looking very much like a PR mk10 Meteor, and I moved
onto the final stages of priming, sanding, and scribing in preparation for
paint.
ctly
when viewed from the front or back of the model.
Using donor resin wing tips shaped to fit into each wing section cavity,
I was able to achieve not only ease of alignment but also a great deal of
strength for the wing joints.
Watching closely the fit and angles of the outer wing panels, I used super glue
to attach and fill the sizable gaps. At
this time I also sanded all of the remaining glue seams in the wing assembly and
fuselage, mounted the panel behind the ejection seat and attached the entire
wing assembly to the fuselage.
Ready to attach the tail section I glued on the Tamiya horizontal stabilizers
and using a carpenters square to ensure a 90 degree relationship to the wings, I
glued the tail section onto the fuselage.
The model was now looking very much like a PR mk10 Meteor, and I moved
onto the final stages of priming, sanding, and scribing in preparation for
paint.
Having
taken care with the assembly of the major components, the only areas that ended
up needing filler were the troublesome nose area and the lower wing to fuselage
joint. For filler I use 3M acrylic
spot putty that is a lacquer based filler.
Additionally, I also use automotive lacquer primer with a very ‘fast’
thinner because of its high build capacity and super hard cured state.
A couple of evenings and these spots were soon sanded, primed and ready
to be rescribed. After a thorough
sanding with 400 grit I touched up the panel lines and drilled the camera lens
ports in the lower aft fuselage. At
this time I also installed the lower fu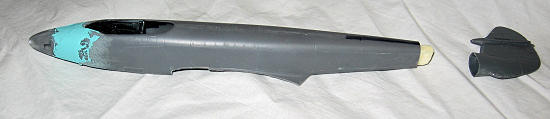 el
tank; unfortunately, I managed to mount it 4 mm to far forward.
I can live with it but I cannot figure out how I missed all of the
landmarks and attached it so far forward.
Nearing the paint shop, I endeavored to attach the final bits and pieces
such as the forward canopy section, install the instrument panel, seat, and
stick. Thinking I was clever
for not ‘finishing’ the cockpit as a means to reduce labor (masking and touch
up) I inevitably made more work for myself as the instrument panel would not go
into place. Clearly I should have
painted and attached it when the tub was being installed-nuts!
Looking over the etched Eduard set that came with the Tamiya kit, I
realized a solution through judicious bending of a pre-painted brass panel.
Although not entirely accurate, it is in there, and more importantly, I
can live with it.
el
tank; unfortunately, I managed to mount it 4 mm to far forward.
I can live with it but I cannot figure out how I missed all of the
landmarks and attached it so far forward.
Nearing the paint shop, I endeavored to attach the final bits and pieces
such as the forward canopy section, install the instrument panel, seat, and
stick. Thinking I was clever
for not ‘finishing’ the cockpit as a means to reduce labor (masking and touch
up) I inevitably made more work for myself as the instrument panel would not go
into place. Clearly I should have
painted and attached it when the tub was being installed-nuts!
Looking over the etched Eduard set that came with the Tamiya kit, I
realized a solution through judicious bending of a pre-painted brass panel.
Although not entirely accurate, it is in there, and more importantly, I
can live with it.
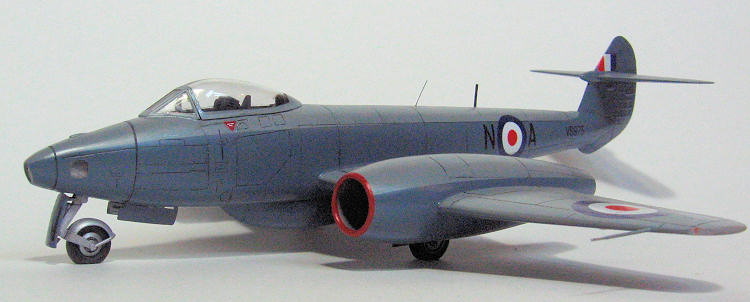
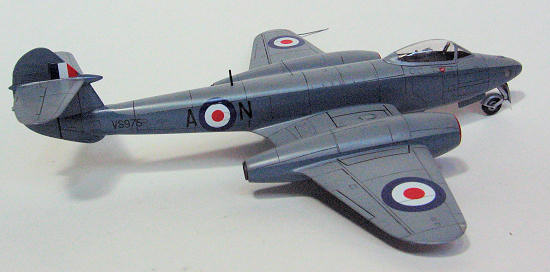
| COLORS & MARKINGS |
Painting
began with a wipe down and pre shading of panel lines with Floquil engine black
using my Iwata airbrush. Next I
sprayed the lighter topside shade of medium sea grey using Model Master Enamels
cut 1 to 1 with Testors airbrush thinner.
After a couple of days I carefully masked off the top surfaces, installed
all of the landing gear doors in their closed positions and sprayed the
remainder of the model with Model Master PR blue.
Letting things sit for a few hours I cleaned up mold lines on the
 Tamiya
landing gear and painted both the gear legs and resin True Details wheel hubs
with Floquil old silver. Unmasking
the model revealed no major bleed through and the whole thing was given a coat
of lacquer gloss clear in preparation for decals.
The last bit of painting was to spray the red engine openings.
This required careful masking and was very tedious, but in the end turned
out fantastic.
Tamiya
landing gear and painted both the gear legs and resin True Details wheel hubs
with Floquil old silver. Unmasking
the model revealed no major bleed through and the whole thing was given a coat
of lacquer gloss clear in preparation for decals.
The last bit of painting was to spray the red engine openings.
This required careful masking and was very tedious, but in the end turned
out fantastic.
I had
chosen to build this particular plane because of the artwork on a Freightdog
decal sheet I was using for a previous Spitfire build. As such, I had already
worked with the decals and for the most part they went on perfectly.
I used an application of Micro-Sol for each application, and to a one
they all lay down nicely and conformed to panels and panel lines.
For the most part that is. I
did manage to fold over the second set of under wing call numbers as I was
putting them onto the model, and despite my best efforts I could not undo or
save them. Disaster, but not an
insurmountable disaster; I used letters and numbers from the spare decal bin to
replace the destroyed decal, and although not an exact match I can again live
with the outcome. After another
coat of gloss lacquer cut with some Testors Dull Coat to make it a bit more
semi-gloss I installed the landing gear, gear doors, and antenna.
The camera ports were given covers using Micro Crystal Kleer and the
conversion was finished.
| CONCLUSIONS |
Since
completing this model, I have built two more from that that same Freightdog
decal sheet, with another under consideration.
As a rule, I seldom do more than one kit from a decals sheet… certainly
getting my monies worth from this one!
| REFERENCES |
Rickard,
J (12 February 2008), Gloster Meteor PR
Mk.10 ,
http://www.historyofwar.org/articles/weapons_gloster_meteor_10.html
Pat Earing
May 2011
Copyright ModelingMadness.com. All rights reserved. No reproduction in part or in whole without express permission from the editor.
If you would like your product reviewed fairly and fairly quickly, please contact the editor or see other details in the Note to Contributors.