| KIT: | Hallam-Vac 1/72 Auster AOP.9 |
| KIT #: | ? |
| PRICE: | $ |
| DECALS: | See Review |
| REVIEWER: | Carmel J. Attard |
| NOTES: | Vacuformed kit. |
| HISTORY |
AUSTER AOP-9
The Auster AOP-9 was the successor of the Auster Mk-6 and was designed from the outset of an air observation post or as a light communications aircraft. It was the last in a long line of three-seat machines to serve in the British armed forces.
The Prototype Auster
WZ662 flew for the first time on the 19th of March 1954 at
Rearsby, Leicester and the type made its debut at the Farnborough 1954 Air
Show with WZ664, which was powered by a 1x Blackburn Cirrus Bombardier 202
engine. 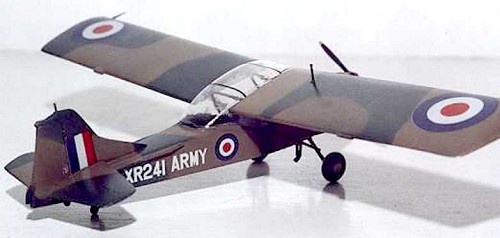 Subsequent Farnborough visitors of the type were WZ715 during the
1955 Airshow, XK417 in the 1956, civilian G-AVWT Auster 9 in the 1972 Air
show and in 1988, XR244was among the veteran and vintage section of
participant aircraft at Farnborough.
Subsequent Farnborough visitors of the type were WZ715 during the
1955 Airshow, XK417 in the 1956, civilian G-AVWT Auster 9 in the 1972 Air
show and in 1988, XR244was among the veteran and vintage section of
participant aircraft at Farnborough.
In the span of 10 years that followed its first flight, 145 Austers were produced. The initial deliveries were made to Middle Wallop during 1955, when it also entered service with No656 Squadron in Malaya and was flown on missions against communist guerrillas. In September 1957 the AOP-9 became the mainstay of the New Army Air Corps and for the ten years that followed it remained in this key role until helicopters replaced it. The Auster AOP-9 remained with the RAF, RAE, and AAC until the mid of 1970s mainly for training and communications duties.
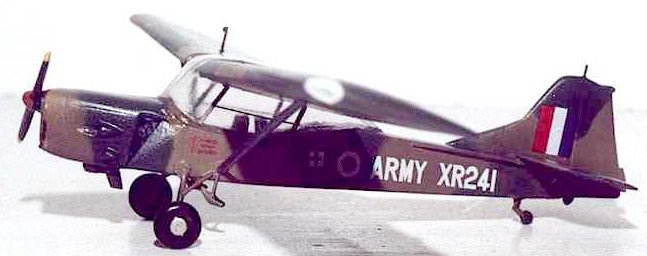
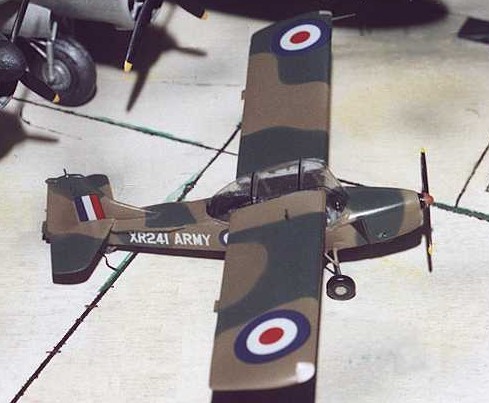
Preserved examples of Austers AOP-9 include WZ662, which was built by Auster Aircraft in 1954 and eventually found its way to the Wales Aircraft Museum at St.Athem, then Cardiff-Rhooce in UK. Other preserved examples include WZ670 at the Museum of Army Flying, Middle Wallop. The other remaining example is XR241 / G-AXRR with the Shuttleworth Trust at Old Warden. Incidentally, the Hallam-Vac accurate scale model is based on this latter example i.e. the military version.
| THE KIT |
To my knowledge
Airfix was the only company to release the Auster to a scale of 1.72. This
was based on the AOP6 version. This was released in an all yellow Antarctic
livery some 40 years ago and later on it was released in an interesting
Army colour scheme consisting of dark earth and dark gre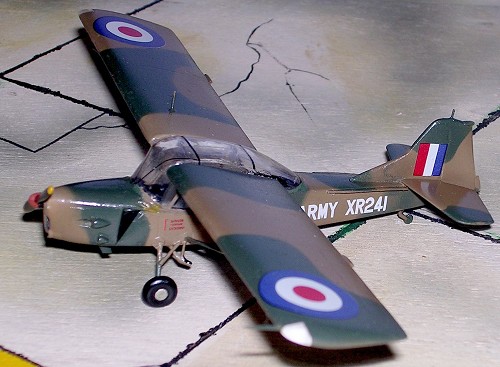 en overall
camouflage. This version differed a lot from the version that was yet to be
developed. Apart from this model I do recall another Auster kit close to a
scale of 1.48 that was released by a kit company way back in 1966 that was
called “Lincoln Intenational” based in Hong Kong. I recall buying the Kit
from Bonnet Stores at Sliema in Malta for the price of 1s.6d. It was an Auster 9 in civil markings. So today, Hallam-Vac release of the AOP-9 to
the famous scale of 1.72 remains the sole representation that can be found
nowadays.
en overall
camouflage. This version differed a lot from the version that was yet to be
developed. Apart from this model I do recall another Auster kit close to a
scale of 1.48 that was released by a kit company way back in 1966 that was
called “Lincoln Intenational” based in Hong Kong. I recall buying the Kit
from Bonnet Stores at Sliema in Malta for the price of 1s.6d. It was an Auster 9 in civil markings. So today, Hallam-Vac release of the AOP-9 to
the famous scale of 1.72 remains the sole representation that can be found
nowadays.
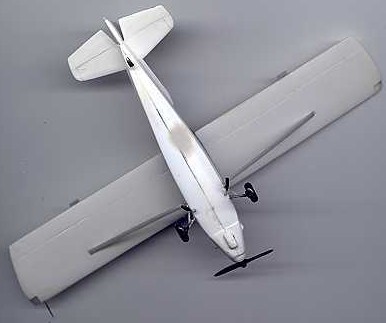
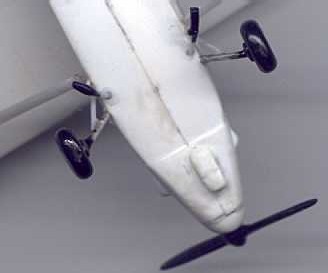
The kit pack contains just one sheet of white plastic card that contains all the major parts to make up the Auster, which is obviously small in size. These contained the main parts to make the fuselage, main planes and tail planes, along with six other minor parts as the instrument panel, accurate nose cowling, air intake, cockpit floor, and three seats. There is also a very clear one-piece canopy. (My pack contained two of these, possibly a standard feature in case one of these is spoilt during construction) There is also a smaller pack that contained the white metal parts consisting of two main wheels, a two bladed propeller and a tail wheel.
The instruction sheet is printed in blue. There is an exploded view which indicates the position of each and every item found in the kit as well as other smaller items such as the foot step to aid the crew enter the cabin, position of antennae etc. A five-view drawing indicates the camouflage pattern but alas, there is no direct indication which of the two shades was the dark earth or the olive green.
| CONSTRUCTION |
 For those who are by
now more familiar with these types of vac form kits, the construction of
the AOP-9 will be found to be a straightforward one. As with every kit of
this type, the components were first of all carefully outlined using tip of
a felt pen or a sharp pencil, which are then scored with a sharp exacto
knife. The pieces were then snapped from the backing sheet and were gently
sanded down to the correct section i.e. as far as the felt pen ink lines
indicated. The aperture of the cockpit area was then cut with a modelling
knife and the air intakes on either side of the forward nose were drilled
out and air vents at the rear were carefully opened up.
For those who are by
now more familiar with these types of vac form kits, the construction of
the AOP-9 will be found to be a straightforward one. As with every kit of
this type, the components were first of all carefully outlined using tip of
a felt pen or a sharp pencil, which are then scored with a sharp exacto
knife. The pieces were then snapped from the backing sheet and were gently
sanded down to the correct section i.e. as far as the felt pen ink lines
indicated. The aperture of the cockpit area was then cut with a modelling
knife and the air intakes on either side of the forward nose were drilled
out and air vents at the rear were carefully opened up.
The wing halves were
sanded down to the required size on a sanding block. These were then
 scraped at the trailing
edge with a sharp blade to obtain a thin and continuous sharp edge. These
were glued together with their corresponding wing half. Cockpit floor was
sanded to shape, column and three seats added, rudder pedals added. The
crystal clear one-piece canopy provided enough reason to do careful
paintwork to the interior, seats, straps, instrument panel, and floor.
scraped at the trailing
edge with a sharp blade to obtain a thin and continuous sharp edge. These
were glued together with their corresponding wing half. Cockpit floor was
sanded to shape, column and three seats added, rudder pedals added. The
crystal clear one-piece canopy provided enough reason to do careful
paintwork to the interior, seats, straps, instrument panel, and floor.
As with all vac form models small strips of plastic card from the backing sheet were cemented around the edges of one fuselage half. This served as aid to correctly locate the halves together and also to provide a strong joint. The single unit tail plane was glued in place, followed by the tail fin and rudder. Any small amount of filler to the fuselage and tail joints was added and sanded to smooth finish upon drying. Some attention was given to the air intake fitted to nacelle underside. The accompanying drawing shows the various antennae, small intakes, and other items to be added in order to make the scale replica more detailed.
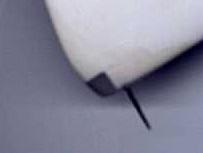 Making the wing tip
li
Making the wing tip
li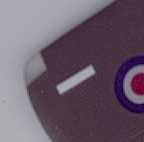 ght involved cutting the required space to receive the clear Perspex.
This was thicker than the wing section and was glued in place. The oversize
Perspex was then levelled to shape with a flat file and sanded followed by
polishing with toothpaste to bring a clear, transparent wing tip light.
Other important areas that needed care were the drilling of locating holes
to receive the undercarriage legs. The joint at the fuselage adjacent to
cockpit needed the careful provision of a strong wing joint and also
correct wing position with accurate incidence relative to fuselage using
cardboard templates drawn from the drawing provided with the kit. I
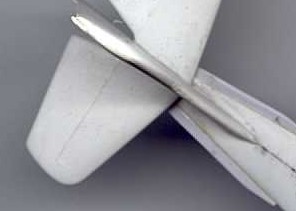
preferred to use 1.5 mm diameter surgical needles, which are cut to a
length that extend through to either side of the transparency. These
corresponded with
ght involved cutting the required space to receive the clear Perspex.
This was thicker than the wing section and was glued in place. The oversize
Perspex was then levelled to shape with a flat file and sanded followed by
polishing with toothpaste to bring a clear, transparent wing tip light.
Other important areas that needed care were the drilling of locating holes
to receive the undercarriage legs. The joint at the fuselage adjacent to
cockpit needed the careful provision of a strong wing joint and also
correct wing position with accurate incidence relative to fuselage using
cardboard templates drawn from the drawing provided with the kit. I
preferred to use 1.5 mm diameter surgical needles, which are cut to a
length that extend through to either side of the transparency. These
corresponded with 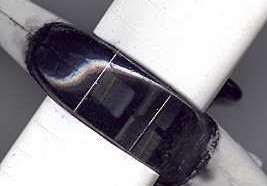 accurate holes drilled at each wing root.
 Anti spin strakes
were added to either side of rear fuselage ahead of the tail planes.
Finally the cockpit footsteps were added to either side of the fuselage.
These were made out of stretch sprue and scrap piece of card to form the
step. All the tiny parts were now glued to the kit and the Auster is now in
one piece.
Anti spin strakes
were added to either side of rear fuselage ahead of the tail planes.
Finally the cockpit footsteps were added to either side of the fuselage.
These were made out of stretch sprue and scrap piece of card to form the
step. All the tiny parts were now glued to the kit and the Auster is now in
one piece.
| COLORS & MARKINGS |
Finally the kit clear cockpit canopy was masked with Maskol and the wing tip lights were masked with masking tape. The model was airbrushed in Compucolor dark earth that was slightly lightened with a few drops of white to make up for the light effect on the scale. After drying the dark earth was airbrushed using the fine nozzle and the paint adequately thinned down in order to obtain the narrow merging between the two colours. The finish obtained was semi matt and the decals adhered well upon application in their correct place. In the end the whole model was given a coat of Humbrol clear satin.
| CONCLUSIONS |
 Having completed the
kit, I have a representation of the last fixed wing AOP that the Auster
Aircraft Company produced for the Army. The end result was not only
pleasing but made me consider other model projects of aircraft used by the
Army. To mention a few these include the Army Beaver, Auster AOP6 and the
Army Chipmunk that all carried the same camouflage scheme at any one time
while serving with the British Army.
Having completed the
kit, I have a representation of the last fixed wing AOP that the Auster
Aircraft Company produced for the Army. The end result was not only
pleasing but made me consider other model projects of aircraft used by the
Army. To mention a few these include the Army Beaver, Auster AOP6 and the
Army Chipmunk that all carried the same camouflage scheme at any one time
while serving with the British Army.
September 2005
Carmel J. Attard (Malta)
If you would like your product reviewed fairly and quickly by a site that has around 300,000 visitors a month, please contact me or see other details in the Note to Contributors.