| KIT #: | 803 |
| PRICE: | $26.00 |
| DECALS: | Six options |
| REVIEWER: | Torben Plesberg |
| NOTES: | HaHen decals for Luftwaffe FFS-S |
| HISTORY |
The Nord 2501 Noratlas was designed as a successor to the C-47. The designer might have been inspired by the German Gotha Go 244, which was the first land transport plane with a central fuselage and twin booms and fins. The American Fairchild C-82 (and C-119) was a similar design, but larger.
The Armé de l’Air ordered 212 machines as its principal transport aircraft in the fifties. Air forces of other countries showed interest in the project: Brazil, Israel and Germany. In the end also Kongo, Niger, Nigeria, Greece and Honduras ordered the Noratlas, however, as surplus aircraft form France and Germany.
Germany ordered 25 planes built by Nord. A further 161 planes were license built in Germany by VFW (Vereinigte Flugtechnischen Werke). The French built planes suffered from different shortcomings, and for a time they were all grounded, until the problems had been taken care of by VFW.
 The
Noratlas called Nora by the crews served with the three air transport wings of
the resurrected Luftwaffe, now called Bundesluftwaffe: LTG 61, LTG 62 and LTG
63. LTG is short for Lufttransportgeschwader, meaning air transport wing. The
FFS-S Abteilung B also flew the Noratlas as a trainer aircraft. Some 24 Noras
were attached to this unit. FFS is short for Flugzeugführerschule meaning pilot
school. The pilot school existed from 1956 to 1978. In 1978 The FFS-S was
disbanded, however, continued as LTG 62, which also had been disbanded some
years earlier (1971). More than 9000 Luftwaffe pilots got their wings with the
FFS-S in twenty years.
The
Noratlas called Nora by the crews served with the three air transport wings of
the resurrected Luftwaffe, now called Bundesluftwaffe: LTG 61, LTG 62 and LTG
63. LTG is short for Lufttransportgeschwader, meaning air transport wing. The
FFS-S Abteilung B also flew the Noratlas as a trainer aircraft. Some 24 Noras
were attached to this unit. FFS is short for Flugzeugführerschule meaning pilot
school. The pilot school existed from 1956 to 1978. In 1978 The FFS-S was
disbanded, however, continued as LTG 62, which also had been disbanded some
years earlier (1971). More than 9000 Luftwaffe pilots got their wings with the
FFS-S in twenty years.
From 1968 to 1971 the Noratlas was replaced by the Transall D, a much larger and stronger transport aircraft. However, some Noras continued flying until 1974 as flying classrooms for education of Phantom crews (Kampfbeobachter = WSO, the second crew member in the backseat). A couple of Noras flew as target tugs, and the last Nora flight in Luftwaffe service took place December 16 1980, and this plane can be seen in the Luftwaffenmuseum.
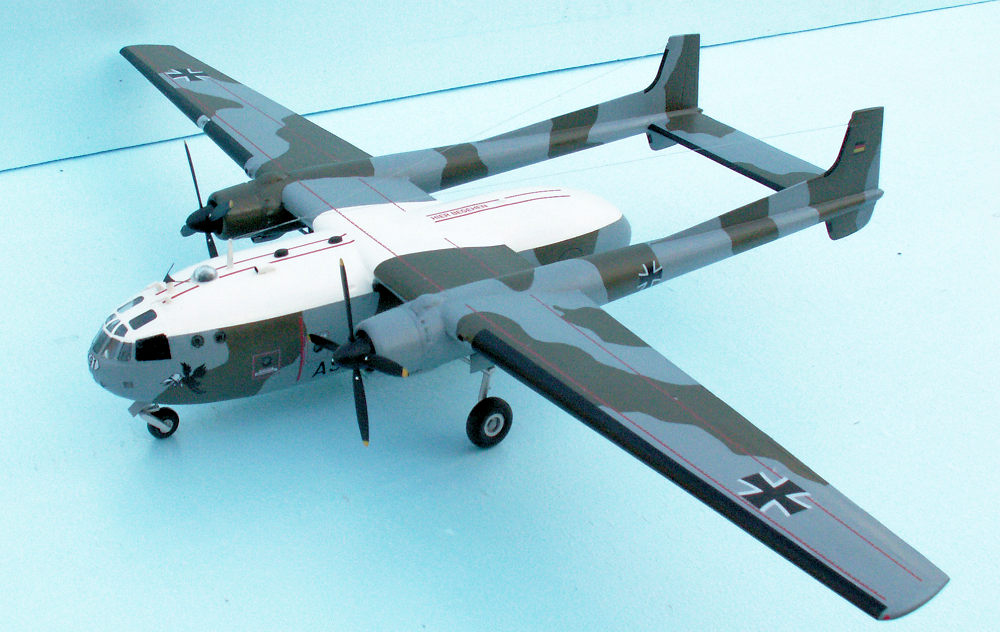
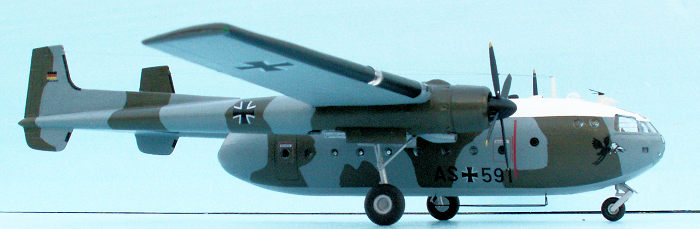
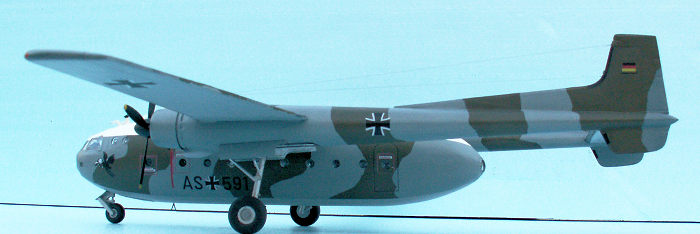
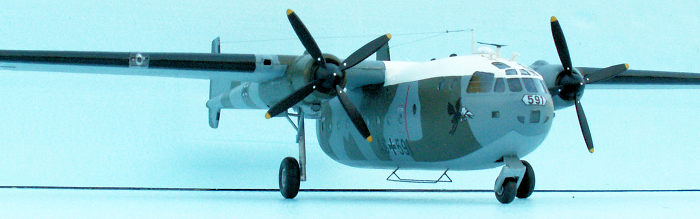
The Noratlas was not a rare guest in Kastrup Airport near Copenhagen in the sixties, mostly from the Armé de l’Air. When I visited Fuhlsbüttel Airport at Hamburg in August 1963, I got some good photos of Noratlas AS + 591 from FFS-S, and this aircraft is the subject of my model. Notable is the badge of the pilot school, the Hans “Huckebein”, which is a figure of the author Wilhelm Busch. It is a flying crow (or raven) with a handkerchief bound around its head, probably meaning “blind flying”. The Focke Wulf Ta 183 project is also known under the name “Huckebein”.
| THE KIT |
 There
are eight sprues in a light grey styrene and one sprue with the clear parts. The
instructions consists of three very large sheets printed on both sides. Page one
defines the sprues, gives a very short story of the Noratlas, and shows how to
put the central fuselage together. All in French language. Page two shows how to
assemble the wings and the twin booms with engines, main undercarriage and tail
plane. Pages three and four show how to paint and decal the six options. Page
five is a translation of the French text into English and page six is a
translation into German.
There
are eight sprues in a light grey styrene and one sprue with the clear parts. The
instructions consists of three very large sheets printed on both sides. Page one
defines the sprues, gives a very short story of the Noratlas, and shows how to
put the central fuselage together. All in French language. Page two shows how to
assemble the wings and the twin booms with engines, main undercarriage and tail
plane. Pages three and four show how to paint and decal the six options. Page
five is a translation of the French text into English and page six is a
translation into German.
There are a couple of options: Two different canopies and two different fins. None of the canopies are correct, however, the three front windows are too low by some 2 mm. The difference between the fins is the length of the fin fillet. The short one is for version one of the French aircraft – and for the support plane of Patrouille de France, when they flew the Magister (not an option of the kit!) The long fins are for all the other options. I know that a few German Noras had the short fins, they might have been among the French built aircraft.
The two fuselage halves did not fit together, because the port half was warped in the rear end, meaning that it was about 4 mm too low and thus impossible to marry to the starboard half. This part should be sent back to the Replacement Part Service of Heller, and I know from experience, that this service works. A couple of years ago I got a canopy for the De Havilland DH 89. It was missing with the kit. I choose, however, to take care of this warping problem in my own way – an extra challenge!
 Some of
the parts have a bad fit. The main undercarriage is not perpendicular with the
ground on the assembled model. The legs lean outwards by about 5 degrees. The
wing construction is too weak, and it is not possible to achieve the right
dihedral. The outer wings get an anhedral because of their mere weight. There
are no engine details at all. However, the large spinners almost cover the front
opening of the cowlings leaving not much to see any way – especially if the
inner sides of the cowlings are painted in a dark color.
Some of
the parts have a bad fit. The main undercarriage is not perpendicular with the
ground on the assembled model. The legs lean outwards by about 5 degrees. The
wing construction is too weak, and it is not possible to achieve the right
dihedral. The outer wings get an anhedral because of their mere weight. There
are no engine details at all. However, the large spinners almost cover the front
opening of the cowlings leaving not much to see any way – especially if the
inner sides of the cowlings are painted in a dark color.
The decals are definitely not to a Cartograf standard, and the carrier film is yellowed – very much! The decal sheet from HaHen (short for Harald Hensel) offers options for all 186 German Noras. This is a very good solution to the decal problem, if you want to make a Luftwaffe Nora. These decals are of a high quality, even if the type of letters and numerals are not entirely correct compared to photos of the real thing. The carrier film covers the entire sheet, and each decal must be cut close to each design - 0.5 to 1 mm. The decals are very easy to apply, and corrections are easy to do with a small drop of water.
| CONSTRUCTION |
If all
parts were as they should be, it would be a piece of cake to assemble the
fuselage. First the office parts must be glued together, including the nose
wheel well and all the twenty four circular windows of the cabin. There is
definitely a need for some nose weight. The instructions recommend 20 g “in the
nose”. However, there is very little room in the nose. The office floor with
pilot seats and gear plus the nose wheel well leaves not enough room for 20 g –
unless you can afford gold or osmium as weight! The best solution is to put a
lot of lead or brass on the floor behind the second bulkhead (with the opening
to the
 cabin, part no 41). I used 56 g of lead. This weight makes it impossible
to get the model into a tail sitting mode.
cabin, part no 41). I used 56 g of lead. This weight makes it impossible
to get the model into a tail sitting mode.
The real problem was how to glue the fuselage halves together with the rear end of the port half being up to four mm too low. First thing to do was cutting away the vertical end to the rear of the large recess for the wing. Now it was possible to force the upper edge of the rear fuselage half sufficiently upwards to get into contact with the starboard half. However, one thing is to force the warped fuselage half in place with your fingers, another is to fix it long enough for the glue to harden. I solved this problem in the following way:
The two recess halves were not in alignment, and this should be taken care of first. I cut a 1.5 mm plastic board to a size corresponding to the united recess halves minus a couple of mm in each side and end. With this alignment plate glued in place on the underside of the recess, this would force the two recess halves in alignment. To do this, it was a good measure that I previously had cut the vertical end to the rear of the recess away, because it offered sufficient room for using a forceps that can be locked as a clamp, until the glue is set. This operation has to be done simultaneously with the assembly of the fuselage halves. I exercised all the movements for this operation three or four times without glue, until I knew exactly what to do and in the right order. A genuine challenge!
The rear fuselage shells should be glued together, before they are glued to the fuselage. An option is to let the shells open for a diorama. In this case painting of the interior is necessary, as well as the inner sides of the shells. The clear parts with windows (69 + 70) should be glued to the shells. The closed loading doors (shells) have a bad fit to the rear end of the fuselage and require a lot of sanding and filling.
The canopy is not correct, the three front windows being too low by about 2 mm. The solution to this problem might be to heat form a new canopy from acetate. However, since the canopy profile seemed right as seen from the side, I decided to file away the horizontal framing in the top of the windows and in this way make them 2 mm taller. To obtain a new framing would only be a question of correct masking before the paint job.
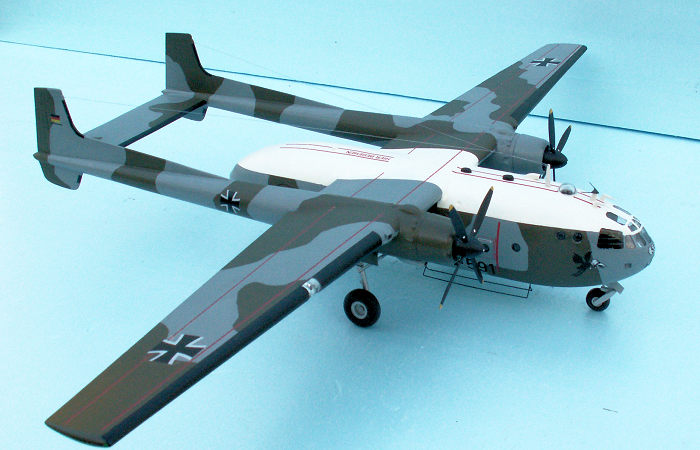
 On a
twin boomed aircraft it is very important with a perfect fit of the boom parts.
Heller did a good job in this respect, I must say. A problem, however is to get
the main undercarriage legs perpendicular to the ground. When all the parts are
assembled, the legs are canting outwards by about 5 degrees. The reason for this
is a half mm too low position of the holes for parts no 22 and 23 in parts no 9
and 11 – the inner halves of the booms. It is not possible to detect this flaw
before the assembly. After the assembly it is too late!
On a
twin boomed aircraft it is very important with a perfect fit of the boom parts.
Heller did a good job in this respect, I must say. A problem, however is to get
the main undercarriage legs perpendicular to the ground. When all the parts are
assembled, the legs are canting outwards by about 5 degrees. The reason for this
is a half mm too low position of the holes for parts no 22 and 23 in parts no 9
and 11 – the inner halves of the booms. It is not possible to detect this flaw
before the assembly. After the assembly it is too late!
I found a solution to this problem, too. By cutting parts no 22 and 23 close to the legs, and gluing them together again, it was possible to reduce the canting problem to almost nothing.
The wings are extremely long – and flexible, and without a strong wing spar, this means that the wings alone by their own weight destroy the dihedral and makes it into an anhedral. The only way to avoid this problem is to build in a non- flexible wing spar before the wing halves are glued together. This spar might be a tube of brass or acryl, or even better: a piece of v-shaped alu-profile. However, the profile should also cover the central wing. In other words: A full span non-flexible wing spar is needed, if you want the correct dihedral on your Heller model of the Noratlas. The wing spar must be bent according to the dihedral before being glued in place in the central wing.
Of course I did not do this wing modification, because I did not have the necessary experience with the kit. However, it is different now and I know exactly what to do, if I build another Noratlas some day. The fin should be the long one, part no 61. The short fin is probably for early aircraft, until the long fin fillet was improving the longitudinal stability.
| COLORS & MARKINGS |
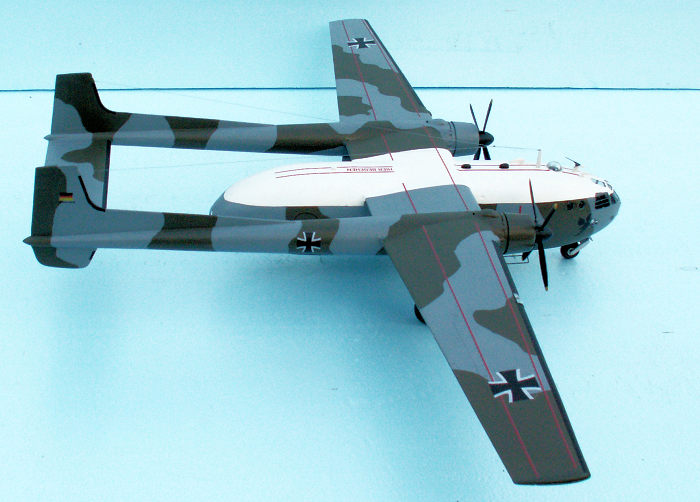
The
standard color scheme of a Nora from FFS-S in 1963 is as follows: A camouflage
pattern of Basaltgrau RAL 7012 and Gelboliv RAL 6014 on all upper and side
surfaces and the booms. Upper side of the fuselage is white to reflect the
sunshine. Under side of the fuselage is Silbergrau RAL 7001. I used Revell Aqua
colors: For the camouflage 57 Grau and 46 Nato-Oliv, the underside 76 Hellgrau,
and HB 22 Gloss white for the top. In 1963 the aircraft were without the
day-glow areas on the nose, the fins, the cowlings and the wing tips. It is
noted that the booms don’t have the Hellgrau on the undersides. An exception is
the large intake under the c owlings! A camouflage pattern is shown on a sheet
coming with the HaHen decal sheet, and this may serve as a guideline. The
Noratlas aircraft were camouflaged in the same way as the F-84F Thunderstreaks,
all of which had individual camouflage patterns. No matter how you make the
camouflage pattern for your Luftwaffe F-84F, there will always be an aircraft
among the 450 with a similar pattern. The Noratlas aircraft did also all have
their own individual pattern of camouflage.
owlings! A camouflage pattern is shown on a sheet
coming with the HaHen decal sheet, and this may serve as a guideline. The
Noratlas aircraft were camouflaged in the same way as the F-84F Thunderstreaks,
all of which had individual camouflage patterns. No matter how you make the
camouflage pattern for your Luftwaffe F-84F, there will always be an aircraft
among the 450 with a similar pattern. The Noratlas aircraft did also all have
their own individual pattern of camouflage.
The camouflage procedure was: Masking and painting of the fuselage top and central wing top , HB 22 gloss white. Masking and painting of the underside of the fuselage with 76 Hellgrau. Masking and painting of the fuselage, wings, booms and fins with 57 Grau. Marking of the camouflage pattern with a soft pencil, and painting with 46 Nato-Oliv.
The undercarriage legs are aluminium Revell Aqua aluminium 99. The tires are rubber black, Tamiya XF85, The de-icing devices of the wings, tail plane and fins, and propeller blades and spinners are Engine Black Flat, Model Master 4888. Propeller tips are yellow, Model Master RLM 04 Gelb 4771. Navigation lights were marked with uni Posca red and green 0.7 mm marking pens.
The white top of the fuselage needed five layers of HB 22 before the paint covered properly. All clear parts were either masked or covered. The twenty four circular cabin windows each got a protective roundel punched with a 4.2 mm punch from 6 mm Tamiya tape. The other windows in the nose or in the rear were covered with small pieces of Tamiya tape meticulously cut into the right shapes. The masking of the canopy was of special importance, because the paint should make the new horizontal top framing of the three front windows. When the paint job was finished, it was a pleasure to remove all the masking tape and watch the appearing of all the glazed areas. Only two or three spots needed a light touch up.
Before the decaling, the whole aircraft got a layer of gloss varnish, with the exception of the white top, which was painted with a gloss white. The decaling of the model was easy with the decals from HaHen. The only difficult item was the front marking with the three numerals of the NATO code: AS + 591. The style of these small numerals is quite different from the style used on the actual aircraft! It was probably a soldier without education in sign painting, who was ordered to make the nose marking on the aircraft.
 The
badge of the Noratlas unit of FFS-S, Ausbildungsgruppe B, is the Hans “Huckebein”,
a flying raven with a handkerchief around its head. The Huckebein decal is far
too big, almost twice the size of the badge of the real aircraft. The blue
colors of the badges of LTG 61, LTG 63 and WS 50 are too dark. Only the badges
of LTG 62 are correct: a white elephant on a black disc. The resurrected LTG 62
had Huckebein as badge.
The
badge of the Noratlas unit of FFS-S, Ausbildungsgruppe B, is the Hans “Huckebein”,
a flying raven with a handkerchief around its head. The Huckebein decal is far
too big, almost twice the size of the badge of the real aircraft. The blue
colors of the badges of LTG 61, LTG 63 and WS 50 are too dark. Only the badges
of LTG 62 are correct: a white elephant on a black disc. The resurrected LTG 62
had Huckebein as badge.
After the decaling, the whole model got a layer of HB Satin Cote to protect the decals and provide a realistic finish to the model.
A few smaller pieces were added to complete things. This included the twin pitot tubes on the roof of the office, the ILS antenna in front of the astrodome, the radio antenna mast behind the astrodome with wires to the fins, the intake for cabin air behind the radio mast, and the large antenna placed low on the starboard side of the fuselage behind the nose wheel.
| CONCLUSIONS |
Heller’s 1/72 Noratlas is the only game in town in this scale. Another Noratlas kit is to a 1/170 scale – and a Heller product, too. This is definitely too small for a proper model. Faller used to have a Noratlas kit to a 1/100 scale. The standard transport aircraft of Armé de l’Air and Luftwaffe for almost two decades should be a popular subject as a model – in the least in France and Germany. However, fighter aircraft are far more popular than transport aircraft. That is a pity. The Noratlas kit is recommendable for modelers with an average skill, however, it is not an easy built – not because of the warped fuselage half, which I suppose is not a standard with the kit! It would be great, if Heller would release a new tool Noratlas without the flaws of the old kit from the seventies.
| REFERENCES |
Wikipedia: Nord Noratlas – article in German
Wikipedia: Flugzeugführerschule “S” – article in German
Photos of FSS-S Noratlas AS+591 at Fuhlsbüttel Airport, Hamburg August 1963
Paul A Jackson: German Military Aviation 1956-1976, ISBN O 904597 03 2
2 March 2018
Copyright ModelingMadness.com If you would like your product reviewed fairly and fairly quickly, please
contact
the editor or see other details in the
Note to
Contributors. Back to the Main Page
Back to the Review
Index Page
Back to the Previews Index Page