Revell 1/72 SE.535 Mistral
| KIT #: | 4172 |
| PRICE: | $5.00 when new |
| DECALS: | Two options |
| REVIEWER: | Spiros Pendedekas |
| NOTES: | Reboxed Heller kit |
| HISTORY |
The SE.535 Mistral (aka Vampire FB.53) was a licensed upgraded Vampire built by French SNCASE, basically utilizing a more powerful Rolls Royce Nene engine and a Martin Baker ejection seat. While not faster than the standard Vampire, due to the airframe’s Mach limitations, it was among the best performing and most refined single seat Vamps.
 The
Mistral emerged from the need to power up the somewhat underpowered Vampire.
The post WWII rapidly developing French aircraft industry resumed De
Havilland studies to install the more powerful, yet slightly bigger
Rolls-Royce Nene engine (also licensed built in France by Hispano) in the
Vampire, in place of the Goblin.
The
Mistral emerged from the need to power up the somewhat underpowered Vampire.
The post WWII rapidly developing French aircraft industry resumed De
Havilland studies to install the more powerful, yet slightly bigger
Rolls-Royce Nene engine (also licensed built in France by Hispano) in the
Vampire, in place of the Goblin.
The required modifications included a slightly wider fuselage and new air inlets, with their prosperous design eliminating the need of the top mounted paired scoops witnessed at British and Australian Nene-powered Vampires.
The first Mistral to see service was the SE.532 using the Nene 102 engine and a fixed seat, of which 97 entered service. Later on, the SE.535, of which another 150 were delivered was introduced, featuring a licensed built Martin Baker ejection seat, using the Nene 104 and capable of carrying bombs or rockets.
The Mistral operated with the Armee de l'Air from 1952 and was eventually phased out of service in 1961. All Mistrals were built in the SNCASE Marignane plant.
| THE KIT |
Introduced by Heller in 1979
and reboxed about 40 (!) times till 2012 from quite a few companies, practically
covering all Vampire versions with the use of alternate sprues, this kit is the
definition of “venerable”.
The specific kit was the 1991 Revell Mistral reboxing. It came in a small side
opening typical Revell blue box, with a nice boxart of an ascending, lightly
banking Mistral over a snowy mountain area. By opening the box I was greeted
with four sprues of silver colored styrene, the three of them being common to
all Vampire/Mistral versions, whereas the fourth specifically assigned to the
Mistral, containing the correct for the Mistral fuselage halves, intakes, air
brakes, wheels, ejection seat and exhaust nozzle.
Molding is good, with just a bit of flash here and there. Apart from the moving
surfaces' borders, detail is raised all around, looking good. Cockpit features a
correctly shaped but average looking seat, a stick, an instrument panel with
nicely molded instruments (onto which a decal can optionally be affixed), and a
gun sight. If you go for a closed canopy, the narrow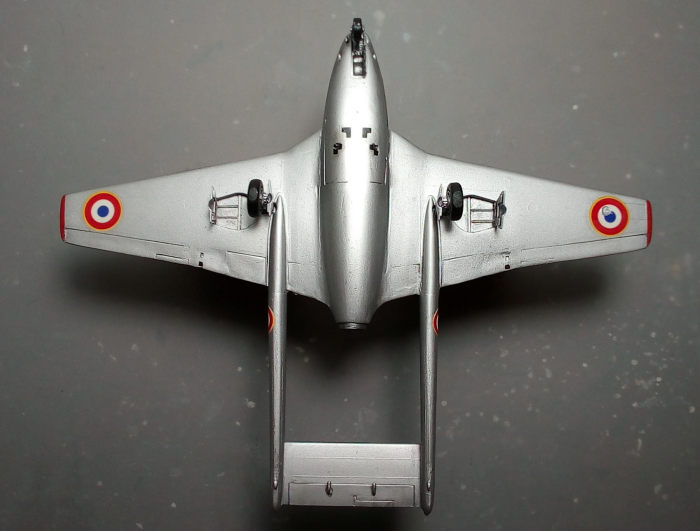 cockpit opening and overall black color guarantee that, apart from the seat top
part, nothing else will be practically visible, so the not too busy cockpit
looks will be un-noticeable…
cockpit opening and overall black color guarantee that, apart from the seat top
part, nothing else will be practically visible, so the not too busy cockpit
looks will be un-noticeable…
The landing gear is well represented: gear legs are scale correct and quite
detailed, wheels have the correct rims, with the front one capturing the
distinctive square profile nose tire looks. Wheel wells are passable and the
same can be said for the exhaust nozzle.
Clear parts are well molded and reasonably clear, but overly thick: if you opt
for an open canopy or just wishing for more clarity, you might consider going
aftermarket.
Instructions are the typical nice old style Revell, with the simple construction
spread in 11 clear steps. Color callouts are given everywhere in Revell color
codes, meaning having your conversion charts handy if you use other paint
brands. Camo suggestions are equally clear, with two more or less identical
schemes in overall silver with the wingtips and bullet fairing fin bases done in
red. Decals were very old, printed in 1990 by Revell of Germany, with correct
color shades, but slightly off-registered and with a lot of carrier film around
them.
Since I have an affection for old / stock kits, joyfully grabbing them upon discovering them, especially if found cheap, I could not resist grabbing this one back in 2004, discovered at a toy/bookshop in my hometown. Since then, it was only after 17 years that I decided to build it, with the plan to send it as a Christmas present to a beloved friend in France.
| CONSTRUCTION |
I started by attaching the
instrument panel and rear bulkhead onto the cockpit floor, then attached the
cockpit at the starboard fuselage half. Vampire kits are glorious candidates for
severe tail sitting,
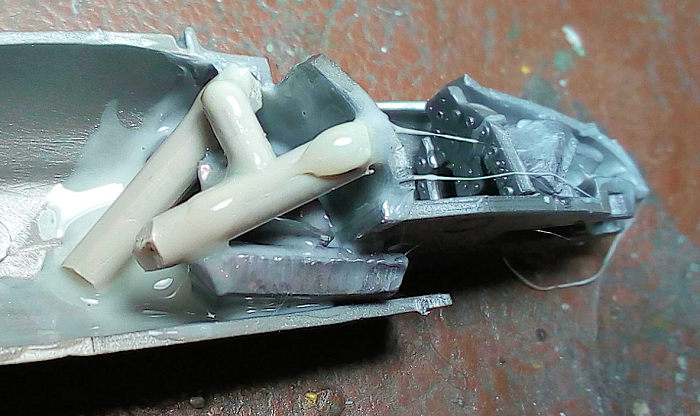 so I took
no chances: not only I stuffed as many tiny lead weights at the front as I
could, but I also added ample extra weights beside the cockpit rear bulkhead.
All were secured by a combination of styrene rods that created a “cage” around
the weights and liquefied styrene that coated them. I then joined the fuselage
halves, followed by attachment of the lower front part that contains the nose
wheel well and the bland gun openings, which were successively drilled out for
extra realism.
so I took
no chances: not only I stuffed as many tiny lead weights at the front as I
could, but I also added ample extra weights beside the cockpit rear bulkhead.
All were secured by a combination of styrene rods that created a “cage” around
the weights and liquefied styrene that coated them. I then joined the fuselage
halves, followed by attachment of the lower front part that contains the nose
wheel well and the bland gun openings, which were successively drilled out for
extra realism.
I love subassemblies, joyfully discovering quite a few of them, even at this
small, uncomplicated kit. Those were the two 4-piece wings and the two 2-piece
booms, which were assembled.
One point of interest when building twin boom models with less than perfect fit
(such as this kit), is the alignment of the complete fuselage / wings / booms /
horizontal stabilizer assembly: there are quite a few ways to deal with it, my
preferred one is to join everything at once and, with glue still uncured, to
adjust the general alignment, repositioning by hand the individual parts; when
feeling satisfied, I usually place the model onto some sort of support (paint
bottles and the like…) with each of the individual parts supported/held at the
correct angle, then let the model cure, frequently rechecking the alignment.
This is what I did with the Mistral.
Overall fit of the above elements was average, the resulting gaps initially
treated with liquefied styrene, then sanded smooth. I was ready to proceed to
puttying, when, to my dismay, I discovered some areas of the fuselage being
shrunk: those were the areas where blobs of liquefied styrene (that I had
beforehand used for securing the lead weights) had “stagnated” at some innard
areas, producing dreaded shrinkage spots at the outsides, meaning having to wait
a couple of days for the shrinkage to stop (also meaning being very careful with
liquefied styrene, only spot-applying tiny amounts, since any bigger blob of it
will melt and ruin your beloved model's surface...).
Upon shrinkage stopping (which can be witnessed by the plastic not being soft
anymore), I applied generous amounts of filler, not only at the shrunk areas,
but also at all areas needing attention (quite a few of them). In fact I was
amazed by the amount of putty that had to be used on such a small model,
deserving the name “Minuscule Putty Queen”!
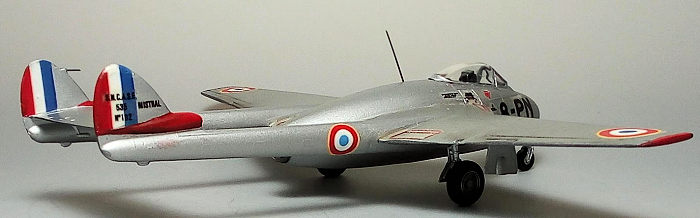
I continued by adding some stretched sprue pieces inside the main wheel wells to
make them look busier and then added the distinctive mass balances under the
horizontal stabilizer. Landing gear and wheel wells were supposed to be
“silver”, as the camo “color”, so I was only too keen on adding the landing gear
(sans the wheels), including the nicely detailed doors, at that stage. After
letting the model rest on its legs and performing the necessary alignments, I
let the glue cure overnight, with the next morning heading to the paint shop!
| COLORS & MARKINGS |
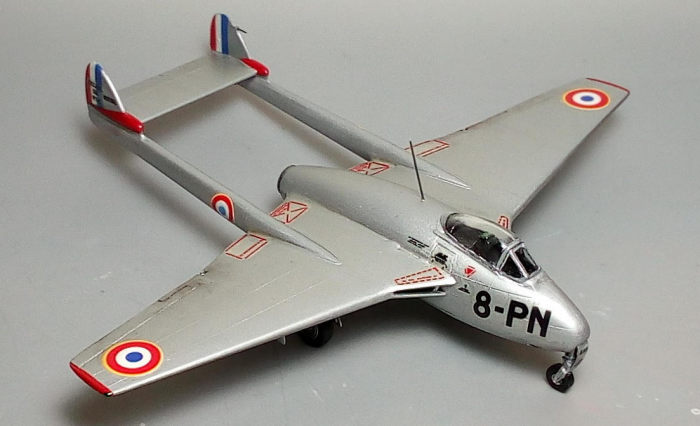
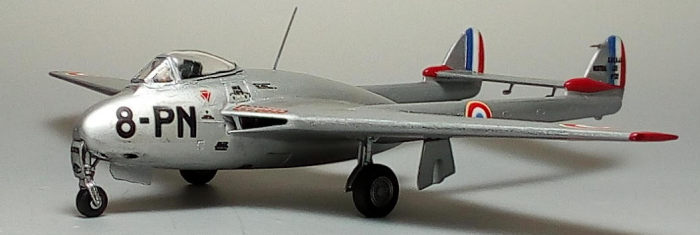
 Few things
are more joyful than painting “silver” a petite model of a beloved plane, where
the complete landing gear is already attached, having to be painted the same
color! I thus went on and applied Hu11 Silver allover, which dried to a nice,
kind of “High Speed Silver” shade. Regarding my filling and sanding job results
(which became more than obvious with silver paint…), while not perfect, they
were deemed “passable” (translation: I was too lazy to go on another
filling/sanding/painting loop…). Upon drying, the wingtips and fin base bullet
fairings were masked and red was applied, with decals to follow!
Few things
are more joyful than painting “silver” a petite model of a beloved plane, where
the complete landing gear is already attached, having to be painted the same
color! I thus went on and applied Hu11 Silver allover, which dried to a nice,
kind of “High Speed Silver” shade. Regarding my filling and sanding job results
(which became more than obvious with silver paint…), while not perfect, they
were deemed “passable” (translation: I was too lazy to go on another
filling/sanding/painting loop…). Upon drying, the wingtips and fin base bullet
fairings were masked and red was applied, with decals to follow!
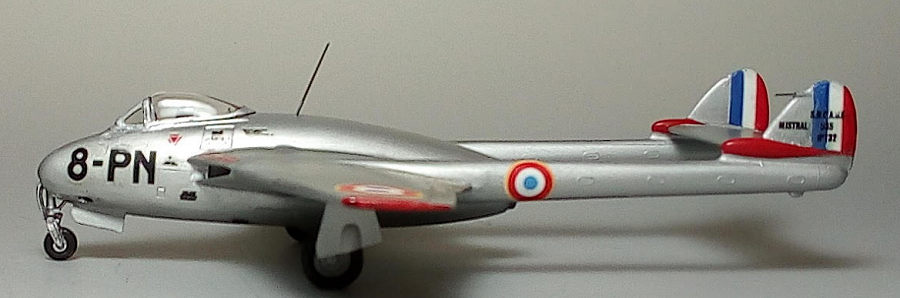
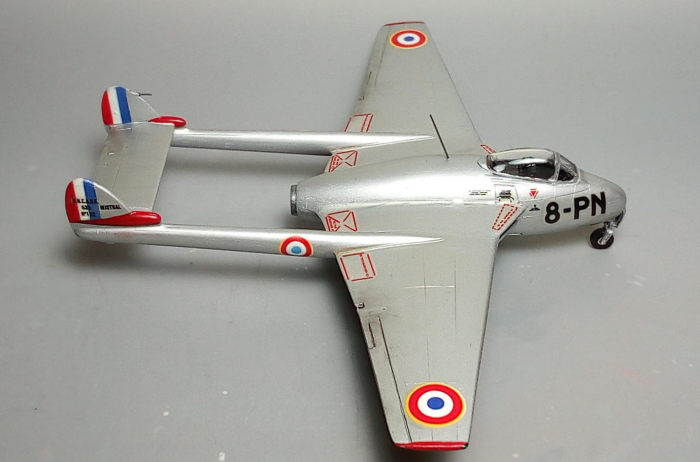
I decided to depict #152 “8-PN” subject, based in Maghreb, purely because the
“8-PN” code was all black (the other option, "7-CO", featured some white that
bled through the black borders…). While the 30 year old decals detached from
their backing paper easily and seemed to adhere positively onto the level silver
areas, they refused to follow any curvy surface whatsoever. With the help of
droplets of Future as “bonding” agent, I somehow manage to lay all of them,
except for the boom roundels that disintegrated and I had to use leftover ones
from the decal dungeon.
Continuing with the decals’ issues, since there was quite a lot of excess carrier film, I faced some problems when I had to trim it at the fin French flags areas, with the decals starting to partly disintegrate, having to retouch the offended areas with a 10/0 brush.
After completing the challenging decal session, I gave all decals a sealing coat of Future.
| FINAL CONSTRUCTION |
All cockpit innards, including the control stick and also the rear view
anti-glare area were painted black. A decal is supposed to be affixed onto
the nice instrument panel, but I preferred to dry brush it with silver and
add a few red, white and yellow “knobs” with a 10/0 brush. The seat’s basic
color was black, with dark green head cushion and light green rest of the
cushions and parachute cover. After having blue (per the French “tradition”)
seat belts added from painted masking tape, the seat was attached in
position.
 The
main wheels were tad filed to look “weighted”, then all tires were painted
black and subsequently attached. The exhaust nozzle had its mounting lugs
shaved-off, in order to be able to fit into the rear, then it was painted
Testors Burned Metal and attached.
The
main wheels were tad filed to look “weighted”, then all tires were painted
black and subsequently attached. The exhaust nozzle had its mounting lugs
shaved-off, in order to be able to fit into the rear, then it was painted
Testors Burned Metal and attached.
Apart from a black wash, mainly in the wheel wells and some dirtying on the
tires and ailerons hinges areas with brown dry pastels, no other weathering
was performed, as all pics show Mistrals nice and clean. A satin coat gave
the model its final shade.
The transparencies had their frames hand painted silver and attached,
together with the tiny but noticeable gunsight. Fit of the front windscreen
was less than perfect, leaving significant gaps at its fuselage attachment
points, which were filled with white glue. The port fin pitot, as well as a
distinctive shoulder mounted antenna mast were fabricated from stretched
sprue and attached. The wingtip lights were represented by mini blobs of red
and green paint and the port underwing lens was made by a blob of Clearfix
onto the already silver recession.
I then called this beautiful “evolved Vampire” done!
| CONCLUSIONS |
The Revell (Heller rebox) Mistral, though old mold, has good general shape, while detailing is average. Heller went all the way addressing the differences between the Vampire and the Mistral, by providing different dedicated sprues for each version, something not that common in the late 70s. Build is not that challenging, though, truth be told, Heller kits should somehow be treated as limited run kits nowadays (absence of locating pins, test fitting before gluing, lots of puttying and the like...).
Decals (in my Revell rebox) were slightly off registered, whereas their age imposed some serious challenges requiring extra care during application, with a couple of them destroyed. Transparencies are not bad, but the windscreen presented some serious fit issues, possibly being a short shot at my case. An omission is the absence of wing tanks, something that Mistrals and a number of Vampire versions used to carry: there are aftermarket ones available (together with bulged, gorgeous looking wheels, vacuformed canopies and interesting decal options).
 Those molds
have been reboxed almost 40 times since 1979; with production seemingly halted
in 2012 (though, who knows, Heller might “surprise” us in the future!), these
kits are not easy to find, as of 2021.
Those molds
have been reboxed almost 40 times since 1979; with production seemingly halted
in 2012 (though, who knows, Heller might “surprise” us in the future!), these
kits are not easy to find, as of 2021.
Special Hobby came with a modern tool 1/72 Vampire in 2014, the Mistral version
covered by the “cousin” Azur (with extra resin goodies). Those kits, though
still not totally “mainstream”, look very well appointed with great details for
the scale, being sensibly priced. Since they build well, too, as Torben Plesberg
demonstrated in his excellent SH
Vampire FB.52 build, these kits are the way to
go if you want a modern, detailed Vampire/Mistral. Revell also took the chance
and reboxed the SH kit in 2017, as the F Mk.3 version.
Despite the extra
attention (and extra putty!) that was required, construction of this old Heller
mold was uncomplicated and I had a great time putting it together. Painting was
a snap, whereas decals needed their attention due to age. If you like the
Vampire/Mistral and you happen to own such a kit, or find a leftover one
somewhere, grab it and build it: at no time you will come up with a respectable
representation of this iconic plane, a nice minuscule model in your showcase.
Happy modeling!
Spiros
Pendedekas 9 May 2022 If you would like your product reviewed fairly and fairly quickly, please contact the editor or see other details in the
Note to
Contributors.