
Heller 1/48 Alouette II
| KIT #: | 80479 |
| PRICE: | $ |
| DECALS: | One option |
| REVIEWER: | Spiros Pendedekas |
| NOTES: | New tool kit |
| HISTORY |
 The Alouette II was a widely used type and popular with operators, with over
1,300 rotorcraft eventually being constructed between 1956 and 1975. The
type was predominantly used for military purposes in observation,
photography, air-sea rescue, liaison and training, but it has also carried
anti-tank missiles and homing torpedoes. It has additionally been used for
casualty evacuation (with two external stretcher panniers), crop-spraying
and as a flying crane, with a 500-kilogram (1,100 lb) external underslung
load.
The Alouette II was a widely used type and popular with operators, with over
1,300 rotorcraft eventually being constructed between 1956 and 1975. The
type was predominantly used for military purposes in observation,
photography, air-sea rescue, liaison and training, but it has also carried
anti-tank missiles and homing torpedoes. It has additionally been used for
casualty evacuation (with two external stretcher panniers), crop-spraying
and as a flying crane, with a 500-kilogram (1,100 lb) external underslung
load.| THE KIT |
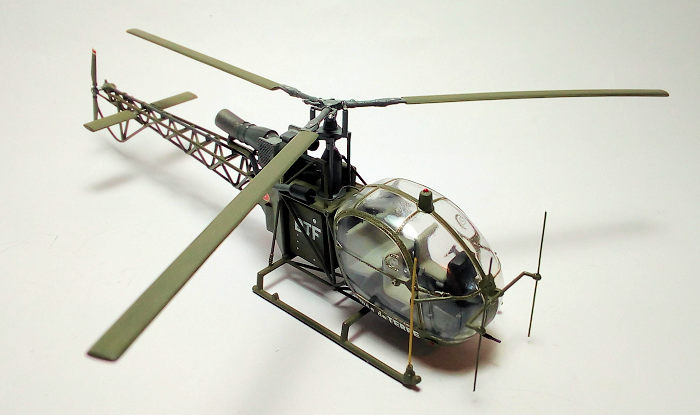
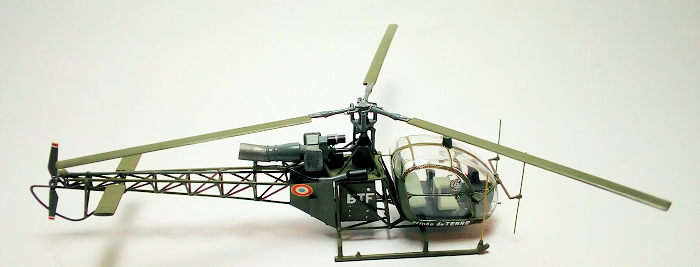
 Upon opening the box, you are greeted with almost 90 well molded flash free
pieces in two olive styrene sprues and a nice clear fret. The number of
parts is not small, indicating Heller’s commitment to realistically render
the Alouette II “all exposed” distinctive posture. Especially if one
considers the 1967 kit origins, cockpit, exposed turboshaft engine, rotor
hub and blades, rear rotor and driving shaft, structural framing and various
supports, skis, all are adequately represented (leaving room for a lot of
super detailing, for sure). The characteristic bubble canopy is very wisely
split along its middle frame line and, with a little extra modeler’s
attention, the assembled canopy will almost look seamless. Finally, for
making the three rod antennas, a piece of fine wire is included.
Upon opening the box, you are greeted with almost 90 well molded flash free
pieces in two olive styrene sprues and a nice clear fret. The number of
parts is not small, indicating Heller’s commitment to realistically render
the Alouette II “all exposed” distinctive posture. Especially if one
considers the 1967 kit origins, cockpit, exposed turboshaft engine, rotor
hub and blades, rear rotor and driving shaft, structural framing and various
supports, skis, all are adequately represented (leaving room for a lot of
super detailing, for sure). The characteristic bubble canopy is very wisely
split along its middle frame line and, with a little extra modeler’s
attention, the assembled canopy will almost look seamless. Finally, for
making the three rod antennas, a piece of fine wire is included.| CONSTRUCTION |
 Rotor shaft assembly, main hub (sans blades, which were painted airframe
color), engine driving shafts and rear transfer gearbox were painted Hu140
Gull Gray.
Rotor shaft assembly, main hub (sans blades, which were painted airframe
color), engine driving shafts and rear transfer gearbox were painted Hu140
Gull Gray.| COLORS & MARKINGS |
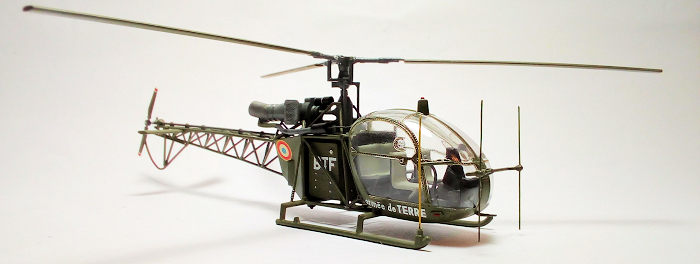
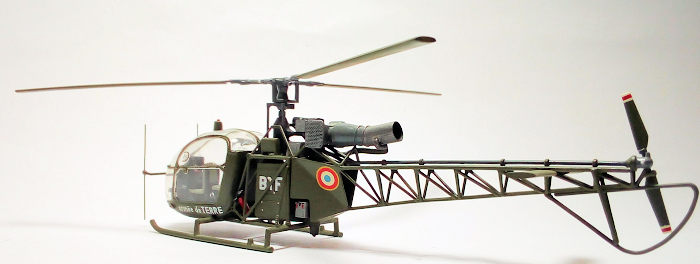 Basic color would be Hu86 Light Olive, as per instructions. I was very
tempted to start airbrushing the complex basic structure, but, fearing that
airbrushed paint will not reach all “hidden” areas, I restrained myself and
proceeded to hand brushing, using relatively thin paint, with my trusty
Humbrol #2 senator paint brush. I have to admit that I have always been very
pleased with the brush painted results of Humbrol green (among others)
enamels, as it was the case here. Even the front blades and rear rotor were
hand painted and, among drying, it was difficult to tell if they were hand-
or air brush- painted. The assembled canopy had its frame lines and rest of
details carefully hand painted too, with my 10/0 Springer Pinsel synthetic
brush.
Basic color would be Hu86 Light Olive, as per instructions. I was very
tempted to start airbrushing the complex basic structure, but, fearing that
airbrushed paint will not reach all “hidden” areas, I restrained myself and
proceeded to hand brushing, using relatively thin paint, with my trusty
Humbrol #2 senator paint brush. I have to admit that I have always been very
pleased with the brush painted results of Humbrol green (among others)
enamels, as it was the case here. Even the front blades and rear rotor were
hand painted and, among drying, it was difficult to tell if they were hand-
or air brush- painted. The assembled canopy had its frame lines and rest of
details carefully hand painted too, with my 10/0 Springer Pinsel synthetic
brush.| FINAL BITS |
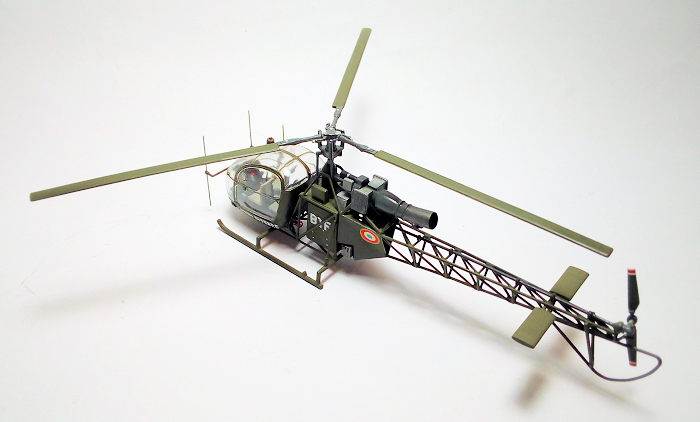
 I attached the engine and rotor shaft assy on top, followed by the
hub/blades assy. Then I attached the rear driving shaft, the rear rotor
(which had its tips painted red and white beforehand), the battery (aluminum
with red details), and the nice fire extinguisher (red with black details).
The three wire antennas were fabricated from the supplied wire piece and
affixed in position with cyanoacrylate. The starboard one was painted
yellow, whereas the front ones frame color.
I attached the engine and rotor shaft assy on top, followed by the
hub/blades assy. Then I attached the rear driving shaft, the rear rotor
(which had its tips painted red and white beforehand), the battery (aluminum
with red details), and the nice fire extinguisher (red with black details).
The three wire antennas were fabricated from the supplied wire piece and
affixed in position with cyanoacrylate. The starboard one was painted
yellow, whereas the front ones frame color.| CONCLUSIONS |
12 October 2021
Copyright ModelingMadness.com. All rights reserved. No reproduction in part or in whole without express permission.
If you would like your product reviewed fairly and fairly quickly, please contact the editor or see other details in the Note to Contributors.