| KIT #: | SH 72345 |
| PRICE: | $23.99 |
| DECALS: | Three options |
| REVIEWER: | Dan Lee |
| NOTES: | Used Special Hobby Masks |
| HISTORY |
The Super Mystère represents the final step in evolution which began with the Dassault Ouragan and progressed through the Mystère II/III and Mystère IV. While earlier Mystère variants could attain supersonic speeds only in a dive, the Super Mystère could exceed the speed of sound in level flight. This was achieved thanks to the new thin wing with 45° of sweep (compared with 41° of sweep in the Mystère IV and only 33° in Mystère II) and the use of an afterburner-equipped turbojet engine.
 The first
prototype Super Mystère B.1, powered by a Rolls-Royce Avon RA.7R, took to the
air on 2 March 1954. The aircraft broke the sound barrier in level flight the
following day. As the Super Mystère B.2, sometimes known as the SMB.2, the
aircraft entered production in 1957. The production version differed from the
prototype by having a more powerful SNECMA Atar 101G engine. A total of 180
Super Mystère B.2s were built.
The first
prototype Super Mystère B.1, powered by a Rolls-Royce Avon RA.7R, took to the
air on 2 March 1954. The aircraft broke the sound barrier in level flight the
following day. As the Super Mystère B.2, sometimes known as the SMB.2, the
aircraft entered production in 1957. The production version differed from the
prototype by having a more powerful SNECMA Atar 101G engine. A total of 180
Super Mystère B.2s were built.
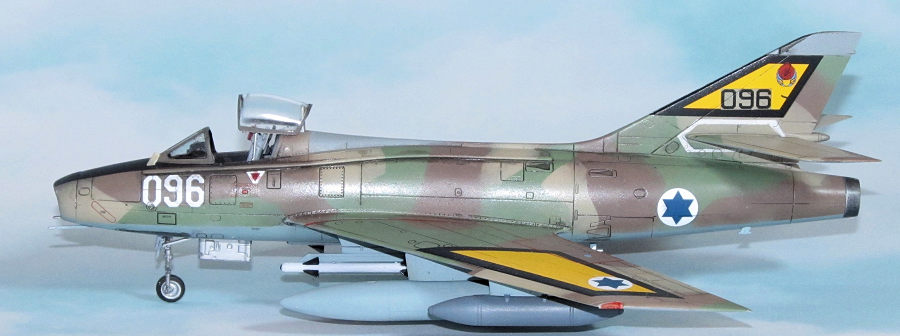
The Israelis used them extensively during the 1967 and 1973 war. Super Mystères also participated in the controversial attack on the intelligence ship USS Liberty by strafing and dropping napalm. In 1973, the Israeli Air Force and Honduras Air Force upgraded their Super Mystère B.2s with a non-afterburning version of the Pratt & Whitney J52-P8A and new avionics. In Israeli service these upgraded SMB.2s were also known as the IAI Sa'ar (Hebrew for Storm.)
| THE KIT |
This kit was originally released as a Special Hobby kit and Israeli markings with the Azur/Frrom boxings for the French versions. See Scott's preview for an idea of what is in the box. The only difference is that this kit comes with Sprue E and two Sprue Is which contains Israeli specific parts such as a new exhaust and weapons including Shafrir 2 AAMs and bombs. This is a “new” Special Hobby kit which has really crisp parts and mounting tabs on the parts and it also wasn't a headache to build.
| CONSTRUCTION |
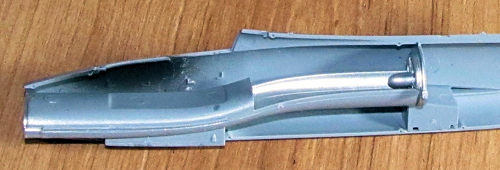 It all
began with the intake and exhaust. I glued the pieces together using Tamiya
extra thin cement and the seams were filled in with Perfect Plastic putty with
the excess putty removed using damp Q-Tips. The intake, exhaust and the various
other parts were then primed using Badger Stynylrez black primer and then
painted using various shades of Vallejo Metal Color paint.
It all
began with the intake and exhaust. I glued the pieces together using Tamiya
extra thin cement and the seams were filled in with Perfect Plastic putty with
the excess putty removed using damp Q-Tips. The intake, exhaust and the various
other parts were then primed using Badger Stynylrez black primer and then
painted using various shades of Vallejo Metal Color paint.
While priming the various intake
and engine parts, I painted the cockpit with the same black primer. I let it dry
for a day or two then added the instrument panel (IP) decal to the plastic IP
part. The wheel wells were painted with Vallejo Off White to emulate the French
creme color Dassault us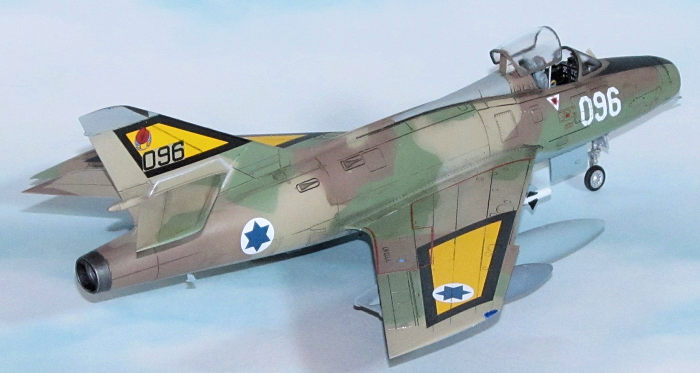 es
for the wheel wells.
es
for the wheel wells.
I added all the interior parts and put it all together using small thin lines of CA glue along all the seams. I made my one major mistake with this kit when I forgot to add noseweights as it turns out to be a tailsitter. I used CA glue to fill in the gaps around the extended tailpipe and sanded all the seams smooth using various grades of wet/dry sandpaper (220/400/600/1500.)
The wings were glued in next. I really liked the tabs except they didn't go in all the way leaving a small gap between the wing and fuselage. I ended up using 0.005 inch thick plastic sheet to fill in the gaps at the trailing edges and Perfect Plastic putty for the rest of the gap. The plastic sheet was used to allow the trailing edges to mate with the fuselage and not flex when using Tamiya Extra Thin Cement.
At this point I masked everything up and prepared the model for painting.
| COLORS & MARKINGS |
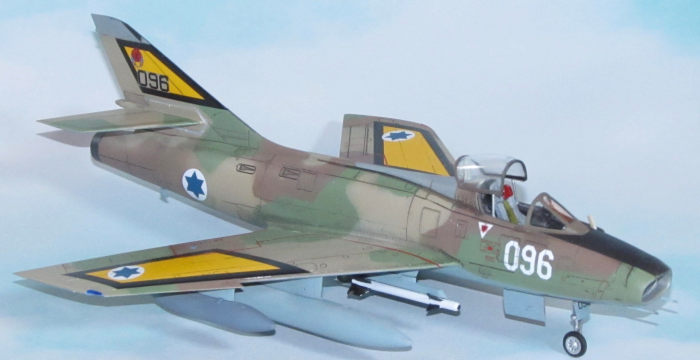
I decided to use Scheme A (096) for the model because it was the most colorful of the trio with the chrome yellow ID triangles. I used all Tamiya colors for the exterior of this model as I didn't have any more of the Gunze colors.
The model and various parts were
first primed using Badger Black Stynylrez and when it was dry I sprayed on a
very thin coat of Tamiya XF-57 Buff as the top first layer. Next I masked off
the undersides and sprayed on XF-23 Light Blue on the underside and underside of
the various landing gear parts. Once dry, I masked off all the green areas and
sprayed on XF-71 cockpit Green which was close enough to FS34227 for me. I had
the lighter green used in the update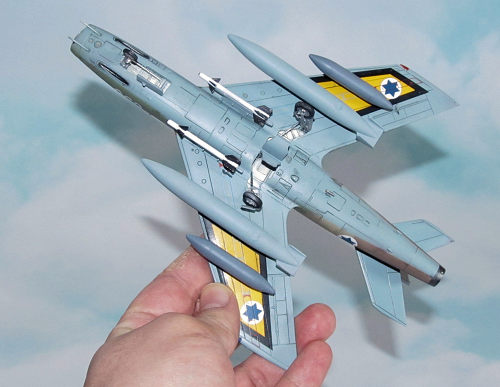 d
Netz Scheme, but it was too light so I went with the XF-71. Lastly, I made more
low tack tape masks to cover up the non brown areas and sprayed on a couple of
thin coats of XF-52 Dark Earth.
d
Netz Scheme, but it was too light so I went with the XF-71. Lastly, I made more
low tack tape masks to cover up the non brown areas and sprayed on a couple of
thin coats of XF-52 Dark Earth.
The black anti glare areas were masked off and painted using XF-1 while the grey section behind the canopy was painted using XF-80 Light grey.
Once everything was dry, I sprayed on Mission Models Gloss coat for the decals.
The decals went on without too much trouble. I used MicroSol/MicroSet and Solvaset decal solutions to soften the decals enough so they snuggled into the details without too much fuss. I was thankful that the Israeli Air Force doesn't use a lot of stencils on this particular aircraft. I didn't add the red lightning decals as I wanted it in its Yom Kippur War markings and not as a museum aircraft.
All the pictures of the Sa'ar have it very clean so I just used Tamiya black and brown enamel panel line washes to darken highlight the panel lines. The excess was removed using Turpenoid dampened Q-Tips.
Lastly I sprayed on Tamiya flat coat for the final coat.
| FINAL CONSTRUCTION |
 The
missiles, fuel tanks and napalm bombs were glued together, sanded down and
painted using the instruction color scheme. I didn't have French Dark Blue grey
for the napalm canisters so I used Xtracrlyix FS35237 instead.
The
missiles, fuel tanks and napalm bombs were glued together, sanded down and
painted using the instruction color scheme. I didn't have French Dark Blue grey
for the napalm canisters so I used Xtracrlyix FS35237 instead.
The landing gear turned out to be the most fussy of the parts. I saved some headaches by using CA glue for the attachment points. Dassault landing gear has always been complex, but in 1/72 scale it proved to be a headache to me.
It was after I attached the landing gear when I realized that the Super Mystere Sa'ar was a tailsitter. I ended up rolling small BB weights down the intake to balance it out. The weights are loose so if I move the model I have to jiggle them around till the plane sits down in the correct stance.
The various antennas, probes, pylons, weapons and fuel tanks were added last and the canopy masking was removed.
| CONCLUSIONS |
I usually don't build in 1/72 but there hasn't been a 1/48 release of this plane since the early 2000s by Fonderie Miniatures who didn't produce the easiest kits (although I have been told that the Super Mystere was actually one of their best kits.) The Special Hobby Super Mystere Sa'ar is a really nice kit to build. This was the first Special Hobby kit I've built that didn't fight me every step of the way. It makes for a really nice, easy build of a not common (in model world) French jet that served in various parts of the world. It is definitely would be the perfect short run kit for the novice to build.
Just don't forget to add nose weights.
18 March 2022
Copyright ModelingMadness.com. All rights reserved. No reproduction in part or in whole without express permission.
If you would like your product reviewed fairly and fairly quickly, please contact the editor or see other details in the Note to Contributors.