KP 1/72 Spitfire IXe
|
KIT # |
23 |
|
PRICE: |
$6.95 |
|
DECALS: |
Four aircraft |
|
REVIEWER: |
Mark Fordham |
|
NOTES: |
|
HISTORY |
The History of the Spitfire really does not need to be repeated here as anyone who has even a passing interest in aircraft can name and spot a spitfire, but the interesting aspect of this kit was the inclusion of marking for the Czechoslovakian Security Air Guard (Air Police). With clipped wings, two 20 mm cannons and two .50 cal machines guns this aircraft would have been the ultimate in police presence in post war Czechoslovakia.
|
THE KIT |
I picked up KP’s 1/72nd scale Spitfire from a NZ version of Ebay for a song ($5.00NZ) with the idea of giving it to my 8 year old son as he is forever wanting cheap models to do. When it arrived however and I had a look at the molding I was impressed enough to grab it for myself. (Yet another sad case of child abuse. :o) Ed)
 Molded in soft
white plastic with raised panel lines and “soft” detailing the KP Spitfire
reminds me a lot of the Airfix IX version but with more interior detail.
Molded in soft
white plastic with raised panel lines and “soft” detailing the KP Spitfire
reminds me a lot of the Airfix IX version but with more interior detail.
With separate wing tips for the traditional oval wing, doing a clipped wing Spit was defiantly going to be the easier of the versions to do. There is some sidewall detail in the cockpit and a nicely molded seat and control panel round of the detail in the cockpit, enough for the basics in 1/72nd scale.
Some effort has been made to try a depict the classic gull wing under the rear wing root, while not as good as the Airfix Mk I Spit but definitely better than the Italeri Mk V that I could compare it to. While on the subject of wings the KP Spitfire has the two 20mm cannons molded onto the upper wing and even after some heavy handling didn’t break off during the construction of the model.
Extras include the wing-tip extensions, Slipper tank and two bombs. Instructions for what goes with what are supplied on a really cheap piece of newsprint type paper that smelled of cats …well you know the smell. And featured painting instructions for the four versions of decals supplied with the kit. Three exploded assembly diagrams complete the information.
|
CONSTRUCTION |
Construction begins with, ha! you thought I was going to say the cockpit didn’t cha. Well in this case I started off by gluing the two upper wings to the single piece lower wing and as I had decided to do the clipped wing version from the start I consigned the wing-tips into the spares bin. The upper wing has just enough wheel-well detail molded into it to use without adding any more.
 Moving onto the fuselage next, with
the floor, seat, control stick and control panel glued in and painted it was
time to close up the two sides. fit was very good along the top and only a small
amount of sanding was needed to hide the join lines. In fact making this kit is
like re-visiting an old Matchbox or Airfix friend with it’s easy fittings and
minimal detailing.
Moving onto the fuselage next, with
the floor, seat, control stick and control panel glued in and painted it was
time to close up the two sides. fit was very good along the top and only a small
amount of sanding was needed to hide the join lines. In fact making this kit is
like re-visiting an old Matchbox or Airfix friend with it’s easy fittings and
minimal detailing.
With the fuselage together it was a simple matter to add the completed wing section and tail planes. Filler was needed around the wing roots and once sanded smooth the lost panel detail was re-scribed using an old airbrush needle. A dab of filler was also used on the tail planes but all in all very little work was needed to get this kit ready for the paint room.
The only tricky bit in the construction was the prop which consisted of a backing plate and separate nose cone, trying to get a seamless join between the two is impossible and if you have a suitable replacement one piece spinner that would be the way to go.
The blades also look a little wrong when compared to other Mk IX models that I have so a little bit of careful sanding got them looking slightly better in profile.
Undercarriage legs were added before painting so the Spit had something to sit on and in retrospect are a tad on the short side. The wheels supplied with the KP kit were too toy like and were replaced with wheels from the Italeri Mk IX.
|
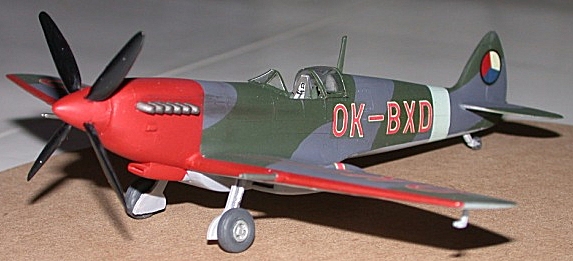
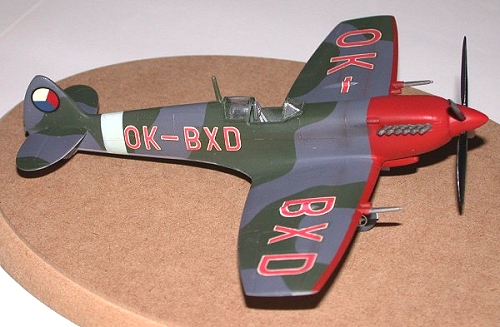
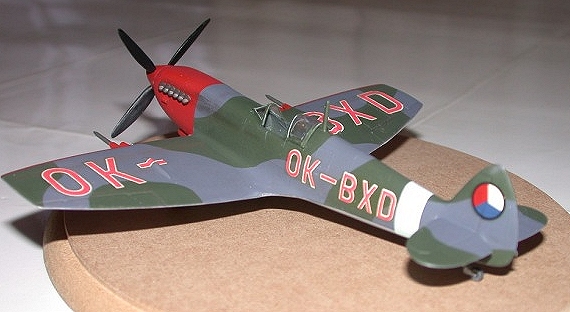
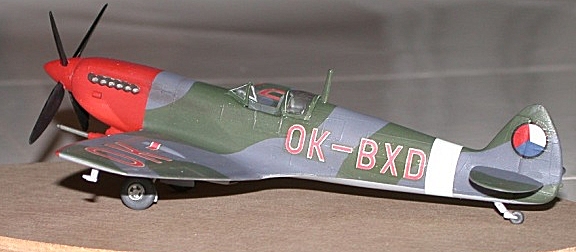
COLORS & MARKINGS |
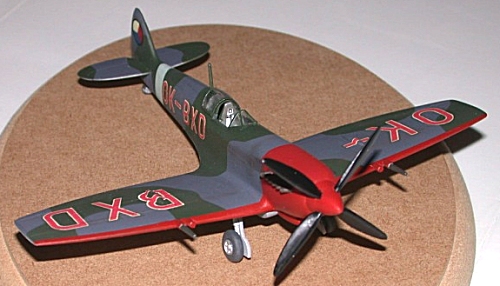 KP gives you
four decal versions, One RAF version repainted and preserved in the Air
Collection of the Military Historical Institute in Prague. One other version is
depicted as they returned home in August 1945 with original RAF style Roundels
and code letters. The third version wears the scheme given to Czech Spitfires as
it was demonstrated to the Czech public in September 1946. The Final Spitfire
featured is in the marking of the Security Air guard (SAG) which was the one
that I planed to do from the minute I spotted the decal sheet.
KP gives you
four decal versions, One RAF version repainted and preserved in the Air
Collection of the Military Historical Institute in Prague. One other version is
depicted as they returned home in August 1945 with original RAF style Roundels
and code letters. The third version wears the scheme given to Czech Spitfires as
it was demonstrated to the Czech public in September 1946. The Final Spitfire
featured is in the marking of the Security Air guard (SAG) which was the one
that I planed to do from the minute I spotted the decal sheet.
Painting of the SAG is no different from the standard RAF Spitfires with Dark Green (Humbrol HB1) and Ocean Grey (Humbrol HB3) upper camo and Medium Sea Grey (HB-6) under surfaces. These were sprayed using a Paasche Vls-90 airbrush @ 22 psi using the recommended Humbrol paints. Starting with the lightest color first and finally finishing up with the dark grey.
Once the basic colors were dry the colorful red nose and wing leading edge was masked off and sprayed using Tamiya XF-7. The final painting consisted of the RAF Sky (HB-4) band around the rear fuselage. Three light coats of Future were laid down to give the Spit a gloss coat in preparation for the decals.
Ah yes, KP Decals, printed on continuous decal film (Alps??)(Nope, just the old way of doing things as the KP Spitfire mold has to be at least 25-30 years old. Ed) that had yellowed over the years the decals looked unusable to start with, my spares box had nothing useful for the codes so with some reservation I decided to try using the kit decals. The SAG Spitfire had red wing and fuselage codes outlined with White, each color was printed separately on the decal sheet so I first cut out the white codes in blocks and trimmed as close to the letters as I dared.
 On application
to the model the white was so see-through that it almost disappeared against the
green/grey of the camo. Once all the white codes were done I went back and
repainted over the top of them with thinned white paint. The red codes were then
applied the same way and reacted well to Microscale’s Micro Sol and snuggled
down well even around the cannon bulges.
On application
to the model the white was so see-through that it almost disappeared against the
green/grey of the camo. Once all the white codes were done I went back and
repainted over the top of them with thinned white paint. The red codes were then
applied the same way and reacted well to Microscale’s Micro Sol and snuggled
down well even around the cannon bulges.
The final Czech roundels came from the spares box as the KP ones were printed off register. once all the decals had dried for a few days the Spit was given a couple of light coats of Humbrol Matt coat to dull down the gloss finish.
The canopy was crushed in this kit in transit and was toast with a big split running from front to back. I glued the two bits back together and used it as a master for a vacuformed “smash” molded replacement, as the vac replacement was in scale for thickness I carefully cut it up to display the canopy in the open position.
|
CONCLUSIONS |
A very enjoyable and for the most part hassle free build. The KP Spitfire looks accurate and apart from the short undercarriage captures the look of the Spitfire well. Decals would no doubt be replaced by the more resourceful modeler but part of the charm of this kit was the Red nosed SAG version. Recommended as an entry level model or someone happy pottering around with Airfix/Matchbox/Revell quality kits.
|
REFERENCES |
Fighting Aircraft of WWII
Copyright ModelingMadness.com. All rights reserved. No reproduction in any form without express permission from the editor.
If you would like your product reviewed fairly and quickly, please contact the editor or see other details in the Note to Contributors.
Back to the Reviews Index Page 2025