|
HISTORY |
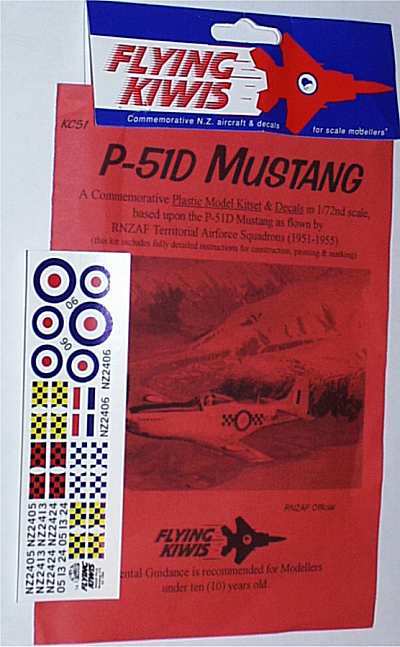
Flying Kiwis 1/72 P-51D Mustang
|
KIT # |
KC 51 |
|
PRICE: |
$10.45 NZ |
|
DECALS: |
Four aircraft |
|
REVIEW & |
Mark Fordham |
|
NOTES: |
Flying Kiwis utilise the Hasegawa P51D mouldings with locally produced Decals and Instructions. |
|
HISTORY |
The North American P-51D Mustang an especially versatile and effective attack
aircraft, it was ordered to replace the 12 operational squadrons of Chance
Vought Corsair’s that served New Zealand so well in the Pacific during WWII.
Originally 370 Mustangs were placed on order but as the war ended it was decided
to keep the first 30 arrivals and cancel the rest of the contract.
After being placed in storage for six years the Mustangs were formed into four
squadrons of the Territorial Air Force (TAF) Two were issued to and flown by the
RNZAF Fighter Wing based at Ohakea.
The TAF Mustangs became an overnight hit in the four areas that they were flown
in, what with the chequerboard markings painted in the provincial rugby colours
(Auckland Wellington, Canterbury and Otago) and the “weekend” flight that
were staged by their volunteer pilots, the high speed flash of polished Mustang
on a low flyby was often greeted with “Tallyho TAF!!”
|
THE KIT |
On opening the Flying Kiwis P-51D Plastic bag you get the separately bagged
Hasegawa kit, one folded A4 instruction leaflet photocopied on, for some reason
(so you can find it under that modelling desk clutter?) bright red paper showing
exploded diagrams of the construction steps and painting guides. Due to the
simple nature of this kit the instructions are more than adequate for assembling
this plane and one sheet of decals depicting four TAF Aircraft.
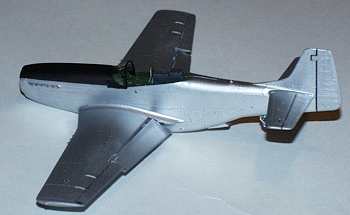
Turning to the kitset itself shows that the Hasegawa Mustang is now showing
it’s age a little bit, there is a fair amount of flash around the smaller
parts noticeably around the separate nose cowl and cockpit.
Detail consists of nice crisp raised detail on wings and fuselage, some
detailing in the wheel wells and inside the fuselage halves which given the
original age of the moulding was state of the art!
One disappointment is that the exhaust stubs are moulded as part of the fuselage
and on my example were a little soft in detail, looking more like melted blobs
than stubs.
There are no ejector pin marks or sink marks in any visible locations on the
upper surfaces of the moulding, however the inner side of the lower wing needs
the mountains of pin marks removed so that the upper wings can sit correctly.
Radio aerial is moulded on port fuselage side, anybody care to take bets on how
long it stays there ?
|
CONSTRUCTION |
Construction starts with cleaning up the large amount of flash and painting
the one piece cockpit interior, adding the instrument panel and scratch building
the pilots harness, A word of note on detailing. Where I live luxuries like
etched brass detail sets and aftermarket decals are unavailable so I am forced
to use the time honoured method of “if it ain’t supplied make (read fake) it
“ so it’s out with the masking tape and lead sheet.
One advantage of 1/72nd scale that most interior detail gets lost under a closed
canopy anyway. Slop a coat of US interior green around and drybrush to highlight
the effects. Radio boxes were picked out in dark grey as black is too stark in
this scale for very small items.
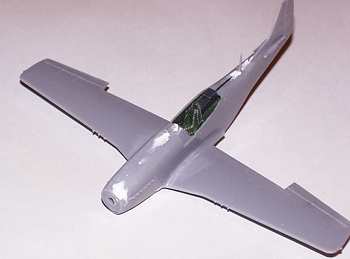 Assembling the fuselage and main wings presented no problems and the upper
wing/fuselage joint almost disappears. I decided the cut and drop the flaps to
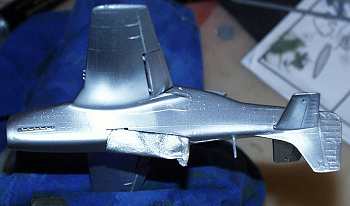
emulate a real “Muzi” at rest. Cleaning up as I went. On mating up the nose
to fuselage you hit the worst snag in the kit, the fit is terrible! The nose is
too short and too wide to fit the contour of the body, so after checking that
the bottom of the nose lined up it was out with the files on the sides and the
filler on the top. Lots of filling and sanding later we have a satisfactory
joint. Note filler around nose in photo.
Assembling the fuselage and main wings presented no problems and the upper
wing/fuselage joint almost disappears. I decided the cut and drop the flaps to
emulate a real “Muzi” at rest. Cleaning up as I went. On mating up the nose
to fuselage you hit the worst snag in the kit, the fit is terrible! The nose is
too short and too wide to fit the contour of the body, so after checking that
the bottom of the nose lined up it was out with the files on the sides and the
filler on the top. Lots of filling and sanding later we have a satisfactory
joint. Note filler around nose in photo.
Dabs of filler are needed on most of the underside joints but nothing
that isn’t too difficult to clean up You'll also need some filler at the front
of the wings where it meets the fuselage. Tailplanes are a perfect fit with no
filler needed, just a light sand to tone down some of the heavy fabric detail.
Most of the main construction work has now been done and it’s time to turn
your attention to the last bit and bobs, The gear doors are moulded in the
closed position and need to be cut apart for a wheels down version. The wheels
are nicely moulded with fine tread pattern which is unfortunately lost in trying
to remove the mould line running around each tyre. TAF aircraft were flown by
Weekend volunteers and rarely
Carried drop tanks under the wings so I consigned these to the spare’s box.
|
PAINT & MARKINGS |
Kiwi Wings quote and recommend Tamiya paints in their instructions which
considering we have only Humbrol, Revell or Tamiya paints to choose from is a
handy hint for the younger modeller.
I decided to use the recommended Tamiya paints and Revell Contacta Pro glue
through out.
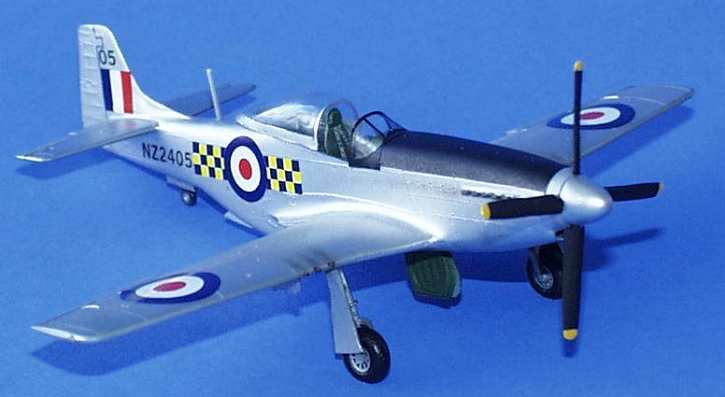
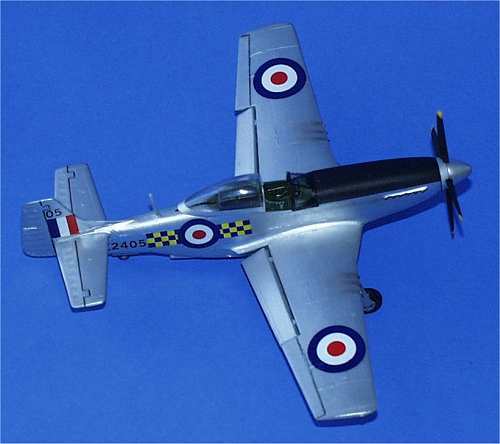
 RNZAF/TAF Mustang fuselages were usually highly polished natural aluminium
with painted aluminium wings and flat black anti-glare panels. And were well
maintained and treated more like hot rods than fighter planes, photos from
Mustangs of the RAAF and RNZAF show these planes to be so highly polished that
they looked chromed.
RNZAF/TAF Mustang fuselages were usually highly polished natural aluminium
with painted aluminium wings and flat black anti-glare panels. And were well
maintained and treated more like hot rods than fighter planes, photos from
Mustangs of the RAAF and RNZAF show these planes to be so highly polished that
they looked chromed.
I gunned a coat of Tamiya X-11 Chrome Silver over the fuselage, then when that
was dry, masked off the body and sprayed the wings Flat Aluminium. After leaving
the lot to dry for a day or two, mask off and spray the flat black anti –
glare panel on the nose. Check from photos how far down to mask, as the black
anti-glare panel does differ slightly from plane to plane, some meet at a point
in the centre of the fuselage and others remain a constant width.
Spinner colour is Chrome Silver with the prop blades flat black
 Finally some light weathering was added around the exhausts and guns using
pastel’s, but remember don’t overdo it as these planes were kept in above
average condition.
Finally some light weathering was added around the exhausts and guns using
pastel’s, but remember don’t overdo it as these planes were kept in above
average condition.
After much thought I decided on the “scafies” scheme. NZ2405 of No 4 (Otago)
Sqn Territory Otago, Southland with the Dark blue – Yellow checks.
The decals went on without any problems and reacted well to Micro Sol,
conforming around the Mustangs curves. The red in the roundels is not supplied
as a separate decal and show a small amount of bleeding. This would be easy to
correct by using some red centres from the spare’s box.
Colours are accurate and certainly liven up the rather bland Mustang.
|
CONCLUSIONS |
 A very simple kit within the scope of the average modeller which is were my
modelling skills firmly lie.
A very simple kit within the scope of the average modeller which is were my
modelling skills firmly lie.
With a little bit of work a good model of a piece of Kiwi Aviation history can
be added to your collection straight out of the box …err plastic bag. I’m
rushing out to add the Skyhawk to my collection before they are gone forever
from our skies
If you ever see a Flying Kiwis model at your local hobby shop grab it, at the
very least you can add one of the rarer air forces to your collection
|
REFERENCES |
Mustangs of the RAAF and RNZAF, Peter N Anderson
Alpine Fighter Collection
If you would like your product reviewed fairly and fairly quickly, please contact the editor or see other details in the Note to Contributors.