|
KIT: |
Italeri 1/72 F4U-5N Corsair |
|
KIT # |
HC 1321 |
|
PRICE: |
$8.50 |
|
DECALS: |
Two versions: see review |
|
REVIEW
& |
Drew
Nix |
|
NOTES: |
|
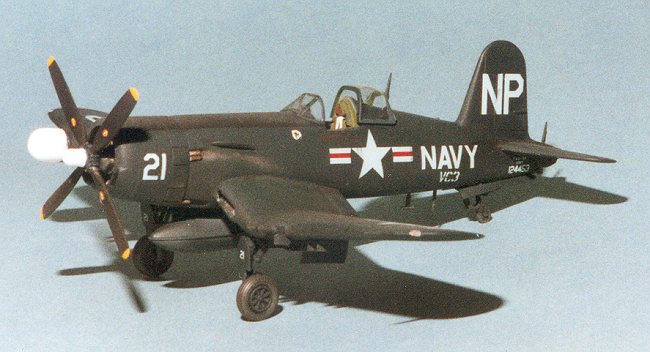
The Corsair has to be THE premiere propeller-driven fighter of all time (with apologies to P-51 Mustang fans). The first prototypes flew in 1940 and the last Corsair was manufactured in 1953. Fast and rugged, the “Bent-Wing Bird” has been a favorite of modelers and model manufacturers for years.
 This Italeri offering is of the Korean War Era F4U-5N. This version included
the lengthened nose, first seen on the F4U-4, to accommodate a more powerful
version of the ubiquitous Pratt and Whitney R-2800 radial engine. It also
had a radome added to the starboard wing and various antennas added to the
fuselage, thus the suffix “N” for Nightfighter.
This Italeri offering is of the Korean War Era F4U-5N. This version included
the lengthened nose, first seen on the F4U-4, to accommodate a more powerful
version of the ubiquitous Pratt and Whitney R-2800 radial engine. It also
had a radome added to the starboard wing and various antennas added to the
fuselage, thus the suffix “N” for Nightfighter.
The radome and antennas are there and look accurate on the Italeri kit. Unfortunately, the lengthened nose was not included, the kit nose being 1/8 inch too short. This may sound picky, but you can definitely tell the difference in this scale. All detail is finely engraved and adds tremendously to the look of the kit. Even the vertical tail is correctly angled to port as on the real item. This counteracted the torque of the engine.
When I decided I wanted to include this kit in my collection, I had also decided to lengthen the nose myself with sheet plastic. Then I read in Fine Scale Modeler about a resin update set for this kit produced by Red Dawg Resin (formerly Russell’s Replicas). At the modest price of $5.00 (plus $1.00 shipping and handling), off went my check. After waiting 3 months(!), I finally received the update set. The resin is the same color as that found in most Verlinden kits, and of about the same quality. Besides the fuselage nose plug, Russell also includes a more realistic propeller hub and 5 blades (I needed the extra blade as one of the ones sent had several pinholes all the way through it, an occupational hazard when trying to cast resin parts that thin).
 Now on to the construction. As with 99% of all aircraft kits, construction
starts with the cockpit. I was very impressed with the level of detail Italeri
has been able to achieve in this scale. All I added were some seat belts
and shoulder harnesses made from white masking tape. Painting and drybrushing
took care of the rest.
Now on to the construction. As with 99% of all aircraft kits, construction
starts with the cockpit. I was very impressed with the level of detail Italeri
has been able to achieve in this scale. All I added were some seat belts
and shoulder harnesses made from white masking tape. Painting and drybrushing
took care of the rest.
The fit of the parts was good to excellent. As usual with all my projects, putty and/or super glue had to be used to fill various seams. Before I cemented the fuselage halves together, I followed the instructions in the update set and cut both halves right behind the cowl flaps. This does make the fuselage a little weaker until the nose plug can be added, so be aware of this if you decide to lengthen the nose. Russell recommends that you thin the plastic behind the cowl flaps on the nose after its removal. Be sure to do this, else your exhaust stacks won’t fit. Russell gives you a length of strip styrene to use to replace the kit’s individual exhaust stacks (a nice touch by Italeri), but I recommend you replace this with styrene rod cut to length. If you use the kit’s exhaust stacks, they will be too short. The resin nose plug fared in nicely with the kit, with a minimum of filling and sanding required. Red Dawg’s instruction sheet is easy to follow, telling you just what to do and when to do it. The wing to fuselage joint did require some filling, but nothing major. The main problem area in construction was the main gear, which are a little “fiddly” with their construction.
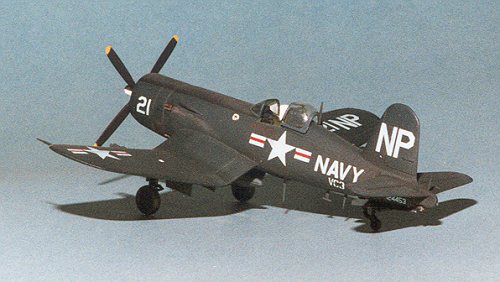
 The canopy is a two-piece affair that is very clear and easy to mask for
painting. Italeri recommends that you paint both versions “Blue Angels
Blue”. I painted mine with Testor’s Model Master Flat (also called
Non-Specular) Sea Blue as this looks more accurate based on pictures and
paintings of this aircraft. The main gear legs and the wheel hubs are Sea
Blue as well.
The canopy is a two-piece affair that is very clear and easy to mask for
painting. Italeri recommends that you paint both versions “Blue Angels
Blue”. I painted mine with Testor’s Model Master Flat (also called
Non-Specular) Sea Blue as this looks more accurate based on pictures and
paintings of this aircraft. The main gear legs and the wheel hubs are Sea
Blue as well.
I wanted to do the aircraft flown by the Navy’s only ace, the only nightfighter ace, and the only ace flying a propeller-driven aircraft during the Korean War--Lieutenant Guy P. “Lucky Pierre” Bordelon. He snuffed 5 of the infamous “Bedcheck Charlies” during his tours of duty in Korea. “Bedcheck Charlie” was the name given by G.I.’s to the slow Soviet-built biplanes and trainers that flew over the front lines in the middle of the night. Their radial engines were out of tune, so that they made an irritating sound as they flew over the troops, preventing them from getting some rest. Occasionally, Bedcheck Charlie would drop a small bomb or two causing the troops even more irritation, although the bombs seldom did any real damage. Bordelon was able to fly low enough and slow enough with his Corsair to get Bedcheck.
Italeri’s decals for this version feature the correct powder-blue tinting for what would normally be the white portions of the markings. According to the Osprey book, Aces of the Korean War, the white in the markings was toned down with blue to make the nightfighter less visible at night. Note: The drawings of this aircraft on the back of the kit box have a fundamental error! The side profiles are reversed. The left side is shown decorated as the right should be and vice versa. The decal placement as shown in the instructions is correct based on the cover drawing of the Squadron book, F4U Corsair In Action (1st Edition).
 Before decaling began, I tested two decals that I didn’t plan to use
on a scrap piece of painted sheet styrene. I used both Solvaset and the
Microscale system to test the compatibility of the decals with the setting
solutions. Neither seemed to have any negative effects on the decals. I always
spray Future acrylic floor wax, unthinned, onto my model to prepare for the
decals, preferring to use several light coats of Future until a smooth, glossy
coat is achieved. After allowing the wax a suitable drying time, the decals
were applied. They went down without a hitch. They’re a little thick,
but this means they can be handled without them shattering or tearing. They
go down looking matte but once everything dries, they clear up nicely.
Before decaling began, I tested two decals that I didn’t plan to use
on a scrap piece of painted sheet styrene. I used both Solvaset and the
Microscale system to test the compatibility of the decals with the setting
solutions. Neither seemed to have any negative effects on the decals. I always
spray Future acrylic floor wax, unthinned, onto my model to prepare for the
decals, preferring to use several light coats of Future until a smooth, glossy
coat is achieved. After allowing the wax a suitable drying time, the decals
were applied. They went down without a hitch. They’re a little thick,
but this means they can be handled without them shattering or tearing. They
go down looking matte but once everything dries, they clear up nicely.
After all decals were in place, another coat of Future sealed the decals and helped to hide their edges. Next I sprayed Testor’s Dullcote thinned 50/50 with Testor’s METALLIZER Thinner to give everything that matte appearance. A little weathering and it’s ready for the display case.
I was very favorably impressed by this kit, so much so that I recently bought the Italeri F4U-7/AU-1 in the same scale. Strangely, the fuselage on that one appears to have the correct lengthened nose! Whether you choose to lengthen the nose or not, I can heartily recommend this kit.
November 5, 1997