
Academy 1/48 F4U-4B Corsair
|
KIT # |
2124 |
|
PRICE: |
$14.00 |
|
DECALS: |
See Review |
|
REVIEWER: |
Emilio Diaz |
|
NOTES: |
|
HISTORY |
Notes: Kit bash project using the following items: Hobbycraft F4U-1a, True Detail F4U-4 cockpit, bombs and wheels, High-Tech PW R-2800, Verlinden F4U-4 detail set, Squadron Products F4U-4 canopy, Moskit exhaust tips, M.V. Lenses and Monogram Pro Modeler F4U-5n.
The Korean War dragged on for it’s third year. Talks were going on with little progress and the 8th Army still needed air support. The war had degraded into a slugfest with constant call for airpower when the weather permitted.
 VMA-332 had just got on line, after relieving
VMA-312, on the U.S.S. Bairoko (CVE-115) during June of 1953. During
this “Police Action”, VMA-332 flew from escort carriers and shore bases.
The Squadron provided close air support for the mud Marines fighting the
Chinese and North Korean Communists. Both Army and Marine ground troops
preferred close air support provided by Marine Squadrons over Air Force
squadrons, Marines squadrons got the job done!
VMA-332 had just got on line, after relieving
VMA-312, on the U.S.S. Bairoko (CVE-115) during June of 1953. During
this “Police Action”, VMA-332 flew from escort carriers and shore bases.
The Squadron provided close air support for the mud Marines fighting the
Chinese and North Korean Communists. Both Army and Marine ground troops
preferred close air support provided by Marine Squadrons over Air Force
squadrons, Marines squadrons got the job done!
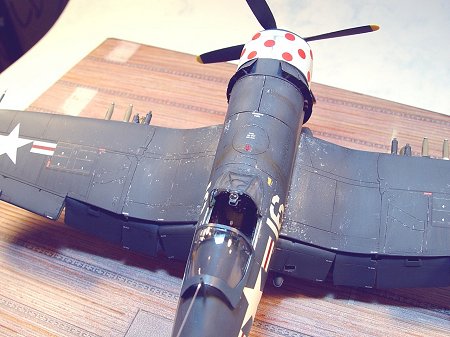
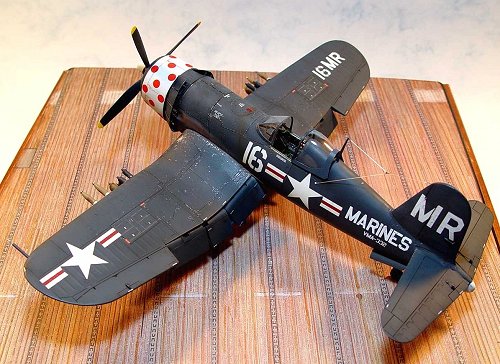
To identify VMA-332 Corsairs to our ground troops, the
Squadron's Corsair engine cowlings were painted white with red polkadots.
This provided instant recognition and encouragement for mud Marine ground
troops when the Squadron blasted the enemy with rockets and bombs. Troops
called VMA 332 "the Polkadots" and the moniker, won in combat, stuck.
During the squadron’s deployment, it flew a mixed bag of F4Us. It was supplied with both dash 4 and dash 4bs from spare aircraft held by the 1st Marine Air wing. Missions were flown with maximum weapon loads. This requirement, together with the Corsair’s old engines, demanded catapult launching. Still the squadron lost three F4Us, one in action and two to damage, during this war cruise. During a period from July 5th to July 14th, VMA-332 flew a total of 308 sorties, expending the following ordnance:
 1000# GP--------- 3
500# GP --------- 166
250# GP --------- 6
260# Frag.-------- 12
100# GP --------- 928
Napalm -------- 15
5” HVAR -------- 464
20mm Ammo.---40,200 Rds.
50 Cal. Ammo.--34,425 Rds.
VMA-332 flew the last missions of the war on July 27th, 1953, when the truce was signed. The squadron remained deployed and was the last US unit to fly F4Us from a CVE aircraft carrier into combat. VMA-332 returned to the states during December, 1953, ending the Corsair’s US combat record.
|
THE KIT |
Let me begin with the fact that the Academy kit is a dog, but beauty is in the eye of the beholder! I wanted a Korean War Corsair and this kit was the only option to build a dash 4b. Talking with my buddy Gene Chudy, we came to the conclusion that the cockpit area of this kit was the main problem. He gave me a Hobbycraft F4U and told me to have at it!
Looking at both kits, I found them to be light in details. I pulled out the Monogram Pro modeler kit and decided to use prop, landing gear, wheel well covers, tail wheel gear, bomb racks, cannons and antennas from this kit for their fine level of details.
|
CONSTRUCTION |
 The Academy kit is horribly misshapen around the
cockpit, the area being too wide, but the rest of the kit is detailed
with nice engraved panel lines. Using the set of excellent drawings from
Aero Detail 25 book, I enlarged these to 1/48th, and used this
as a guide to plan where to make the cuts. I studied the Monogram F4U-5
kit and noted where Hasegawa made the mold break; I transferred this
point to the Academy and Hobbycraft kits. Out came the saw and I chopped
the noses of both kits. Checked the total length against Hasegawa’s dash
4 and I fitted the Academy nose to the Hobbycraft aft fuselage and sanded
till the pieces matched. So much for the hard part.
The Academy kit is horribly misshapen around the
cockpit, the area being too wide, but the rest of the kit is detailed
with nice engraved panel lines. Using the set of excellent drawings from
Aero Detail 25 book, I enlarged these to 1/48th, and used this
as a guide to plan where to make the cuts. I studied the Monogram F4U-5
kit and noted where Hasegawa made the mold break; I transferred this
point to the Academy and Hobbycraft kits. Out came the saw and I chopped
the noses of both kits. Checked the total length against Hasegawa’s dash
4 and I fitted the Academy nose to the Hobbycraft aft fuselage and sanded
till the pieces matched. So much for the hard part.
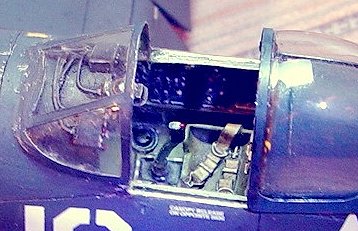 Pulled out the True Detail cockpit set. Measured
the width and checked the fit. Had to remove quite a lot of material till
the sides of the cockpit set were translucent. I then proceeded to paint
the set using the Detail and Scale book on late model Corsairs as a
guide. I used acrylic paints to paint the cockpit and the seat, followed
by washes of thinned oil paint, with dry brushing with enamel base color
and highlighted the details with colors. Added a few scratch-built detail
parts, used the control stick and weapon panels from the Verlinden set to
finish off the cockpit. Painted the instrument panel weathered black,
picked out the details on the faces and glossed the instruments with
Future Floor Wax. I fitted the cockpit and sanded till the assembly was
straight and level. Next I then superglued the cockpit and reinforced to
area where the nose grafts came together.
Pulled out the True Detail cockpit set. Measured
the width and checked the fit. Had to remove quite a lot of material till
the sides of the cockpit set were translucent. I then proceeded to paint
the set using the Detail and Scale book on late model Corsairs as a
guide. I used acrylic paints to paint the cockpit and the seat, followed
by washes of thinned oil paint, with dry brushing with enamel base color
and highlighted the details with colors. Added a few scratch-built detail
parts, used the control stick and weapon panels from the Verlinden set to
finish off the cockpit. Painted the instrument panel weathered black,
picked out the details on the faces and glossed the instruments with
Future Floor Wax. I fitted the cockpit and sanded till the assembly was
straight and level. Next I then superglued the cockpit and reinforced to
area where the nose grafts came together.
Next it was time to remove the kit cowl flaps
and engine. First I built up the area behind the cowl flaps using epoxy
putty. Then I carved away the kit flaps using a flat square tipped wood
carving chisel. Next I removed the kit exhausts, filled the
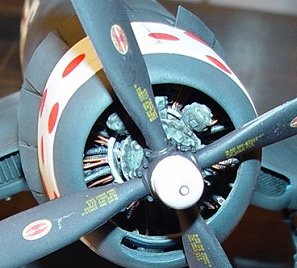 graft joint
and started to rescribe the new panel lines on the Hobbycraft fuselage
using the drawings from Aero Detail 25 book. The fuselage was now ready
for the engine. I used the R-2800 from the High-Tech set. This is a
complete metal cast model with separate cylinders and engine block. I
painted the engine using the same techniques that I used on the cockpit
and finished up detailing with a scratch-built ignition harness and push
rods. Mounted the completed engine on a bulkhead made out of scrap
plastic using the kit engine/bulkhead as a guide.
graft joint
and started to rescribe the new panel lines on the Hobbycraft fuselage
using the drawings from Aero Detail 25 book. The fuselage was now ready
for the engine. I used the R-2800 from the High-Tech set. This is a
complete metal cast model with separate cylinders and engine block. I
painted the engine using the same techniques that I used on the cockpit
and finished up detailing with a scratch-built ignition harness and push
rods. Mounted the completed engine on a bulkhead made out of scrap
plastic using the kit engine/bulkhead as a guide.
Looking at the tail wheel well, I noted that it had no detail. Made up the stringers and cross beams and measured the area to install the tail wheel gear from the Monogram kit. Painted the area and modified the Monogram tail wheel assembly so that it would fit in the tail wheel well. I then assembled the fuselage and added the cockpit glare shield and gun sight.
 Time to assemble the wings. Decided cut away the
kit flaps, in order to drop the flaps. The wheel wells on the wing are
shallow, but I decided to leave them alone, as this would weaken the kit
wing too much. Had to rescribe the wings for the 20mm cannon bays, using
the Monogram kit as a guide. Cut out the gun camera and the wing tip
lights. Drilled out the ground recognition lights and the mounting holes
for the bomb racks. Made up a false wing spar to mount the Verlinden
flaps and assembled the wings together. Matching up the wing assembly to
the fuselage, I only had to trim off a ¼” of the bottom fuselage to get a
near-perfect fit. Filled in all the new join lines using 3M Spot Glazing
Putty. Added the horizontal stablizers and removed the trim tab control
arms that were molded on and replaced these with wire.
Time to assemble the wings. Decided cut away the
kit flaps, in order to drop the flaps. The wheel wells on the wing are
shallow, but I decided to leave them alone, as this would weaken the kit
wing too much. Had to rescribe the wings for the 20mm cannon bays, using
the Monogram kit as a guide. Cut out the gun camera and the wing tip
lights. Drilled out the ground recognition lights and the mounting holes
for the bomb racks. Made up a false wing spar to mount the Verlinden
flaps and assembled the wings together. Matching up the wing assembly to
the fuselage, I only had to trim off a ¼” of the bottom fuselage to get a
near-perfect fit. Filled in all the new join lines using 3M Spot Glazing
Putty. Added the horizontal stablizers and removed the trim tab control
arms that were molded on and replaced these with wire.
Added the landing flaps and cowl flaps from Verlinden. Scratch-built the wing tip light lenses from scrap clear plastic, drilling out the bulbs and painting these red and green. Cemented the lenses, sanded the parts till they fit and finished by polishing.
Assembled the Monogram landing gear and modified
these units to fit the 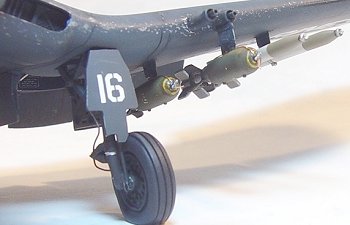 Academy wings. Added scratch-built retraction
cylinders, hydraulic manifolds and brake lines to the wheel well bays.
Cut free the True Detail wheels and drilled them out to fit the modified
landing gear. Detailed out the landing gear using different gauges of
brass wire to represent the brake line, tow clevis and retraction link.
Added the bomb racks and the 20mm cannon fairings to the wings and then
moved back to the fuselage.
Academy wings. Added scratch-built retraction
cylinders, hydraulic manifolds and brake lines to the wheel well bays.
Cut free the True Detail wheels and drilled them out to fit the modified
landing gear. Detailed out the landing gear using different gauges of
brass wire to represent the brake line, tow clevis and retraction link.
Added the bomb racks and the 20mm cannon fairings to the wings and then
moved back to the fuselage.
Using the canopy from Squadron, I removed both sets from their backing sheets using a new X-Acto blade. I managed to damage one when cutting the front windshield from the cockpit bubble. I glossed with Future Floor Wax and attached the front windshield after it was dry. I then faired in the seam using super glue and masked the framework with Bare Metal foil. I then blanked off all openings with tissue paper to protect from overspray. The model was now ready to paint.
|
COLORS AND MARKINGS |
The Corsair I decided to model had seen years of
intense service, being built in the mid-1940’s and being a hand-me-down
aircraft from VMA-312. But Gloss Sea Blue was highly resistant to fading,
so the model should only show wear and dirt. I had to tone down the
weathering to a realistic level. Spraying interior gr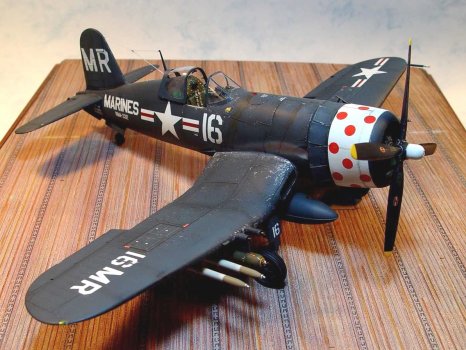 een as a base coat,
I checked for seam flaws. I pre-shaded the kit with Tamiya Gloss Black.
Using Tamiya Gloss Sea Blue as a base color, I then oversprayed this
color with Aero Master Gloss Sea Blue, till I got the finish I was
looking for. I sprayed both of these paints thin to achieve better
control using a Badger dual action airbrush. To protect the thin finish
and prepare the surface for decals, I use Testor’s Metalizer Sealer. The
model was ready for decals.
een as a base coat,
I checked for seam flaws. I pre-shaded the kit with Tamiya Gloss Black.
Using Tamiya Gloss Sea Blue as a base color, I then oversprayed this
color with Aero Master Gloss Sea Blue, till I got the finish I was
looking for. I sprayed both of these paints thin to achieve better
control using a Badger dual action airbrush. To protect the thin finish
and prepare the surface for decals, I use Testor’s Metalizer Sealer. The
model was ready for decals.
The Super Scale sheet provides complete markings for two different aircraft from the Korean War. I decided to use the one for a Corsair from VMA-332, as it is a very colorful scheme. The decals are fair to poor in register. The lettering had bleed thru past the outline on some of the major lettering and I had to trim these with base color. The cowling band was too short and I had to use a second sheet to get the right length. The maintenance stencils were too large so I used the detail stencils from the beautiful sheet from Victory Decals. All decals where set using the Micro Sol system. The decals were left to dry overnight and the model was wiped down to remove all residues.
|
FINAL CONSTRUCTION |
. I begin to weather the model at this stage by spraying the kit with a coat of satin floor varnish. I then applied oil washes to add depth to the finish, followed by overspraying to tone down the panel lines with the original base color. Then I studied all the pictures of operational Corsairs I could find finished in G.S.B. and got my trusty Prisma silver pencil to start adding paint chips in high use areas. With this done, I then sprayed the exhaust stains using grays, browns, blacks and reds to get the color I wanted. Next I added all drips, spills and smears using oil washes, black and brown fine tipped markers to represent the grime the aircraft would collect. I finished the weathering with a light coat of Testor’s Dullcote to lock in the finish.
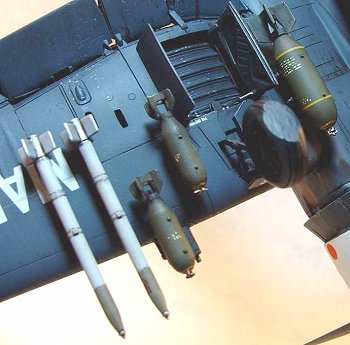
 The model was almost finished; I removed all the
masking and did any touching up on the finish. I first assembled the 500#
and 100# general purpose bombs from True Details, painted them Tamiya
Olive Drab and weathered these items by overspraying with Aero Master’s
Faded O.D. Added the bomb fuse wires by drilling the nose fuses and using
32 gauge wire. Assembled the Monogram 5” rockets and painted them using
gray, olive drab and silver Gunzie paints. Highlighted all the fuses on
these weapons by using good old Testor’s Chrome Silver, followed by a
wash of thin black acrylic paint.
The model was almost finished; I removed all the
masking and did any touching up on the finish. I first assembled the 500#
and 100# general purpose bombs from True Details, painted them Tamiya
Olive Drab and weathered these items by overspraying with Aero Master’s
Faded O.D. Added the bomb fuse wires by drilling the nose fuses and using
32 gauge wire. Assembled the Monogram 5” rockets and painted them using
gray, olive drab and silver Gunzie paints. Highlighted all the fuses on
these weapons by using good old Testor’s Chrome Silver, followed by a
wash of thin black acrylic paint.
Drilled out the radio antenna locations, added the IFF aerials from the Academy kit. Replicated the antenna wires by using “Spider Wire” and attached the same using Super Glue Gel. Added the Moskit exhaust tips, assembled the bubble canopy using the excellent detail items from Verlinden and added the recognition lights from M.V. Lenses. Turning to the landing gear, the Monogram units with the gear doors were added. The model was now complete.
The base is an Imex plastic display case designed for three 1/18th scale cars. I started with Verlinden 1/48th carrier deck, I hand colored all the printed deck detail with various watercolor markers, using grays and browns. The embossed decking lines were redone using the rounded edge of a 6” steel rule as the embossing tool and a 24” steel rule as a guide. This was then glued to the Imex base and left to dry overnight. I then weathered the deck using ground up pastels and locked the colors in place with a light coat of Dulcote. Finished the base by trimming it with picture frame molding.
|
CONCLUSIONS |
The kit is suitable for intermediate builders and I enjoyed making a “silk purse out of a sow’s ear” exercise. It showed me what could be done to an old kit by using a few new models as donors and a detail set to bring it up to today’s standards. I hope you all enjoy the review. You can contact me at Emilio.Diaz@ispat.com.
February 2004
|
REFERENCES |
“Vought F4U Corsair”, Aero Detail 25 by Scott T. Hards
“F4U in Detail & Scale, Part 2, Late Model Corsairs”, #8256 by Bert Kinzey
“F4U in Action”, #1029 by Jim Sullivan
Declassified Action Reports from the U.S.S.Bairoko (CVE-115) 5/53 to 7/53
“F4U in Action”, #1145 by Jim Sullivan
“War Bird History, F4U Corsair” by Nicholas Veronico and John & Donna Campbell
“Fighting Colors, F4U Corsair in Color” by Jim Sullivan
“USN/USMC Over Korea” by Thomas Doll
“The Official Monogram U.S.Navy & Marine Corps Aircraft Color Guide”, Vol.3 by John M.Elliott
VMA-332 Home page web site, www.skyhawk.org/4E/vma332/vma332.htm
VMA-332 history, Korean War History web site, www.koreanwar.org
Copyright ModelingMadness.com. All rights reserved. No reproduction in part or in whole without express permission.
If you would like your product reviewed fairly and fairly quickly, please contact the editor or see other details in the Note to Contributors.