AML/Revell 1/32 Avia S-199 (late)
| KIT #: | 32-006 |
| PRICE: | £26.00 plus what it costs for the 109 kit |
| DECALS: | Three options |
| REVIEWER: | Frank Reynolds |
| NOTES: | Revell 1:32 BF109G-6 £18-00. AML 33-021 paint masks £4-60. |
| HISTORY |
During World War 2 Germany established a production
facility for the Me109G-14 in Czechoslovakia and following the defeat of the
Nazis, the Czechs continued production of the type as the Avia S-99. A fire at a
storage facility wiped out their stocks of DB-605 engines, which curtailed
production after only 20 aircraft had been co mpleted, so the resourceful Czechs
adapted the airframe to accept what was essentially a bomber engine, the Junkers Jumo 211F, married to a VS 11 paddle blade propeller. The new version was the
Avia S-199. In service the aircraft proved to be a handful; the basic 109 was
known to have challenging handling characteristics, especially on take-off and
landing. The S-199 was even worse, soon being dubbed “Mule”or “Mezec” by its
operators, yet over 600 were produced by Avia in Prague and by Letov on a second
production line. The Czech armed forces made extensive use of this home-produced
warplane well into the late 1940s
mpleted, so the resourceful Czechs
adapted the airframe to accept what was essentially a bomber engine, the Junkers Jumo 211F, married to a VS 11 paddle blade propeller. The new version was the
Avia S-199. In service the aircraft proved to be a handful; the basic 109 was
known to have challenging handling characteristics, especially on take-off and
landing. The S-199 was even worse, soon being dubbed “Mule”or “Mezec” by its
operators, yet over 600 were produced by Avia in Prague and by Letov on a second
production line. The Czech armed forces made extensive use of this home-produced
warplane well into the late 1940s
In 1945 an ostensibly civilian unit was established as Aviation of the Corps of National Security renamed Security Aviation in 1947. Its function seems to be that of border security.
| THE KIT |
The conversion set is presented as a high quality product. The small well packed box was lined in bubble wrap and a card insert. 20 crisply cast resin parts were protected by a series of zip lock bags. There was a small fret of etched parts and printed instrument dials. A single vacuform bubble canopy is provided. With my normal level of pessimism about vac canopies, I purchased a spare one for about 5 Euros. Unfortunately the only available vendor at the time had a minimum shipping and handling charge which nearly tripled the overall cost.
Instructions consist of a eight page A5 booklet
setting out a parts chart and colour references keyed to FS numbers and paints
by Humbrol, Gunze Sangyo, Lifecolor and Agama. Exploded view sketches show how
the 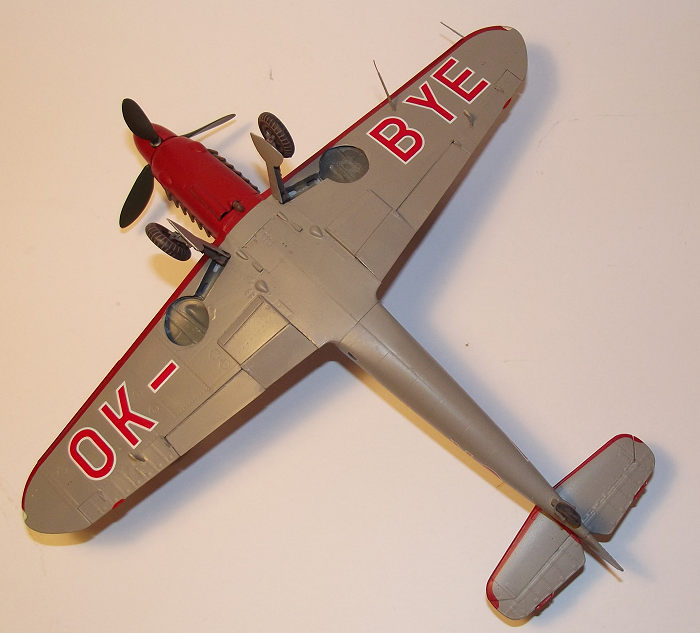 conversion parts are to be blended onto the Revell airframe but should be
read in conjunction with Revell’s instructions, so some careful planning is
recommended. It is clear that the conversion is designed to need a minimum of
alteration to the basic kit.
conversion parts are to be blended onto the Revell airframe but should be
read in conjunction with Revell’s instructions, so some careful planning is
recommended. It is clear that the conversion is designed to need a minimum of
alteration to the basic kit.
The pack includes two decal sheets about 8” by 4”, produced by AML themselves, containing everything needed to complete a scheme of the builder’s choice including national insignia, wing walks, unit insignia and stencilling.
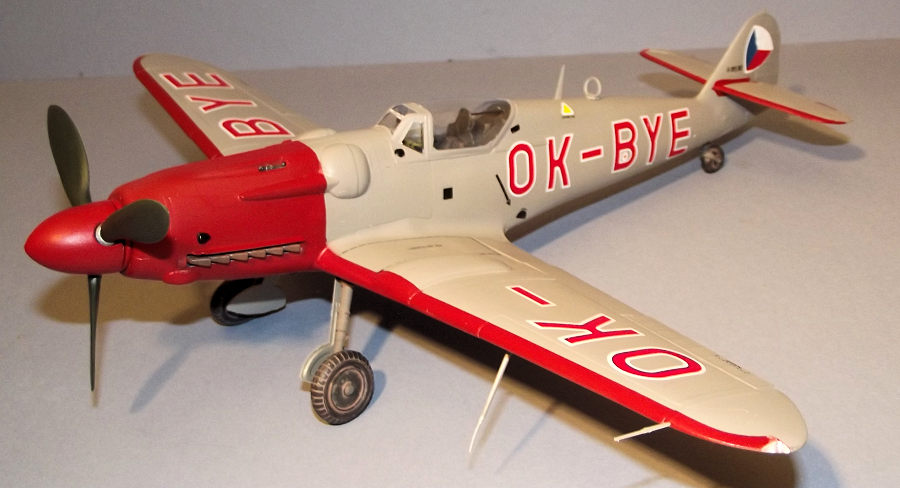
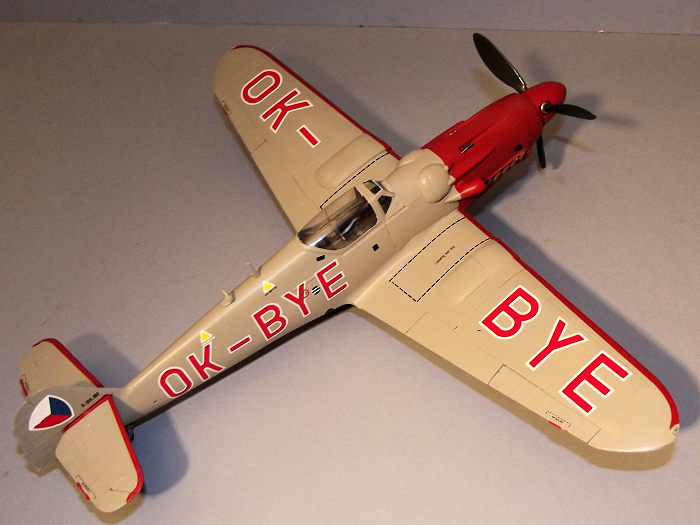
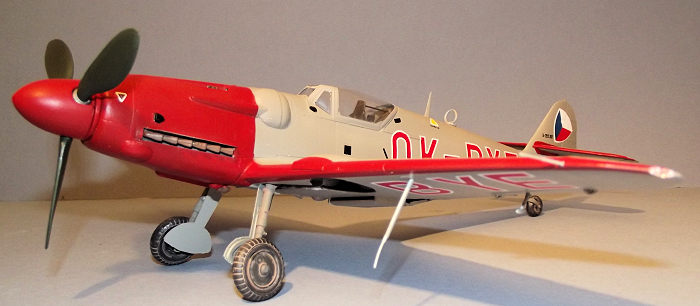
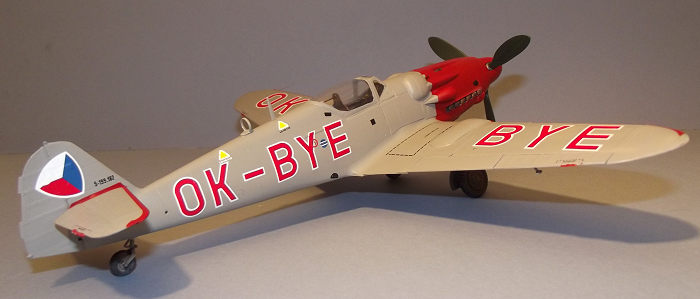
Three choices of aircraft are on offer, two finished in overall RLM 02 Green/Grey with tri-colour Czech roundels. One is of the 3rd Squadron, 3rd Fighter Air Division, 3rd Air Regiment, Brno-Slatina 1950-51. The second is from the 1ST Squadron, 7th Air Regiment, Brno, 1950. The third option and the subject of this build is the unusual civil registered “Air Police” version in overall pale grey, based at Plzen-Bory 1949-50.
The resin conversion parts essentially consist of replacements for, or additions to, Revell items. Direct replacements are provided for the engine’s side and upper cowls and the large bulges for the cannon breeches. New large upper wing bulges are included, together with the blunt nose cowl front, a spinner with three huge propeller paddle blades and lower cowl bulges. A pair of underwing gun gondolas is provided, but is not needed for the Air Police version.
The builder is expected to use most of the Revell G-6 kit including the wheels, exhausts, and cowl side intake.
| CONSTRUCTION |
I prefer to cut, trim and sand all of the resin parts
at an early stage so that they can be built into the airframe with a minimum of
fuss. So armed with a brand new razor saw blade, a new dust filter mask and some
wet and dry abrasive paper I set to work. The potential dangers of resin dust
are well known so a good mask and good ventilation are essential. The clean
castings and good definition of the cut lines made the work straight forward.
Some patient trimming and sanding was, however, required to the joining faces
since the major ca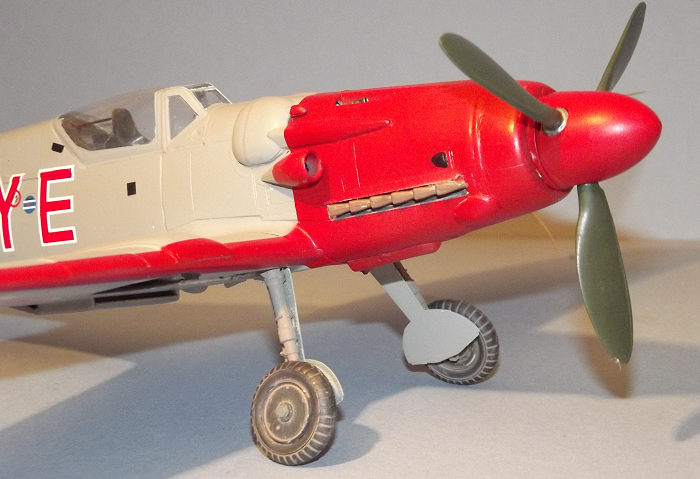 stings have a strengthening bar cast over the edge and these
need to be smoothed away .The resin parts were then washed in a mild detergent
solution and left to dry overnight.
stings have a strengthening bar cast over the edge and these
need to be smoothed away .The resin parts were then washed in a mild detergent
solution and left to dry overnight.
Construction can follow the sequence set out in Revell’s instructions but I marked up where deviations should occur in order to accommodate the resin parts. A minor disadvantage with AML’s design is the wing modification. They provide resin fairings to slip on top of the Revell wings to form the later pattern wheel housing. However the interior of the wheel wells will retain the early pattern shallow dish effect in the well roof and, perhaps more crucially, only the narrow pattern wheels are supplied by Revell. Replacement wheels need to be sourced. Fortunately, I have a well-stocked spares box resulting from multiple 109 builds over the last few years.
Discussions on the web suggest that the exhausts for the Jumo engine are different from those on a 109’s DB engine but Revell’s offering looks to be near enough for my purposes.
The next order of business was to revisit the Revell parts frames and harvest all of the parts that I would not need, carefully storing them in self-seal bags just in case I had got my choices wrong.
Construction begins with the cockpit tub and Revell provides a good set of basic mouldings which builds up as a main floor, rear bulkhead with seat pan and well detailed cockpit side walls with throttle, trim wheels and separately moulded pipework and cables. The plastic parts have a representation of seat belts moulded in but these can be covered over when AML’s etched steel belts are fixed in place with cyano glue. A replacement resin floor box is fixed between the rudder pedals. I elected to use plastic pedals rather than etched steel items. The steel fret provides a new instrument panel which is backed with a thin clear plastic printed sheet with instrument detail. The basic colour of the cockpit interior was sprayed in Xtracrylix XA1203 RLM66 Schwarzgrau Matt. The seat belts were brush painted light sand and a further touch of colour introduced by picking out the pipes and wires to the side walls in yellow, silver and blue according to Revell’s call outs. The substantial wing spar was glued under the cockpit floor and the sub assembly side aside to harden.
The short tail wheel configuration was selected, with the forks and internal support tubes painted in RLM Grau 02 XF-22 from Tamiya’s Acrylic range.
 The two fuselage halves were modified by cutting 7.5mm
off the nose to accommodate the resin plug which forms the blunter nose profile.
The engine exhausts were painted Red Brown and glued in place from the inside of
the lower cowls. The kit is engineered in such a way that I could not figure out
a means of adding them later in the build. The two fuselage halves were joined
by threading them onto the wing spar and around the cockpit tub, not forgetting
the trap the tailwheel support tube inside the fuselage. The fuselage assembly
was strapped up with sticky tape and left for a few days to harden.
The two fuselage halves were modified by cutting 7.5mm
off the nose to accommodate the resin plug which forms the blunter nose profile.
The engine exhausts were painted Red Brown and glued in place from the inside of
the lower cowls. The kit is engineered in such a way that I could not figure out
a means of adding them later in the build. The two fuselage halves were joined
by threading them onto the wing spar and around the cockpit tub, not forgetting
the trap the tailwheel support tube inside the fuselage. The fuselage assembly
was strapped up with sticky tape and left for a few days to harden.
The forward fuselage has an open framework to which the cowl panels are attached. One of the more obvious characteristics of the S.199’s layout is the relocation of the 109’s large side mounted supercharger intake from the left to the right side of the engine. AML have cast new panels which allow for this, but in other respects they are the same. I elected to keep the left side cowl as a plastic item and it was a straightforward job to carve away the supercharger seating, fill the hole with an offcut of plastic card, fill and sand smooth. Before the cowl panels are added it is useful to fix the lower resin insert that provides the oil cooler panel. The resin right hand nose panel was tacked into place with cyano glue and the new blunter nose section using the same adhesive. With the top cowl yet to be added, the resin to plastic joints were strengthened from the inside with a smear of quick setting epoxy. The top cowl was added next. I found it to be about 1mm too short, possibly as the result of shrinkage so I lined it up with the front of the cockpit, leaving a gap in the nose area that was filled with offcuts of plastic card, sanded to shape and refined with an application of Squadron Green Putty. Left to settle for a couple of days, the fuselage was completed with the installation of the massive cowl bulges which are cast with their very distinctive tapering forward extension, followed by two small bulges to the lower corners of the nose.
 Attention now turned to the wing structure and Revell
has a very specific build sequence that is worth following. The inner panels of
the upper wing are glued in place first, sitting on the wing spar and butting up
to the wing root. Radiator faces and side walls to the wheel wells are added
underneath to form a strong centre section. The lower wing is one piece from tip
to tip and thanks to Revell’s good engineering slipped into place without fuss.
The upper wing outer panels were added to complete the basic wing structure. The
upper surface wheel bulges were then added.
Attention now turned to the wing structure and Revell
has a very specific build sequence that is worth following. The inner panels of
the upper wing are glued in place first, sitting on the wing spar and butting up
to the wing root. Radiator faces and side walls to the wheel wells are added
underneath to form a strong centre section. The lower wing is one piece from tip
to tip and thanks to Revell’s good engineering slipped into place without fuss.
The upper wing outer panels were added to complete the basic wing structure. The
upper surface wheel bulges were then added.
The tail fin and horizontal tail sections were added to complete the basic airframe. Leading edge slats, elevators, ailerons and wing flaps are all separately moulded and could be posed deflected if required. I chose to fix them all closed up.
Once all the glue had dried I treated the main joints of the airframe to a hand brushed coat of dark grey acrylic paint which is useful as a form of soft filler and a means of highlighting any joints which are misaligned. All of the hand brushed paint was gently buffed away with sanding sticks so that any remaining areas of dark paint showed up areas where a touch of filler was needed. I had left off the large intake on the right hand cowl side to give clear access to the panel joints and it was then added.
The one piece vac canopy/windscreen proved to be an excellent fit. Moulded in a firm clear plastic it was easy enough to trim and my fear and dislike of vac canopies proved unfounded on this occasion. I now have a rather expensive unused spare canopy in the spares box.
A tapered seat head rest is provided among the etch parts. I copied this in plastic card painted it Dark Grey and carefully fixed inside the canopy frame with Humbrol ClearFix.
The canopy exterior was masked with the vinyl masks supplied. Suitably tidied and re-sanded the entire airframe was primed with Grey Auto Primer from a rattle can.
| COLORS & MARKINGS |
This was a good time to catch up on some sub-assemblies. Thankfully the gear legs can be assembled and painted separately and are a positive plug fit. They were finished in Grau 02, the wheel hubs Black and the tyres Tamiya XF-85 Rubber Black.
Next, the inevitable conundrum. Which Grey? AML recommend FS6122, Humbrol 125 and equivalents by Gunze Sangyo, Lifecolor and Agama. I spent a lot of time looking at images on the web and consulting a small book that I obtained from Czechoslovakia in the 1970s which has some exquisite side view water colour drawings of Czech military aircraft.
 I settled for
Tamiya XF-20 Medium Grey as “near enough for me”. The cockpit area was sprayed
dark grey to give a dark finish to the canopy framing then the whole airframe
was coated with Tamiya Ultra Fine White primer from a Rattle can. The Red areas
to the nose and leading edges were sprayed in Tamiya XF-7 Flat Red using my
trusty Iwata HP-C airbrush. The red areas were masked out using a separate set
of masks from AML. The ones I used were intended for an S99.13/109G-10 but it
was easy enough to mask off the nose section in straight lines of tape and the
wing masks were common to the S-99 and 199. Subsequent to the build AML has
issued a 199-specific set of masks.
I settled for
Tamiya XF-20 Medium Grey as “near enough for me”. The cockpit area was sprayed
dark grey to give a dark finish to the canopy framing then the whole airframe
was coated with Tamiya Ultra Fine White primer from a Rattle can. The Red areas
to the nose and leading edges were sprayed in Tamiya XF-7 Flat Red using my
trusty Iwata HP-C airbrush. The red areas were masked out using a separate set
of masks from AML. The ones I used were intended for an S99.13/109G-10 but it
was easy enough to mask off the nose section in straight lines of tape and the
wing masks were common to the S-99 and 199. Subsequent to the build AML has
issued a 199-specific set of masks.
The Medium Grey was built up in gentle misted coats. The airframe was sealed with two coats of Future/Klear applied with a No 5 paint brush, to provide a gloss base for the decals.
The decals were thin and required careful application but had good colour density. Each decal was carefully floated into place on a small puddle of Micro Set and gently pressed down with a paper towel. Left overnight to settle, the decals were sealed in with two further hand brushed coats of Future/Klear, then two finely misted airbrushed coats of Xtracrylix Flat varnish to provide a dull matted finish.
The gear legs were glued into positive locations on the wheel wells and although the gear doors proved to be a bit of a fiddle, they were eventually installed to my satisfaction. The build was completed with the installation of the aerials, aileron balances and tail wheel.
| CONCLUSIONS |
 The total cost of around £50-00 is reasonable for a
1:32 fighter. The conversion set has just about everything you need. Many
similar conversions provide a new nose formed from one hefty block of resin and
it is to AML’s credit that they have formed the new nose from thin panels to
make the whole thing more manageable.
The total cost of around £50-00 is reasonable for a
1:32 fighter. The conversion set has just about everything you need. Many
similar conversions provide a new nose formed from one hefty block of resin and
it is to AML’s credit that they have formed the new nose from thin panels to
make the whole thing more manageable.
The “bubble top 109 with civil registration” is certainly something a bit different and I am glad to have it in my collection.
This is the second such AML conversion that I have attempted and my conclusion remains the same. This is a package that has great potential for those who have more talent than I possess, yet is suitable for a first attempt at a conversion because the basic requirement is so simple – take a Revell 109, shorten the nose a bit, then add some well -crafted resin parts and follow a relatively simple paint scheme, especially if the overall Grau 02 option is chosen.
Highly recommended to all.
| REFERENCES |
Messerschmitt Bf109 in Action. Squadron/Signal Publications no 57 by John R. Beaman Jr. 1983.
Letadla ceskoslovenskych pilotu I; by Vaclav Sorel and Jaroslav Velc. Published by Albatros, Prague 1979.
The internet.
4 March 2019
Copyright ModelingMadness.com
Project courtesy of my wallet.
If you would like your product reviewed fairly and fairly quickly, please contact the editor or see other details in the Note to Contributors.
Back to the Main Page Back to the Review Index Page Back to the Previews Index Page