Dynavector 1/48 Gloster Javelin FAW.9
|
KIT: |
|
|
KIT # |
? |
|
PRICE: |
$48.00 |
|
DECALS: |
three options |
|
REVIEWER: |
Tom Cleaver |
|
NOTES: |
Vacuformed multi-media kit |
|
HISTORY |
Britain came out of the Second World War with a top-ranked aviation industry, and one of two air forces to have flown a jet fighter operationally during the war. The industry was forward-looking and had several other jet-powered types in various stages of development. Unfortunately, due to the economic strain of the war, rapid development of jet aircraft could not be sustained as it was in the United States and the Soviet Union, and within five years of the end of the war, British aviation development had fallen behind that of its peers. As British aviation writer Bill Gunston has pointed out, Britain literally did not have the engineering manpower necessary to sustain rapid aviation development.
 One unfortunate
aspect of this situation was that aircraft types that were designed
during the immediate post-war period found their development stretched
out, with the result that those types which did achieve operational
status did so several years after their American and Russian
counterparts. As a result, they were considered passe by that point, and
their operational lives were not as long or successful as they might have
been had their development been pursued with more speed. Perhaps the
premier example of this is the Hunter, which only achieved IOC some seven
years later than its design contemporaries, the F-86 Sabre and the
MiG-15. Perhaps the most unfortunate thing that happened to British
aviation was the decision not to proceed with the Miles M.100 supersonic
research aircraft, and the bureaucratic decision made after the death of
Geoffrey deHavilland in the crash of the D.H.108 that supersonic flight
was too dangerous to proceed with further; this hobbled development at
just the wrong time, allowing the 1956 decision that further development
of supersonic aircraft was not necessary in light of the possible use of
guided missiles to hit the industry at just the moment when supersonic
developments were about to bear fruit. In the end, only the English
Electric "Lightning" would survive that bureaucratic and political
fiasco, but by then it was too late to save the great names of the
British aviation industry.
One unfortunate
aspect of this situation was that aircraft types that were designed
during the immediate post-war period found their development stretched
out, with the result that those types which did achieve operational
status did so several years after their American and Russian
counterparts. As a result, they were considered passe by that point, and
their operational lives were not as long or successful as they might have
been had their development been pursued with more speed. Perhaps the
premier example of this is the Hunter, which only achieved IOC some seven
years later than its design contemporaries, the F-86 Sabre and the
MiG-15. Perhaps the most unfortunate thing that happened to British
aviation was the decision not to proceed with the Miles M.100 supersonic
research aircraft, and the bureaucratic decision made after the death of
Geoffrey deHavilland in the crash of the D.H.108 that supersonic flight
was too dangerous to proceed with further; this hobbled development at
just the wrong time, allowing the 1956 decision that further development
of supersonic aircraft was not necessary in light of the possible use of
guided missiles to hit the industry at just the moment when supersonic
developments were about to bear fruit. In the end, only the English
Electric "Lightning" would survive that bureaucratic and political
fiasco, but by then it was too late to save the great names of the
British aviation industry.
In 1945, Gloster Aviation was the leading British aviation company in regard to the development of jet-powered flight. The company had built the very first British jet aircraft, the Gloster-Whittle E.28/41, and had designed and brought to fruition the Meteor, which became Britain's first-line post-war fighter. In addition to the Meteor, the company had several other designs under development. Immediately following the end of the war, the Air Ministry issued specifications F.43/46 and F.44/46, for a day fighter and a day-and-night fighter respectively, with armament of four 30mm cannon, to which gloster responded. After further development and refinement, the RAF night fighter requirement crystallized in is specification F.4/48, for which Gloster submitted the G.A.5 design; the company received instructions to proceed with prototype construction on April 13, 1949. At the same time, deHavilland's D.H.110 design was also ordered as a competitor to the Gloster design. After an even-longer gestation period than the Gloster design, the D.H.110 would eventually emerge as the Sea Vixen.
 The initial
order to Gloster was reduced from four to two aircraft, with the first
prototype, WD404, flying on November 26, 1951. Initial trials revealed a
need for change in the rear fuselage profile, which cured the buffeting
that was experienced. WD404 was lost on June 29, 1952, when both
elevators came off in flight. The second prototype, WD808, flew on
August 20, 1952.
The initial
order to Gloster was reduced from four to two aircraft, with the first
prototype, WD404, flying on November 26, 1951. Initial trials revealed a
need for change in the rear fuselage profile, which cured the buffeting
that was experienced. WD404 was lost on June 29, 1952, when both
elevators came off in flight. The second prototype, WD808, flew on
August 20, 1952.
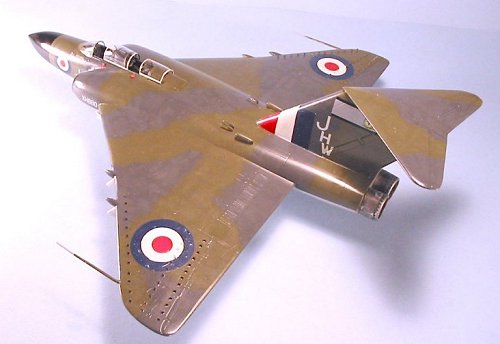
The Javelin - as the G.A.5 was now known - was the first multi-engine, two seat delta wing aircraft to fly. Unfortunately for the design, the wing was extremely conservative, with most of the fuel and all of the armament inside, and the leading edge only swept about 45 degrees. Being both thick and not at the optimum 60-degree sweep all other deltas would use, the Javelin was irreparably subsonic, even with the extension to the wing leading edge on the outer wing half to decrease the thickness/chord ratio and reduce the onset of buffeting. Even if the wing had been right, the use of a T-tail would have resulted in the aircraft destroying itself in supersonic flight. The Javelin was the first British aircraft to seriously suffer from the lack of a domestic supersonic flight development program.
The FAW Mk.1 first flew on July 22, 1954. 40 were built, of which 11 were retained for further development. The 30 FAW Mk.2s were essentially similar, with the exception of their use of U.S. supplied radar. The dual-control T.Mk.3 appeared in 1956, and would be used by 228 Operational Conversion Unit, and by operational squadrons for dual checks and instrument training.
An all-flying tail with the elevators acting as balance tabs (something that would have been there to begin with had the supersonic program been allowed to proceed) was introduced on the FAW Mk.4, which entered service in early 1957. Even with its impressive fuel capacity (for a British airplane), the Javelin was short-ranged for its role of knocking down Russian bombers inbound over the Norwegian Sea; the FAW Mk.5 saw a 220-gallon increase in fuel capacity. The similar FAW Mk.6, with its U.S. radar, was the last of the "first generation" Javelins.
 Introduction of
the more powerful Sapphire 200-series engine in the FAW. Mk.7 saw a
useful increase in climb. Four Firestreak infra-red homing air-to-air
missiles became the primary armament for bomber interception. 96 Mk.7s
were delivered, making this the most numerous variant, and the type first
saw operational service with 33 Squadron in August 1958.
Introduction of
the more powerful Sapphire 200-series engine in the FAW. Mk.7 saw a
useful increase in climb. Four Firestreak infra-red homing air-to-air
missiles became the primary armament for bomber interception. 96 Mk.7s
were delivered, making this the most numerous variant, and the type first
saw operational service with 33 Squadron in August 1958.
The FAW Mk.8 had U.S. radar, but even the addition of afterburning could not push it past Mach 0.93 at 30,000 ft. The 47 built brought total Javelin production to 381 aircraft, and the type entered squadron service in January 1960.
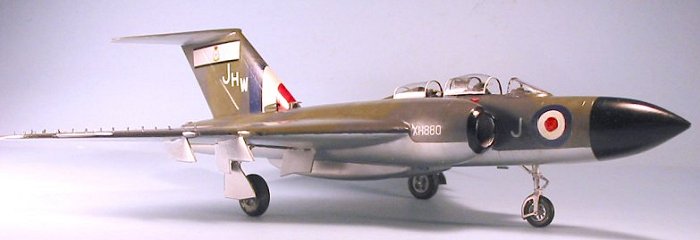
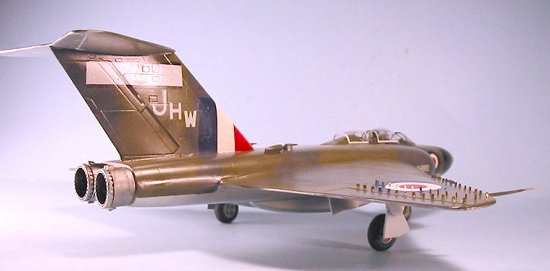
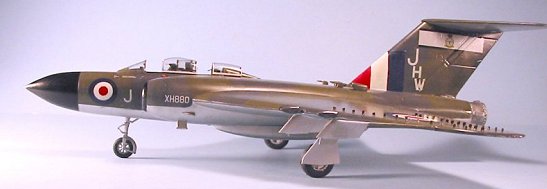
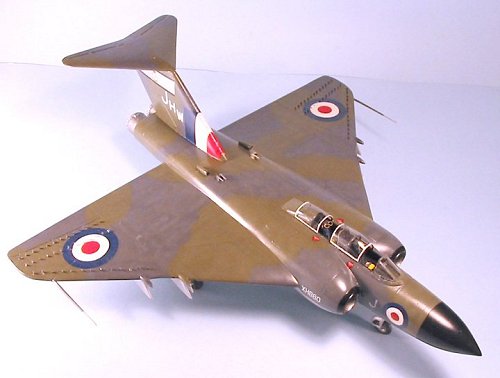
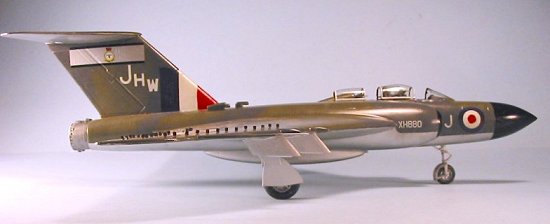
The FAW Mk.9 was a rebuild of 46 of the FAW. Mk.7 aircraft, brought up to Mk.8 standards with U.S. radar, afterburners and the drooped wing leading edge. Two 200-gallon slipper tanks could be carried and the Mk.9 had provision for air-to-air refueling. The first examples entered service with 25 Squadron in 1961, and the type was the last Javelin in service - with 60 Squadron at Seletar - when Yours Truly happened to pass through during the 1964 SEATO exercises, thus allowing me to see in person what was perhaps the most memorable-looking Brit jet ever.
|
THE KIT |
Hawk released a model of the Javelin in the mid-Fifties, which was done from the initial prototype and was in approximately 1/72 scale - with effort, a first-generation Javelin could be produced from this kit. In the 1980s, Airfix released the FAW.Mk.9 in 1/72, which while dated is still the definitive injection-molded Javelin and is still in production and available.
 This vacuform
from Dynavector is the only 1/48 Javelin released, I believe (ID Models
may have done one, too). Being done by Dynavector, it is accurate and
easy to assemble once the vacuform parts are taken off the backing. The
landing gear, cockpit interior, and afterburner exhausts are in white
metal, while the vortex generators are done in photo-etch, as are the
fins for the Firestreak missiles. Even with all this weight, a modeler
will still need to fill the nose with lead weights to get a nose-sitter.
This vacuform
from Dynavector is the only 1/48 Javelin released, I believe (ID Models
may have done one, too). Being done by Dynavector, it is accurate and
easy to assemble once the vacuform parts are taken off the backing. The
landing gear, cockpit interior, and afterburner exhausts are in white
metal, while the vortex generators are done in photo-etch, as are the
fins for the Firestreak missiles. Even with all this weight, a modeler
will still need to fill the nose with lead weights to get a nose-sitter.
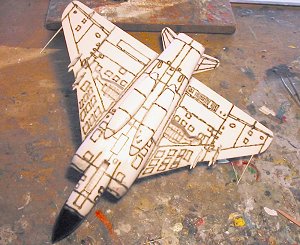
Decals are provided for three aircraft. Unfortunately - as I discovered the hard way - these decals are the weak point of the kit: not only are they not fully opaque, they are (other than the serials) about five percent too big, which means the tail insignias are hard to use and the rest are hard to position accurately. Additionally, they are the kind of British decals that leave a modeler saying "@#$%$#%$#@@!!! Brit decals!" If Taro is going to continue in production with this kit, I would sincerely hope he would contact one of the many real decal designers and producers, and replace these nearly-worthless decals with some that are worthy of the rest of the kit.
The overall kit breakdown in terms of design appears to have been dominated by the controlling factor of the parts having to fit inside the standard Dynavector box. The result is a kit design that can easily result (as it did for me) with a misalignment of the wings and fuselage. A far more effective and easy design would have been to split the airframe - fuselage and wings together - into upper and lower halves. This would have resulted in a far stronger model ultimately, and one it would have been impossible to misalign.
|
CONSTRUCTION |
This review is
going to focus on the problems associated with assembly of the kit, and
my recommendations based on my experience for how you can modify the
construction phase to get both an easier build and a better result than I
did. 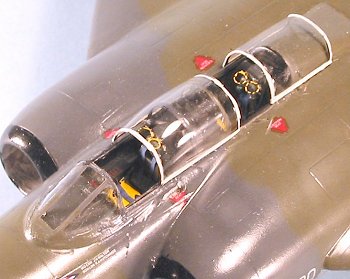 Unfortunately,
this is not a Dynavector kit like the others that have been reviewed here
at M2, which demonstrate that a modeler of average skill can be pretty
much assured of a nice result merely by assembling things correctly and
being willing to add putty and sand as necessary.
Unfortunately,
this is not a Dynavector kit like the others that have been reviewed here
at M2, which demonstrate that a modeler of average skill can be pretty
much assured of a nice result merely by assembling things correctly and
being willing to add putty and sand as necessary.
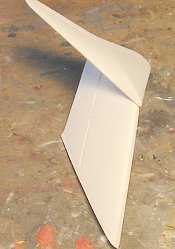
With any vacuform project, construction begins with taking the parts off the backing sheet and sanding them down. My research had found that the later Javelin had a somewhat thicker trailing edge to the wing, so when I sanded that down, I did not go for a razor-sharp trailing edge as I usually do.
Once the parts had been cleaned up, I cut out the main wheel wells in the lower wings, and glued in the vacuform wheel well. I then assembled each wing, and also the vertical fin and horizontal stabilizer, and set those aside.
 I then turned to
the cockpit, which is a vacuformed tub with white metal side panels,
instrument panels and seats. After assembling the cockpit, I painted it
black, then drybrushed theinstrument panels to bring out detail. A
modeler who wanted a more detailed cockpit could really go to town here,
adding throttles and other levers, etc. When this was finished, I glued
it in position in the upper half of the fuselage.
I then turned to
the cockpit, which is a vacuformed tub with white metal side panels,
instrument panels and seats. After assembling the cockpit, I painted it
black, then drybrushed theinstrument panels to bring out detail. A
modeler who wanted a more detailed cockpit could really go to town here,
adding throttles and other levers, etc. When this was finished, I glued
it in position in the upper half of the fuselage.
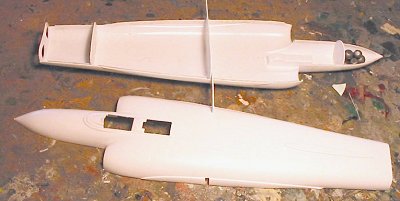
I the
scratched some bulkheads for the fuselage interior, filled the nose ahead
of the gear well with fish weights, and glued the fuselage halves
together.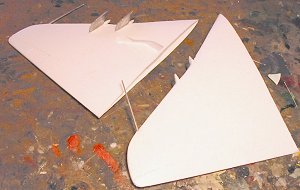
It was at this
point that difficulty arose. The wings are attached to the fuselage, to
fit around a "core" molded on the fuselage sides. You must be very
careful at this point, to insure that you correctly align the wing fore
and aft. Study the planform drawing - there is a panel line that passes
just in front of the leading edge of the wing where it attaches to the
fuselage. If you merely fit the wing comfortably to the core,
 there is every chance
you will not get that alignment, and the wing will end up positioned
about 1/8" too far forward. This is what happened to me, and by the time
I caught that it was far too late to disassemble the wings and reattach
them.
there is every chance
you will not get that alignment, and the wing will end up positioned
about 1/8" too far forward. This is what happened to me, and by the time
I caught that it was far too late to disassemble the wings and reattach
them.
I finished
basic assembly by gluing the tail pieces together and attaching the tail
assembly to the fuselage, and gluing in the white metal intakes; the
vacuform trunking didn't look good, so I ended up just blanking off the
 end of the white
metal part. All joints required putty. Once it was dry and sanded down,
I went over the areas with Mr. Surfacer 500, followed by Mr. Surfacer
1000, and then followed with a re-scribing of the panel lines as
necessary.
end of the white
metal part. All joints required putty. Once it was dry and sanded down,
I went over the areas with Mr. Surfacer 500, followed by Mr. Surfacer
1000, and then followed with a re-scribing of the panel lines as
necessary.
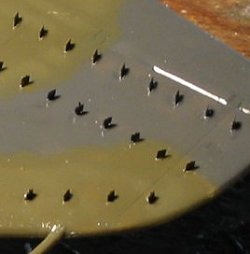
Once the model was assembled, I took a Number 11 X-acto blade and deepened the attachment holes for the photo-etch vortex generators on the outer wing. Speaking from experience, I would now forget the photo-etch parts, and make the vortex generators from .010 plastic sheet, since these could then be more accurately attached to the wing after it was painted and the decal applied.
I test-fitted the canopy and realized it was not going to fit easily, which meant the only way to do it easily was to cut it apart and pose it open at a later stage.
|
COLORS AND MARKINGS |
Painting:
 I used the
drawings in the instructions to guide me in painting the camouflage
pattern. I used Tamiya XF-24 Dark Grey for the Dark Sea Grey, and Gunze
Sangyo H-72 RAF Dark Green, with the radome painted with Tamiya X-18
Semi-gloss Black. Once all this was dry and I had given it a coat of
Future, I painted the lower surfaces with Pollyscale Old Silver, which
looks very good as the Aluminum lacquer the original was painted.
I used the
drawings in the instructions to guide me in painting the camouflage
pattern. I used Tamiya XF-24 Dark Grey for the Dark Sea Grey, and Gunze
Sangyo H-72 RAF Dark Green, with the radome painted with Tamiya X-18
Semi-gloss Black. Once all this was dry and I had given it a coat of
Future, I painted the lower surfaces with Pollyscale Old Silver, which
looks very good as the Aluminum lacquer the original was painted.
Decals:
It was at this stage that a nice one-footer model became an OK three-footer. I had been concerned about whether the decals were opaque enough, since this has been a problem on earlier Dynavector kits. However, the decals on the Skyshark had been reprinted opaque enough, and these looked on the sheet to be like those, so I proceeded to apply the national insignia. Wrong! They are barely opaque! I strongly urge you to apply a white decal circle or paint that area white before you apply the decal. I also discovered the national insignias are too big, but unfortunately I had no British Type D roundels in the decal dungeon that were anywhere close to the right sizes. Additionally, the fin flash is poorly designed and doesn't fit well; you end up having to cut it apart with a knife while it is wet, then slather on solvent and hope it stays in position.
 I had planned
to do the 60 Squadron airplane, in memory of that day I had seen the ten
Javelins of that squadron lined up at Seletar. Unfortunately, such was
not to be due to the fact that the squadron insignia bar is too large to
fit properly on the rudder without getting in the way of the finflash.
Again, this was discovered when the decal was wet. I managed to trim the
bar for the 25 Squadron airplane and jam in the Squadron Leader's letter
codes, though they too were too large and do not fit as the instructions
show. By the time I had all this done, I had no desire to have anything
further to do with the decal sheet, so I did not proceed with the wing
walks and stenciling.
I had planned
to do the 60 Squadron airplane, in memory of that day I had seen the ten
Javelins of that squadron lined up at Seletar. Unfortunately, such was
not to be due to the fact that the squadron insignia bar is too large to
fit properly on the rudder without getting in the way of the finflash.
Again, this was discovered when the decal was wet. I managed to trim the
bar for the 25 Squadron airplane and jam in the Squadron Leader's letter
codes, though they too were too large and do not fit as the instructions
show. By the time I had all this done, I had no desire to have anything
further to do with the decal sheet, so I did not proceed with the wing
walks and stenciling.
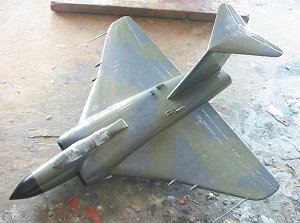
To top it off, the national insignias were so non-opaque that the red and blue colors were no good either. Once the decals were dry, I hand-painted the national insignias to get something semi-acceptable. I knew this model was going out to Planes of Fame to sit behind glass a good three feet at least from the nearest viewer; at that distance, it looks like a good model of the Javelin.
|
FINAL ASSEMBLY |
The white metal seats are not very good at all. I painted them, added the hand grips to the headrest and painted those, and glued the seats into the cockpit. I then attached the radar scope instrument panel. The canopy managed to rip on being cut apart, which made me very happy indeed that Dynavector provides two of them. I Futured the second one, painted it, and cut it apart, then positioned it on the model in the open position.
I attached the landing gear and gear doors, and heaved a sigh of relief that the model was finished.
|
CONCLUSIONS |
 This turns out
to be the most difficult of the Dynavector kits I have made to date. The
basic design of the kit, separated as it is so that the parts will fit
the box, makes for a designed-in confusing assembly. The photo-etch
vortex generators are a PITA and best replaced with sheet plastic. The
decals are really not worthy of the rest of the kit.
This turns out
to be the most difficult of the Dynavector kits I have made to date. The
basic design of the kit, separated as it is so that the parts will fit
the box, makes for a designed-in confusing assembly. The photo-etch
vortex generators are a PITA and best replaced with sheet plastic. The
decals are really not worthy of the rest of the kit.
I really hope Taro reads this review and considers contacting an aftermarket company to replace his white metal detail parts with resin - a resin cockpit and resin seats would really turn this kit into a winner, and would be well worth any increase in price. And - please! - find another decal producer.
This kit can be turned into a great model, because I have seen one done by Bill Clark that really is very nice. One cannot approach this, however, with the complacency that comes from having done other Dynavector kits like the Wyvern or the Skyshark.
December 2003
|
REFERENCES |
Though Tom doesn't do references, there is an excellent one in the Warpaint series. #17 has all you really need to do a super Javelin. Ed
Copyright ModelingMadness.com. All rights reserved. No reproduction in part or
in whole without express permission.
If you would like your product reviewed fairly and fairly quickly by a
site that has over 200,000 visitors a month, please
contact
the editor or see other details in the Note to
Contributors.