|
KIT # |
KT 003 |
|
PRICE: |
$49.95 MSRP |
|
DECALS: |
Three aircraft |
|
REVIEWER: |
|
|
NOTES: |
Short run |
|
HISTORY |
I once listened to a very senior retired Marine aviator state unequivocally that the best fighter he ever flew in his entire career - which spanned from World War II to past Vietnam - was the North American FJ-4 "Fury." He went so far as to say that "if they'd have put an afterburner in it, I could've waxed any Crusader in the sky."
 The FJ-4 Fury
was the last of a line of naval fighters developed by North American
Aviation from their F-86 Sabre land-based fighter. In 1952, the Navy
knew it was totally outclassed over Korea by the MiG-15, and turned to
North American to make a version of the only Western fighter at the time
that could successfully take on the MiG-15, the Sabre. The FJ-2 Fury
equipped Marine units and did not see much if any carrier service, while
the FJ-3 became one of the backbones of Navy fighter aviation in the
mid-1950s.
The FJ-4 Fury
was the last of a line of naval fighters developed by North American
Aviation from their F-86 Sabre land-based fighter. In 1952, the Navy
knew it was totally outclassed over Korea by the MiG-15, and turned to
North American to make a version of the only Western fighter at the time
that could successfully take on the MiG-15, the Sabre. The FJ-2 Fury
equipped Marine units and did not see much if any carrier service, while
the FJ-3 became one of the backbones of Navy fighter aviation in the
mid-1950s.
The FJ-3 had its slats removed and replaced with the "6-3" wing leading edge during 1955, with no adverse performance in deck handling, and a considerable increase in air combat performance at altitude. As early as 1953, North American had brought the NA-208 to the Navy as "the ultimate Fury." This was a complete redesign of the Fury, that left the resulting FJ-4 with almost nothing in common with the FJ-3 or the F-86 other than a general planform.
The FJ-4 was
powered by the same J-65 development of the English Sapphire jet engine
as the FJ-3, with a completely redesigned fuselage that was shorter and
deeper than the previous models, with a wing that was increased in size
40 percent, doing away completely with the leading
 edge slats.
While the FJ-4 was heavier than the earlier airplanes, with a resultant
loss of climb rate and ceiling, that wing gave it the maneuverability
referred to by the retired Marine above, to "wax the tail of anything in
the sky."
edge slats.
While the FJ-4 was heavier than the earlier airplanes, with a resultant
loss of climb rate and ceiling, that wing gave it the maneuverability
referred to by the retired Marine above, to "wax the tail of anything in
the sky."
The FJ-4 originally was equipped with four under wing pylons for external fuel and sidewinder missiles. With the introduction of the FJ-4B,optimized for ground attack, another pair of pylons appeared outboard of the fuel tanks. In 1957, the Fury was the first Navy attack aircraft to fire the Bullpup air-to-ground radar-guided missile. The FJ-4B was also cleared to carry a nuclear weapon.
The FJ-4 equipped nine Navy and three Marine squadrons between 1957-60. In 1958, FJ-4Bs of VMF-212 and VMF-214 made the first transpacific flights by single-seat naval aircraft.
|
THE KIT |
Go to the First Look Preview to see what is in the box.
|
CONSTRUCTION |
 I spent quite
a bit of time with this kit, attempting to get the resin wheel wells to
fit within the wings and fuselage, so that the intake trunking could be
attached correctly and there would be room for both the cockpit and
enough weights to make the model a nose-sitter when complete.
I spent quite
a bit of time with this kit, attempting to get the resin wheel wells to
fit within the wings and fuselage, so that the intake trunking could be
attached correctly and there would be room for both the cockpit and
enough weights to make the model a nose-sitter when complete.
Unfortunately,
the resin wheel wells do not seem to have been constructed to fit the
kit. It is impossible to fit the nose wheel well and the intake trunking
correctly, without grinding down the nose wheel well to where the "roof"
is more a membrane. And then, to top things off, rather than being of
rectangular cross-section like it should be, the intake trunking is
square in cross-section, which means it does not fit to the nose part;
given that this is not immediately
 apparent until one attempts to glue
the nose onto the fuselage after the fuselage is assembled, the fault is
major. Oh, and even when you get the main wheel wells to fit within the
wing and fuselage, they look like crap, which is accentuated by the fact
that the gear doors are thick, poorly-molded, and with interior detail
that looks like no photo of the gear doors of a Fury I have ever seen.
apparent until one attempts to glue
the nose onto the fuselage after the fuselage is assembled, the fault is
major. Oh, and even when you get the main wheel wells to fit within the
wing and fuselage, they look like crap, which is accentuated by the fact
that the gear doors are thick, poorly-molded, and with interior detail
that looks like no photo of the gear doors of a Fury I have ever seen.
At this point in the discovery process, this kit was >< this close to going against the wall. (Oh, the humanity!! Ed) After setting it aside a few days, I opened the Wagner Sabre book and counted the number of photos of FJ-4s with the gear doors down, and those with the doors up. In 7 of 8 photos of Furies sitting on the ground, the airplane is "buttoned up." I decided to do the same.
Now, had I
been smart at the outset, I would have put thin Evergreen sheet in the
main gear wells of the fuselage, and then glued the doors to that.
That's what you should do. Also, do not worry about having any part of
the wing well in the model; buttoned up, there is not enough to see
anything there anyway, and all the presence of that part does is make it
difficult to fit the landing gear. Leave it off - 99.9 percent of
people never look at 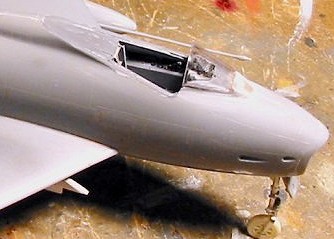 the
underside anyway, and this isn't a kit you're going to enter in a
competition where the judges do pick it up and turn it over.
the
underside anyway, and this isn't a kit you're going to enter in a
competition where the judges do pick it up and turn it over.
If you throw away all the resin interior except for the forward part of the nose wheel well and the cockpit, and then add on an intake cover, you will have a model that goes together relatively well, and that won't have turned the air over the workbench that rich shade of royal purple with the golden lightning bolts flashing all over.
Fortunately, the resin cockpit fits OK - it will fit even better without any other resin parts inside to get in the way, and will still leave the room you'll need for the half ounce of weight it will take to turn this into a nose-sitter. After painting and assembling the cockpit and installing it, I left the seat and control stick out till final detail assembly.
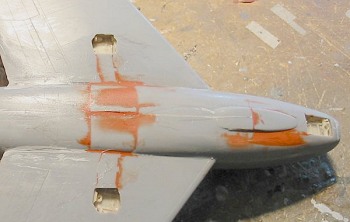
Even after you
have done all this, after you assemble the fuselage you will need to get
out the Dremel tool to thin down the wing halves before gluing them
together; not only does this make the trailing edges look a lot better,
but you cannot get the wings to fit to the fuselage otherwise. Even
then, there will be huge gaps just aft of the wheel wells, which will
have you using a lot of putty to get rid of them. Even if you decide to
"button up" the gear from the outset, you will use a lot of putty over
the gear doors in all three positions, due to the truly awful fit of the
parts with their resulting gaps.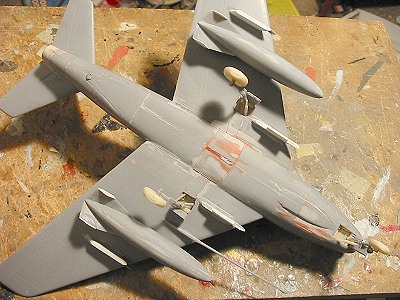
I also used quite a bit of putty with the resin tail cone, and also along the fuselage on the left rear side, to avoid a concave curve when seen in plan view.
The result of using all the putty was later use of lots of Mr. Surfacer 500, followed by Mr. Surfacer 1000, to get a smooth surface to the assembled model. This meant rescribing about half of the panel lines. Quite frankly, I think one could get more surface detail off a 1970-vintage vacuform kit than is provided with this kit, since it is done so lightly.
The drop tanks are barely acceptable, with no detail on them, so you are left to scribe in what you can see from photos. Additionally, only two of the four vertical stabilizing surfaces needed are provided, and these are too small. I made replacements from Evergreen sheet.
I also made the four extra underwing pylons from Evergreen sheet plastic. If you're going to do one of the two Marine aircraft on the decal sheet, you don't need to do this, since neither is an FJ-4B.
|
CAMOUFLAGE & MARKINGS |
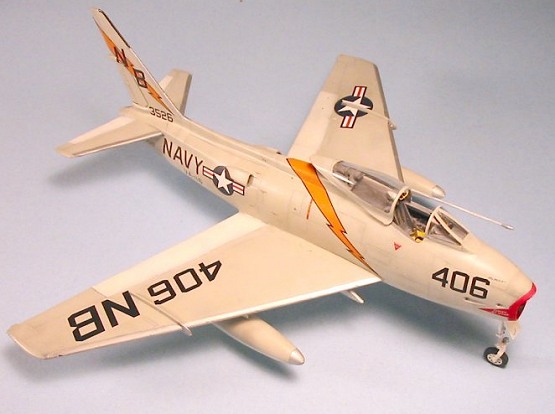
Painting:
After
pre-shading the model, I painted the leading edges of the wings and tail
with SnJ Aluminum, then masked that off. I painted the lower
surfaces with Tamiya Flat White, finishing that off with Gunze-Sangyo
FS17875 Gloss White; if you use only the Gunze paint, you will use nearly
the entire bottle of this semi-opaque paint to get things done - by using
a 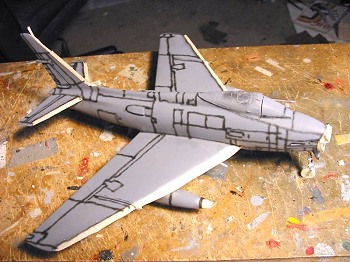 base coat of Tamiya
flat white, I used only a thin coat of Gunze. The upper surfaces were
painted with Gunze-Sangyo Light Gull Grey, which was lightened so I could
go over individual panels to provide a multi-hue weathered effect to the
paint.
base coat of Tamiya
flat white, I used only a thin coat of Gunze. The upper surfaces were
painted with Gunze-Sangyo Light Gull Grey, which was lightened so I could
go over individual panels to provide a multi-hue weathered effect to the
paint.
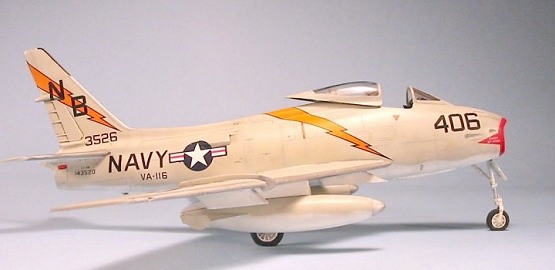
Decals:
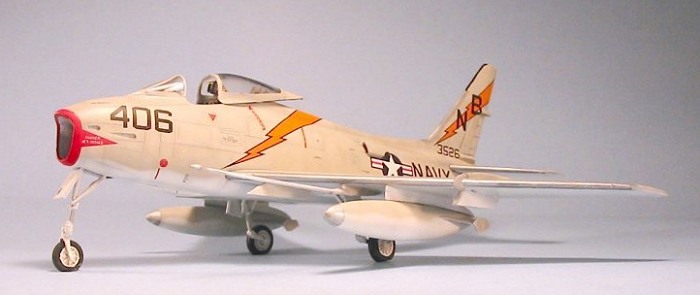
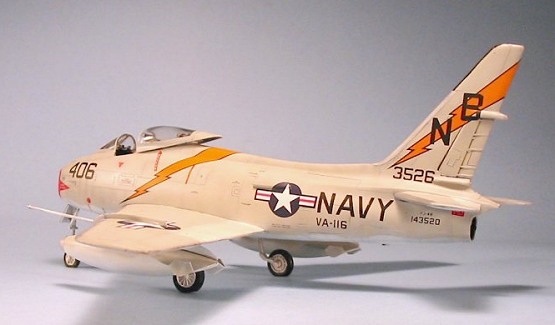
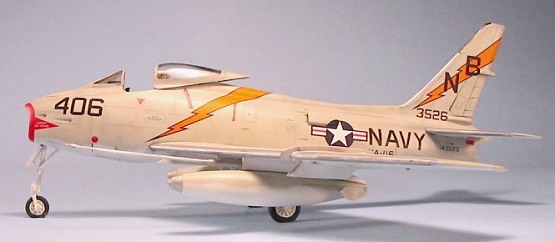
The first thing to notice with the decals is that only one of the airplanes on the sheet is an FJ-4B, going by serial numbers. That one is the VA-116 airplane. Since I had put on the under wing pylons, my choice of markings was easy.
The decals are not as good as one might expect, being thick and resistant to Micro-Sol. Additionally, it is at the point of decaling the model that you discover the fuselage is 3/16" too short aft of the wings - and 3/16" is, let's recall, a scale 8 inches - that's enough to matter. This becomes a problem when you try to position the fuselage insignia and service designator; if you start with the insignia, correctly position it with regard to the fuselage intakes above it, and work aft, the service marking will not fit in its proper position in relation to the tail. All you can do is start with the service marking, position it correctly and work forward. Everything ends up being 3/16" out of position. In the end the model looks OK, and there are not likely to be too many "Fury experts" who can tell you the insignia is improperly positioned, but still...
|
FINAL CONSTRUCTION |
 I gave the
model a final coat of Future, then a coat of Model Master Sealer over the
gloss white areas, so they were not so glossy. I gave the upper surfaces
a coat of Dullcote, and the painting and marking phase was over.
I gave the
model a final coat of Future, then a coat of Model Master Sealer over the
gloss white areas, so they were not so glossy. I gave the upper surfaces
a coat of Dullcote, and the painting and marking phase was over.
After assembling the seat and inserting it, I found the control stick would not fit, so I cut off 1/16" of the bottom and glued it in so it looked right from above. I was already aware that this project had turned into an "almost-acceptable one-footer," and quite frankly just wanted it behind me.
The canopy does not have the rear deck, so I scratchbuilt something that looks "about right", painted it dark grey and inserted it in the canopy. I unmasked the canopy and windscreen, glued the canopy in position (it really doesn't fit in the closed position, and is so poorly molded it has the transparency of a coke bottle even after a good "Futuring").
|
CONCLUSIONS |
 On the basis of
having built the Firefly I released by Grand Phoenix last year, I wasn't
expecting a Tamigawa kit, but I was expecting something superior to a bad
MPM kit from five years ago, or a Fonderies Miniatures model - in fact,
this kit doesn't rank up that high in terms of design and production
quality. Overall, it is more accurate in shapes than the old Matchbox kit
(which is, however, closer to the right length), but that's not saying
much. It is only one-fourth the price of the Collectaire kit, though!
But if you want something more than an "acceptable one-footer," you're
either going to have to refinance the national debt and go for the
Collectaire kit, or wait for some other model company to realize that 50s
jets are "the next big thing" in the hobby. On the 10-point Fun-O-Meter,
10 being best, this FJ-4B is about a 5.7, giving it every benefit of the
doubt.
On the basis of
having built the Firefly I released by Grand Phoenix last year, I wasn't
expecting a Tamigawa kit, but I was expecting something superior to a bad
MPM kit from five years ago, or a Fonderies Miniatures model - in fact,
this kit doesn't rank up that high in terms of design and production
quality. Overall, it is more accurate in shapes than the old Matchbox kit
(which is, however, closer to the right length), but that's not saying
much. It is only one-fourth the price of the Collectaire kit, though!
But if you want something more than an "acceptable one-footer," you're
either going to have to refinance the national debt and go for the
Collectaire kit, or wait for some other model company to realize that 50s
jets are "the next big thing" in the hobby. On the 10-point Fun-O-Meter,
10 being best, this FJ-4B is about a 5.7, giving it every benefit of the
doubt.
Overall, a disappointment, but it is buildable.
June 2003
Copyright ModelingMadness.com. All rights reserved. No reproduction in part or in whole without express permission.
If you would like your product reviewed fairly and fairly quickly, please contact the editor or see other details in the Note to Contributors.