Revell 1/48 F-84E Thunderjet
|
KIT # |
5494 |
|
PRICE: |
$19.95 |
|
DECALS: |
Two Aircraft |
|
REVIEWER: |
|
|
NOTES: |
Cutting Edge F-84 Cockpit and nosewheel bay; Cutting Edge brass gear legs |
|
HISTORY |
The Republic F-84 Thunderjet was the second US jet to achieve production status. Even the initial aircraft proved superior in performance in all categories other than maneuverability compared with the Lockheed F-80 Shooting Star.
The F-84E was the
first of the Thunderjet series to achieve the performance expected in the
design, and the first sub-type to achieve large-scale production. This airplane
was longer than the F-84D and earlier versions, which provided a fineness ratio
to the fuselage that resulted in a top speed just over 600mph. The aircraft was
also capable of carrying a substantial ordnance load in the fighter-bomber role,
and had the range to be an effective bomber escort. The F-84E originally went
into production in 1949 to be used by Strategic Air Command in the
fighter-escort role, and equipped the 27th
 Fighter Escort Wing, led by the
legendary Colonel Don Blakeslee, and the 31st Fighter Escort Wing, led by the
less well-known but equally effective Colonel "Mac" McColpin, the only American
to have commanded all three Eagle Squadrons in the RAF.
Fighter Escort Wing, led by the
legendary Colonel Don Blakeslee, and the 31st Fighter Escort Wing, led by the
less well-known but equally effective Colonel "Mac" McColpin, the only American
to have commanded all three Eagle Squadrons in the RAF.
The Air Force was reluctant to send the "first string" to the Korean War, since most of the top command saw Korea as a sideshow that might turn out to be Act One of World War III, in which case they would need to retain the F-86A Sabre in the continental U.S. to intercept Soviet bombers attacking with the new Soviet A-bomb, and use the F-84E Thunderjet to escort the B-50s that would retaliate.
This attitude was slightly modified when the Soviet MiG-15 showed up over the Yalu in early November. While the F-80s of the 51st Fighter Interceptor Wing seemed able to hold off the new fighter, it was obvious that this was only due to superior pilot training, since the first-generation F-80 was obviously completely outclassed by the second-generation MiG. The Sabres of the 4th Fighter Interception wing and the Thunderjets of the 27th Fighter Escort Wing were alerted to move to Korea in late November and arrived in the theater in early December 1950, as UN forces reeled down the Korean Peninsula following the intervention of the Red Chinese army in the conflict.
Don Blakeslee flew the first F-84E mission over Korea in mid-December. The New Year saw the F-84E enter combat against the MiGs, and while some victories were eked out - again due to superior tactics and pilot training - it was obvious the F-84 did not have the ability to go toe-to-toe with the MiG-15 in the air superiority role, or even in the fighter escort role defending the B-29s. However, the F-84 had range, speed and load-carrying capability that far exceeded that of the F-80C in the fighter-bomber role. The F-84E and later F-84G would take on the chore of ground attack in the Korean War in the same way its predecessor the P-47 Thunderbolt had done in Europe during the Second World War.
 The 49th
Fighter-Bomber Group - which had operated the F-80 since Day One of the Korean
War, was re-equipped with F-84Es in the late Spring of 1951, just before the
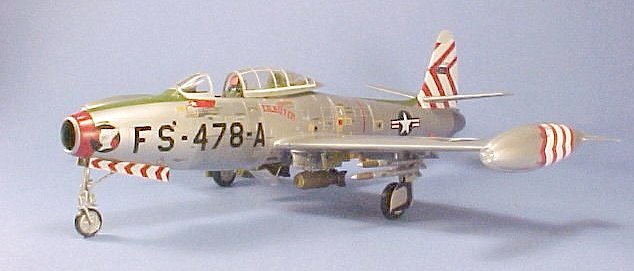
27th FEW was to return to the U.S. The 49th's Thunderjets were among the most
colorful of the period, with the red-and-white, black-and-white and
black-and-yellow rudder stripes that differentiated the 7th, 8th and 9th
Fighter-Bomber Squadrons that made up the group.
The 49th
Fighter-Bomber Group - which had operated the F-80 since Day One of the Korean
War, was re-equipped with F-84Es in the late Spring of 1951, just before the
27th FEW was to return to the U.S. The 49th's Thunderjets were among the most
colorful of the period, with the red-and-white, black-and-white and
black-and-yellow rudder stripes that differentiated the 7th, 8th and 9th
Fighter-Bomber Squadrons that made up the group.
The F-84E would also set a standard for future Air Force fighters by becoming the first one capable of air-to-air refuelling when probes for the British "probe-and-drogue" system were fitted to the airplane's tip tanks, and two different long-range missions to the Yalu were flown out of Japan to prove the system after the F-84s had been flown across the Pacific non-stop from Hawaii to Japan.
|
THE KIT |
Revell-Monogram announced their Thunderjet in early 1998. Unfortunately internal problems in the company resulted in the first kit - the F-84G - not being released for two years, which allowed Tamiya to steal a march with that company's F-84G which was released in September, 1998.
When the R-M F-84G
was released, I made the statement that the kit was not as accurate as the
Tamiya offering, based on drawings. I have since had the opportunity to compare
the Tamiya and R-M kits with the real item out at Chino - where we have three
F-84Es - and now officially reverse that position. In fact, the Tamiya kit
fuselage is too deep in side profile, the ventral fin is too short, and the
vertical fin and rudder are off in shape. While the
 vertical fin shape can be
modified (but not entirely corrected), the other two items are unfixable.
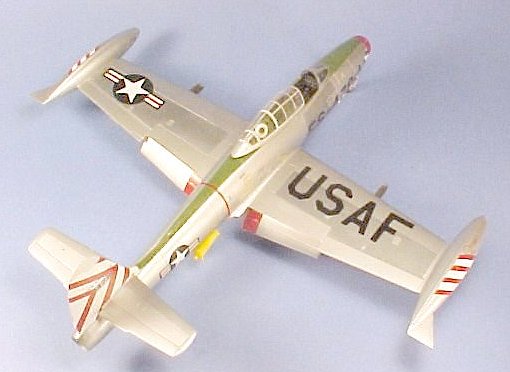
On the other hand, the Revell-Monogram kit is spot-on in fuselage shape. If that
is something that matters to you as a modeler, then not only is the
Revell-Monogram kit the better bargain price-wise, but also in terms of overall
accuracy.
vertical fin shape can be
modified (but not entirely corrected), the other two items are unfixable.
On the other hand, the Revell-Monogram kit is spot-on in fuselage shape. If that
is something that matters to you as a modeler, then not only is the
Revell-Monogram kit the better bargain price-wise, but also in terms of overall
accuracy.
Revell-Monogram released the F-84E earlier this year, with both the clear and reinforced canopy, and a lower nose panel without the blow-in door of the F-84G. The kit also features the tip-tank probes of the air-refueling system used by some F-84Es as described above. This kit offers decals for an early F-84E as flown by Colonel McColpin when he was C.O., 31st FEW, and a later F-84E with the reinforced canopy as flown by the 49th FBW in Korea. These are really excellent decals, far superior to anything released before by Revell-Monogram in my experience, and completely useable.
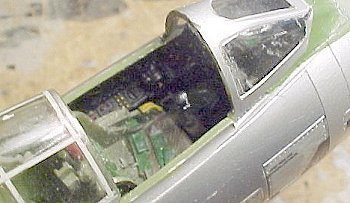
What both the Revell-Monogram and Tamiya kits lacked is a really good cockpit, both being a bit sparse in detail there. Cutting Edge released a very good resin cockpit with seat and a resin nose-gear well, and a really nice set of brass landing gear legs shortly after the Tamiya kit was released. This set is created to fit to the Tamiya kit, which - as stated above - has some fuselage shape and dimension differences with the later Revell-Monogram kit. I decided to see whether the differences were so much that the Cutting Edge set could not be modified to fit the Revell kit.
|
CONSTRUCTION |
 For this kit,
construction started by getting rid of everything inside the cockpit area, and
cutting away the shroud under the windscreen. I also attached the lower forward
fuselage panel, after running some Evergreen sheet around the edges of the
opening to provide a good solid joint for the part.
For this kit,
construction started by getting rid of everything inside the cockpit area, and
cutting away the shroud under the windscreen. I also attached the lower forward
fuselage panel, after running some Evergreen sheet around the edges of the
opening to provide a good solid joint for the part.
Test-fitting of the
Cutting Edge resin cockpit showed there was going to be quite a bit of work on
modifying its shape to conform to the inside of the R-M kit. I brought out the
Dremel and dremeled away, sanded away, test-fit and re-test fit. Finally, I was
able to make the forward part of the cockpit fit, but there was no way to really
make the decking aft of the cockpit fit completely due to dimensional
differences between the Tamiya and R-M kits (the Tamiya kit being too short in
that area). However, this area is completely covered by the
 canopy in either
the open or closed position, so once it was "close enough" I let it be.
canopy in either
the open or closed position, so once it was "close enough" I let it be.
I then painted the cockpit according to the kit instructions and chose the A-1C gunsight installation from the resin parts available. Built up, the cockpit looks far better than the kit-supplied version, and the seat is vastly superior.
The resin nose wheel well fits with only a bit of sanding on the surfaces that fit to the kit parts around the door.
With the difficult part of construction over, I assembled the kit and spent some considerable effort with Mr. Surfacer to get rid of the center fuselage joint seam (which was likely more than it would have been in an OOB assembly, with the resin cockpit inside). With the wheel wells painted yellow zinc chromate (the Tamiya color is perfect for this), it was time to apply a natural metal finish.
|
PAINT & DECALS |
Painting:
 I use SnJ Aluminum
paint as my base coat for a natural metal finish. Unlike Alclad II, it doesn't
need to be primed and there is no possibility of the paint eating the model if
the primer wasn't applied thick enough. You just airbrush it on in light, misty
coats until it looks like what you want, set it aside, and 20 minutes later you
can mask successfully with the stickiest toughest masking tape you can think of
(if you're inclined to do things that wrong), and when you pull it up later
there will be no SnJ pulled up by the tape. Myself, I used low-tack drafting
tape for masking, but I merely want to point out how tough and reliable SnJ is.
I use SnJ Aluminum
paint as my base coat for a natural metal finish. Unlike Alclad II, it doesn't
need to be primed and there is no possibility of the paint eating the model if
the primer wasn't applied thick enough. You just airbrush it on in light, misty
coats until it looks like what you want, set it aside, and 20 minutes later you
can mask successfully with the stickiest toughest masking tape you can think of
(if you're inclined to do things that wrong), and when you pull it up later
there will be no SnJ pulled up by the tape. Myself, I used low-tack drafting
tape for masking, but I merely want to point out how tough and reliable SnJ is.
After masking various areas on the airframe, I apply different colors using Testor's Model Master Metalizer paints, which I seal with the Sealer - yes, the paint will become duller in finish, but the fact of the matter is that a natural-metal finish airplane sitting outside goes dead flat in the sunlight, and this is even more so in an environment like Korea. Highly-polished models of operational aircraft look completely phony if one is trying for a realistic look.
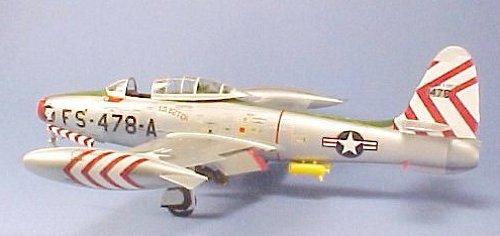
At any rate, the end result is a multi-hue natural metal finish on the model with a minimum of fuss and bother.
Decals:
I applied the kit decals for the 49th FBG airplane as per the decal application diagram in the instructions with no trouble. The decals went down perfectly under a coat of Micro-Sol.
|
FINAL ASSEMBLY |
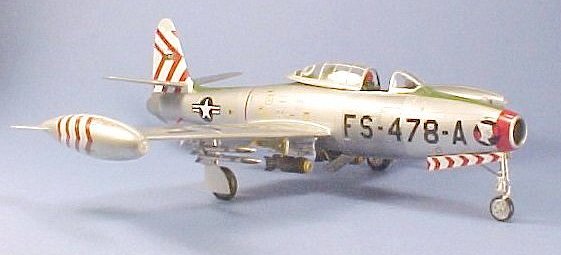
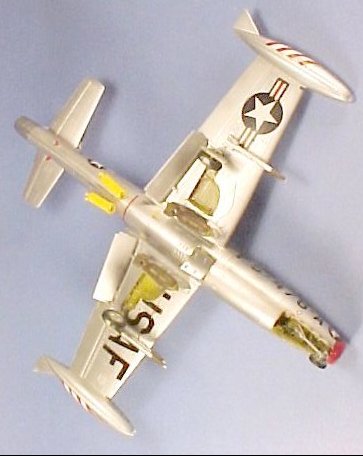
I attached the landing gear and gear doors, the JATO bottles all F-84s used to get off a Korean runway (there was an old joke that, if one built a runway around the equator, Republic would build an airplane that would need every inch for take-off - given that the straight-wing Thunderjet was underpowered, this was very true of its operations), the underwing ordnance, the seat and the canopy.
The end result is a very accurate-looking model of the most effective jet ground attack aircraft of the Korean War.
September 2002
If you would like your product reviewed fairly and fairly quickly, please contact the editor or see other details in the Note to Contributors.