Dynavector 1/48 A2D Skyshark
|
KIT # |
4806 |
|
PRICE: |
@$45.00 |
|
DECALS: |
Three aircraft |
|
REVIEWER: |
|
|
NOTES: |
Vacuformed multimedia kit |
|
HISTORY |
By the end of the Second World War, with operational analysis demonstrating that Navy fighter squadrons had protected the carrier-based strike aircraft so well that defensive crew-manned weapons had proven superfluous, the Navy moved away from the multi-place dive bomber and torpedo bomber strike aircraft, and settled on one single-seat aircraft capable of undertaking both the dive bomber and torpedo strike roles, the Douglas AD Skyraider.
The Skyraider was good, but it was World War II technology, powered by a piston-engine, with performance little better than that of the aircraft it replaced so far as speed was concerned. The Navy looked at the jet engine and knew that was the future, they just didn't know how to bring jet engines onto carrier decks, while still providing the range and ordnance carrying-power necessary for carrier warfare.
 One power plant many designers
were looking at on both sides of the Atlantic in the immediate postwar
period was the turboprop, which seemed to offer higher speeds, while
still offering low-speed controllability that would allow a
turboprop-powered aircraft to operate off existing carrier decks. In
England, this resulted in the Westland Wyvern strike aircraft, which saw
limited service aboard Royal Navy carriers, but acquitted itself well in
its one experience of combat, Operation Musketeer, known to history as
the Anglo-French Suez Intervention of 1956.
One power plant many designers
were looking at on both sides of the Atlantic in the immediate postwar
period was the turboprop, which seemed to offer higher speeds, while
still offering low-speed controllability that would allow a
turboprop-powered aircraft to operate off existing carrier decks. In
England, this resulted in the Westland Wyvern strike aircraft, which saw
limited service aboard Royal Navy carriers, but acquitted itself well in
its one experience of combat, Operation Musketeer, known to history as
the Anglo-French Suez Intervention of 1956.
Shortly after the Skyraider entered service and demonstrated its excellent qualities, Douglas Aircraft suggested a turboprop-powered evolutionary development. The airplane would be approximately the same size as the Skyraider and capable of similar load-carrying. With an aerodynamically cleaned-up airframe most notable in a much thinner wing, and with the 3,035 shaft hosepower with 1,225-lb exhaust thrust of the Allison T-40 turboprop, it was estimated the "Skyraider successor" would be capable of nearly an additional 200 mph top speed, while maintaining the range capability, maneuverability, and carrier qualification of the existing aircraft.
The Navy ordered the Douglas proposal as the XA2D-1 "Skyshark," with two prototypes. The first flew on May 26, 1950, with the second several months later. The two Skysharks were able early on to demonstrate that the estimated performance figures Douglas had quoted to the Navy were achievable; an order for 331 A2D-1s was made that fall as Chinese Communists armies overran the UN forces in North Korea and the Skyraider was proving its worth in the crucible of war.
Unfortunately, the Skyshark had an "Achilles heel," that being the main bearing of the Allison engine, which was basically two J-40 turbojets linked by this main bearing to provide power to the contra-rotating propellers. Allison seemed unable to overcome the problem.
 At the same time that the Skyshark was undergoing the ordeal of being equipped with what turned out
to be an undependable engine, Douglas' Chief Designer Ed Heineman
proposed a new light attack airplane to the Navy. It would be
turbojet-powered, it would have the range to hit the enemy, the speed an
maneuverability to protect itself, and the ability to carry one of the
new lightweight nuclear weapons.
At the same time that the Skyshark was undergoing the ordeal of being equipped with what turned out
to be an undependable engine, Douglas' Chief Designer Ed Heineman
proposed a new light attack airplane to the Navy. It would be
turbojet-powered, it would have the range to hit the enemy, the speed an
maneuverability to protect itself, and the ability to carry one of the
new lightweight nuclear weapons.
With the advent of what would become the Douglas A4D-1 Skyhawk, the hulking Skyshark was cut back to five production aircraft, which only made limited flights before the Navy moved on to adopt state-of-the-art technology embodied in an airplane that would become known as one of the true "greats" of naval aviation.
Skyshark BuNo 125484 managed to evade the wrecker, and ended up out at the Planes of Fame Museum at Chino. Many museum visitors used to marvel at the huge airplane as it sat on the flightline, completely unflyable, but exuding a certain mystique in its look. This airframe still exists, and is up in Idaho today, the property of John Muszala, one of the original "Chino Kids."
|
THE KIT |
Before the release of this
Dynavector kit, the only other kits ever made of the Skyshark were a very
old "desktop model" created by Allyn in about 1950 , and a very nice 1/72
vacuform by Rareplanes, produced in the 1980s. The Allyn kit was picked
up by Microscale in the early 1980s and released with new decals. I know
several modelers - including myself - who attempted to bring this up to
contemporary standards (it had - I believe - five parts, not counting the
stand) with a scratchbuilt cockpit, scratchbuilt landing gear, vacuformed
canopy, etc., etc. I never saw one finished, and my own ended
 up one of
those boxes of parts that went out to become land-fill. The Rareplanes
vacuform was - as was the case with most models from this company - very
nice, with raised detail, and built up into a very acceptable model. It
can still be found and for those who build in 1/72, it is still "the
model you have."
up one of
those boxes of parts that went out to become land-fill. The Rareplanes
vacuform was - as was the case with most models from this company - very
nice, with raised detail, and built up into a very acceptable model. It
can still be found and for those who build in 1/72, it is still "the
model you have."
Dynavector began producing vacuform kits in the early 1990s, and this Skyshark was the sixth of their kits. It is the second most-popular Dynavector kit, the "soul mate" Westland Wyvern being their most popular kit; with over 3,700 sold world-wide, the Wyvern may be the most popular vacuform kit ever made. The Skyshark is a worthy companion.
Main parts are vacuformed on two large sheets of thick plastic. Detail parts, including cockpit detail, landing gear, props and underwing ordnance pylons, are in white metal. The decal sheet, which covers the three production Skysharks to ever fly, is from Fantasy Workshop. Earlier reviewers had noted that the white decals were not sufficiently opaque to successfully go over a Glossy Sea Blue paint scheme, but the decals from this kit - a new production copy made since Taro-san moved back to Japan - presented no problem when applied; it is likely the complaints were noted when new decals were printed.
|
CONSTRUCTION |
Construction of any vacuform starts with taking the parts off the backing sheet and sanding them down to fit. The parts are crisply-molded in this kit, and there was no problem cutting them off the sheet. And evening spent with some rough-grit sandpaper glued on a 2x4 took the parts down to acceptably-thin trailing edges, etc.
 I opened the exhaust holes and
the intake openings on the fuselage halves, thinned the exhaust holes
down from inside, and glued in the white metal exhausts. I then took
some thin Evergreen sheet and glued it to the centerline of the left
fuselage half, to provide extra "mating surface" when the fuselage halves
were glued together. I glued the intake interiors in position, then
glued the fuselage halves together and set that aside.
I opened the exhaust holes and
the intake openings on the fuselage halves, thinned the exhaust holes
down from inside, and glued in the white metal exhausts. I then took
some thin Evergreen sheet and glued it to the centerline of the left
fuselage half, to provide extra "mating surface" when the fuselage halves
were glued together. I glued the intake interiors in position, then
glued the fuselage halves together and set that aside.
The wing halves went together
with no problem after I cut open the wheel wells and glued the vacuform
wheel wells in position. Before assembling the wing, I drilled out all
the 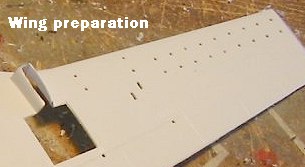 holes on the lower wing for the attachment of ordnance pylons later.
I assembled the white metal cockpit consoles to the vacuform tub, painted and detailed the cockpit in dark grey, attached the instrument panel to the fuselage interior separately, then glued in the cockpit. After that, I made some scratchbuilt bulkheads and glue them in position just aft of the cockpit and just ahead of the rear of the wing cutout, to provide some additional stiffness to the fuselage.
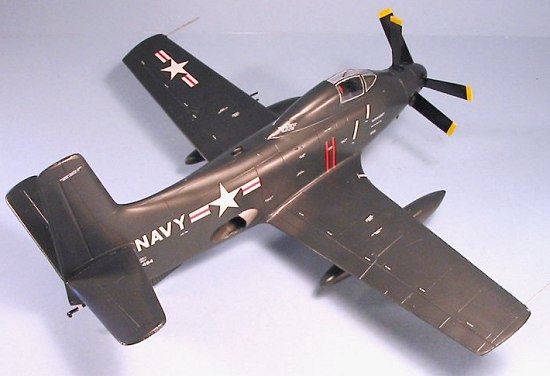
I then attached the wing
subassembly to the fuselage, and attached the horizontal
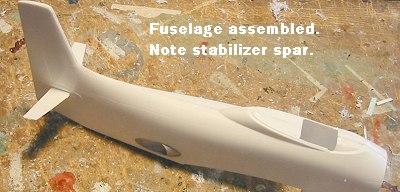 stabilizers.
When the Ambroid had set up, I applied putty to all the seams and joints
and set that aside to dry overnight.
stabilizers.
When the Ambroid had set up, I applied putty to all the seams and joints
and set that aside to dry overnight.
Next, I turned to the propeller assembly. I put CA glue into the vacuform spinners to strengthen them, allowing that to air-dry overnight. the next day, I cut out the circular openings for the propeller blades, attached the white metal backing parts, applied putty to the various assemblies and set that aside to dry while I sanded down the airframe.
Once all the airframe seams were
filled, I applied Mr. Surfacer, and got a smooth overall finish to the
assembly. I rescribed panel lines where necessary.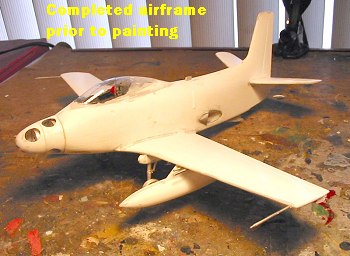
Since I was going to assemble the model with the canopy closed, I decided to use an early injection-molded ejection seat instead of the poorly-done white metal seat provided. This seat might not be "totally right," but since the model is going to be viewed at the Planes of Fame Museum, using this seat was "close enough."
To this point, the kit had assembled like a "Tamiya vacuform." The one big problem in the whole process was getting the canopy to fit smoothly. After gluing it in position, I found I had to use putty, sanding that down carefully afterwards, and three coats of Mr. Surfacer 500 to get a smooth overall connection. I had to repaint the Future on the outside of the canopy to deal with some sandpaper scratches, which came right out under the new coat of Future.
|
CAMOUFLAGE & MARKINGS |
 Painting:
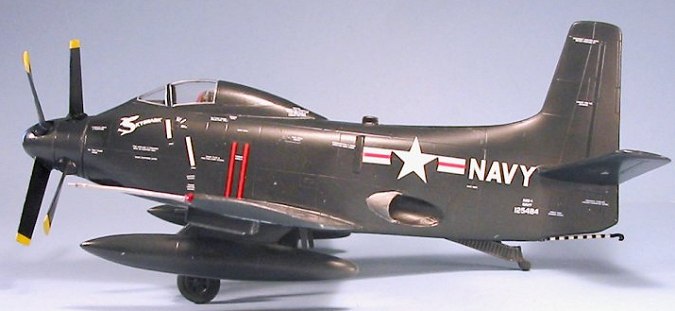
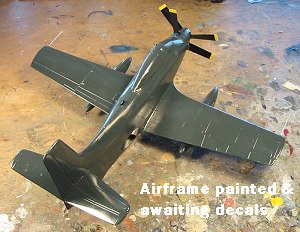
The model was painted with Gunze-Sangyo "Midnight Blue" overall. After the first coat, I found some areas needing additional sanding, Mr. Surfacer 1000, and smoothing, but three thin coats resulted in a good-looking model.
Decals:
The kit decals went down with no problem. I did BuNo 125484 since it is the one that still exists and had a connection to the Planes of Fame Museum where this model is destined to live. The decals were thick enough not to have any "bleed through" over the dark Glossy Sea Blue color.
|
FINAL CONSTRUCTION |
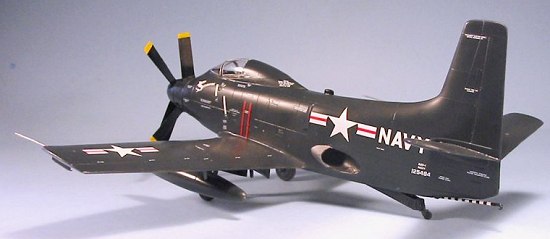
I attached the painted propeller blades, and the wheels, then unmasked the canopy and painted the white "sealer" around the clear glass.
|
CONCLUSIONS |
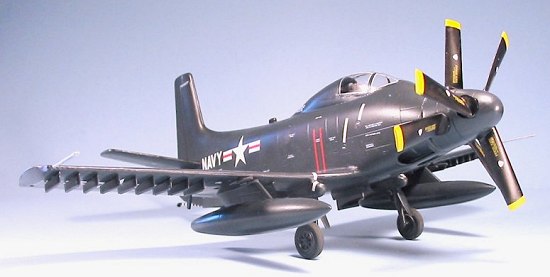
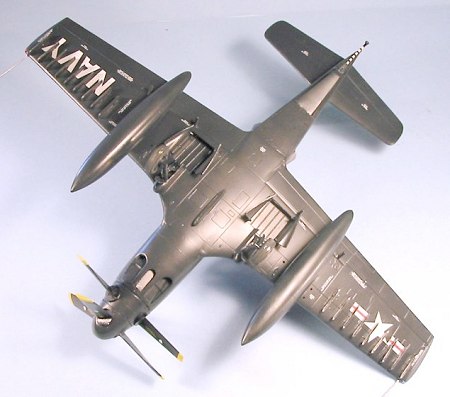 Being "of a certain age" to have
grown up reading books that had photos of all the "Fifties weirdos" of
American aviation in that technologically fast-changing time, I have
always liked the Skyshark for its "look." The kit catches that and
brings this enigmatic airplane to life on my shelf. In case you wonder
how big a Skyshark is, it is 3/4 the size of a B-25. Even in 1/48, it
looks as massive as the original did when I would view it out at Chino
ten years ago.
Being "of a certain age" to have
grown up reading books that had photos of all the "Fifties weirdos" of
American aviation in that technologically fast-changing time, I have
always liked the Skyshark for its "look." The kit catches that and
brings this enigmatic airplane to life on my shelf. In case you wonder
how big a Skyshark is, it is 3/4 the size of a B-25. Even in 1/48, it
looks as massive as the original did when I would view it out at Chino
ten years ago.
This is an easy vacuform that presents no insurmountable difficulties, and could be your "first vac" if you chose to do it, knowing you would have a good result in the end.
July 2003
Review Kit courtesy of HobbyLink Japan, exclusive worldwide distributor of Dynavector kits.
If you would like your product reviewed fairly and quickly , please contact me or see other details in the Note to Contributors.