|
KIT: |
RoG 1/48 F-86D and Hasegawa 1/48 F-86F-40 |
|
KIT # |
|
|
PRICE: |
$? and $29.98 |
|
DECALS: |
See Review |
|
REVIEW & |
|
|
NOTES: |
A great kitbash article` |
CREATING AN F-86L AND A CANADAIR SABRE Mk.IV
|
HISTORY |
F-86L:
The F-86L was an update of the F-86D Sabre, which utilized the longer-span slatted wing of the F-86F-40 to improve high altitude performance and maneuverability, which had always been the weak point of the entire Sabre series with the smaller wings. Additionally, the F-86L was equiped with an onboard datalink to the SAGE (Semi-Automatic Ground Environment) air defense system, the first "computer war" system ever developed, which allowed more accurate interceptions regardless of time of day or weather. (Under 'Project Follow-On', 2,192 kits were ordered in January 1956 with the first modified plane flying in October of that year, Ed). While the F-86L served with several first-line Air Defense Command squadrons, its time in service was shortened by the introduction of the F-102A beginning in late 1956, and it saw the majority of its service with interceptor squadrons of the Air National Guard, with the last units converting on to other aircraft in 1965. The service of the F-86L in the ANG marked the first attempt to bring the reserve units into a more active role vis-a-vis the active Air Force, a development which today sees the Air National Guard as an integral part of the air forces, and providing the air defense of American cities in the aftermath of the attack of September 11, 2001.
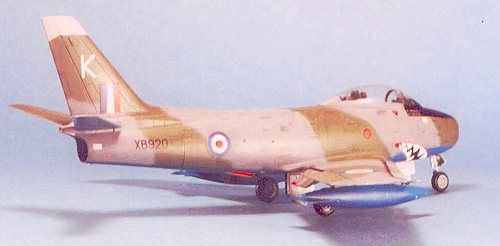
Sabre IV:
When the Royal Canadian Air Force decided in 1949 to adopt the new North American F-86 Sabre as the service's standard day fighter, an agreement was made with the parent company for domestic production of the Sabre by Canadair. The Canadair Sabres eventually included the best single aircraft of the original series, the Orenda-powered Sabre VI - there are those who will argue the Sabre VI was even better than the Australian Sabre, but that belief is open to argument.
The first major production version of the Canadair Sabre was the Sabre Mk. IV, which was equivalent to the North American F-86E Sabre. This had the all-flying tail which allowed for easy transonic dives and maneuverability up to the limiting Mach number, while also being equipped with the original narrow-chord slatted wing.
In the early 1950s, the RAF was primarily equipped with the first-generation Meteor - an aircraft whose limitations were thoroughly demonstrated over Korea by 77 Squadron RAAF; with the Meteor completely outclassed by the MiG-15 which was the primary equipment of Soviet forces facing the NATO air forces, and the Hunter and Swift delayed by design problems, the service turned to the Sabre as interim equipment pending the arrival of the Hunter. 430 Canadair Sabre Mk.IVs were provided through MDAP assistance, with the first aircraft arriving in 1952. All but two of the RAF squadrons that operated the Sabre were in 2TAF based in Germany. The last of the aircraft went operational in November 1953, replacing Vampires - an airplane described by one RAF pilot as "even less militant than the Meteor." The Sabre IV served with the RAF until 1957; many pilots considered the early Hunter F.4 a retrograde step compared to the Sabre IV, with the only benefit being the additional power available. Refitted with the "6-3" leading edge, the Sabre IVs were to later serve with the Italian and Turkish air forces into the early 1960s, and with the Yugoslav air force throughout the 1960s.
|
THE KITS |
The Revell-Germany F-86D Sabre is different from that released in the United States by ProModeler, being an F-86D-45 or later series, with the parabrake housing in the rear fuselage, and using the larger mid-fuselage air intakes. This kit will be generally available in the United States beginning in late October, 2001, though likely at a significantly higher price than the domestic ProModeler version.
Hasegawa's F-86F Sabre in both short wing and long wing versions has been available since the mid 1990s, and is an excellent example of the company's products.
|
CONSTRUCTION |
Take note that, to do the F-86L, you need the Revell/Germany F-86D, which has the parabrake housing. This can be scratchbuilt from the ProModeler kit, but you will have to do the additional conversion on the P-M kit to be right.
 I have long wondered why
Hasegawa or someone else did not do the earlier F-86E Sabre with the slatted
wings. However, when the ProModeler kit was announced, I decided I would use the
opportunity to do a cross-kit conversion of the ProModeler and Hasegawa kits, to
create a long-wing F-86L and a slatted-wing F-86E. This conversion is easier
than one might think, but not so simple as merely swapping wings. That is
because the fuselage center section of the two sub-types is different, with the
Dog Sabre being of deeper section here.
I have long wondered why
Hasegawa or someone else did not do the earlier F-86E Sabre with the slatted
wings. However, when the ProModeler kit was announced, I decided I would use the
opportunity to do a cross-kit conversion of the ProModeler and Hasegawa kits, to
create a long-wing F-86L and a slatted-wing F-86E. This conversion is easier
than one might think, but not so simple as merely swapping wings. That is
because the fuselage center section of the two sub-types is different, with the
Dog Sabre being of deeper section here.
The result of this is that the only way to do this is to cut off the wings, and mate the lower wing surfaces to the proper center section. I did this using some Evergreen strip to strengthen the joint, which made for an overall strong-enough replacement.
F-86D Wing To F-86F Fuselage - the Wing Sweep Problem:
The big problem faced with these conversions was the question of wing sweep. There is marked difference between the sweepback of the Hasegawa and Revell/ProModeler kits. As to which is "correct," both result in a model that "looks like a Sabre to me" built out of the box. However, if you are going to do this cross-kit conversion, the question becomes important.
 The problem is due to the
fact that one has to mate the wing to the lower fuselage section in such a way
that the landing gear wells mate up. If you leave the F-86D wing at its original
sweep angle, mating the wing sections to fit the wheel well will result in the
leading edge of the wing fitting to the fuselage at the same point where the
leading edge of the "6-3" wing does. This is completely incorrect. The only
solution if you wish to keep that sweepback is to thoroughly modify the central
wheel well in the Hasegawa kit's center section. Purists may do this since they
believe the F-86D wing is "right." However, there is a simpler solution:
The problem is due to the
fact that one has to mate the wing to the lower fuselage section in such a way
that the landing gear wells mate up. If you leave the F-86D wing at its original
sweep angle, mating the wing sections to fit the wheel well will result in the
leading edge of the wing fitting to the fuselage at the same point where the
leading edge of the "6-3" wing does. This is completely incorrect. The only
solution if you wish to keep that sweepback is to thoroughly modify the central
wheel well in the Hasegawa kit's center section. Purists may do this since they
believe the F-86D wing is "right." However, there is a simpler solution:
If you take the upper wing part of the Hasegawa kit, and mate it to the upper wing part of the F-86D, so they match along the trailing edge, you will be able to re-cut the wing root of the F-86D wing to match the sweepback of the Hasegawa wing. You than then mate the F-86D upper wing to the lower wing, and cut that wing root. The result of changing the sweep angle is that the F-86D wing will now fit the Hasegawa center section correctly as regards the wheel well, and will fit to the forward fuselage the way the narrow-chord slatted wing should on the real thing. You will have to fill in the hole that results from the wing leading edge being moved back, but this is easy with putty and some sanding, followed by some Mr. Surfacer and some rescribing of panel lines.
F-86D Fuselage and F-86F Wing:
Here the conversion is much simpler. Glue the Hasegawa wing together, then cut off the lower wing in line with the wing root of the upper wing. The wing aligns with the F-86D center section with no problem, and the leading edge merely needs to be puttied in to smooth the transition from wing to fuselage joint.
The F-86F-40 wing was slatted, the same way the earlier wing was. Hasegawa does not provide this. Most modelers do not attempt to create this slatted wing, but as you can see it can be done. I cut the slats out, sanded the interior surface of the slat at an angle so it would look right when in position - making certain to get the proper cross section at the outer tip where it can be seen. I scratch built the leading edge of the inner surface of the wing with Evergreen sheet, and scratch built the slat rails from the F-86D parts. This is not a difficult scratch conversion, and the result looks good.
Construction Continues:
 Once the wings have been
cross-kitted, the rest of the construction proceeds with each kit in accordance
with instructions, other than you should delete the intake in the right rear of
the F-96F fuselage just ahead of the air brake, since this was applicable to the
F-86F-40 version only.
Once the wings have been
cross-kitted, the rest of the construction proceeds with each kit in accordance
with instructions, other than you should delete the intake in the right rear of
the F-96F fuselage just ahead of the air brake, since this was applicable to the
F-86F-40 version only.
Interestingly, the F-86D tail surfaces, which are at the original sweep angle, do not look so different with the Hasegawa wings attached that one needs to worry about changing sweep angle.
Also, there is no appreciable "toe in" that I could see when I attached the wing pylons to the modified F-86D wing in their proper location. You have to use the underwing pylons for the particular wing with that particular wing, since the airfoil sections are slightly different. (But not noticeably so when the model is completed) This means you also use the drop tanks for the F-86D with the D wing, etc. Here, when doing the F-86L, you will want to use the drop tank fins with the vertical fin modification of the later Sabre drop tank.
|
PAINT & DECALS |
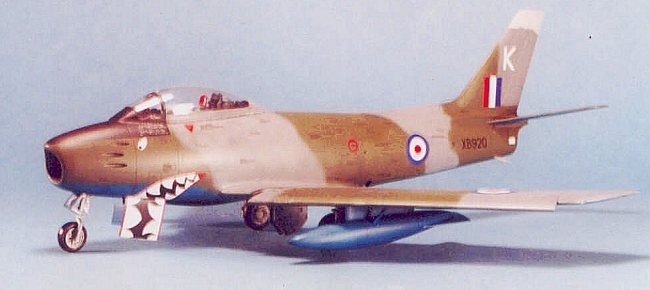
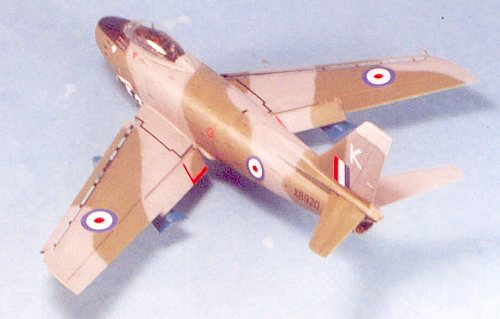
Sabre IV:
I had originally planned to make the F-86E "Honest John" flown by Bud Mahurin in Korea, for which I have the markings from the old Aeromaster USAAF/USAF Top Guns sheet. Unfortunately, I also planned to paint the model with Alclad II that had been provided me by the manufacturer, for a comparison with my SNJ process. Disaster lay in wait.
 As clear as I can
determine, the problem was my use of Tamiya gloss black acrylic paint from the
bottle as the base coat to protect the kit plastic from the Alclad Aluminum
paint, per the instructions that came with the Alclad. I applied the Tamiya
paint and let it dry for 48 hours, a very sufficient time for paint to
completely cure here in the Los Angeles environment. I then applied the Alclad
II Aluminum, per instructions. For about two minutes, I had in my hands an
aluminum-painted model that looked pretty good, but not in my opinion that much
better than one with the SNJ Aluminum paint, especially considering the cost
differential. My love of SNJ increased markedly as the Alclad began to eat
through the primer and attack the model! It was a rush between differing
chemistries as I rapidly applied as much Easy Lift Off as fast as I could, and
began scrubbing off paint, reapplying ELO, scrubbing more. There was still
something recognizeable as my model when the paint was removed, but the surface
now looked as bad as what you get with a Hi-Tech kit.
As clear as I can
determine, the problem was my use of Tamiya gloss black acrylic paint from the
bottle as the base coat to protect the kit plastic from the Alclad Aluminum
paint, per the instructions that came with the Alclad. I applied the Tamiya
paint and let it dry for 48 hours, a very sufficient time for paint to
completely cure here in the Los Angeles environment. I then applied the Alclad
II Aluminum, per instructions. For about two minutes, I had in my hands an
aluminum-painted model that looked pretty good, but not in my opinion that much
better than one with the SNJ Aluminum paint, especially considering the cost
differential. My love of SNJ increased markedly as the Alclad began to eat
through the primer and attack the model! It was a rush between differing
chemistries as I rapidly applied as much Easy Lift Off as fast as I could, and
began scrubbing off paint, reapplying ELO, scrubbing more. There was still
something recognizeable as my model when the paint was removed, but the surface
now looked as bad as what you get with a Hi-Tech kit.
I sanded down the model with progressively finer-grit sand paper, then polished it with Tamiya rubbing compound, then rescribed panel lines where necessary. This was not a model that was going to end up with a natural metal finish with anyone's paint.
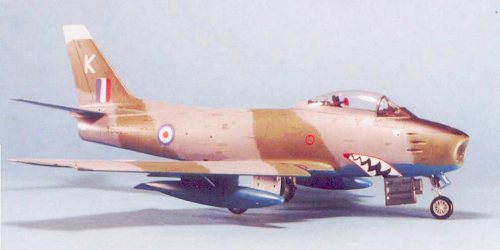 Fortunately, I had the
Cutting Edge decal sheet for foreign Sabres that included a Canadair Sabre IV of
112 "Shark" squadron, RAF. The model surface would have no problem with a
camouflage paint scheme. I painted the model with Acrul PRU Blue lower surfaces
and Gunze Sanyo Dark Sea Grey and RAF Dark Green uppers, over a "preshading" of
semi-gloss black over the panel lines.
Fortunately, I had the
Cutting Edge decal sheet for foreign Sabres that included a Canadair Sabre IV of
112 "Shark" squadron, RAF. The model surface would have no problem with a
camouflage paint scheme. I painted the model with Acrul PRU Blue lower surfaces
and Gunze Sanyo Dark Sea Grey and RAF Dark Green uppers, over a "preshading" of
semi-gloss black over the panel lines.
As a final point, I am aware that many modelers swear by Alclad II, and I have seen the results which look fine to me. However, they do not look so incredibly much better than what I can do with my SNJ basecoat and Model Master Metalizers system for a multi-hue natural metal finish to justify in my mind the major cost increase of Alclad in comparison, coupled with the ease of using SNJ - a paint that is not carnivorous of the model it is going on. As a big believer in the old engineering concept of KISS (Keep It Simple, Stupid), I am going to stick with SNJ.
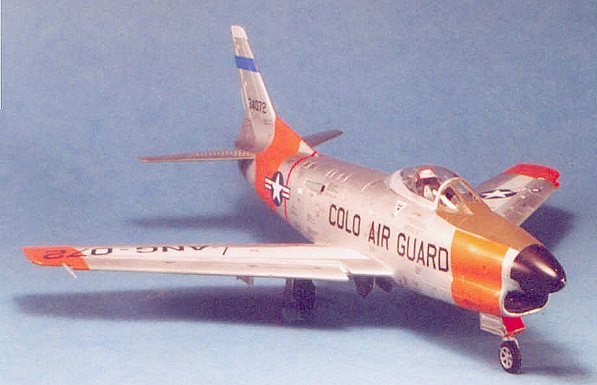
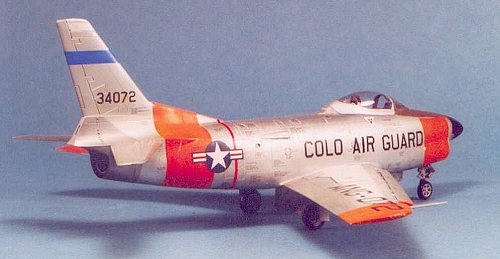
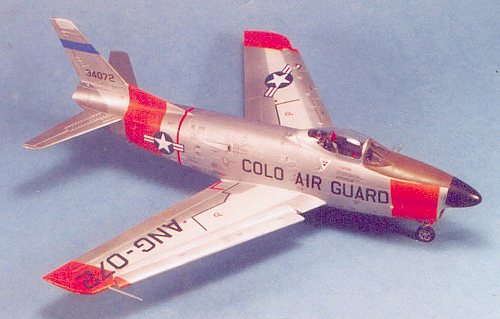
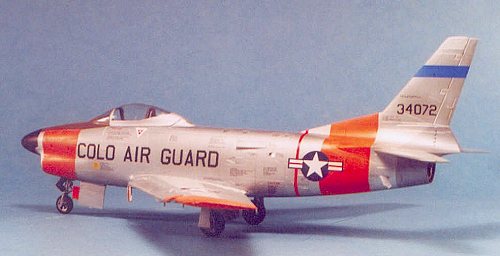
Painting the F-86L:
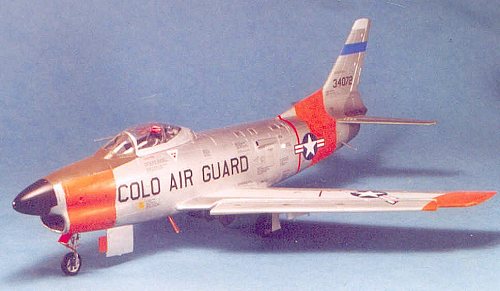 I had decided at the
outset to do a Colorado Air National Guard airplane, since I remembered seeing
these out at Buckley ANG base outside Denver as a kid. However, the problem here
was that the airplanes carried day-glo orange panels on the nose, rear fuselage
and wingtips. The only day-glo paint I am aware of is the Model-Master paint; I
used it once and it was the most difficult paint I ever used (worse than the
Alclad) and I swore ten years ago I would never repeat that fiasco. Fortunately,
MicroScale makes some decal sheets of solid color, including Day-Glo Orange, and
I had an unused sheet. Problem solved.
I had decided at the
outset to do a Colorado Air National Guard airplane, since I remembered seeing
these out at Buckley ANG base outside Denver as a kid. However, the problem here
was that the airplanes carried day-glo orange panels on the nose, rear fuselage
and wingtips. The only day-glo paint I am aware of is the Model-Master paint; I
used it once and it was the most difficult paint I ever used (worse than the
Alclad) and I swore ten years ago I would never repeat that fiasco. Fortunately,
MicroScale makes some decal sheets of solid color, including Day-Glo Orange, and
I had an unused sheet. Problem solved.
I painted the model as I had the F-86D - Tamiya Semi-Gloss Black radome, Gunze-Sanyo Olive Drab anti-glare, and Gunse-Sanyo H-338 Light Grey wing center sections. I masked off those areas and then applied a basecoat of SNJ Aluminum, following that with various shades of Testor Model Master Metalizer paints, though only around the exhaust area; the F-86L was painted in overall aluminum lacquer for anti-corrosion control.
Decals:
The Sabre IVwas done with the Cutting Edge decals, other than I replaced the national insignia with roundels and fin flashes from a ModelDecal Post War British Insignia sheet; the larger 1/72 roundels were perfectly sized for 1/48 use. Almost all American decal makers get the red and blue shades of pre-WW2 and post-WW2 British national insignia wrong, since they use the US colors of Insignia Blue and Insignia Red.
 With the F-86L, the first
thing to do was apply the orange panels. I used typing paper, which I wrapped
around the model at the appropriate place and then sketched in the correct shape
to go over the curves. I then used these to cut out the decal panels and applied
them. As you can see, the process worked perfectly.
With the F-86L, the first
thing to do was apply the orange panels. I used typing paper, which I wrapped
around the model at the appropriate place and then sketched in the correct shape
to go over the curves. I then used these to cut out the decal panels and applied
them. As you can see, the process worked perfectly.
I used national insignia decals from a Sabre sheet in the decal dungeon. All of the other markings, "ANG-072" on the wings, "COLO AIR GUARD" and the serial number, were all pieced out letter by letter from old MicroScale letter-and-number sheets (there is something to be said for having modeling experience from the Jurassic period, when this was the only way you could do anything different).
Final Finish:
The Sabre IV was given a semi-matt finish using thinned Dullcote.
The F-86L had the orange panels dulled down with several coats of thinned Dullcote, while the rest of the model had a semi-gloss finish of one coat of thinned Dullcote, with a couple other coats on the upper surfaces to dull them down as would happen from sunlight effect. I opted for a "new finish" airplane, because the Day-Glo orange was as bad a paint in 1:1 as it is in scale - it weathered and faded both badly and quickly once in service.
|
CONCLUSIONS |
Creating these two models from a cross-kitting kit-bash is an easy conversion - or at least easy to those who have the courage to take a razor saw to a kit and trust they will be able to go the distance with the project. If you have done a couple other kitbashes, this will present no insuperable problems, and the result is a pair of models you can't put into your collection otherwise - unless you want to spend more money than the Hasegawa kit sells for to get the not-so-great Meteor resin wing conversion for an F-86A/F-86E. And then you still won't have an F-86L.
If you would like your product reviewed fairly and quickly by a site that averages thousands of visits a day, please contact me or see other details in the Note to Contributors.