
Kitty Hawk 1/48 FJ-2 Fury
| KIT #: | KH 80155 |
| PRICE: | $74.00 SRP |
| DECALS: | Five options |
| REVIEWER: | Tom Cleaver |
| NOTES: | 2019 release |
| HISTORY |
By the end of November, 1950, the Navy knew that its main fleet fighter, the Grumman F9F-2 Panther, was seriously outclassed by the opposition. LCDR William T. Ament of VF-112 had shot down the first MiG-15 confirmed by the Soviet records (eat your heart out Russell Brown - the MiG-15 you “shot down” was dropping onto the main runway at Antung as you were climbing back to join your flight, no matter what the USAF continues to claim). Ament was the first to say it was dumb luck, that the enemy pilot could have avoided the entire encounter if he had climbed rather than dived. Ament’s airplane was close to out of control when he fired the final burst, and he missed by less than 100 feet making a twin hole in the mountainside right beside his victory. Two other successful Navy MiG kill claims that month were the result of better training on the part of the naval aviators and inexperience on the part of their opponents. Other than Royce Williams’ amazing 7:1 fight two years later in which he succeeded in downing four of his opponents in a triumph of pilot talent, the Panther was clearly not up to meeting a MiG-15 on an equal basis.
Grumman had already convinced the Navy to put swept wings on the Panther, but the Cougar was a good two years down the line from seeing operational service. The F7U Cutlass was becoming a classic “can of worms” with further developmental delay. The Navy was desperate enough to get a copetitive fighter that the Bureau of Aeronautics finally went to North American and asked, “Please Mr. Kindelberger, can you make us a Sabre we can put on an aircraft carrier? And do it fast?”
 Having already taken note of the Navy’s air combat record over Korea,
North American had already put some thought into whether the Sabre could be
navalized, and had determined it could be. The F-86A had a lower landing speed
and better low speed handling than the F9F-5 Panther Grumman was developing. The
swept-wing Sabre had handling and stall characteristics at low speeds comparable
to the best straight winged airplanes. Since no one at the time knew all the
stresses a jet fighter would be subject to, the Sabre had been designed strong
enough that modifying it to take the stress of carrier operations would not be
that hard, other than beefining up the landing gear. The Navy ordered 300 “Sea
Sabres” (later reduced to 200) known as the FJ-2 “Fury,” though its only
connection to the FJ-1 was that both airplanes came from the same factory,
before the first prototype took flight.
Having already taken note of the Navy’s air combat record over Korea,
North American had already put some thought into whether the Sabre could be
navalized, and had determined it could be. The F-86A had a lower landing speed
and better low speed handling than the F9F-5 Panther Grumman was developing. The
swept-wing Sabre had handling and stall characteristics at low speeds comparable
to the best straight winged airplanes. Since no one at the time knew all the
stresses a jet fighter would be subject to, the Sabre had been designed strong
enough that modifying it to take the stress of carrier operations would not be
that hard, other than beefining up the landing gear. The Navy ordered 300 “Sea
Sabres” (later reduced to 200) known as the FJ-2 “Fury,” though its only
connection to the FJ-1 was that both airplanes came from the same factory,
before the first prototype took flight.
The first prototype to fly was actually the third aircraft ordered: designated XFJ-2B and first flown on 27 December 1951, it differed only from a standard F-86E-10 in its armament, having four 20-mm Colt Mk 12 cannons instead of the six Colt-Browning M3 .50 machine guns of the Sabre. (North American had already designed a cannon-armed F-86 for the USAF) The second and third aircraft to fly were designated XFJ-2 and lacked armament, but were modified to be carrier-capable with arrester hooks and longer nosewheel legs to increase angle of attack at take-off and landing, and catapult fittings. In August 1952, carrier trials were held on USS Midway (CVB-41), followed by carrier qualification trials on USS Coral Sea (CVB-43) in October– December 1952. Results were less than satisfactory, with low-speed handling considered poor, while the arrester hook and nose gear leg were too weak for extended carrier operation.
The first production aircraft flew on 22 November 1952. By now, the FJ-2 incorporated further modifications for carrier operations, with the main landing gear tack widened by eight inches, the outer wing panels folding upward, and the windscreen modified to give the pilot a better view during approach. The FJ-2 also featured the F-86E’s "flying tail" without dihedral (thus ensuring there would be no catastrophic “blank-out” of the horizontal stabilizer in full-stall landing configuration), which made the FJ-2 the first carrier fighter capable of supersonic speed. Outwardly, the FJ-2 was hard to distinguish from an F-86E/F, apart from navy markings and the gun muzzles of the 20 mm cannon. The engine was the General Electric J47-GE-2, a navalized version of the J47-GE-27 used in the F-86F, providing 6,000 pounds of thrust. Top speed at sea level was 675 mph and climb rate was 7,230 fpm. Modification for carrier operation put empty weight at 11,802 pounds and takeoff weight at 18,790 pounds, as compared with 18,152 pounds takeoff weight for the F-86F, which had a maximum speed of 687 mph. The addition 650 pounds to airframe weight meant the FJ-2 was slightly underpowered as compared with its land-based cousin, and a decision had already been made to give it to land-based squadrons of the US Marine Corps.
 Because of demand for the F-86 for the Korean War, production was slowed
and the FJ-2 was not produced in large numbers until after the end of the war.
Only seven FJ-2s had been delivered by the end of December 1953. VMF-122
received its first FJ-2s in January 1954. Eventually six Marine squadrons flew
the FJ-2 before it was phased out of first-line service in the course of 1956.
VMF-235 contributed four FJ-2s to tests of the new steam catapult aboard USS
Hancock (CVA-19) in the summer of 1954, and VMF-122 made a Mediterranean cruise
from March-September 1955 aboard USS Coral Sea (CVA-43) as part of Air Group 17.
The Marines tried to solve the type's carrier handling problems, but the FJ-2
was never really satisfactory. It disappeared from first-line service during
1956, with VMF-232 being the last to give up theirs in February 1957. It was
retired from reserve units by early 1958.
Because of demand for the F-86 for the Korean War, production was slowed
and the FJ-2 was not produced in large numbers until after the end of the war.
Only seven FJ-2s had been delivered by the end of December 1953. VMF-122
received its first FJ-2s in January 1954. Eventually six Marine squadrons flew
the FJ-2 before it was phased out of first-line service in the course of 1956.
VMF-235 contributed four FJ-2s to tests of the new steam catapult aboard USS
Hancock (CVA-19) in the summer of 1954, and VMF-122 made a Mediterranean cruise
from March-September 1955 aboard USS Coral Sea (CVA-43) as part of Air Group 17.
The Marines tried to solve the type's carrier handling problems, but the FJ-2
was never really satisfactory. It disappeared from first-line service during
1956, with VMF-232 being the last to give up theirs in February 1957. It was
retired from reserve units by early 1958.
| THE KIT |
The Fury has not been served well in plastic. It was only in the past year that Sword released accurate 1/72 scale kits. ESCI released a kit some 35 years ago in 1/48; the less said about it the better. While it did show the wingfold, and did make the changes to the landing gear and gear wells, the fuselage was basically their F-86 kit with the canopy modified. In other words, very wrong! Some modelers with high levels of pain endurance did manage to rebuild the fuselage into something approximating what it should have been, and they are to be commended. Collectaire released expensive resin kits of the Fury, which have been pronounced the most accurate kits of the airplane. They now command serious kit collector prices.
 When Kitty Hawk announced they would do the FJ-2 and FJ-3, I’ll admit
that I thought to myself “there they go again, poisoning the well for anyone to
do the kit right.” However, over the months as they released more information
about the kit design, it appeared they really were aiming to create something
that wouldn’t end up being described as “another **itty Hawk Kit.” With hope in
my heart, I ordered one the week it became available earlier this month, and a
week later I received a package from Shenzhen, China. The kit cost me $52,
shipping included.
When Kitty Hawk announced they would do the FJ-2 and FJ-3, I’ll admit
that I thought to myself “there they go again, poisoning the well for anyone to
do the kit right.” However, over the months as they released more information
about the kit design, it appeared they really were aiming to create something
that wouldn’t end up being described as “another **itty Hawk Kit.” With hope in
my heart, I ordered one the week it became available earlier this month, and a
week later I received a package from Shenzhen, China. The kit cost me $52,
shipping included.
Opening the box, it appeared my prayers and hopes were answered.
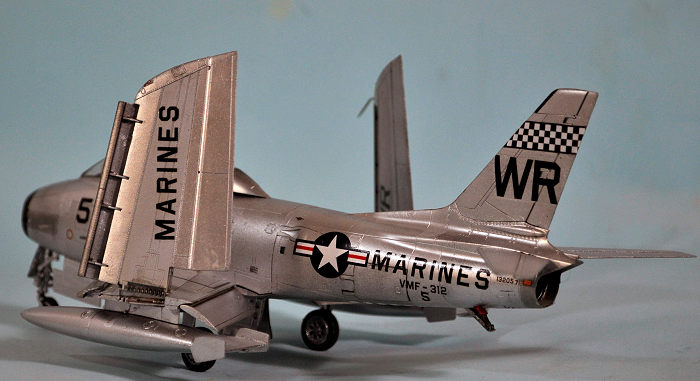
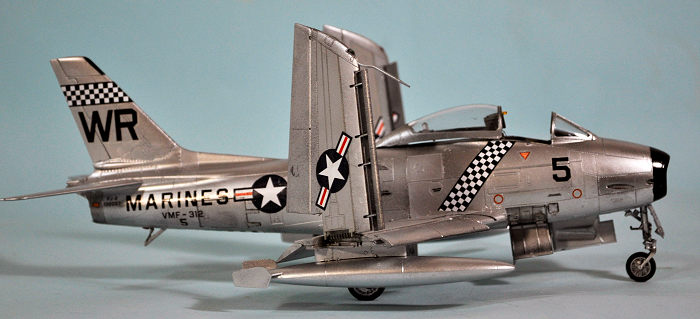
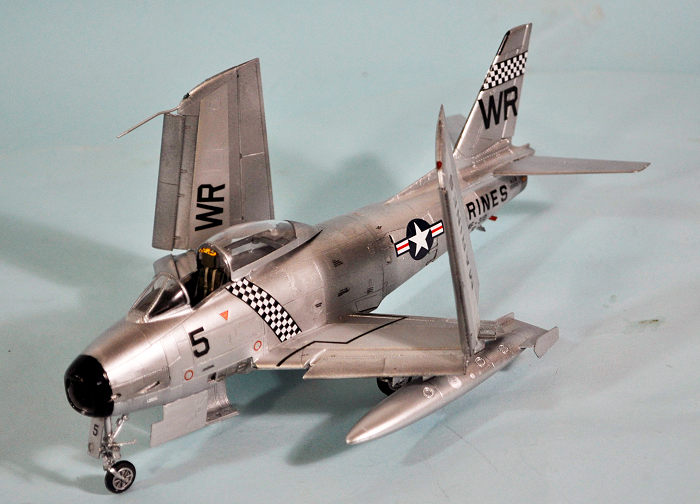
The box contains three light grey sprues with 173 plastic parts plus another clear sprue with 9 parts. There are two crew figures in resin and a small brass etched fret with the seat harness and some other small details. The decal sheet gives marking for five Marine Corps aircraft, of six Marine fighter squadrons to operate the FJ-2). Kit options include separate gear doors, speed brake panels, tail bumper, barrier guard and separate tail hook. The 2-piece canopy can be posed open. There is full cannon bay detail with the ammo bin and shell feeds included as fully-detailed areas. The wing fold is well done and test-fitting showed it was equally able to be posed with wings folded or spread. Wonder of wonders, the slats are separate, as are the flaps and rudder.
The squadrons represented are VMF-122 Werewolves/Candystripers; VMF-235 Death Angels; VMF-312 Checkerboards; VMF-334 Falcons; and VMF-451 Warlords.
While the kit plastic is marvelous, it turns out the decal sheet leaves something to be desired. The user “Sabrejet” over at Britmodeller has done a detailed rundown of the decal shortcomings, and I quote him below:
In terms of decal/colour scheme accuracy, there are issues with all of the aircraft depicted: 1. BuAer No. 132055 13/MX of VMF-334 ‘Falcons’, MCAS Cherry Point. This aircraft was with the squadron from 16May55 to 01May56. My main issue with this scheme is that the stylised ‘falcon’ motifs on the fuselage and tail fin are mid-blue and it’s debatable whether they should be black or dark blue. My feeling (lacking a period colour photo) is that the falcon motif was black (as was the case on the unit’s FJ-4s), but whether blue or black, the shade was much darker than depicted in the kit decals.
2. BuAer No. “131975” 22/WU, VMF-235 ‘Death Angels’, MCAS El Toro and
Atsugi, Japan. The serial number of this aircraft should be 131979, which was
one of four FJ-2s detailed for Operation Steam (often referred to as Project
Steam) aboard the USS Hancock in September 1954. The operation took place in the
waters off San
 Diego as an at-sea evaluation of its new steam catapults. BuAer
No. 131979 served with VMF-235 from 23Apr54 until written off on 10Mar55. For
info, BuAer No. 131975 was also a VMF-235 aircraft, and was with the squadron
from 08Mar54 to 03Jul56, but was not numbered ‘22’. The kit decals have seven
stars on each tail stripe: there should in fact be five per side, with a further
one positioned on the leading edge of the fin (so 11 in total, not 14 as shown
in the decal sheet). The number ‘22’ should also appear beneath the aircraft
type/serial number block on the rear fuselage and this is not included in the
kit decals.
Diego as an at-sea evaluation of its new steam catapults. BuAer
No. 131979 served with VMF-235 from 23Apr54 until written off on 10Mar55. For
info, BuAer No. 131975 was also a VMF-235 aircraft, and was with the squadron
from 08Mar54 to 03Jul56, but was not numbered ‘22’. The kit decals have seven
stars on each tail stripe: there should in fact be five per side, with a further
one positioned on the leading edge of the fin (so 11 in total, not 14 as shown
in the decal sheet). The number ‘22’ should also appear beneath the aircraft
type/serial number block on the rear fuselage and this is not included in the
kit decals.
3. BuAer No. “130257” 5/WR, VMF-312 ‘Checkerboards’, MCAS Cherry Point. The serial number of this aircraft is wrong (130257 isn’t an FJ-2); it should be 132057, which served with VMF-312 from 19Oct54 to 12Feb56. This aircraft should have the number ‘5’ repeated below the unit number on the aft fuselage but it’s missing from the kit. Note that some or all of this unit’s FJ-2s had the checkers repeated on the horizontal tail surfaces and these are not included in the kit.
4. BuAer No. “131987” 12/AM, VMF-451 ‘Warlords’, MCAS El Toro and Atsugi, Japan circa Oct 54 to Nov56. This serial number is incorrect: 131987 was not a VMF-451 machine. This scheme lacks the small ‘12’ which should be positioned beneath the tail serial number. Also the kit decals have nine stars and each fuselage band where there should only be seven. The blue band extends below the fuselage but not the stars. 5. BuAer No. “132000” 318/LC, VMF-122 ‘Candystripers’, aboard USS Coral Sea 23 March to 29 September 1955. This serial number is incorrect: 132000 was not a VMF-122 machine. I’m not 100% sure what the correct serial number of this machine should be, but photographs show what looks like ‘13xxx9’, which from aircraft on the Coral Sea cruise would make it one of BuAer Nos. 131939, 131949, 131959, 131969 or 132049. Note: the 3-digit modex numbers only applied to the Coral Sea cruise; when not aboard, they carried two-digit modex numbers, minus the prefix ‘3’. Note that the tail stripes and 3-digit number should be on a slope, not as depicted in the kit instructions.
I’ll just cut to the chase here and say that, from my experience of trying to use the decals, the national insignias are too large (fixed with Fundekals national insignia). Additionally, the fuselage stripes for the VMF-122 airplane are too short to use; fortunately I discovered that when I could still just rub the decals off. The other fuselage stripes for VMF-235 and 451 are way too long. I ended up doing the VMF-312 option because I only needed to slightly trim the checkerboards to fit the fuselage and vertical fin, and was able to transpose the serial numbers correctly with the above information.
So, basically, the kit is proof that one can indeed take the boy out of the trailer park, but taking the trailer park out of the boy is a different matter. One can hope that the aftermarket decal makers will come to the rescue, because this is a very nice kit otherwise. I will go so far as to say it is Kitty Hawk’s best, and I am now looking forward to the FJ-3 which should be released in the first quarter of 2020.
| CONSTRUCTION |
After looking through the kit, I found only one “nit” — the “ribbed” elevators and rudder – and that one not really a nit since in the late period of their operational life FJ-2s were updated with the FJ-3 control surfaces.
I spent a few hours going over the instructions and looking at the parts and decided I would do a few things “my way.” You can probably do everything their way and things will work, but I think my way will lead to a better final result with less hassle. The main decision was regarding the fuselage. I would build it as two complete halves, and attach the inner parts differently than the instructions called for.
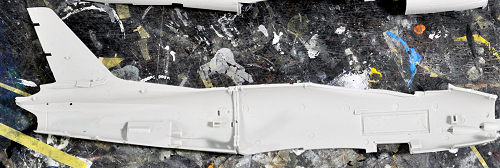 The first thing I did was cut the frames to be inserted at the fuselage
break points of the fore and aft fuselage assemblies and then glue everything
into their respective fuselage parts. This allowed me to assemble the fore and
aft parts of the fuselage to create two complete fuselage halves. Doing it this
way allowed me to work the parts from inside and outside, to get perfect fit
without having to worry later about filler.
The first thing I did was cut the frames to be inserted at the fuselage
break points of the fore and aft fuselage assemblies and then glue everything
into their respective fuselage parts. This allowed me to assemble the fore and
aft parts of the fuselage to create two complete fuselage halves. Doing it this
way allowed me to work the parts from inside and outside, to get perfect fit
without having to worry later about filler.
Once that was done, I decided I was going to go with the cannon bays closed. The kit presents good basic material for the cannon bays and a super-detailer who wanted to put in the necessary wiring and such has got the basics to go for it. This also allowed me to work those cannon bay doors from inside and outside and get them perfectly aligned before applying any glue, since Kitty Hawk neglected to provide any nice “ledges” for them to attach to (which would be there in the real thing!).
The cannon bays are necessary for structural support of the cockpit, but
you don’t need the guns since they aren’t seen, I discovered. After assembling
and attaching the gun bays, I then assembled the intake trunking and the engine.
People have already complained that the engine provided is the J-65 that powered
the FJ-3 r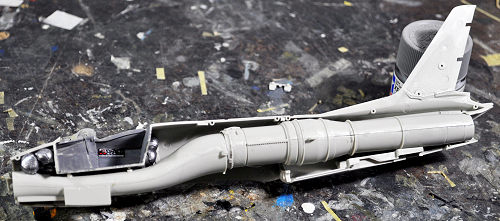 ather than the J-47, but you can’t see the engine unless you’re going
to have it with the rear fuselage pulled away for a maintenance diorama.
However, you do need the engine in there for the exhaust. This is far from a
deal-breaker.
ather than the J-47, but you can’t see the engine unless you’re going
to have it with the rear fuselage pulled away for a maintenance diorama.
However, you do need the engine in there for the exhaust. This is far from a
deal-breaker.
With the interior parts in the right fuselage half, I did a balance test and, yes, nose weight was going to be needed. I squashed some cannonball fishweights and put them in the space in the nose over the intake trunking and ahead of the cockpit. Just for “insurance,” since it’s always a pain to realize when you can’t add more weight, I added two more glued to the rear cockpit bulkhead. The fuselage was definitely nose-heavy.
I then painted the cockpit Tamiya “Dark Sea Grey,” a good approximation for “Dark Gull Grey,” the color Navy cockpits are painted. When dry, I applied the instrument decals, which set down easily under an application of Solvaset despite the fact they are a bit thick (not Tamiya-thick).
When I glued the fuselage together, I found the parts fit very precisely, so rubber-banding was necessary to insure they didn’t move out of position while the Tamiya Extra-Thin was setting up.
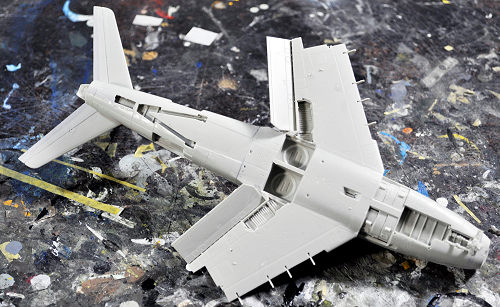
Assembling the wing center section revealed the flaps are designed to be positioned down. You can modify them otherwise, but it’s like fiddling with the Tamiya Corsair or the Hasegawa Japanese fighters with dropped flaps. It’s doable, but it’s a hassle. I decided to “go with the flow” on this and pose them down.
 When I removed the rubber bands from the fuselage, I found I only needed
to apply some Mr. Surfacer to the centerline on the top of the fuselage and
ahead of the cockpit, as well as the nose cap. Five minutes with sanding sticks
made the seams disappear and I rescribed where necessary.
When I removed the rubber bands from the fuselage, I found I only needed
to apply some Mr. Surfacer to the centerline on the top of the fuselage and
ahead of the cockpit, as well as the nose cap. Five minutes with sanding sticks
made the seams disappear and I rescribed where necessary.
The fuselage and wing subassemblies went together without problem and with perfect fit, I assembled the nose gear and main gear at this point, including the outer doors on the main gear, but leaving the rest of the gear doors to be attached after painting.
I applied Mr. Surfacer to the horizontal stabilizers and rudder to get rid of the ribbing. Once set up, I sanded them smooth, then attached them to the model. After assembling the drop tanks, I was ready to paint. One note here about the drop tanks: there is nothing provided to insure you install them correctly to the wing! Butt joins with no guidance! Like I said, you can take the boy out of the trailer park...
One final bit of assembly information. As with many of the other parts, the dive brakes are designed to be displayed “open.” Even doing that, however, you need to do some work with the hinges so they will fit in their slots right. Almost all FJ-2 photos show the airplane with the brakes closed. I had to file down the hinges to fit, and the brake then fitted closed without a problem. This will also make decaling easier, since the kit decals are not separated to fit the parts in open configuration.
| COLORS & MARKINGS |
I painted the wing center sections with Tamiya Flat Aluminum mixed with
Gloss White to get the grey-silver shade I’ve seen on Sabre wings out at Planes
of Fame. I then masked that, and gave the model an overall coat of thinned
Tamiya Semi-gloss Black. When that was dry, I gave it an overall coat of Vallejo
Aluminum. This was followed by brush painting White Aluminum, Dull Aluminum and
Duraluminum on various panels, in line with a good color photo I found of a NMF
FJ-2. The nice thing is, Vallejo paints brushpainted over Vallejo paint do
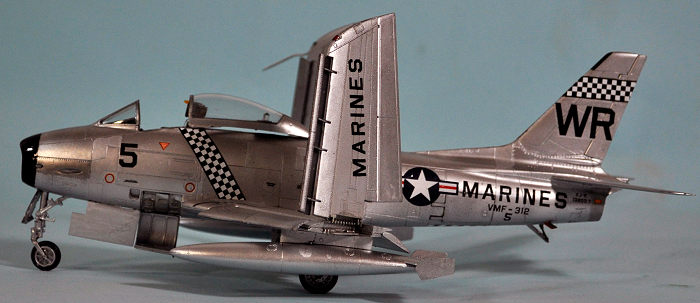 not
leave any brush marks. Thus, it’s easy to do a multi-hue finish since you don’t
have to worry about masking off and risk pulling up this very thin paint. After
the paint had dried, I attached the leading edge slats.
not
leave any brush marks. Thus, it’s easy to do a multi-hue finish since you don’t
have to worry about masking off and risk pulling up this very thin paint. After
the paint had dried, I attached the leading edge slats.
Once fate determined that the model was going to be the VMF-312 option, I proceeded to apply the checkerboards first, to be sure they fit. The fuselage checkerboards were a big long and were trimmed off at the cockpit. Other than fiddling with the transposed serial number, the decals went on without problem under Solvaset. The kit decals were very shiny, so I dulled them down to match the surface they were on with an application of Clear Satin finish.
I figured out where the drop tanks should be positioned and attached them. I then attached the dropped landing gear doors and the ammunition bay panels. I painted the nose cone gloss black to finish the squadron markings. I put the seat in the cockpit and attached the canopy in the open position.
I finally decided I would indeed fold the wings. That way, this “silver Sabre” will stand out from the other silver Sabres in the collection. I think I will do the FJ-3 with the wings lowered.
| CONCLUSIONS |
Take it from this professional Kitty Hawk basher, who has actually told the Kitty Hawk designer to his face that he should be stuffed head-first in a Mojave Desert red ant hill: this is a good kit. It’s definitely Kitty Hawk’s best. The atmosphere over the workbench didn’t even get a little bit lavender, let alone purple.
 The decals are a disappointment, but other than the
Candystriper decals, they can be made to work. You do need different national
insignia or nothing else will fit where it should. “Sabrejet’s” analysis of what
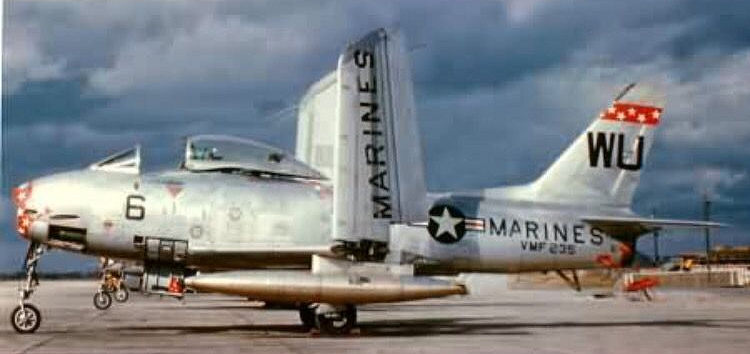
the problems are is very accurate. Here is a photo from Wikipedia to help you
determine shades and placement.
The decals are a disappointment, but other than the
Candystriper decals, they can be made to work. You do need different national
insignia or nothing else will fit where it should. “Sabrejet’s” analysis of what
the problems are is very accurate. Here is a photo from Wikipedia to help you
determine shades and placement.
There is nothing involved in assembling this kit that will present any problems to any modeler with some moderate amount of experience.
I’ve now got a Sabre with folded wings that looks right!
28 November 2017
Copyright ModelingMadness.com
Review kit courtesy of my wallet.
If you would like your product reviewed fairly and
fairly quickly, please
contact
the editor
or see other details in the
Note to
Contributors.
Back to the Main Page
Back to the Review
Index Page
Back to the Previews Index Page