KittyHawk 1/48 F2H-P Banshee
| KIT #: | KH 80131 |
| PRICE: | $ |
| DECALS: | Four options |
| REVIEWER: | Tom Cleaver |
| NOTES: |
Rieth Creations resin correction set used. Available from Rieth Creations for $45.00 |
| HISTORY |
The first jet aircraft to be used successfully on operations from a U.S. Navy aircraft carrier was the McDonnell FH-1 Phantom. The aircraft was not really combat ready and was transferred to the naval reserves by 1949, disappearing from service by 1952.
The fourth jet ordered by the Navy was the F2H Banshee series, a development of the FH-1. Design of what became the Banshee was initiated before delivery of the production FH-1s, and McDonnell originally intended the aircraft would be a modified Phantom, sharing as many parts as possible. However, as it became clear the Navy needed an airplane with heavier armament, greater internal fuel capacity, and increased overall performance, the designers realized they were working on a completely different airplane that would only share a similarity of look with the earlier design.
More powerful engines were required, and two newly-developed Westinghouse J-34 turbojets were used, giving 3,000 lbs thrust as compared with the J-30's 1,600 lbs thrust. Placing the engines in the wing root similar to the FH-1 required a thicker, larger wing of 41 ft, 6 in as compared to the FH-1's 40 ft 0 in. The fuselage was lengthened 12 inches over the FH-1 to provide space for increased fuel capacity, which was increased to 877 gallons. The Banshee was designed to use an ejection seat from the outset. The cockpit was pressurized and air-conditioned; flaps, landing gear, folding wings, canopy, and air brakes were operated electrically rather than pneumatically as on the FH-1, and the windscreen was bulletproof glass, electrically heated to prevent frost.
 Originally designated XF2D-1, a mockup was completed, inspected and approved in
April 1945. While the project survived cutbacks at the end of the war,
development was slowed and the first prototype was not completed until December
1946, with first flight on 11 January 1947. During the first flight, the
prototype demonstrated a climb rate of 9,000 ft/min, twice that of the F8F
Bearcat. In 1947, it was re-designated XF2H-1 and an order was placed that May
for 56 F2H-1s. McDonnell was able to deliver the first of these in August 1948,
three months after the last FH-1 left the factory.
Originally designated XF2D-1, a mockup was completed, inspected and approved in
April 1945. While the project survived cutbacks at the end of the war,
development was slowed and the first prototype was not completed until December
1946, with first flight on 11 January 1947. During the first flight, the
prototype demonstrated a climb rate of 9,000 ft/min, twice that of the F8F
Bearcat. In 1947, it was re-designated XF2H-1 and an order was placed that May
for 56 F2H-1s. McDonnell was able to deliver the first of these in August 1948,
three months after the last FH-1 left the factory.
The F2H-2 appeared in 1949, powered by J34-WE-34s with 3,250 lb thrust. The wing was modified and strengthened to allow carriage of detachable 200 gallon wingtip fuel tanks, while two armament racks were added under each stub and outboard wing, allowing a maximum load of four 250 lb bombs and four 5-in HVARs.
Initial delivery began in 1949 to Atlantic Fleet squadrons; thus the Banshee did not see combat in Korea until USS Essex brought VF-172 to the war in September 1951. With a service ceiling over 45,000 feet, Banshees escorted B-29s. Banshees provided fewer than one in five of the jets that saw combat in Korea and scored no victories in air combat, while three were lost to ground fire by the end of hostilities.
During VF-172's deployment aboard Essex, James A. Michener was aboard ship for six weeks during the first “Cherokee Strikes.” When he returned home six months later and began work on “The Bridges At Toko-ri,” his pilots flew Banshees, though this was later changed to F9F Panthers in the film adaptation.
The
F2H-2P was a photo-reconnaissance version with six cameras housed in a 2 ft 5 in
(0.74 m) longer nose. Remote controls allowed the pilot to rotate the cameras in
the vertical and horizontal planes, and the aircraft could be fitted with a pair
of underwing pods that each contained 20 flash cartridges for night photography.
The camera bay was electrically heated to prevent frost. The F2H-2P was
considered the best photo-recon aircraft used in Korea due to its extended
maximum range, maximum operational altitude of 48,500 feet, and high speed that
made it extremely difficult to intercept. None were lost in
 Korea.
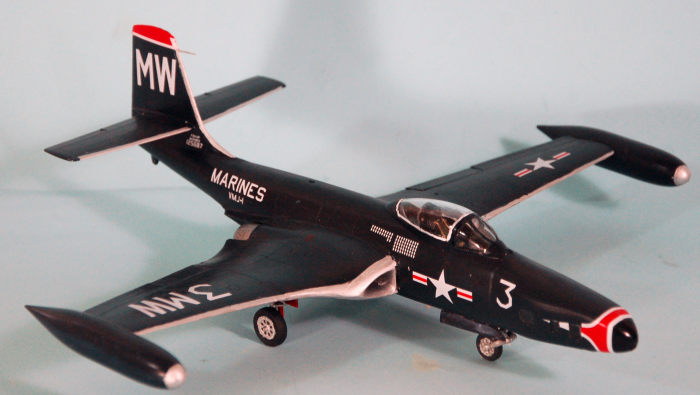
Marine Photographic Squadron 1 (VMJ-1) was formed on the F2H-2P in early 1952, and came to Korea that spring. Over the next 17 months of the war, VMJ-1 flew one-third of all photo reconnaissance missions in 5,025 sorties during which they used 793,012 feet of film. VMJ-1's high-mission pilot was Master Sergeant James R. Todd, whose record of 101 missions included 51 in F2H-2P Banshees. He later recalled, “we relied on a thirty-eight pistol, a can of film and a lot of speed.”
Master Sergeant Lowell C. Truex found it difficult as an enlisted aviator to get the Sabre pilots assigned as his escorts to take him seriously when he gave them a pre-mission briefing. “Some of them took a very casual attitude about escorting a Marine reconnaissance pilot.” However, they soon discovered that the Banshee’s speed meant they had to fly at high power settings to keep up. “The Banshee had more fuel than they did, and it was not uncommon for them to reach ‘bingo’ fuel before the mission was finished. We frequently finished the run and flew home alone.”
Master Sergeant Calvin R. Duke, who claimed to be the oldest NAP flying combat in Korea, was once caught by two MiG-15s while making a photo run in “Mig Alley.” He outmaneuvered them from where they initially caught him at 38,000 feet down to 10,000 feet, where he was able to outrun them using the Banshee’s higher low-altitude speed.
| THE KIT |
The first Banshee model appeared around 1954, released by Hawk, and was based on the F2H-1. This kit had no cockpit or landing gear. In 1958, it was modernized with landing gear. It would be the only 1/48 Banshee kit for the next 60 years. In the late 1980s, Airfix released a 1/72 F2H-2/2P Banshee, which was markedly more accurate than the Hawk kit. Collect-Aire released an expensive all-resin F2H-2/2P around 2002 that provided an accurate model for those willing to pay the premium price. In 2012, KittyHawk announced they would include a 1/48 F2H-2/2P Banshee in their line of U.S. Navy 1950s jets.
The eagerly-awaited kit was released in 2018, to universal cries of “foul.” (Not universal as your editor liked it.) Rather than finally provide modelers with an accurate Banshee, the kit managed to continue the KittyHawk tradition of “poisoning the well” with their line of poorly-designed inaccurate kits.
 The
major problem was the wing, and specifically the area of the engines, which was
markedly too thick. This was so bad that most modelers didn’t notice the
too-shallow cockpit or the incorrect ejection seat, or the fact that the flaps
pretty much didn’t fit in any position, though they were less-obviously wrong
when posed down. The canopy had little detail and could only be posed in the
closed position unless a modeler scratchbuilt the operating mechanism. The
vertical fin and rudder were also incorrect. There was poor fit throughout.
Sales came to a screeching halt as this news flashed through the internet
modeling community. More than a few kits ended up flying through the air to hit
the wall, becoming landfill.
The
major problem was the wing, and specifically the area of the engines, which was
markedly too thick. This was so bad that most modelers didn’t notice the
too-shallow cockpit or the incorrect ejection seat, or the fact that the flaps
pretty much didn’t fit in any position, though they were less-obviously wrong
when posed down. The canopy had little detail and could only be posed in the
closed position unless a modeler scratchbuilt the operating mechanism. The
vertical fin and rudder were also incorrect. There was poor fit throughout.
Sales came to a screeching halt as this news flashed through the internet
modeling community. More than a few kits ended up flying through the air to hit
the wall, becoming landfill.
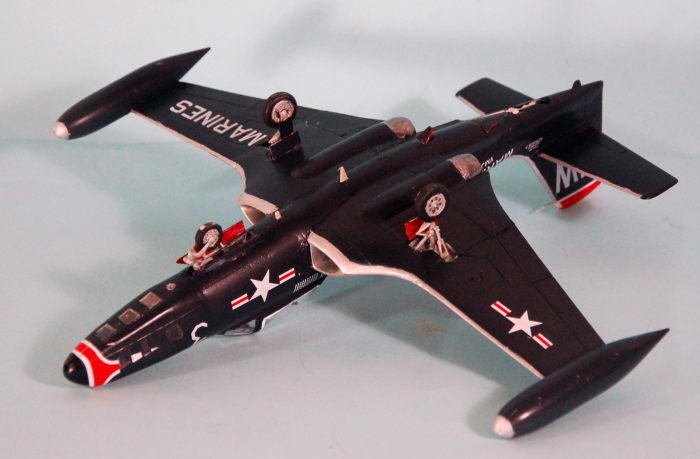
Fortunately, Michael Rieth, who owns Rieth Creations, a resin design company, decided he would make a correct-shaped center section for his model. He announced what he was doing over at The Other Place and The World’s Greatest Modelers (ask them, they’ll tell you) became interested as he published his progress. By this past January, he had created the necessary parts to replace the wing center section, the ill-fitting flaps, and the rear fuselage and vertical fin, and began taking orders from those interested. He has since decided to create a better F2H-2P nose and a nose for an F2H-2N, and may proceed with designing a new cockpit, seat and open canopy. As he said to me recently, “If I corrected everything that was wrong with this kit, I’d be producing an all-resin complete kit.” According to Michael, part of KittyHawk’s problem was confusion between the F2H-2 and the later F2H-3/4, with parts released in the first kit being more appropriate to the F2H-3/4, which is really a very different airplane from the F2H-2.
However, the wing center section takes care of the most objectionable part of the kit. Under a coat of paint, it transforms the model from a candidate to fly against a wall to something that looks good at the standard viewing distance of 3 feet.
There have been two different aftermarket decal sheets for Banshees released, which solve the problem of the poor decals in the kit.
| CONSTRUCTION |
This is not a project for the faint of heart, and you should have considerable experience building short-run, resin, and conversion kits if you want to maximize your chance of success. Michael Rieth has a blog at his website with complete instructions on what to do, fully illustrated with photos. It’s a very good idea to start by studying these instructions thoroughly before proceeding.
 The
first sub-assembly is the fuselage. The tail section is cut off on a panel line.
The incorrect cockpit doesn’t really matter that much, since it is overall
black, and will be under the canopy, which isn’t the clearest piece of clear
plastic ever molded. I wasted some Eduard seat belts on this after looking at
the poor photo-etch seatbelts provided in the kit. I could have saved myself the
effort, looking at it now completed.
The
first sub-assembly is the fuselage. The tail section is cut off on a panel line.
The incorrect cockpit doesn’t really matter that much, since it is overall
black, and will be under the canopy, which isn’t the clearest piece of clear
plastic ever molded. I wasted some Eduard seat belts on this after looking at
the poor photo-etch seatbelts provided in the kit. I could have saved myself the
effort, looking at it now completed.
The nose wheel well requires considerable modification, since as designed the nose wheel will sit toward the rear, which would be right if this was an F2H-3. The nosewheel gear assembly is mostly for the F2H-3, but once it’s in the well few will notice. The nose wheel fork is too long and needs to be cut. Follow Michael’s instructions on where to cut, because you need to keep strength in that joint afterwards since it is load-bearing when the model sits on its gear. Also, the shape of the nose wheel gear doors is not correct for the F2H-2 and needs to be modified in accordance with the instructions at Michael’s blog; again, the entire nose wheel set-up is for the F2H-3.
I put fishweights in the nose forward of the cockpit above the gear well, and beneath the cockpit behind the gear well. Be sure to put in more than you think necessary, because you are attaching a relatively-heavier resin tail at the other end, and the wing center section is also heavier than the kit parts. There was plenty of space. With the fuselage assembled, I attached the resin tail. Be careful here in getting a good fit, because it’s a butt-joint.
I then turned to the wing center section. I assembled the jet engines, then cut them off to only have the engine face to glue to the intake and the exhaust to position in the rear. This is necessary since the engine won’t fit as one part due to the fact the resin center section parts are thicker than the injection-molded parts from the kit.
When I test fitted the upper and lower center section parts and the intakes, I noticed that the forward edge of the lower center section was slightly warped; this shape is hard to mold, and it’s hard to detect if it’s happened other than to cut the parts off their molding blocks and do the test-fitting. I wasn’t sure if putting the lower center section in hot water would solve this, so I used a different method of assembly than Michael shows in his instructions. You should test-fit as I did so you know if you need to go this route.
I
attached the upper center section part to the fuselage. This allowed me to work
that joint from inside and outside, to get it as tight as possible. I then
filled in the seam with cyanoacrylate glue and Mr. Surfacer 500. I then test
fitted the intakes and found I would have to trim the area of the fuselage just
forward of the wing to match the resin part; interestingly, despite the fact the
left and right intakes are similar, the trimming on each side was different.
With that done, I attached the intakes in position and was able to work them
from inside and
 out to get a good fit before gluing. Again, it was necessary to
fill the seam with Mr. Surfacer. I then attached the lower section, cutting off
the “lip” at the forward edge. I used Squadron Gray Putty and Mr. Surfacer to
fill up the sag in the area immediately behind the intake parts.
out to get a good fit before gluing. Again, it was necessary to
fill the seam with Mr. Surfacer. I then attached the lower section, cutting off
the “lip” at the forward edge. I used Squadron Gray Putty and Mr. Surfacer to
fill up the sag in the area immediately behind the intake parts.
I had already assembled the outer wings and test-fitted them to the center section. They didn’t match. I found the solution was to sand down the wheel wells that attach to the lower center section part and then slide them into position; this way they don’t make the wing thicker with the resin center section parts being thicker than the plastic parts would be. I also used the plastic parts for the “wings folded” option in both the resin center section and the plastic outer wings, which resulted in them being “close enough” in fit to have the wings spread. If you scrape off the detail in these parts, the wing will fit in the down position and you can fill the area between the two parts with cyanoacrylate to provide a solid connection. I had to use Mr. Surfacer for the wing joints.
When everything had set up overnight, I spent the next day sanding things smooth, re-applying cyanoacrylate and Mr. Sufacer as necessary to hide all the seams and get everything smooth. I then rescribed the surface detail using a #11 blade and my pounce wheel to reapply the rivet detail.
I attached the flaps in the raised position. Michael’s flaps fit much better than the kit parts do, though I still had to fill in the joints, sand them smooth and rescribe the detail. I then attached the drop tanks. Read Michael’s instructions on the modification you should do to the tanks to get them to fit right, otherwise it is very easy to get things wrong. I finished off by attaching the horizontal stabilizers and filling those seams with cyanoacrylate, then sanding and rescribing.
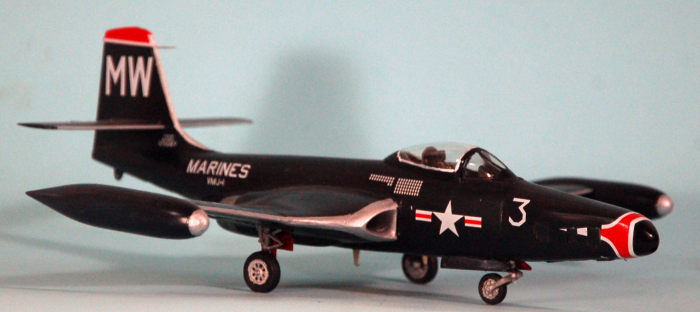
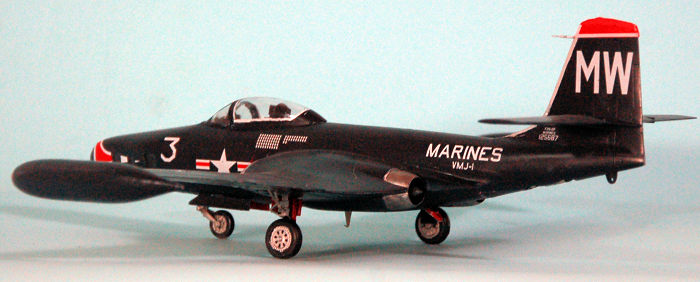
It’s pretty useless to do much with the photo nose. I assembled the cameras and painted them black, then painted the interior of the nose green. The clear plastic parts are slightly too small, and are not very clear. Once everything is assembled, all you see through the windows is that something black is on the other side. I then attached the nose and filled that seam with cyanoacylate and covered it with Mr. Surfacer, then sanded it smooth and rescribed the detail.
When it came time to attach the canopy, I discovered that the windscreen doesn’t fit, with the front tip sticking up. I sanded down the mating surface till it fit right, then glued the part and finished by gluing the sliding canopy in position. I masked them off in anticipation of painting.
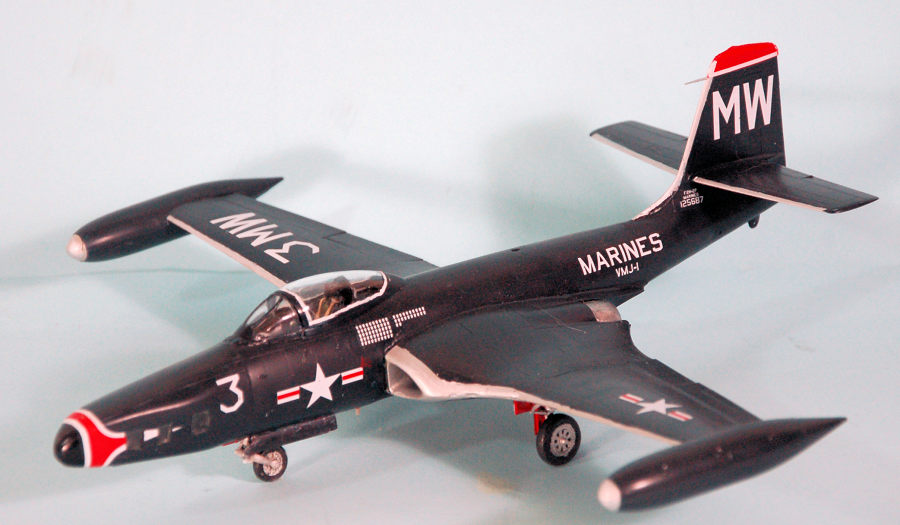
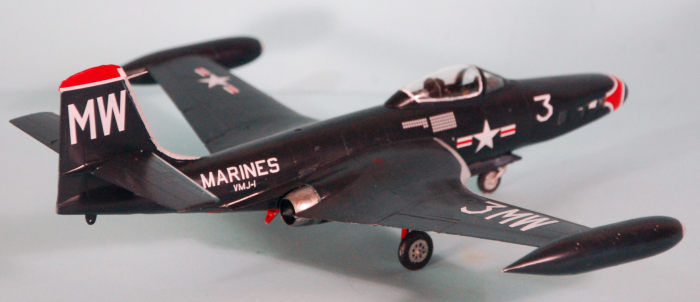
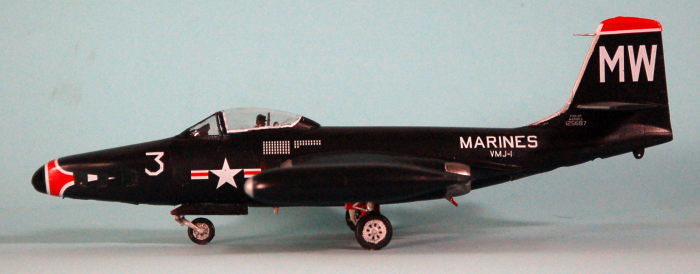
| COLORS & MARKINGS |
I painted the leading edges of the flying surfaces with Tamiya Flat Aluminum, then masked off the silver area. The entire model was painted with Xtracrylix Glossy Sea Blue, which I think is the most accurate shade for this color. I let it dry overnight and then unmasked the model and applied a coat of clear gloss overall.
 The
kit decals are basically awful. They’re very thin and it is necessary to let
them soak for a good 90 seconds or so until they are just ready to float off the
backing sheet in order to slide them off without tearing them or distorting
them. The national insignia for the wing is too small, so if you have decals for
the star-and-bar without blue backing for naval aircraft of this era, use them.
In fact, go order one of the aftermarket sheets and use them. Fortunately, the
white color on the kit decals is opaque enough to go over a dark blue background
and still look white.
The
kit decals are basically awful. They’re very thin and it is necessary to let
them soak for a good 90 seconds or so until they are just ready to float off the
backing sheet in order to slide them off without tearing them or distorting
them. The national insignia for the wing is too small, so if you have decals for
the star-and-bar without blue backing for naval aircraft of this era, use them.
In fact, go order one of the aftermarket sheets and use them. Fortunately, the
white color on the kit decals is opaque enough to go over a dark blue background
and still look white.
When the decals had set, I gave the model an overall coat of clear Satin, to tone down the glossiness to a more “scale” look.
I assembled and attached the landing gear, then unmasked the clear parts.
| CONCLUSIONS |
If you really really really need to have an F2H-2 Banshee in your collection, and if a degree of accuracy is important to you, then you really do need Michael Rieth’s construction set. Any modeler who has had experience with short run and resin kits will be able to use the set. Just be aware that the end result proves the old saying that, no matter how much lipstick you put on a pig, at the end of the day it’s still a pig. However, if you use Michael’s parts, it will be a pig that’s sitting in your collection, rather than in a collection of broken parts where it was hurled against the wall in complete frustration. The kit’s reputation has driven down prices, so you should be able to find one for half of MSRP if not a greater discount.
Rumors abound that the Kittyhawk FJ-3 scheduled for release in April will “get things right” due to its design being based on the Collect-Aire kit. The F2H-3 scheduled for summer is said to have a redesigned and corrected wing and also based on a Collect-Air kit. People also believe in unicorns.
If you would like your product reviewed fairly and fairly quickly, please contact the editor or see other details in the Note to Contributors.
Back to the Main Page Back to the Review Index Page Back to the Previews Index Page