| KIT #: | KH 80156 |
| PRICE: | $ |
| DECALS: | Four options |
| REVIEWER: | Tom Cleaver |
| NOTES: | Caracal Models CD 48174 |
| HISTORY |
By the end of November, 1950, the Navy knew that its main fleet fighter, the Grumman F9F-2 Panther, was seriously outclassed by the opposition. LCDR William T. Ament of VF-112 had shot down the first MiG-15 confirmed by the Soviet records (eat your heart out Russell Brown - the MiG-15 you “shot down” was dropping onto the main runway at Antung as you were climbing back to join your flight, no matter what the USAF continues to claim). Ament was the first to say it was dumb luck, that the enemy pilot could have avoided the entire encounter if he had climbed rather than dived. Ament’s airplane was close to out of control when he fired the final burst, and he missed by less than 100 feet making a twin hole in the mountainside right beside his victory. Two other successful Navy MiG kill claims that month were the result of better training on the part of the naval aviators and inexperience on the part of their opponents. Other than Royce Williams’ amazing 7:1 fight two years later in which he succeeded in downing four of his opponents in a triumph of pilot talent, the Panther was clearly not up to meeting a MiG-15 on an equal basis.
Grumman had already convinced the Navy to put swept wings on the
Panther, but the Cougar was a good two years down the line from seeing
operational service. The F7U Cutlass was becoming a classic “can of worms” with
further developmental delay. The Navy was desperate enough to get a competitive
fighter that the Bureau of Aeronautics finally went to
 North American and asked,
“Please Mr. Kindelberger, can you make us a Sabre we can put on an aircraft
carrier, and do it fast?”
North American and asked,
“Please Mr. Kindelberger, can you make us a Sabre we can put on an aircraft
carrier, and do it fast?”
Having already taken note of the Navy’s air combat record over Korea, North American had already put some thought into whether the Sabre could be navalized, and had determined it could be. The F-86A had a lower landing speed and better low speed handling than the F9F-5 Panther Grumman was developing. The swept-wing Sabre had handling and stall characteristics at low speeds comparable to the best straight winged airplanes. Since no one at the time knew all the stresses a jet fighter would be subject to, the Sabre had been designed strong enough that modifying it to take the stress of carrier operations would not be that hard, other than beefining up the landing gear. The Navy ordered 300 “Sea Sabres” (later reduced to 200) known as the FJ-2 “Fury,” though its only connection to the FJ-1 was that both airplanes came from the same factory, before the first prototype took flight.
The first prototype to fly was actually the third aircraft ordered: designated XFJ-2B and first flown on 27 December 1951, it differed only from a standard F-86E-10 in its armament, having four 20-mm Colt Mk 12 cannons instead of the six Colt-Browning M3 .50 machine guns of the Sabre. (North American had already designed a cannon-armed F-86 for the USAF) The second and third aircraft to fly were designated XFJ-2 and lacked armament, but were modified to be carrier-capable with arrester hooks and longer nosewheel legs to increase angle of attack at take-off and landing, and catapult fittings. In August 1952, carrier trials were held on USS Midway (CVB-41), followed by carrier qualification trials on USS Coral Sea (CVB-43) in October– December 1952. Results were less than satisfactory, with low-speed handling considered poor, while the arrester hook and nose gear leg were too weak for extended carrier operation.
The first production aircraft flew on 22 November 1952. By now, the FJ-2 incorporated further modifications for carrier operations, with the main landing gear tack widened by eight inches, the outer wing panels folding upward, and the windscreen modified to give the pilot a better view during approach. The FJ-2 also featured the F-86E’s "flying tail" without dihedral (thus ensuring there would be no catastrophic “blank-out” of the horizontal stabilizer in full-stall landing configuration), which made the FJ-2 the first carrier fighter capable of supersonic speed. The addition 650 pounds to airframe weight meant the FJ-2 was slightly underpowered as compared with its land-based cousin
During development of the FJ-2, it was seen that the J-47 would not
provide the same performance as the F-86 due to the extra weight. Development of
a version powered by the Wright J65, a license-built version of the British
Armstrong Siddeley Sapphire turbojet promised to deliver 28 percent more thrust
than the J47, for little gain in weight. The new version was designated FJ-3,
and an order for 389 aircraft was placed in
 March 1952. FJ-2 BuNo 131931 was
modified to test the new engine, which lived up to expectation, and the first
production FJ-3 flew on July 3, 1953. In early service, problems were
encountered with the J65 engine, including failures of its lubrication system
under the acceleration of launch or during maneuvers, and failure of the turbine
blades. Because of its more powerful engine, the FJ-3 was superior to most
models of the F-86, except the F-86H. The only externally visible change
required by the new engine was a deeper intake to accommodate the larger mass
flow.
March 1952. FJ-2 BuNo 131931 was
modified to test the new engine, which lived up to expectation, and the first
production FJ-3 flew on July 3, 1953. In early service, problems were
encountered with the J65 engine, including failures of its lubrication system
under the acceleration of launch or during maneuvers, and failure of the turbine
blades. Because of its more powerful engine, the FJ-3 was superior to most
models of the F-86, except the F-86H. The only externally visible change
required by the new engine was a deeper intake to accommodate the larger mass
flow.
Early FJ-3s had the same wing as the FJ-2, but from 1955 onwards the "6-3" wing, with a leading edge that was extended 6 inches at the root and 3 inches at the tip was substituted. This modification enhanced maneuverability at the expense of a small increase in landing speed due to deletion of the leading edge slats. The FJ-3 6-3 wing was different from that fitted to the F-86F, as camber was applied to the underside of the leading edge to improve low-speed handling and the new leading edge also held extra fuel. From the 345th aircraft onwards, the wings were provided with four stations for external loads.
Deliveries began in September 1954, and the FJ-3 joined the fleet in May 1955. An FJ-3 was the first fighter to land aboard the new supercarrier USS Forrestal (CVA-59) in 1956. In March 1954 the Navy ordered an additional 149 aircraft for a total of 538 FJ-3s. The last 194 were modified to FJ-3Ms with the ability to carry AIM-9B Sidewinders. Some FJ-3s were later modified to control Regulus missiles (KDU-1), and Grumman F9F-6K Cougar target drones as the FJ-3D. In 1956 the Navy retro-fitted all its FJ-3s with probe-and-drogue air refueling equipment, a long probe being fitted under the left wing.
Like other second-generation jets in the 1950s, the period of the fastest technological change in aviation history, the FJ-3 did not have a long life in first-line service as squadrons began to change over to the supersonic F8U-1 Crusader in 1958. The Fury lasted in reserve service long enough for its designation to change in 1962 to F-1C (FJ-3), MF-1C (FJ-3M) and DF-1C (FJ-3D).
| THE KIT |
 The FJ-3 kit began appearing in China this past April, and made it to US
distributors in May, a matter of weeks before Kitty Hawk announced it was going
out of business. Modelers scrambled to get it as prices went up. I was fortunate
to order one as soon as it showed up at a US online distributor and got it for
the original MSRP of $49.00. The kit is no longer available at any trustworthy
online dealer. Hopefully, the rumor that the line will be picked up by Trumpeter
or Hobby Boss will prove true and the kit will become available again in 12-18
months.
The FJ-3 kit began appearing in China this past April, and made it to US
distributors in May, a matter of weeks before Kitty Hawk announced it was going
out of business. Modelers scrambled to get it as prices went up. I was fortunate
to order one as soon as it showed up at a US online distributor and got it for
the original MSRP of $49.00. The kit is no longer available at any trustworthy
online dealer. Hopefully, the rumor that the line will be picked up by Trumpeter
or Hobby Boss will prove true and the kit will become available again in 12-18
months.
The kit differs from the earlier FJ-2 in replacing that kit’s Sprue A with a Sprue A carrying parts specific to the FJ-3, such as the slatless 6-3 wing.
As with the FJ-2 the kit decals are less that wonderful, with wrong-size national insignia and squadron markings that don’t quite fit, as well as BuNo decals that are not accurate for sub-type. Fortunately, Caracal Decals came to the rescue with CD48173 and 48174, FJ-3 Parts 1 and 2, which include early Glossy Sea Blue airplanes (which can only be done by a mix-and-match of the two kits, using the FJ-2 wing on the FJ-3 fuselage), gull grey-and-white FJ-3 and 3Ms in Navy and Marine markings, and FJ-3Ds, as well as schemes for reserve aircraft. Like the kit, these have also sold out.
| CONSTRUCTION |
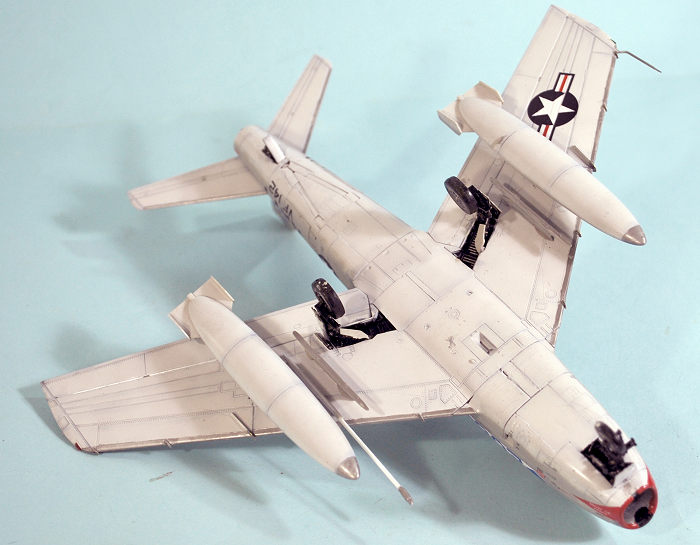
I assembled this kit with the wings spread, the flaps raised, and the gear doors, ammo doors and canopy closed. Doing so proved that this kit, like all other Kitty Hawk kits with lowered/opened options, really wants to be built the way I did with the FJ-2: wings folded, flaps dropped, and gear doors, ammo doors and canopy open. If you want a problem-free build, follow that option. Besides, a Fury with wings folded looks better in any collection of Sabres.
I assembled the fuselage the way I did for the FJ-2. The first thing I did was cut the frames to be inserted at the fuselage break points of the fore and aft fuselage assemblies and then glue everything into their respective fuselage parts. This allowed me to assemble the fore and aft parts of the fuselage to create two complete fuselage halves. Doing it this way allowed me to work the parts from inside and outside, to get perfect fit without having to worry later about filler.
Once that was done, I decided I was going to go with the cannon bays closed. The kit presents good basic material for the cannon bays and a super-detailer who wanted to put in the necessary wiring and such has got the basics to go for it. This also allowed me to work those cannon bay doors from inside and outside and get them perfectly aligned before applying any glue, since Kitty Hawk neglected to provide any nice “ledges” for them to attach to (which would be there in the real thing!).
The cannon bays are necessary for structural support of the cockpit, but
you don’t need the guns since they aren’t seen, I discovered. After assembling
and attaching the gun bays, I then assembled the intake trunking and the engine.
People have already complained that the engine provided is the J-65 that powered
the 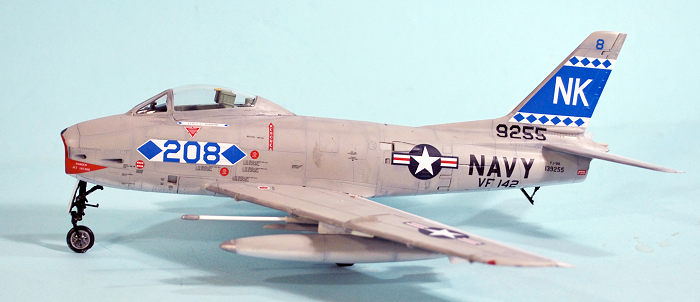 FJ-3 rather than the J-47, but you can’t see the engine unless you’re going
to have it with the rear fuselage pulled away for a maintenance diorama.
However, you do need the engine in there for the exhaust. This is far from a
deal-breaker.
FJ-3 rather than the J-47, but you can’t see the engine unless you’re going
to have it with the rear fuselage pulled away for a maintenance diorama.
However, you do need the engine in there for the exhaust. This is far from a
deal-breaker.
With the interior parts in the right fuselage half, I did a balance test and, yes, nose weight was going to be needed. I squashed some cannonball fishweights and put them in the space in the nose over the intake trunking and ahead of the cockpit. Just for “insurance,” since it’s always a pain to realize when you can’t add more weight, I added two more glued to the rear cockpit bulkhead. The fuselage was definitely nose-heavy.
One now arrives at the cockpit, which must be painted before putting it in the fuselage.
The FJ-2 and FJ-3 came from the factory with the cockpit and ejection seat painted in a “Teal” Green. When the FJ-3s went through overhaul following the official change of cockpit color for Navy airplanes to Dark Gull Grey, many (but not all) were repainted in this color. At some point in the production line, the cockpits were painted DGG, but this did not occur at some logical point like the changeover to the FJ-3M. Almost all photos of FJ-3s have the canopy closed, so one can only see the headrest of the seat. If it’s a color photo, one can differentiate between Teal and DGG. However, the cockpit the seat was in could be Teal or DGG with the seat in the opposite color or the same color. To top it off, FJ-3s with the different colors all served at the same time in squadrons, and the changeover to the ribbed elevators and rudders, which might signify the “color change” cannot be trusted, since early-production airplanes had these retrofitted at overhaul, when they might or might not have had the cockpit repainted.
Thus, any guess you want to make is as good as any other, and nobody can prove you wrong since there are no color photos of operational FJ-3s with the canopy open and the cockpit visible in the shot.
I chose to do the cockpit and seat in “Teal.” I created the color using Tamiya XF-21 “Sky” out of the bottle with XF-4 “Flat Blue” in a mix of 4 parts XF-21 to 1 part XF-4.
I used the kit decals for the instrument panels and made my first wrong decision in deciding I would close the canopy when the fuselage was assembled since the cockpit wasn’t as detailed as the real thing, but what could be seen through the very clear canopy would look OK.
Moving on, there is another interesting color question. The “official”
colors for the landing gear, gear well and gear door is: silver gear legs and
wheel hubs (silver lacquer), gloss insignia red
 overall gear well and gear door
insignia. This is right for all the various paint schemes.
overall gear well and gear door
insignia. This is right for all the various paint schemes.
However, in an effort to control corrosion at sea, the Navy made a strange decision to paint interior areas like wheel wells, flap wells, interiors of gear doors and flaps, and sometimes the gear legs as well, semi-gloss black with a paint that looked like fresh tar. This can be found in F9F Panthers and Cougars, F7U Cutlasses, and FJ-3s. It wasn’t a good idea, since it prevented maintainers from spotting corrosion early on, as well as making maintenance hard because the color-coded wires were also painted black. It stopped after a few years, and not all airplanes got it, but it is there to be found in photos.
One can find photos of all the airplanes for which Caracal provides markings. Of course, the one I chose happened to have this black gear, a fact confirmed after spotting that in a black-and-white photo when I found the color original. I learned all the above from Tommy Thomason, the go-to-source for information on navair. For this model, the gear wells and gear doors and gear legs were painted with Tamiya X-18 “Semi-gloss Black.” I made my second poor decision when I decided to close the main gear doors, to match the photo I found.
As regards the wings, assembly of the wings up or down is equally easy, though if you are going to raise the flaps you need to cut out the ribbing inside the wing so the flap can sort of fit; but the wing part itself is a bit thick back there, so you don’t get a nice smooth junction between wing upper surface and flap. The easy fix as pointed out earlier is not to make this choice. There is a “Kitty Hawk problem” if you are doing an FJ-3 in that the locating holes in the lower right wing for the missile rails is not in the “mirror” location of the left wing, which is in the correct position. I measured the distance of the correct locating holes on the right wing from a panel line, and got the position. You also need to mark the location for the new locating holes you are going to drill with the right part for the left wing rail, since those locating pins are not the same as the locating holes on the right wing. So draw the line for the holes on the wing, then measure the distance from the flap line to the rearmost hole on the right wing and mark that, then match the forward hole to the correct part. A further note - do not attach the missile rails until they have been painted, since they are Light Gull Grey. Also, do not attach the refueling probe until final assembly, so you don’t break it off. (Yes, I discovered all this the hard way, as a favor to you so you won’t have to)
The kit provides the “ribbed” rudder and elevators found on late-production FJ-3s, which was also refitted to some (but not all!) earlier airplanes. Again, perhaps the appearance of these on the production line might have something to do with the cockpit color change, but since they were also refitted to earlier airplanes, so no one can say with any certainty.
Once all this had been discovered and the model successfully assembled, it was time to paint it.
| COLORS & MARKINGS |
The photo I found of the airplane I was doing showed some wear to the
paint, with the areas of panel lines darker (just like a model!). I preshaded
the model with Tamiya X-18 Semi-Gloss Black. I then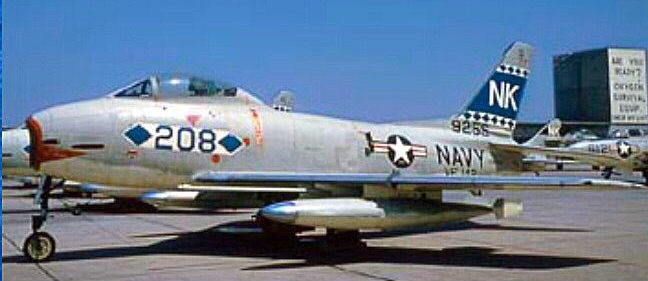 painted the lower surfaces
with Tamiya X-2 Gloss White (with a small tiny brushful of X-18 to make it
“off-white”). I then painted the upper surface light gull grey after masking off
the flaps, ailerons and elevators. In both cases, I applied the paint thinned
50-50, so the underlying pre-shading would show though correctly.
painted the lower surfaces
with Tamiya X-2 Gloss White (with a small tiny brushful of X-18 to make it
“off-white”). I then painted the upper surface light gull grey after masking off
the flaps, ailerons and elevators. In both cases, I applied the paint thinned
50-50, so the underlying pre-shading would show though correctly.
I finished off by masking the wings, rudder and horizontal stabilizers and painting the leading edges with Vallejo “Dull Aluminum” for the Coroguard.
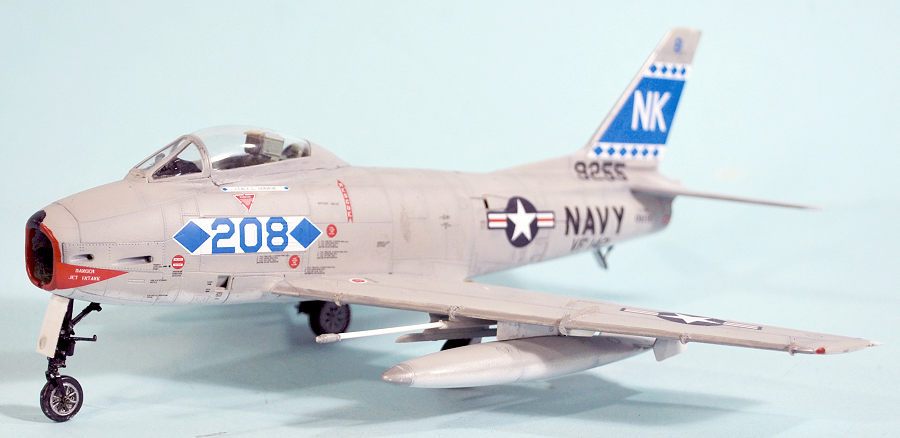
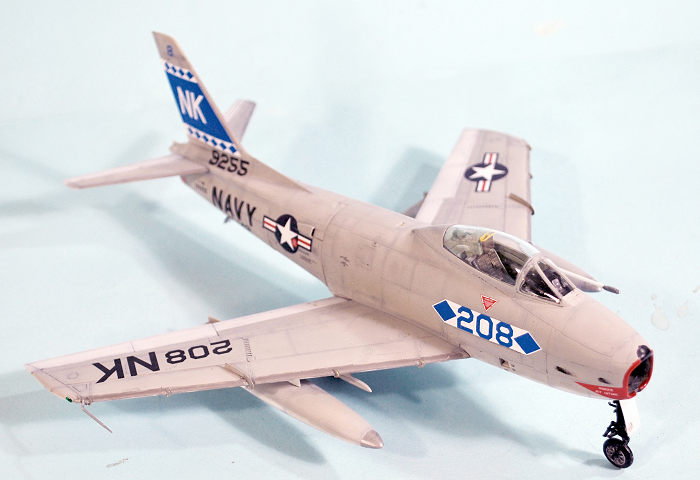
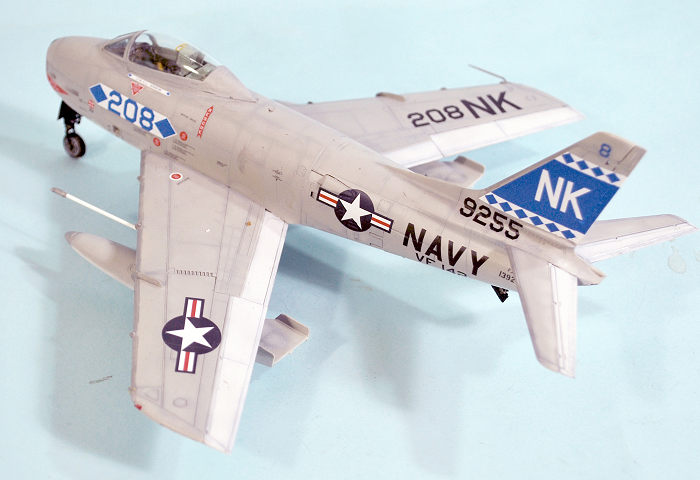
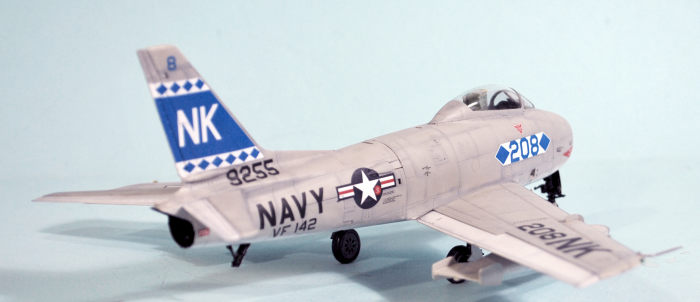
I went for the VF-142 airplane when based on USS Hancock in 1958. To prove (once again) that one must never “assume” (since it really does make an “ass” of “u” and “me”), I neglected to look at the photo I’d gone to such pains to track down and thereby managed to position the vertical fin decal 1/16 inch low, which affected the position of the serial. Most people who will ever see this model in person will never know that, but I mention it here as a “teaching moment” because I tattooed “don’t assume” on my frontal lobes, and it is still there, but... DON’T ASSUME!!!
I gave the gloss white a coat of clear satin varnish to bring down the gloss surface to a more “scale” look, and gave the light gull grey a coat of clear flat. Then I assembled the landing gear (and it’s just as hard to do that on a model with black gear and well as it was to service the real thing), then attached the missile rails and drop tanks. I decided to leave the missiles off since most photos of FJ-3Ms show the rails empty (because the Sidewinders were being worked on in the maintenance shop). I unmasked the canopy and decided to declare victory.
| CONCLUSIONS |
I went into the detailed explanations above because this model is not one to just “throw together” per the Kitty Hawk instructions. Follow my map to the minefield of this kit, and you can have a nice result. Because of all the hinky-ness of the process, I recommend the kit to experienced modelers. The result gives you an important addition to any collection of naval fighters or your Sabre collection.
19 August 2021
Copyright ModelingMadness.com. All rights reserved. No reproduction in part or in whole without express permission.
Review kit courtesy of my wallet. Thanks to Caracal Decals for the decals.
If you would like your product reviewed fairly and fairly quickly, please contact the editor or see other details in the Note to Contributors.