| KIT #: | 4818 |
| PRICE: | $65-90.00 |
| DECALS: | Four options |
| REVIEWER: | Tom Cleaver |
| NOTES: |
New tool kit |
| HISTORY |
The North American F-82 Twin Mustang is the last piston- engined fighter ordered into production by the United States Air Force.The first XP-82 prototype (44-83886) was completed on May 25, 1945, and made its first successful flight on June 26, 1945. It was accepted by the USAAF on August 30, 1945. Overall performance of the XP-82 was such that the production P-82Bs had been ordered in March 1945.
The XP-82 prototypes, and production P-82Bs and P-82Es, had both cockpits fully equipped cockpits so the airplane could be flown from either position on long flights, while later night fighter versions kept the cockpit on the left side only, placing the radar operator in the right position. Some P-82B airframes were completed before the war’s end, but most remained at the factory awaiting engines until 1946. service during the war.
The XP-82 prototypes and the 20 P-82Bs used Packard- Merlin V-1650 engine, giving these aircraft a top speed of 487 mph. The USAAF had always wanted the P-82 to use an American engine; when the British increased the royalty for US-built Merlins, the powerplant was changed in August 1945 to the Allison V-1710-100 engine. Two P-82Bs were converted to one P-82C and one P-82D for development purposes. It was found the Allison-powered Twin Mustangs had a top speed of only 461 mph. The P-82D, now designated F-82E with the USAAF becoming the USAF, was ordred into production in 1947, following the Russian display of four Tu-4 reverse-engineered B-29s at the Tushino Air Disply. The P-82Bs were utilized as trainers, the only time the trainer version was faster than the operational fighter, other than the T-33 which was faster than the F-80.
Production of 100 F-82Es as long-range escorts for Strategic Air Command was completed in 1948. The 27th Fighter Wing was re-designated the 27th Fighter Escort Wing and began operations from SAC HQ in Nebraska. The unit moved to Bergstrom AFB in Texas in 1950, where they began converting on to the F-84E Thunderjet. Their F-82Es were sent to Ladd AFB Alaska, where they flew as escorts for B-36s that penetrated Siberian air space in 1952-52.
 The night
fighter version was developed to replace the aging Northrop P-61C for use in Air
Defense Command pending acquisition of jet-powered interceptors. These were
divided into 100 F-82Fs using an AN/APG-28 radar, and 80 F-82Gs using a
SCR-720C-18 radar. The F-82Fs equipped ADC squadrons based at Hamilton AFB
outside San Francisco and McChord AFB outside Seattle, and McGuire AFB outside
New York City, while 48 F-82Gs equipped the Far East Air Force, with the 4th
F(AW)S at Naha AFB Okinawa, the 68th F(AW)S at Itazuke AFB, Japan and the 339th
F(AW)S on southern Honshu and Johnson AFB in northern Honshu, Japan. The F-82Gs
arrived in FEAF in February 1950.
The night
fighter version was developed to replace the aging Northrop P-61C for use in Air
Defense Command pending acquisition of jet-powered interceptors. These were
divided into 100 F-82Fs using an AN/APG-28 radar, and 80 F-82Gs using a
SCR-720C-18 radar. The F-82Fs equipped ADC squadrons based at Hamilton AFB
outside San Francisco and McChord AFB outside Seattle, and McGuire AFB outside
New York City, while 48 F-82Gs equipped the Far East Air Force, with the 4th
F(AW)S at Naha AFB Okinawa, the 68th F(AW)S at Itazuke AFB, Japan and the 339th
F(AW)S on southern Honshu and Johnson AFB in northern Honshu, Japan. The F-82Gs
arrived in FEAF in February 1950.
When North Korea invaded South Korea on June 25, 1950, it was at first unclear whether this was in response to a provocation by the Republic of Korea (ROK), since there had been several incidents back and forth in preceding months. An F-82G from the 68th F(AW)S carrying four drop tanks, was able to fly to the 38th Parallel shortly after dawn and confirm that it was indeed the North Koreans who were the invaders, with several columns of T-34 tanks already well past the border.
The F-82 was the only Air Force fighter aircraft capable of flying to the region of Seoul from Japan. At first, the airplanes were used to fly cover later on June 26 for the evacuation of American diplomatic personnel and their families to a ship at Inchon. At 1300 hours, two North Korean People’s Air Force fighters - identified variously as La-7s, La-11s or Yak-9s - intercepted the F-82s over Inchon, but there was no combat.
Three flights of F-82s were over Kimpo shortly after dawn on June 27 as C-54s began flying in with supplies for the ROK forces. At 1150 hours, five NKPAF fighters - two Yak-9Us, two La-11 trainers with light bombs, and what was identified as an La-7 but wss more likely an La-11 were spotted heading for Kimpo to attack the C-54 just preparing to take off. One of the Yak-11s scored several hits on the vertical stabilizer of the 68th squadron’s 1st Lt. Charles Moran. Moments later, element leader 1st Lt. William G. "Skeeter" Hudson engaged the Yak-11; closing on its tail, he opened fire and got hits. The Yak banked hard right, with Hudson in close pursuit. A second burst set the right wing gas tank on fire, knocking off the right flap and aileron. The pilot bailed out, but the observer, either dead or badly wounded, remained in the aircraft. The North Korean pilot was immediately surrounded by South Korean soldiers, who he engaged in a fight with his pistol. The ROK soldiers returned fire and killed him.
Moments later, Lieutenant Moran shot down what he claimed as an La-7 over the airfield, while Major James W. Little, CO of the 339th, shot down another La-7 (It has since been determined these were both most likely the two Yak-9s). The C-54 was able to escape. Three NKPAF aircraft had been shot down, with pilot Lt. William G. "Skeeter" Hudson and radar operator Lt. Carl Fraiser scoring the first United States aerial "kill" of the Korean War.
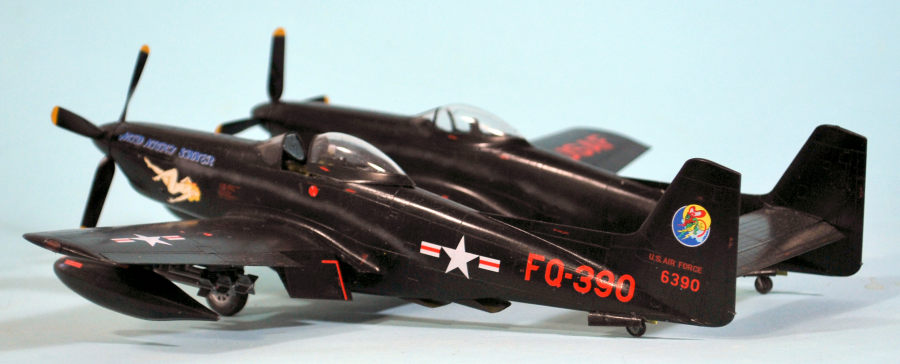
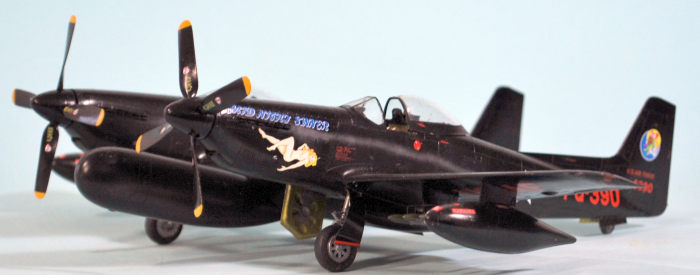
On June 28, F-82s - including the 4th squadron’s “Mid Night Sinner,” FQ-390 - escorted Douglas MacArthur’s C-69 Constellation “Bataan” to Kimpo, where he was to meet ROK President Syngman Rhee. While MacArthur was on the ground, other NKPAF fighters attempted to attack the airfield and were chased off by the F-82s, which claimed two shot down.
 Over the next
desperate two month as UN forces retreated into the Pusan Perimeter, the F-82
was the only fighter that could escort B-26 Invaders to attack the enemy north
of the battle zone. On July 5, the 339th Squadron returned to Johnson AB. The
339th had been in combat a total of 10 days, flying a total of 44 combat sorties
for which they had been given no training.
Over the next
desperate two month as UN forces retreated into the Pusan Perimeter, the F-82
was the only fighter that could escort B-26 Invaders to attack the enemy north
of the battle zone. On July 5, the 339th Squadron returned to Johnson AB. The
339th had been in combat a total of 10 days, flying a total of 44 combat sorties
for which they had been given no training.
On July 10, F-82s from the 4th and 68th squadrons joined B-26s and F-80s to hit North Korean road traffic. An estimated 117 trucks, 38 tanks and seven personnel carriers were destroyed, along with a large number of enemy troops killed when the B-26s destroyed a bridge at Pyongtaek, causing a massive jam.
By the fall, after the Inchon Invasion, the F-82s began operating from Kimpo and Suwon air bases, conducting night intruder missions over North Korea and providing close air support over the battlefield. The fighters were moved to Pyongyang following the Chinese intervention in November, to provide cover for “The Big Bug-out,” the escape of the UN forces from North Korea. After the fall of Pyongyang and then Seoul in December, the F-82s retreated to Japan, where they were again the only USAF aircraft capable of providing extended support to ground forces from Japanese bases.
The F-82s were only kept operational by turning others into hangar queens for parts. When the F-82F and G were ordered, they were considered so temporary that no spare parts had been ordered for them! FEAF asked for reinforcements, but the Air Force would not release the ADC aircraft in the United States.
By the summer of 1951, the 68th’s F-82s were replaced in the night air defense role by the F-94B Starfires of the 319th F(AW)S. Those not scrapped were transferred to Alaska to supplement the F-82Hs, along with the surviving F-82Gs from the 4th and 339th squadrons. The last F-82s left operational service in Alaska in June 1953. During their time in combat, 11 F-82s were lost to enemy ground fire.
| THE KIT |
The F-82 has interested modelers ever since Monogram brought out its 1/72 kit of the airplane back in 1972. Hobbycraft released a kit in 1/48 back in the 1990s that tops most modelers’ list of “Difficult Kits.” The kit has probably ended up in the trash more often than it has resulted in a model.
Two years ago when Modelsvit released their P-51H Mustang to acclaim, they announced they would release a 1/48 F-82 Twin Mustang by the end of 2020. As with many other plans made that year, things took longer than planned. The company released 3D computer plans this past summer, and it was obvious they were going to equal the P-51H with this release. The kit was finally released on December 1 as an F-82F/G night fighter.
 The kit marks
Modelsvit’s best yet, a “high-end limited-run” kit. While a modeler should still
assemble the kit as if they were doing a limited-run kit, checking the clean up
all sprue nubs and such, they will find that the parts assemble almost as well
as an Eduard kit.
The kit marks
Modelsvit’s best yet, a “high-end limited-run” kit. While a modeler should still
assemble the kit as if they were doing a limited-run kit, checking the clean up
all sprue nubs and such, they will find that the parts assemble almost as well
as an Eduard kit.
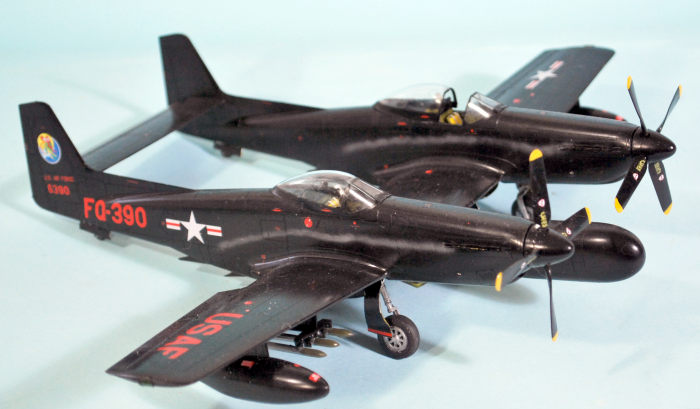
The kit provides two different canopy options, open or closed, and these canopies are much thinner and clearer than those that came with the P-51H. Unlike earlier Modelsvit kits, there is a minimum of photo-etch, this being limited to instrument panels, seat belts and the delicate exhaust baffles that probably can’t be done any other way.
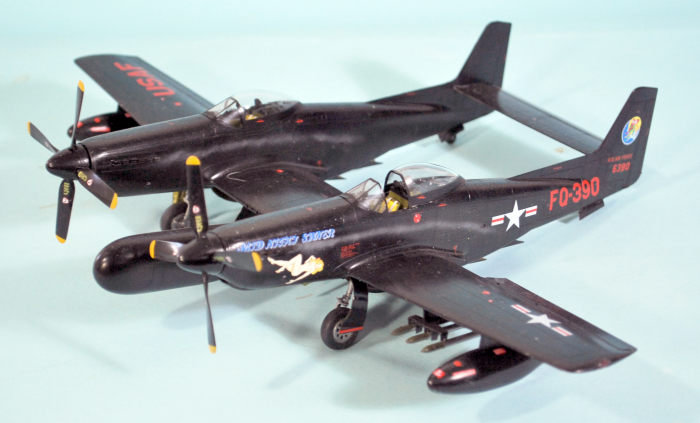
Decals are provided for four aircraft: two F-82Fs from stateside units and two F-82Gs from the 4th and 68th squadrons that saw service in the Korean War. All of the options have nose art or names and the decals appear to be opaque enough to maintain their color over a black model.
This is not a small model - it is some 150 percent larger than a standard P-51 so far as the fuselages are concerned, with a wingspan almost equal to an A-20 and greater than a Beaufighter.
| CONSTRUCTION |
The instructions in the kit are comprehensive, and if a modeler commits the revolutionary act of following them, an excellent result is guaranteed. Construction begins with the cockpits, which I painted Interior Green on the sprue, then painted the various details. The frame for the seat is very delicate - really too delicate. In the end, after everything broke off it from minor handling, I made seat frames from .015 diameter Evergreen plastic rod.
Once the
cockpits were complete, I glued each into their respective outer fuselage halves
(i.e., the part that has the full dorsal fin. I then painted and attached the
radiators and their ramps, and the tail wheel well parts, and attached them. I
lightly sanded down the vertical fin upper edge on the inner fuselage halves, to
insure good close fit. Test-fitting showed everything would come together and
fit. I ran Tamiya Extra Thin glue into the mating area of the dorsal fin on the
outer fuselage half, then brought the fuselage halves together and glued them.
If you take your time and do a few inches at a time, you can insure that the
fuselage halves come together correctly along the centerline, which will mean
you will 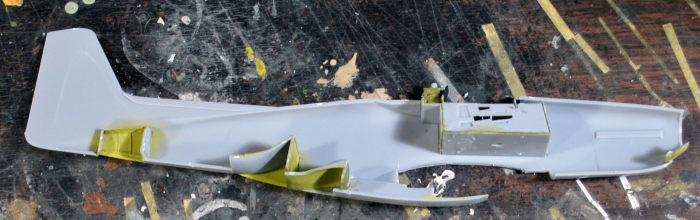 only
have to lightly scrape that joint once the glue has set up, for it to disappear.
I rubber banded the fuselages and set them aside.
only
have to lightly scrape that joint once the glue has set up, for it to disappear.
I rubber banded the fuselages and set them aside.
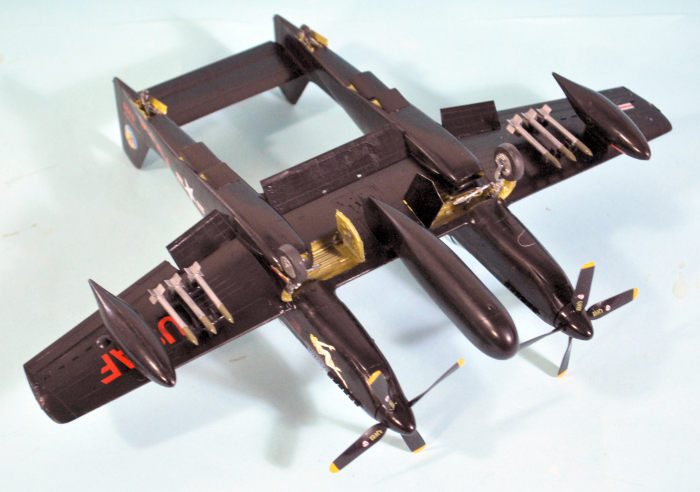
Several people have now mentioned that there is wing warpage to varying degrees in the various parts that compose the wing. It cannot be emphasized enough that if the wing isn't right, the entire rest of the model will be thrown off. This problem is most likely due to sprue trees being removed from the mold too soon. From the conversations I have had, I suggest that before you proceed with any wing assembly, you place each part on a flat surface and check that it is touching that surface as it should. Any that don't pass the test can be pretty easily fixed at this point. If you later find that the warpage wasn't solved, when you have the fuselages attached to the wing, slice open the leading/trailing edge of the wing at the area where warpage appears. Get things aligned with the parts able to move, then when in position, hit them with glue and hold it in the proper position until the glue sets up. As a matter of fact, in hindsight, from hearing these stories, I can see where there was some slight warpage of my model, which I fixed as I just described, without thinking of it as a major problem.So, the problem is "variable" from barely noticeable with mine to nearly ending the project with a toss in the trashcan for another modeler I know. You are now informed of the problem and possible solutions.
I assembled
the wheel well. It is a good idea for you to sand down the left forward corner
of the left wheel well walls about 1/32 inch, which will guarantee the upper
wing parts fit correctly. I glued the upper center section in place and then
test-fitted each fuselage to insure everything would mate up right and was lucky
when it did. I then attached each outer wing half in turn, test fitting the
fuselages for each, to insure that the fit at the leading edge of the wing was
right. When the wing set up, I fitted the fuselages in place and glued each. By
taking care in doing this test-fitting, everything went together right, thus
insuring that the model was aligned properly. I rubber b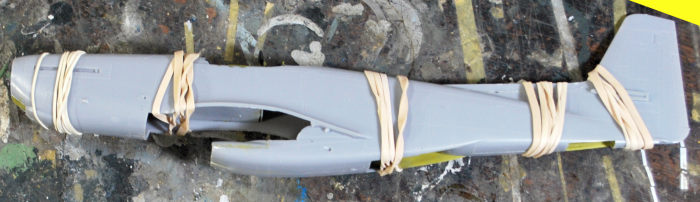 anded
the forward mating area of the lower wing and fuselage lower nose. I attached
the horizontal stabilizer and once I was sure it was properly aligned, I rubber
banded the rear fuselages to hold everything in position while the glue set up.
anded
the forward mating area of the lower wing and fuselage lower nose. I attached
the horizontal stabilizer and once I was sure it was properly aligned, I rubber
banded the rear fuselages to hold everything in position while the glue set up.
The ailerons, elevator and the flaps all have the over-under parts fit to give sharp trailing edges, and these do not need any thinning to get proper fit (but check anyway). You should attach the outer flaps first, then the ailerons, then attach the center section flap and insure it is aligned with the outer side flaps. The attachment for the elevator has you press the elevator onto a ridge in the horizontal stabilizer. This didn’t want to fit, so is shaved it off and sanded the leading edge of the elevator so that when I glued it on it drooped a bit. Alternatively, you could leave the elevator unassembled, attach the upper part in position, then glue the lower part in position.
I decided to use the closed canopy option for the radar operator’s canopy, and the open canopy option for the pilot. I found that the sliding canopy needs to have its lower edge scraped down to a knife edge, while the deck that fits inside the canopy should be sanded down to half its thickness, so that the open canopy will sit right on the fuselage. The canopies are all clear enough that you can use the closed canopy option for both and still see the cockpit detail. You should also scrape down the interior of the front edge of the windscreen to get it to fit flush with the fuselage, and you need to do some trimming of the cockpit edges cutting the raised area back about 1/32 inch, so that the windscreen will fit nice and tight. The radome went together without problem and fit perfectly to its position on the wing.
| COLORS & MARKINGS |
I painted the model with Tamiya X-18 “Semi-gloss Black” thinned 40 percent and misted on to get a nice smooth finish. Because of the semi-gloss finish, I did not need to apply any clear coat before applying the decals.
 Once the model
was painted, I attached the landing gear. This is the one “funny” part of the
build, as it is not apparent how the main gear leg fits in the well. I consulted
the close-up photos I found on the internet of the landing gear and attached the
main gear leg in its proper position using CA glue to hold it. I then attached
the main wheels. I finished off by attaching the tail wheels, testing the “sit”
to be sure both tail wheels touched the ground and modifying it as necessary to
achieve that.
Once the model
was painted, I attached the landing gear. This is the one “funny” part of the
build, as it is not apparent how the main gear leg fits in the well. I consulted
the close-up photos I found on the internet of the landing gear and attached the
main gear leg in its proper position using CA glue to hold it. I then attached
the main wheels. I finished off by attaching the tail wheels, testing the “sit”
to be sure both tail wheels touched the ground and modifying it as necessary to
achieve that.
The kit decals are excellent. They are properly sized and in the correct “North American font” (the same as used on the F-86). The decals want to go on, and settle in under a bit of Micro-Sol without any silvering.
I had purchased the Print Scale Decals sheet, which has Lieutenant Hudson’s Yak-killer as an option. As with most Print Scale sheets, this is poorly researched. Nearly all the markings are 125-150% too big in comparison with the correct kit decals. The “buzz number” and serial for Hudson’s airplane are the only decals on the sheet that are useable if accuracy is important to you. I’ll do Hudson’s airplane with the second kit when it arrives.
| FINAL ASSEMBLY |
 I
unmasked the canopies and placed the open canopy in proper position. Be sure
when you attach the propellers that you put the proper one on each fuselage
- the props counter-rotate toward each other, coming down over the center
section of the wing.
I
unmasked the canopies and placed the open canopy in proper position. Be sure
when you attach the propellers that you put the proper one on each fuselage
- the props counter-rotate toward each other, coming down over the center
section of the wing.
It is physically impossible to mount all five rockets on the underwing rocket tree. I decided this would be a model of “Mid Night Sinner” on the MacArthur escort mission when there was a severe ordnance shortage and the airplane was only carrying six rockets. That’s my story and I’m sticking to it. I finished assembly by gluing the drop tanks in position.
I airbrushed a line of grey exhaust staining on both sides of both fuselages as seen in photos, using thinned Tamiya “Neutral Grey.” Photos of these airplanes in the early summer of 1950, when they had only been in use for four months, show them with little weathering of the paint, so I left things alone.
| CONCLUSIONS |
This is a really excellent model. Everything fits with only some slight modifications. Remember that it is a “high-end limited-run” kit. Do the assembly as you do for a limited run kit - test fit three times before gluing once - and you will have a “high end” result. When finished, this model can sit next to your Eduard P-51s and it stands up to the comparison. This is the Twin Mustang we have been waiting for.
6 January 2022
Copyright ModelingMadness.com. All rights reserved. No reproduction in part or in whole without express permission.
Review kit courtesy of Modelsvit.
If you would like your product reviewed fairly and fairly quickly, please contact the editor or see other details in the Note to Contributors.