Clear Prop 1/48 F-86A Sabre
| KIT #: | |
| PRICE: | $115.95 (U.S. SRP) |
| DECALS: | Three options |
| REVIEWER: | Tom Cleaver |
| NOTES: | 2024 release |
| HISTORY |
The F-86 Sabre almost didn't happen. Had the Air Force not been willing to delay the F-86 program for a year while North American undertook to study the swept wing research done by Messerschmitt during World War II, the F-86 would have been a straight-winged airplane with a performance approximating the F-84 Thunderjet, and history would have been very different had that F-86 entered combat against the MiG-15 over Korea. Development of the Sabre was "just right," with its first flight in 1947 coming within months of the unknown Russian prototype it would meet a few years later; there were no major "bugs" to be worked out for production, and the airplane entered squadron service a year before the outbreak of the Korean War.
With the entry of the MiG-15 into combat over Korea in November 1950,
the Fourth Fighter Interceptor Group was sent to Korea, arriving in Japan in
early November. The Sabre flew its first combat mission by the middle of the
month. By the end of the month when the Sabre detachment was evacuated from
Korea as UN Forces retreated out of North Korea in the face of the Chinese
intervention in the war, it had been
 established
that the Sabre could take on the MiG-15 with confidence both from equipment and
flying ability of the pilot. The next two and a half years would see air battles
between outnumbered Sabres and MiG-15s over "Mig Alley."
established
that the Sabre could take on the MiG-15 with confidence both from equipment and
flying ability of the pilot. The next two and a half years would see air battles
between outnumbered Sabres and MiG-15s over "Mig Alley."
While the Sabres proved their superiority over the MiG when it was flown by Chinese and North Korean pilots, when the U.S. fighter went up against MiGs manned by Russian veterans of the Second World War, it was a different kettle of fish. The Russians of the 324th IAD - the first unit to enter combat - were commanded by no less that Colonel General Ivan Kozhedub, the Allied Ace of Aces of the Second World War. The Ace of Aces of the Korean War was not 16-victory ace Captain Joseph McConnell of the 51st FIW, but rather Colonel Yevgeny Pepelyaev, CO of the 196th Guards Fighter Regiment, a fierce believer in the adage "train hard, fight easy" who strove "to meet the American standard" with his pilots. During his 6-month tour in 1951, Peplyaev claimed 23 of the 104 victories scored by the 196th IAP.
The F-86A and the MiG-15 were similar in performance, but quite different in details. The Sabre could exceed Mach 1 in a dive, though the F-86A was “out of control” when it exceeded its V(ne) of 0.95 Mach, due to the limitations of the fixed horizontal stabilizer. The MiG-15 was thoroughly subsonic due to the design of the horizontal stabilizer, with a V(ne) of 0.93 Mach. The MiG excelled at high altitude combat, with a combat ceiling of 50,000 feet, while the Sabre's best combat altitude was below 35,000 feet; it was wallowing at 40,000 feet. Thus, many combats began with the MiG-15 pilots deciding to attack with a dive on the Sabres below. Sergei Karamenko, a 13-victory MiG ace (on top of 12 WW2 victories), described combat between Sabres and MiGs thus: "The Sabre was the most dangerous threat to my friends and I in Korean skies. Our MiG-15 and the F-86 Sabre belonged in the same class, similar types with similar performance. They differed only in that the MiG had an advantage in rate of climb at altitude, while the Sabre was superior in maneuvering, especially at low level. These advantages could not always be used, however. The fight, as a rule, was decided in the first attack. After the first pass, we reached for altitude, while the Sabres rushed for the ground. Each tried to reach the altitude where it held a distinct advantage, and thus the battle faded."
| THE KIT |
Modelers have wailed for decades, asking for a good state of the art injection-molded F-86A Sabre, while the kit companies have repeatedly released kit after kit of the F-86F. Clear Prop, one of the best Ukrainian model companies, announced they would release an F-86A earlier this year.
 This
first release is an early F-86A-5, in the airplane’s pre-Korean War
configuration. Clear Prop has shown photos of the parts trees, showing that the
next release will be a Korean War-configuration F-86A-5. The parts trees of the
current release have two nose cones - one for theF-86A, and one that is scribed
for the ranging radar positioned in the nose of the F-86E. So, it appears that
Clear Prop is committed to owning the early Sabre.
This
first release is an early F-86A-5, in the airplane’s pre-Korean War
configuration. Clear Prop has shown photos of the parts trees, showing that the
next release will be a Korean War-configuration F-86A-5. The parts trees of the
current release have two nose cones - one for theF-86A, and one that is scribed
for the ranging radar positioned in the nose of the F-86E. So, it appears that
Clear Prop is committed to owning the early Sabre.
The kit has delicate engraved surface detail, and the wiong is correct for the slatted version since there is no “ledge” for the slats if retracted, like every Bf-109 kit or A-4 Skyhawk kit has.
Decals are provided for three early F-86A-5s from the 1st FIW, the 4th FIW, and the 56th FIW, the first three units to operate the Sabre.
Modelers should be aware that this kit - like all other Ukrainian kits - is a “High-End/Limited Run” kit. Treat it like a limited run kit (test fit three times before gluing once) during assembly and the result will be a “high end” model that can sit next to all your other Sabres.
| CONSTRUCTION |
 The
most difficult part of this project is proper assembly of the fuselage. Fail
this and all is lost
The
most difficult part of this project is proper assembly of the fuselage. Fail
this and all is lost
Unlike every other Sabre kit, where the fuselage is two well-molded halves (the early Academy kits being also divided fore and aft at the fuselage break like), the Clear prop F-86A has two fuselage halves, with the lower sections forward and immediately aft of the wing being separate. Like all other Sabre kits, it has the exhaust and intake tubes inside. All of this has to be assembled exactly right in order for those lower parts and the wing sub-assembly to fit properly.
Before proceeding with the fuselage assembly, assemble the wing sub-assembly, minus the slats, flaps and ailerons, but do attach the leading edge of the wing. (This is all easy, just follow the instructions)
When I assembled the exhaust and then fitted it in the rear fuselage, the attachment tabs didn’t fit and the assembly was too wide to get the left and right halves of the fuselage to come together around the exhaust. I cut off the tabs, and then glued the exhaust to the inside of the airbrake well - it’s set up to do that. Even doing that, the rear fuselage would only just barely come together.
To get the forward intake tub installed right, you should first assemble the cockpit and glue it in position. MAKE SURE IT IS IN EXACT POSITION, or the tube will not be positioned correctly.
You should depart from the kit instructions and attach the nose cone to the intake tube. This way, when you assemble it, it will be properly positioned if the nose cone is properly attached to the fuselage half. Also cut away the attachment tabs. Glue the tube to the bottom of the cockpit floor (it’s supposed to be).
 Let
everything set up very solidly before proceeding. Sand down the interior of the
dorsal fin extension on the right fuselage half so that it fits nice and tight
when inserted into the dorsal fin area on the left half. Glue the two fuselage
halves together and rubber band the rear fuselage. You need several rubber bands
and you need to get them tight in order to bring the fuselage halves together
completely.
Let
everything set up very solidly before proceeding. Sand down the interior of the
dorsal fin extension on the right fuselage half so that it fits nice and tight
when inserted into the dorsal fin area on the left half. Glue the two fuselage
halves together and rubber band the rear fuselage. You need several rubber bands
and you need to get them tight in order to bring the fuselage halves together
completely.
Now attach the wing sub assembly to the fuselage. This way you can get the upper wing-fuselage joint nice and tight. If you want to use the drop tanks, be sure to open the attachment holes for the pylons before assembling the upper and lower wing parts.
Now attach the lower rear fuselage part aft of the wing and insure it is in proper position. Rubber band it tightly in position. Assemble the nose wheel well and attach it to the lower side of the intake tube. Be very careful to get it EXACTLY in position. Now glue the lower forward fuselage. Rubber band the forward fuselage tightly, and then rubber band the wing to the fuselage tightly. Let everything set up overnight.
If you got everything in the exact right position, when you take off the rubber bands, everything should be nice and tight and you will only have to worry about a centerline on the upper nose, the upper mid-fuselage centerline, and the lower rear fuselage centerline. Relax, pat yourself on the back; it’s all downhill with the wind at your back from here. Trust me: I learned all this The Hard Way. Follow my instructions and you will have a happy modeling session and an excellent result.
 I then
sanded down and filled the centerline seams. I then attached the windscreen and
the canopy in the closed position and rubber banded them to get nice tight fits.
When assembling the ailerons and flaps, sand down the interior of the lower half
of each, so that when it is fitted into the upper half there is a nice tight
fit.
I then
sanded down and filled the centerline seams. I then attached the windscreen and
the canopy in the closed position and rubber banded them to get nice tight fits.
When assembling the ailerons and flaps, sand down the interior of the lower half
of each, so that when it is fitted into the upper half there is a nice tight
fit.
The flap actuators are all photo-etch. The attachment is half-assed, but persevere, let the C-A glue set up solidly. Take a #11 knife blade and open up all the slots in the wing leading edge so they’re nice and straight. When the C-A has dried on the actuators, put some C-A glue on the tip of each actuator and carefully slip the slat into position. Be sure to press the leading edge down, or you’ll have slats that stick straight out. You should not attach the slats until the model has been painted.
| COLORS & MARKINGS |
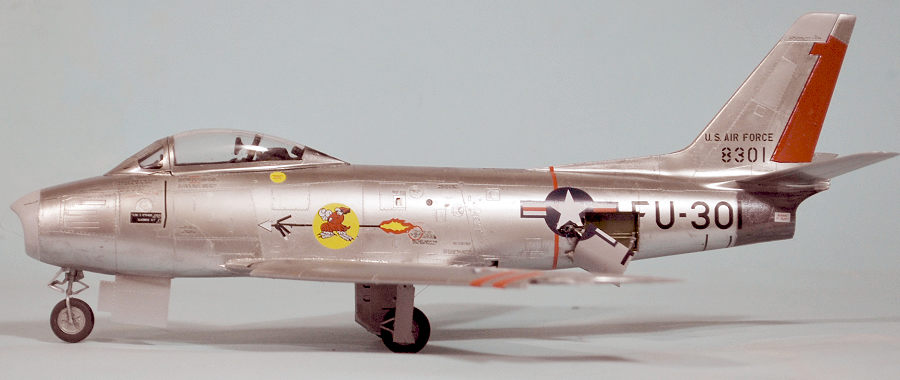
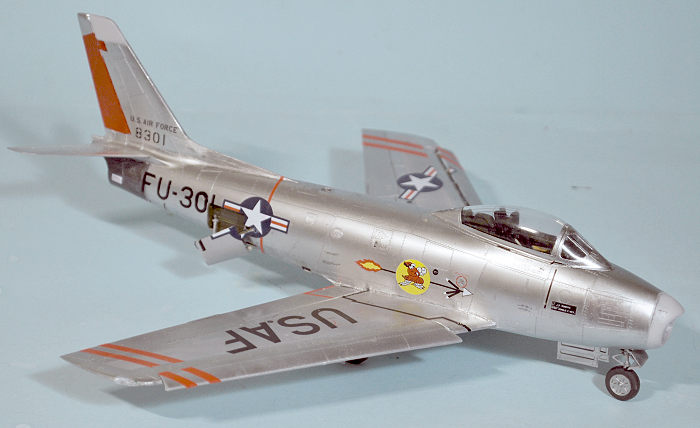
The early Sabres hadn’t been in operation long, and were very well-maintained. I decided to go for a “shiny look” to the natural metal finish.
First, I painted the nose cap and the fin tip with Mr Hobby C-97 light gray, and masked them off. I painted the wing center sections with Tamiysa silver LP-11, to which I added sa bit pof the C-97 Light Gray, then masked them off. I painted the tail cone with Tamiya Gun metal, LP-19, and masked that off.
 I
then airbrushed the model with Mr Hobby Super Metallics “Super Duralumin”
SM-208, thinned 10 parts thinner to one part paint, and “misted” it on till I
had the finish I wanted. Doing this gave a result far more shiny and “metallic”
than I had achieved with this paint before.
I
then airbrushed the model with Mr Hobby Super Metallics “Super Duralumin”
SM-208, thinned 10 parts thinner to one part paint, and “misted” it on till I
had the finish I wanted. Doing this gave a result far more shiny and “metallic”
than I had achieved with this paint before.
I painted the gear doors, the air brakes, the flaps and ailerons, with “Superfine Silver 2" SM-201. I painted the gear legs and wheel hubs with “Super Stainless 2". SM-204. I painted the slats and the fuselage side panel immediately above the wing with Tamiya “Silver” LP-11 after masking the area. I also masked off and painted the dorsal fin extension with “Super Stainless” SM-204.
For all this masking, I was able to use Tamiya Tape to mask over the wing center sections, but I used low tack drafting tape to mask on the Super Metallics paints. I carefully unmasked everything and was rewarded with a very nice multi-hue natural metal model. I then hand painted the interior of the wheel wells and the airbrake well with Interior Green.
I used the kit decals for the 4th FIW option, the boxart version. The decals went on with an application of Micro-Sol without any problems.
I assembled the landing gear and attached them, and attached the airbrakes. I discovered these Sabres did not use the wingtip pitot tube, so I left it off.
| CONCLUSIONS |
This Sabre is not as easy to do as a Hasegawa or Academy Sabre, but it you take you time and test fit everything to get it right before gluing, you’ll be rewarded with a very nice F-86A-5 Sabre.
Recommended for modelers with experience assembling Ukrainian high-end/limited-run kits.
Thanks to Clear Prop for the review kit.
29 August 2024 Copyright ModelingMadness.com. All rights reserved. No
reproduction in part or in whole without express permission from the editor. If you would like your product reviewed fairly and
fairly quickly, please
contact
the editor
or see other details in the
Note to
Contributors.