Modelsvit 1/48 F-82E/H
| KIT #: | 4820 |
| PRICE: | ~$80-90.00 delivered |
| DECALS: | Four options |
| REVIEWER: | Tom Cleaver |
| NOTES: | Short run kit |
| HISTORY |
In October 1943, the North American began work on a fighter with an unrefueled range of over 2,000 miles. The twin-fuselage design was similar to the Messerschmitt Bf 109Z "Zwilling." Although based on the lightweight experimental XP-51F, which would later become the P-51H Mustang, the result was actually a new design.
The XP-82
was powered by two Packard Rolls-Royce V-1650 Merlin engines. Initially, the
left engine was a V-1650-23 with an additional gear in the propeller reduction
box to allow the left propeller to turn opposite to the right propeller, which
was driven by the more conventional V-1650-25. In this arrangement both
propellers would turn upward as they approached the center wing, which
theoretically would allow better single-engine control. This proved wrong when
the aircraft refused to become airborne during its first flight attempt. After a
month of work North American engineers finally discovered that rotating the
propellers to meet in the center on their upward turn created sufficient drag to
cancel out all lift from the center wing section, one quarter of the aircraft's
total wing surface area. The engines and propellers were then exchanged, with
 their rotation
meeting on the downward turn, and the problem was fully solved.
their rotation
meeting on the downward turn, and the problem was fully solved.
The first XP-82 prototype made the type's first successful flight on 26 June 1945 and was accepted by the USAAF on 30 August 1945. The XP-82 prototypes, and production P-82Bs and P-82Es, retained both fully equipped cockpits so that pilots could fly from either position, alternating control on long flights. Although some P-82B airframes were completed before the end of World War II, most remained at the North American factory in California waiting for engines until 1946. As a result, none saw service during the war.
The licensing costs paid to Rolls-Royce for each Merlin were increased after the war. This forced North American to switch the P-82C domestically-designed Allison engines. The Allison-powered P-82 models demonstrated a lower top speed and poorer high-altitude performance than the Merlin-powered versions.
With the rapid draw-down of the armed forces after the war, the newly established United States Air Force had little money for new prop-driven aircraft. The completed P-82 airframes (minus engines)already manufactured went into storage, with an uncertain future.
The creation of Strategic Air Command included a need for fighter escorts. Until jets could be developed and put into service, the Twin Mustangs were seen as an interim solution to SAC's fighter escort mission also as an all-weather air defense interceptor.
The F-82E was the first operational model and its initial operational assignment was to the Strategic Air Command 27th Fighter (later Fighter-Escort) Wing at Kearney Air Force Base, Nebraska in March 1948.
F-82F/G night fighters were modified for cold weather and designated F-82H. Six were initially assigned to the 449th F(AW)S at Adak Island in December 1948 to replace their P-61 Black Widows. The Twin Mustang was well-suited for the air defense mission in Alaska due to its long-range flying ability. In March 1949, the squadron was reassigned to Ladd AFB, near Fairbanks, with an additional eight F-82Hs.
 The squadron
patrolled wide areas of Alaska as Soviet aircraft flying from airfields in
Siberia would often test the air defenses. Beginning in August 1950, the 449th
began receiving the F-94 Starfire jet interceptor, and the F-82s were assigned
to a separate detachment within the squadron. The slower F-82s had a longer
range than the F-94s, and the Twin Mustangs patrolled remote areas of Alaska.
The F-82s were also used for long-range visual reconnaissance of Soviet
airstrips on the Chukchi Peninsula. The Twin Mustangs were flown over some of
the most remote areas of the Territory and very rugged interior regions.
The squadron
patrolled wide areas of Alaska as Soviet aircraft flying from airfields in
Siberia would often test the air defenses. Beginning in August 1950, the 449th
began receiving the F-94 Starfire jet interceptor, and the F-82s were assigned
to a separate detachment within the squadron. The slower F-82s had a longer
range than the F-94s, and the Twin Mustangs patrolled remote areas of Alaska.
The F-82s were also used for long-range visual reconnaissance of Soviet
airstrips on the Chukchi Peninsula. The Twin Mustangs were flown over some of
the most remote areas of the Territory and very rugged interior regions.
The Twin Mustangs in Alaska operated further north than any other USAF aircraft at the time. In April 1952, they flew as escorts for SAC B-36s near Barter Island in the Beaufort Sea, 1,000 miles south of the North Pole. The F-82H made a brief appearance in the movie "Top of the World". The 449th’s F-82s also bombed ice jams on the Tanana, Kuskokwim and Yukon Rivers to avert floods.
In February 1951, the Air Force ordered all remaining F-82s in the Air Force inventory transferred to Alaska. The FEAF F-82Gs arrived in a badly corroded condition; they were also all high-time airframes and proved difficult to maintain. After four months at the 39th Air Depot Wing at Elmendorf, most were scrapped.
Overall, Alaskan Air Command had a total 36 F-82E, F, G and H model F-82s. By 1952, attrition had claimed many. The right seat was usually occupied by an experienced flight mechanic. With the long patrol flights with high-hour aircraft, pilots began having more and more mechanical problems that forced them to land on crude airstrips. The mechanic usually could repair the aircraft well enough to get airborne and head back to Ladd AFB. Sixteen of the 36 F-82s became the main source for spare parts to keep the others operational. By the spring of 1953, the number available had dwindled to a handful; each was flown about 48 hours per month until it was impossible to keep them reliably operational.
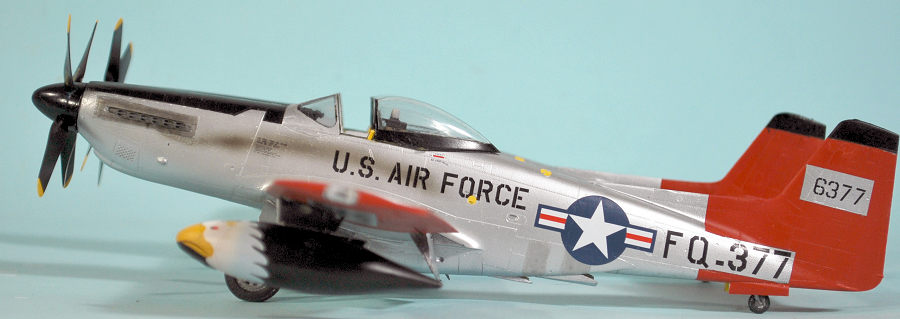
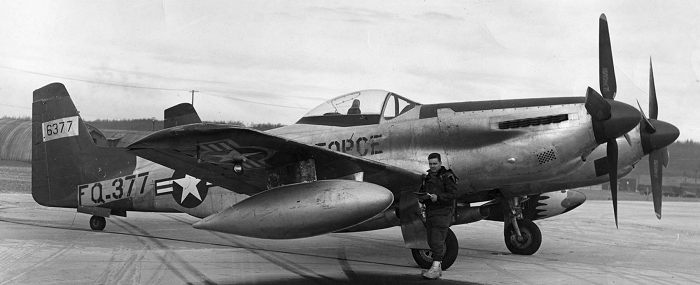
The last F-82Hs were sent to Elmendorf AFB, Alaska, for disposal in June 1953. The last Twin Mustang in the inventory (46–377) was originally an F-82G that served with two different squadrons in Okinawa and Japan. It was sent to Elmendorf AFB, being officially retired on 12 November 1953.
| THE KIT |
This F-82E/H is the second release by Modelsvit, with the original F-82F/G night fighter kit released this past January. This kit differs from the earlier kit in not having the radome and its mount. Decals are provided for two F-82Es of the 27th Fighter Escort Wing and two F-82Gs of the 449th Fighter (All Weather) Squadron in Alaska.
| CONSTRUCTION |
 When I built the
F-82G night fighter, I had no problems with assembly, and couldn't figure out
why so many people were posting they were having problems, to the point where a
couple people round-filed their kit.
When I built the
F-82G night fighter, I had no problems with assembly, and couldn't figure out
why so many people were posting they were having problems, to the point where a
couple people round-filed their kit.
Well, this time I got to find out what all the moaning was about, and fortunately I was able to discover the cause. If you are going to do one of these kits, here's what you need to know for a problem-free build:
BE ABSOLUTELY FREAKING CERTAIN BEYOND A DOUBT THAT YOU GET THE UPPER CENTER PIECE OF THE WING IN PERFECT POSITION! It turns out, I did that by happenstance with the first kit, which is why I had no problem, and didn't with this kit. It is easy to miss. The locating pins on the kit are very small and easy to get rid of when cleaning up the part. BE VERY CAREFUL NOT TO DO THAT when you clean that top center part. You have got to get it exactly in the correct position, not a micro-nano-millimeter wrong to left or right, or it throws off all the rest of the downstream assembly and depending on how badly you missed will be a PITA or a major freaking screaming fit with the atmosphere over the work table deep purple with lightning bolts and thunder.
I did not discover the mistake until it was too late to fix, with the end result I had to do a lot of cutting and filing and sanding on the mount for the right fuselage to get it close to correct position, and then there was a lot of rubber banding, and then a lot of Mr. Surfacer on the joins of both fuselages to the wing (less on the left) with concomitant sanding and loss of the beautiful surface detail and rescribing with the pounce wheel and then polishing out because this one is in NMF and not black so I couldn't hide anything with paint.
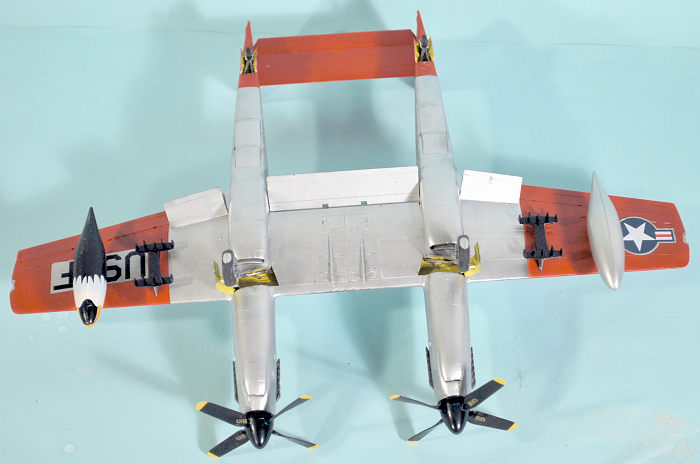
I have determined that the best way to avoid this is to assemble the wing by starting with either the left or right outer wing, which is easy to position correctly. Then proceed to attach the center section, aligning it with that outer wing. You still need to test-fit the fuselages to the wing, but fit problems will be much easier.
 I also elected
to close the main gear inner doors, which I should have done before further
assembly of the wing. The doors are not designed for this, so you have to trim
them to fit in the well. It's easy to take off too much, so proceed with caution
in getting that done. If you do all this before assembling the wing, you could
put some evergreen sheet inside the wing to create a "ledge" for the door to sit
on and be glued to, much easier than trying to fit it from outside with the wing
assembled. It does look right - the F-82 gear door cycles closed after the gear
is lowered.
I also elected
to close the main gear inner doors, which I should have done before further
assembly of the wing. The doors are not designed for this, so you have to trim
them to fit in the well. It's easy to take off too much, so proceed with caution
in getting that done. If you do all this before assembling the wing, you could
put some evergreen sheet inside the wing to create a "ledge" for the door to sit
on and be glued to, much easier than trying to fit it from outside with the wing
assembled. It does look right - the F-82 gear door cycles closed after the gear
is lowered.
Another thing: the clear plastic windshield is too thick to fit correctly to the fuselage. You need to thin that part from inside the maximum you can without messing up the area that has to be clear. You should also sand down the coaming inside. Remember this is a "high-end/limited-run" injection kit and test fit everything well before applying glue. The sliding canopy will fit perfectly in the closed position but is too thick to position properly open unless you also thin it down from inside and also sand down that area of the rear fuselage that will be hidden by the canopy, to get a good fit. The canopies are very clear, so you can close the canopy and still see what's inside. I have also found that the Squadron vacuform canopy for the old Hobycraft F-82 is available through dealers on eBay. I will use one of those for the last F-82 kit I have.
During assembly, I managed to misplace the photoetch set before I could make the “night fighter exhausts” for the kit. Faced with having no exhausts, I wondered if someone might have made a resin replacement, and so googled “F-82 1/48 resin exhaust” and thus discovered Resin2Design.com, which has an eBay store, and has made a beautiful set of 3D printed exhausts. The price is under $10 and they are worth every penny; I strongly recommend them.
| COLORS & MARKINGS |
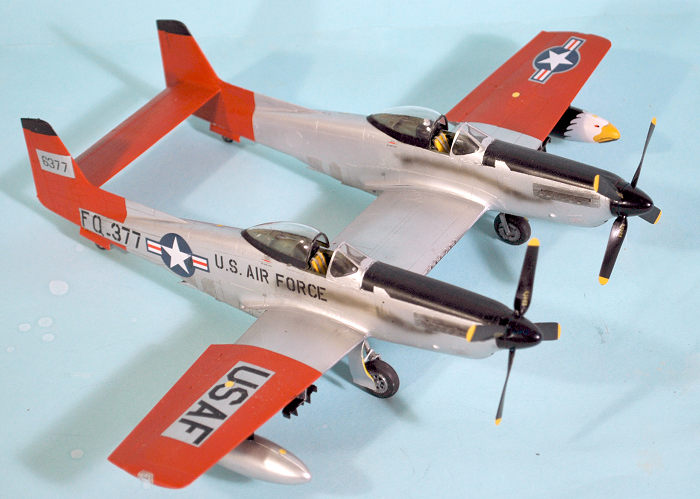
 I first
painted the red areas with Tamiya XF-4 Red, then masked these areas off. I gave
the model an overall coat of Tamiya X-18 Semi-gloss Black. I masked off the
upper rudders and the anti-glare panel, and applied Vallejo Aluminum. I used
some Vallejo Duraluminum and White Aluminum for various small panels.
I first
painted the red areas with Tamiya XF-4 Red, then masked these areas off. I gave
the model an overall coat of Tamiya X-18 Semi-gloss Black. I masked off the
upper rudders and the anti-glare panel, and applied Vallejo Aluminum. I used
some Vallejo Duraluminum and White Aluminum for various small panels.
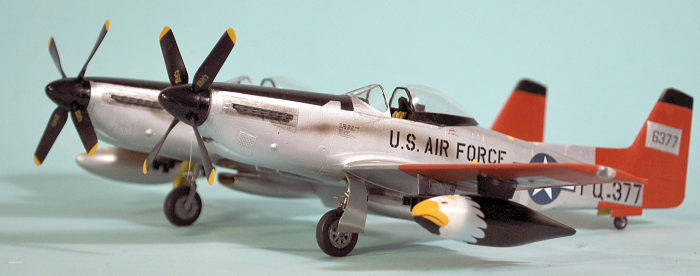
The decal sheet includes the markings for 46-377, the last operational F-82H. The decals went on without problem under a coat of Micro-Sol.
I applied exhaust staining as it was in the two photos of this airplane I found, then unmasked the canopies and installed them in open position. I attached the landing gear and props and decaled it complete.
| CONCLUSIONS |
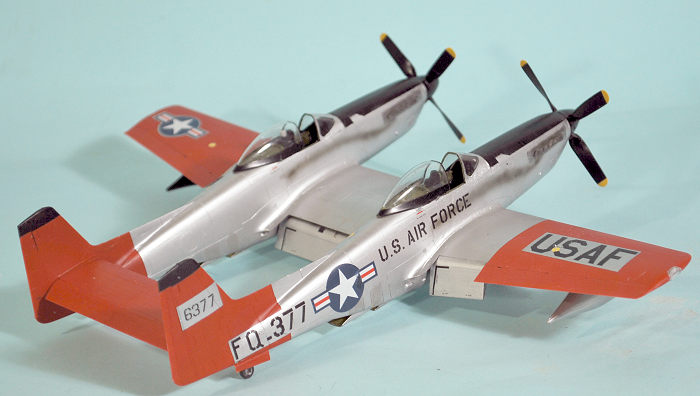
The F-82 is a very interesting airplane. Modelsvit has done a very good job with this kit, though you must bear in mind that it is a “high-end/limited-run” kit. Test fit everything, take care in getting parts properly in place, and you will have a very good looking result. Recommended for modelers with experience in doing limited-run kits.
20 October 2022
Copyright ModelingMadness.com. All rights reserved. No reproduction in part or in whole without express permission.
Review kit courtesy of Modelsvit.
If you would like your product reviewed fairly and fairly quickly, please contact the editor or see other details in the Note to Contributors.