| KIT: | Trumpeter 1/48 Wyvern S.4 |
| KIT #: | 2820 |
| PRICE: | $54.95 MSRP |
| DECALS: | Three options |
| REVIEWER: | Tom Cleaver |
| NOTES: |
| HISTORY |
One major change in naval aircraft during the Second World War was the development of a single-seat strike fighter that could take on both the role of dive-bomber and torpedo-strike. In the U.S. Navy, this development led to the Douglas Skyraider, one of the most successful naval aircraft ever built; in the Royal Navy it resulted in the Westland Wyvern, which was surely one of the most frustrating naval aircraft ever built, an airplane that took ten years to bring to operational readiness, only to be declared obsolete within four years of its initial arrival on British decks.
W.E.W. “Teddy” Petter began development of what would become the Wyvern as his
last project at Westland before leaving for English Electric where he would
design his masterpiece, the Canberra jet bomber. Petter’s objective was to
develop a long-range carrier-based day fighter with the ability to carry a
torpedo or bombs as appropriate for a secondary role as an anti-shipping strike
aircraft. The original design would have had the engine mounted amidships, a
layout that had been tried for the Westland F.7/30 prototype of 1934. The
favored engine at this point was the Rolls-Royce Eagle, a 24-cylinder
liquid-cooled “H” type like the Napier
 Sabre, designed for an ultimate
output of 3,500 horsepower. Further development was made official when the
Naval Staff issued specification N.11/44, written around the Westland proposal.
A mockup with the mid-mounted engine and nose-mounted cockpit found little
support from the service pilots who would fly it, so a second mockup was created
with the engine in the nose and the cockpit atop a significant hump in order to
obtain a 15-degree angle of view over the nose for deck landing. By June 1944,
the design was known as the W.34, though it was officially known as the N.11/44
until the adoption of the name “Wyvern” in 1947.
Sabre, designed for an ultimate
output of 3,500 horsepower. Further development was made official when the
Naval Staff issued specification N.11/44, written around the Westland proposal.
A mockup with the mid-mounted engine and nose-mounted cockpit found little
support from the service pilots who would fly it, so a second mockup was created
with the engine in the nose and the cockpit atop a significant hump in order to
obtain a 15-degree angle of view over the nose for deck landing. By June 1944,
the design was known as the W.34, though it was officially known as the N.11/44
until the adoption of the name “Wyvern” in 1947.
By August 1944, Westland began investigating the possibility of changing the powerplant to a turboprop. However, six Eagle-powered prototypes were ordered in November 1944. The planned turboprop was the Rolls-Royce RB.39 Clyde, which Rolls-Royce expected to deliver in December 1945.
The N.11/44 prototype, which was the biggest British single-seat naval fighter type at the time, required a double fold of the wing, with the tips folding down in order to have clearance on the hangar decks of RN carriers. In order to launch from a deck, the airplane required a contraprop, which was developed by Rotol (8-blade) and DeHavilland (6 blade). This in turn led to a very large vertical fin to provide directional stability.
With the end of the war, Rolls-Royce was directed to cease further development of the Eagle and concentrate on gas turbine development. A pre-production batch of 20 N.11/44s would be Eagle-powered, becoming the Wyvern Mk.1, while all further development would be centered around turboprop powerplants.
The first prototype N.11/44 flew on December 16, 1946. Six other prototypes appeared in 1947-48, with the pre-production Wyvern Mk.1s produced in 1949. Useful work with the Mk.1s resulted in spring-tab control surfaces that greatly improved maneuverability. Only five Mk.1s were used for this work.
The
first Turboprop Wyvern, the N.12/45 prototype flew on January 16, 1949, powered
by a R-R Clyde. While the Clyde exceeded initial performance estimates, it
suffered from a variety of problems, not the least of which was that Rolls-Royce
was committed to other engine projects, which kept them from focusing on solving
the Clyde’s problems. The Armstrong-Siddeley Python was the only turboprop of
the necessary power that could be used for the Wyvern. This change added at
least two years  to the
development cycle as the engineers struggled to create a throttle control that
would allow the engine to be rapidly throttled back for a carrier landing, or
rapidly throttled up to make a go-around, the solution being an inertia control
unit that was, unfortunately, mechanically complex.
to the
development cycle as the engineers struggled to create a throttle control that
would allow the engine to be rapidly throttled back for a carrier landing, or
rapidly throttled up to make a go-around, the solution being an inertia control
unit that was, unfortunately, mechanically complex.
The Wyvern finally appeared from development as the S.Mk.4, and began to be delivered to RNAS Ford in May 1953 to equip 813 Squadron. These aircraft did not have the definitive engine control unit and thus were not carrier-compatible until these units were installed in the summer of 1954. The first operational Wyverns went aboard HMS Albion in September 1954, where it was discovered their problems were not over, as there were a series of flameouts during catapult launch as a result of fuel starvation under high-g loading while the aircraft were with Albion during a Mediterranean cruise. The Wyverns were offloaded at Hal Far, Malta, and remained there until March 1955 when they returned to England. A final design of the ICU/ECU unit solved the flameout problem. 813 and 827 Squadrons embarked aboard HMS Eagle in May 1955 for a second Mediterranean cruise, which gave the Wyverns some 1,500 operating hours and 1,000 landings, after which the aircraft was considered proven.
The final modifications of the S.Mk.4 appeared in early 1956. This was visually identifiable by the removal of the curved windscreen over the flat armored glass, a strengthened canopy with a more extensive metal frame, and dive brakes added under the wing center section. The result was an airplane that still didn’t provide the performance that was needed, and only continued on operations due to the fact there was no alternative. The airplane was so short-ranged that it needed a large centerline fuel tank in addition to the wing tanks, which meant it could not carry a torpedo, and when it was carrying enough fuel to have an adequate range, it could not get off a carrier deck even with a catapult while carrying its maximum ordnance load, thus requiring the use of RATOG units to get the Wyvern airborne.
813
and 827 Squadrons returned from the Mediterranean and decommissioned in November
1955. They were replaced by 830 and 831 Squadrons which activated in January
1956. 830 Squadron went aboard HMS Eagle that May, destined to be the
only unit to fly the Wyvern in combat, when their nine aircraft participated in
six days of strikes against Egyptian military targets in the Suez
 Canal Zone in October-November
1956 as part of Operation Musketeer, the Anglo-French “intervention” in what was
called “the Sinai War,” though that was really part of a conspiracy by the two
western powers, working with Israel, to regain control of the Suez Canal
following its nationalization by Egypt in 1955.
Canal Zone in October-November
1956 as part of Operation Musketeer, the Anglo-French “intervention” in what was
called “the Sinai War,” though that was really part of a conspiracy by the two
western powers, working with Israel, to regain control of the Suez Canal
following its nationalization by Egypt in 1955.
813 recommissioned in October 1956, giving the FAA three strike squadrons. With the decommissioning of 830 and 831 Squadrons in January and February 1957, 813 was the last Wyvern operational unit, embarking on HMS Eagle in July 1957 for a tour that lasted until March 1958. 813 decommissioned at Ford on March 29, 1958, which marked the end of active service for the Wyvern. 33 had been lost to all causes during its operational life. The survivors were all melted down during 1959, and the only Wyvern in existence today is the Wyvern Mk.1 VR137, which was never actually flown.
The Westland Wyvern suffered an extended developmental period due to the fact it was one of the first aircraft to use the then-new turboprop. Almost all of the basic technological development that would make later turboprops efficient and reliable was accomplished in this program, which may be the Wyvern’s greatest contribution to aeronautical development.
| THE KIT |
The
Wyvern has been a favorite of mine ever since as a wee young aeronut I picked up
“The Aircraft of the World” by William Green and Gordon Swanborough at the local
library in 1954. The book was an eye-opener: the first I had found with
detailed information and photographs of airplanes, and some of them even had
detailed three-view drawings; thus was I introduced to good technical aviation
history by two of the best writers ever (one of whom I would work for 25 years
later). One of the airplanes deemed deserving of those newfangled three-view
drawings was something called the Westland Wyvern. I didn’t know a thing about
it other than I just liked its look. I still do - a Wyvern is a mythological
dragon, and the airplane has a very dragon-like look to me. I laugh every time
I think of the Very Well Known Modeler who took a look at one of the many Wyvern
models I’ve made over the years (this one being the ID Models vacuform) at the
1988 IPMS Nats and proclaimed it a “what-if” model that didn’t belong in the
1/48 Naval Aircraft category since something that looked like t hat
could never have been actually produced. So much for Model Gnus.
hat
could never have been actually produced. So much for Model Gnus.
In 1/48, there have been three previous kits of the Wyvern.
Two of these were vacuforms, one by ID Models that has long been superseded b the other - a very advanced vacuform that provides everything a modeler needs to create a beautiful model, produced by Dynavector. With the addition of the Compass Rose resin cockpit designed by Roy Sutherland, it’s a kit that’s still hard to beat. Two years ago, Classic Airframes produced a limited run Wyvern, which built up as the definitive late-production S.Mk.4, with the added-on dive brakes on the lower wing center section, the wing fences inboard of the ailerons to prevent aileron snatch, the late production windscreen with the flat armor glass, and the late canopy with the metal framing for strength.
All
of these kits are now bested by this new release from Trumpeter. The kit comes
on five light grey sprues of airframe parts, a sprue of parts for the gearing of
the contra-rotating props, and a sprue of clear plastic for the separate canopy
and windshield, camera ports and navigation lights. There are a total of 220
parts, which include all the ordnance the airplane was ever supposed
 to carry, including rockets,
1,000-lb bombs, a torpedo, the centerline tank and the two wing tanks, as well
as the RATOG units. The kit makes up as a late-version S. Mk.4.
to carry, including rockets,
1,000-lb bombs, a torpedo, the centerline tank and the two wing tanks, as well
as the RATOG units. The kit makes up as a late-version S. Mk.4.
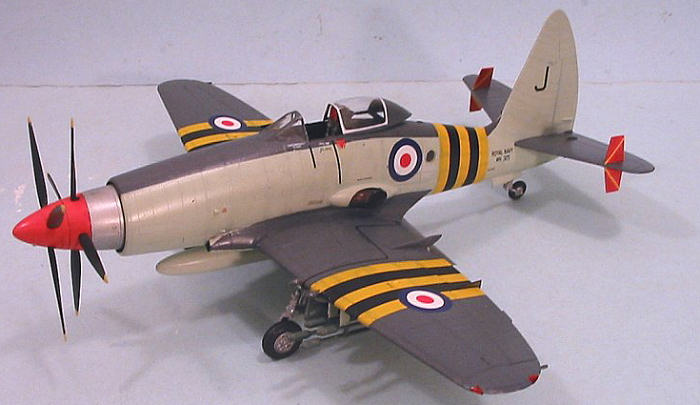
The kit has beautiful restrained surface detail, which is quite accurate, as the accompanying photograph here of a real Wyvern demonstrates.
The kit decals provide markings for three Wyverns: WN325 from 830 Squadron aboard HMS Eagle during Operation Musketeer, WL879 of 813 Squadron during the unit’s final deployment aboard HMS Eagle in 1958, and WN335 of 831 Squadron aboard HMS Ark Royal in 1957. All stencils are provided, as well as nose art for each airplane. The national insignia are the correct size and color. The yellow and black “invasion stripes” are provided as decals for those “stripe-challenged” modelers.
| CONSTRUCTION |
Due to the excellent production design, the Trumpeter Wyvern assembles as easily as a Tamiya kit. With careful assembly, I was able to produce this model without using any putty or Mr. Surfacer on seams, something I haven’t done with any model in a very long time.
As
with the Tamiya Corsair, the wing when extended is weak, and needs some extra
stiffening .
I did this the same way I do with the Tamiya Corsair - I cut some evergreen
strip and glued it inside the center wing, giving extra “grab area” for the glue
for the outer wing when it is attached to the positioning pins. Test-fitting
the wings in the folded position reveals that this will work, but the wing will
be pretty weak. Even with the extra evergreen sheet providing added strength,
once the model is assembled it would be advisable to handle it by the fuselage
only to avoid the possibility of breaking the wings.
.
I did this the same way I do with the Tamiya Corsair - I cut some evergreen
strip and glued it inside the center wing, giving extra “grab area” for the glue
for the outer wing when it is attached to the positioning pins. Test-fitting
the wings in the folded position reveals that this will work, but the wing will
be pretty weak. Even with the extra evergreen sheet providing added strength,
once the model is assembled it would be advisable to handle it by the fuselage
only to avoid the possibility of breaking the wings.
Like the Skyraider, Dauntless and Helldiver, the Westland Wyvern was not normally seen on the ground with the wing air brakes extended, so I assembled those closed. If you attach these to the wings in their component parts, you will get much better fit, because the assembled air brake is not as thick in section as the wing where it attaches. Attach the lower part to the lower wing, then attach the upper part to the upper wing, and then finally attach the forward section, and all will fit properly.
Also like the Skyraider, the Wyvern was hardly ever seen with the Fowler flaps open on the ground. However, as with most kits that have separate flaps, the flaps fit better in the lowered/open position than they do in the closed position, so I attached them open.
 The one
thing that Trumpeter got wrong is the shape of the propeller blades.
Rather than provide the blades used on the production aircraft, they are the
more "paddle-shaped" blades used on the prototype. To correct them, they
should be more pointed, which is simple to fix with a sanding stick, and I
think it took me about 5-6 minutes to do both sets of propellers.
The one
thing that Trumpeter got wrong is the shape of the propeller blades.
Rather than provide the blades used on the production aircraft, they are the
more "paddle-shaped" blades used on the prototype. To correct them, they
should be more pointed, which is simple to fix with a sanding stick, and I
think it took me about 5-6 minutes to do both sets of propellers.Surprisingly (to me at least) the contra-rotating gizmo the kit provides actually works. Not accurately, since the rear prop rotates at about half the speed of the forward blades, but you can vary the pose of the blades. I would not do this frequently, and I suspect if this was ever motorized the plastic gears would grind away and break in a matter of minutes, but for setting the pose of the model they are adequate.
A nother
inaccuracy is that kit would have you pose the inner gear doors hanging open.
The gear doors on the Wyvern cycled down to lower the gear, then the inner doors
cycled back up to the fully-closed position. It’s easy to do this by cutting
off the hinges, and the doors fit perfectly to the wheel well opening.
nother
inaccuracy is that kit would have you pose the inner gear doors hanging open.
The gear doors on the Wyvern cycled down to lower the gear, then the inner doors
cycled back up to the fully-closed position. It’s easy to do this by cutting
off the hinges, and the doors fit perfectly to the wheel well opening.
The cockpit provides adequate detail, particularly since everything ends up painted black. The seat provided in the kit is OK, but a resin seat will be better since this is the one item in the cockpit that will catch the eye of the viewer. I had an extra Martin-Baker Mk.2 seat from the Classic Airframes Canberra (no need to stick it in the cockpit when you can’t see it when finished) and used that. John Adams at Aeroclub mentioned to me that Aeroclub has a resin seat with molded harness detail that is correct for the Wyvern, so that is another source.
I stopped assembly when the main airframe was complete, minus the outboard stabilizing fins on the horizontal stabilizer, the flaps, or any drop tanks or other underwing load, all of which would be painted separately and attached after painting and decaling were completed.
| COLORS & MARKINGS |
Since some readers have asked for more detail about how I paint a model, I have taken more pictures of the step-by-step process, and will outline it here in more detail than usual.
First
was to paint the wheel wells and gear door interiors with SNJ Aluminum, which I
then went over with Tamiya Smoke to
 “pop
out” detail. I had already painted the engine canister aluminum - the kit
instructions would have you do this in Dark Grey but that is incorrect.
“pop
out” detail. I had already painted the engine canister aluminum - the kit
instructions would have you do this in Dark Grey but that is incorrect.
I
then moved to pre-shading the model. Since much of it was to be covered with
either Yellow or Sky, I preshaded those areas with Tamiya German Grey, rather
than flat black, so it wouldn’t take so much paint to cover that color. I then
painted the area of the ID stripes with a thin coat of Flat Whit e,
being sure to allow the shading to show through, then applied Tamiya Flat
Yellow, leaving a “ragged” look which would be right for stripes applied
temporarily that had faded. I then masked these stripes with Tamiya Tape, and
preshaded the areas of the upper fuselage and upper wing surfaces with Tamiya
Flat Black, as well as painting the black ID stripes. I went back over the
strips after lightening the black with some German Grey to simulate wear and
fading.
e,
being sure to allow the shading to show through, then applied Tamiya Flat
Yellow, leaving a “ragged” look which would be right for stripes applied
temporarily that had faded. I then masked these stripes with Tamiya Tape, and
preshaded the areas of the upper fuselage and upper wing surfaces with Tamiya
Flat Black, as well as painting the black ID stripes. I went back over the
strips after lightening the black with some German Grey to simulate wear and
fading.
 When this was done and the stripes all masked, I applied the upper surface
color, using Xtracrylix Extra-Dark Sea Grey, which I then lightened a bit with
Xtracrylix Dark Sea Grey and then went and highlighted panels.
When this was done and the stripes all masked, I applied the upper surface
color, using Xtracrylix Extra-Dark Sea Grey, which I then lightened a bit with
Xtracrylix Dark Sea Grey and then went and highlighted panels.
When
this was thoroughly dry (I usually let Xtracrylix dry overnight at least before
masking on it to be sure it is thoroughly cured), I masked the borders of this
color with Tamiya tape, covering the larger areas with drafting tape. I then
painted the fuselage sides and lower surfaces with Xtracrylix “Sky,” ligh tening
it with White and highlighting panels.
tening
it with White and highlighting panels.
The
finlets were first painted yellow, then masked, and painted Xtracrylix “Red
Arrows Red,” as was the prop spinner. I am not sure these are the right colors
for 830 Squadron Wyverns, since the only color photo I have of Wyverns of this squadron, which is identified as being taken in the fall of
1956, shows both the finlets and the spinner painted Black. I did it this way
strictly for review purposes. The choice of red or black is your call, with
black supported by color photos and red by “tradition.”
Wyverns of this squadron, which is identified as being taken in the fall of
1956, shows both the finlets and the spinner painted Black. I did it this way
strictly for review purposes. The choice of red or black is your call, with
black supported by color photos and red by “tradition.”
When all was dry I unmasked the model and gave it a coat of Xtracrylix Gloss Varnish.
Decals:
While the kit decals are good, on closer examination I noticed a slight
off-printing of the national insignia, with a narrow white border along one
hemisphere. Had I not had substitutes in the decal dungeon, I would have solved
the problem by a close trim of the national insignia decals. It is also
important to note that these decals are not fully opaque, and that when you put
them on the upper wing over black, yellow and extra dark sea grey, the colors
will bleed through. The solution here is to use some all-white decal and cut
out a backing to apply first. With two decals atop each other, the colors won’t
bleed through (or at least not so noticeably). I should remark I had to do this
even with the Micro-Scale decals I used as replacements. Other than that, the
rest of the kit decals are very good, and go on without problem under Micro-Sol.
One thing to note about markings for the 830 Squadron airplane - since several “Hex-spurts” have stated that it should have numbers on the nose - is that the original location for the aircraft number was aft of the fuselage insignia, in the area covered by the temporary identification stripes, which were painted over those numbers. During the six days of Operation Musketeer, the nine Wyverns of 830 Squadron did not carry aircraft numbers. After Operation Musketeer, while the ID stripes were retained, the numbers were painted on the aircraft noses.
When all the decals were set, I washed the model, then gave it an overall coat of Xtracrylix Satin Varnish, which does a good “scale approximation” of a gloss finish.
| FINAL CONSTRUCTION |
 I first attached the
landing gear and the inner gear doors, then fit the contraprop per the kit
instructions, and was rewarded by it working as noted above.
I first attached the
landing gear and the inner gear doors, then fit the contraprop per the kit
instructions, and was rewarded by it working as noted above.
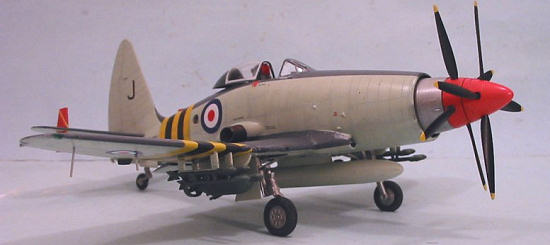
I had determined early on that I didn’t want to do yet another Wyvern with the wing drop tanks, as all the others I have ever done have been thus equipped. I used the bomb rack and the 1,000-lb bomb, with four sets of rockets, to arm the airplane as it likely was for the first airfield strikes during Operation Musketeer. There are damn few photos of these airplanes during the operation, so coming up with a “standard” ordnance load is a bit of an educated guess, but these airplanes were the only ones aboard Eagle capable of carrying two 1,000-lb bombs (the others being Sea Venoms and Sea Hawks which only carried rockets), which would have been needed to disable the runways of the airfields struck in northern Egypt on the initial strikes.
Again, the kit instructions would have you paint the bombs and rockets olive drab, but British bombs and RPs are painted Bronze Green. I used Xtracrylix “US Medium Green” which is a close approximation of Bronze Green.
With all that done, I unmasked the windshield and the canopy and posed the canopy open.
| CONCLUSIONS |
This kit assembles as nicely as it looks when you open the box. The kit is in all ways comparable with anything released by Tamiya or Hasegawa, with the additional benefit of being a far more “adventurous” release than either of those companies would ever do nowadays.
I never, ever thought I would see a mainstream injection-molded kit of the Wyvern, and certainly not one of this superb quality. The only thing I can think of that would be better would be for Trumpeter to release a Wyvern of this quality in 1/32, to sit next to my Hawker Sea Fury by Paul Fisher. The finished model looks better than that from Classic Airframes, which I thought was an excellent model (it still is, this one is just better).
Highly recommended. Buy in confidence. This kit will make an average modeler look advanced, and an advanced modeler look expert with the resulting model.
Review kit courtesy of Stevens International.
| REFERENCES |
Just a bit of an add-on note, 4plus publications has a fine book on this subject. Visit them at www.4pluspublications.com to see about ordering one for your next Wyvern build. Ed
September 2006
If you would like your product reviewed fairly and quickly by a site that has over 325,000 visitors a month, please contact me or see other details in the Note to Contributors.