| KIT: | Revell 1/32 Hunter FGA.9 |
| KIT #: | ? |
| PRICE: | $32.95 MSRP and still readily available |
| DECALS: | Two options |
| REVIEWER: | Tom Cleaver |
| NOTES: | Previous build stripped and repainted using Xtradecals X005-32. |
| HISTORY |
To my mind, the Hawker Hunter is aesthetically one of the best‑looking jets ever designed. In that opinion, I am not alone, as many have responded favorably to the flowing lines of Britain's first successful swept‑wing fighter. With the first prototype having flown July 20, 1951, the Hunter is one of the longest‑serving jets in any air force, with the last of its type retired from the Royal Air Force only in 1996.
Interestingly enough, this most successful of all Britain's post‑war military jets was not always considered a success. The early development of the Hunter was plagued with so many problems it seemed likely it would be replaced by the Supermarine Swift until that airplane revealed even more serious design faults.
 The
Hunter design, embarked upon in 1948 by a team led by Sir Sydney Camm,
introduced several new features in its cockpit arrangement, since it was the
first British cockpit to provide from the start for an ejection seat. All
instruments and controls fell readily in sight or to hand, which was an
invaluable aid to pilot efficiency.
The
Hunter design, embarked upon in 1948 by a team led by Sir Sydney Camm,
introduced several new features in its cockpit arrangement, since it was the
first British cockpit to provide from the start for an ejection seat. All
instruments and controls fell readily in sight or to hand, which was an
invaluable aid to pilot efficiency.
From the F.6 on, Hunters were capable of level flight at Mach 0.95, with a maximum speed of 715 m.p.h. at sea level. Supersonic speed was easily reached in all versions by putting the aeroplane into a 30E dive from heights above 30,000ft. Recovering was equally simple: the pilot merely needed to throttle back as he eased out of the dive and, if necessary, use the airbrake.
The Hunter was remarkably steady as a gun platform and - once the problem of disposing of empty shell cases was resolved - it made full use of its devastating armament of four 30mm Aden guns, each more powerful than the MK 108 guns of the Me 262 from which they were developed. The firepower of four 30mm
cannon was such that any target that got in a Hunter's sights
could be shredded with a 2 second burst. The airframe was so strong that no Hunter was ever lost to midair structural failure.
The
FGA.9 (fighter, ground attack), was developed following the F.6 with a
strengthened airframe and an Avon 207 replacing the Avon 203, for sustained
high-weight operations, allowing it to carry increased underwing loads. The
aircraft could be visually identified by a braking parachute above the jet
exhaust. The FGA.9 was first delivered to the RAF in October 1959, with No 8
Squadron based at Khormaksar, Aden, being the first unit to operate it.
During the 1960s, most Hunter squadrons in the RAF operated a mixture of F.6 and
FGA.9 aircraft. The majority of FGA.9s were actually rebuilt F.6s.
When Fighter Command became Strike Command in April 1968, the RAF's tactical
support and strike force was 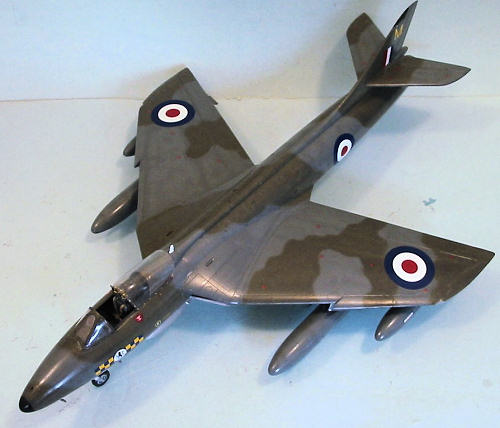 mainly
represented by two FGA.9 units, Numbers 1 and 54 Squadrons. The operational unit
to fly the FGA.9 was 8 Squadron - the first to use it - which was disbanded when
it returned from the Far East at the end of 1971.
mainly
represented by two FGA.9 units, Numbers 1 and 54 Squadrons. The operational unit
to fly the FGA.9 was 8 Squadron - the first to use it - which was disbanded when
it returned from the Far East at the end of 1971.
By the early 1970s, Hunters were being used as advanced trainers, mostly stationed at RAF Valley, where graduate pilots were introduced to high-powered air combat maneuvering and firing ordnance. Several FGA.9s were used by the RAF and the Fleet Air Arm through the 1980s in secondary operational roles and also to give pilots of other - more expensive - aircraft high performance jet time at a lower cost than would have been the case had they flown their Lightnings, Phantoms, or Buccaneers.
Hunter production totaled 1,985 aircraft, including 445 built under license in Belgium and the Netherlands. Some 400 Hunters were later re‑manufactured by Hawkers/BAC for service with second air forces, and it served with no less than 21 different world air forces, a record only bettered by the MiG‑17, which is amazing when one considers the relatively low production run in comparison with the Soviet fighter.
We have a Hunter based out at Chino that is still in its operational Fleet Air Arm scheme. While it is beset by mechanical problems and therefore does not fly often, everyone who passes it on the flight line pauses to look at it and comment on the beauty of its lines.
| THE KIT |
Revell answered Modelers’ “want lists” in 1998 with the release of this 1/32 Hunter, which then promptly became a shelf-sitter - as have nearly every model ever released in response to the pleas of modelers for this or that kit.
This
is unfortunate, because this kit of the Hunter is probably the most accurate kit
of the airplane released by anyone.
 Produced “to a price,” it is simple in
construction and does not have much of the detail modelers seem to prefer in
this scale. However, what detail is there is quite adequate to make a good
model - the only real need being a more detailed seat, and there are 1/32
Martin-Baker seats available for those who want them.
Produced “to a price,” it is simple in
construction and does not have much of the detail modelers seem to prefer in
this scale. However, what detail is there is quite adequate to make a good
model - the only real need being a more detailed seat, and there are 1/32
Martin-Baker seats available for those who want them.
The kit originally sold for around $18 when first released by Revell USA. I found this particular one shelf-sitting at a local hobby shop and was able to pick it up at the original price, which is a very good bargain when you consider that most recently I have seen the kit in its Revell of Germany box on the same shelf for $54 - a price that (to me at least) is vastly inflated for what’s there. One can frequently find this kit at shows on dealer’s tables for quite reasonable prices. Aeromaster released at least two aftermarket sheets I am aware of for the kit (four sheets including one for just stencils. Ed); while currently out of production, they can still be found here and there. Xtradecals has also released a sheet that is currently available from Hannant’s, so there are more markings possibilities available than merely the two in the box.
| CONSTRUCTION |
Assembly is very straightforward. If you follow the instructions, there will be
no problems, and I only found myself needing to use Mr. Surfacer 500 on the
fuselage centerline and the centerlines of the underwing drop tanks. A
considerable amount of weight 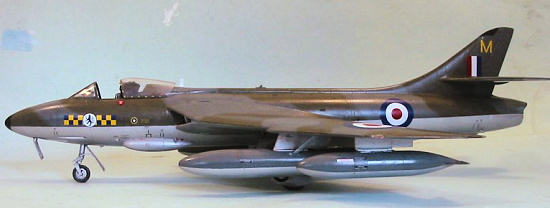 is
needed to insure nose sitting, and I filled up the area in front of the cockpit
above the nose gear well, as well as the area immediately behind the cockpit
with fish weights.
is
needed to insure nose sitting, and I filled up the area in front of the cockpit
above the nose gear well, as well as the area immediately behind the cockpit
with fish weights.
I painted the cockpit black, then drybrushed with aluminum to “pop out” detail. 1/32 scale instrument faces from a ProModeler decal sheet were used for the instrument panel.
I used Cutting Edge 1/32 posable resin British seatbelts to improve the look of the very basic ejection seat.
I was also able to use the outer wing pylons and the larger drop tanks that are redundant in the new F.6 kit to bring this kit up to full FGA.9 configuration.
| COLORS & MARKINGS |
Painting:
Originally, I painted this model in the RAF trainer scheme, then discovered that
there were no FGA.9s used in that role. For a long while, the model sat on an
upper shelf while I contemplated what to do with it. When the new F.6 was
released, and I obtained the Xtradecals sheet for the FGA.9, I decided to strip
the model and repaint it, since I would then be able to put it in operational
camouflage and markings, and use the stencil decals from the newer kit, since I
planned to do that as an air show performer from
 either the Black Arrows or the
Blue Diamonds.
either the Black Arrows or the
Blue Diamonds.
I stripped the model with Pollyscale Easy Lift Off, and cleaned it off. I took this opportunity to also repair and re-do some of the seam-filling I had done earlier.
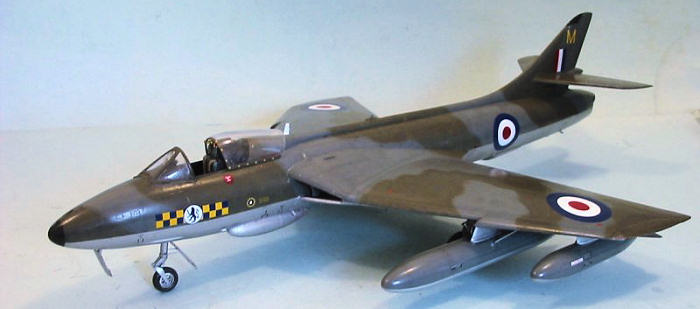
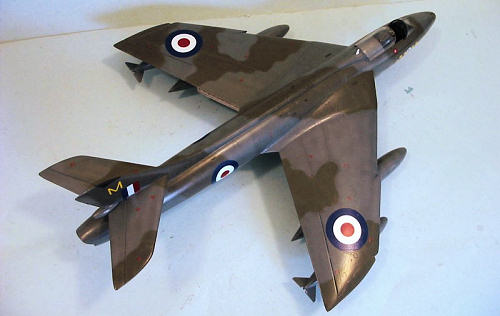
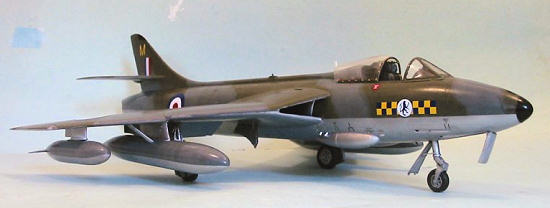
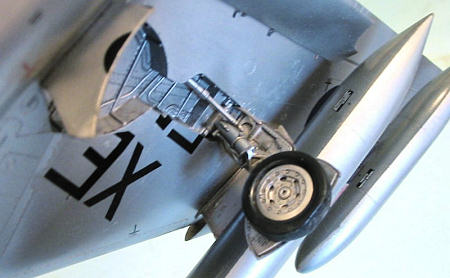
I decided to do the 54 Squadron airplane from the Xtradecals sheet, serving in the mid-1960s. I first painted the lower surfaces with SNJ Aluminum, since the airplanes were painted at the time with “Speed Silver,” an aluminum lacquer. I also took the opportunity to “pop out” detail in the landing gear and gear wells by hand-painting thinned Tamiya “Smoke” over these areas, which nicely simulates a bit of oil and wear. When all that was dry I masked off the lower surfaces and painted the upper surface camouflage with Xtracrylix RAF “Dark Sea Grey” and RAF “Dark Green,” which I freehanded. When this was dry, I gave the model an overall coat of Xtracrylix Gloss Varnish.
Decals:
The
Xtradecals are printed by MicroScale and present no problem. I particularly like
that the national insignia decals are fully opaque and none of the color
differences on the underlying surface came through. The kit stencil decals are
exhaustive, to say  the least, and took two sessions over two days to fully
complete. These decals are also good and present no difficulties in
application.
the least, and took two sessions over two days to fully
complete. These decals are also good and present no difficulties in
application.
| FINAL CONSTRUCTION |
I attached all the drop tanks, unmasked the canopy and posed it in the open position.
| CONCLUSIONS |
I like the Hunter, and I like this kit, which is easy to build, and presents no problems. Those who want to super detail it would have a very good-looking model as a result. The only thing it really needs besides aftermarket decals is a good resin seat, which improves the look of everything 100 percent.
October 2006
Review kit courtesy of my wallet. Decals courtesy of Hannant’s.
If you would like your product reviewed fairly and quickly by a site that has over 325,000 visitors a month, please contact me or see other details in the Note to Contributors.