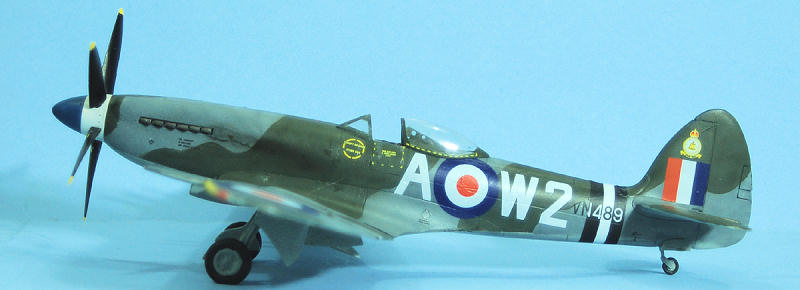
Revell 1/32 Spitfire F.24
| KIT #: | 4704 |
| PRICE: | $32.50 MSRP |
| DECALS: | options |
| REVIEWER: | Tom Cleaver |
| NOTES: | Matchbox molding |
| HISTORY |
The Spitfire F. Mk. 24 was
an almost completely different airplane from the original Spitfire Mk I, being
twice as heavy, more than twice as powerful and exhibiting an increase in climb
rate of 80% over its ancestor.
The last Spitfire variant
produced, the F. Mk. 24 (type 356) was similar to the F. Mk. 22, with an
increased fuel capacity of 66 gallons in two 33-gallon fuel tanks installed in
the rear fuselage. The F. Mk. 24
was a dedicated ground support tactical fighter from the outset, equipped with
zero‑point fittings for rockets, as well as one 500-lb and two 250-lb bombs.
The F. Mk. 24 also used the
larger "Spiteful" tail unit from the outset. Late production aircraft were
equipped from the outset with short barreled Mark V Hispano cannon.
 The F.
Mk. 24's performance was impressive, with a maximum speed of 454mph, a climb
rate of over 2,500 fpm that allowed it to reach 20,000 ft in eight minutes,
making it one of the most advanced
piston‑engined fighters of the era.
The F.
Mk. 24's performance was impressive, with a maximum speed of 454mph, a climb
rate of over 2,500 fpm that allowed it to reach 20,000 ft in eight minutes,
making it one of the most advanced
piston‑engined fighters of the era.
81 F. Mk. 24s were
completed, of which 27 were conversions of F. Mk. 22s. The last F. Mk. 24 was
delivered in February 1948.
With the revolution in
aircraft created by the adoption of jet power, the post-war aviation industry of
By the end of 1946, the only
front‑line squadrons in Fighter Command still using Spitfires were 41, equipped
with Spitfire F.21s and 63, equipped with LF Mk XVIEs.
The Auxiliary Air Force, which had been reformed in June, 1946; 13 RAuxAF
squadrons operated Spitfires. When
the RNVR squadrons were formed in 1948, they operated Seafires until 1954.
While ten squadrons still operated Spitfires in the
| THE KIT |
| CONSTRUCTION |
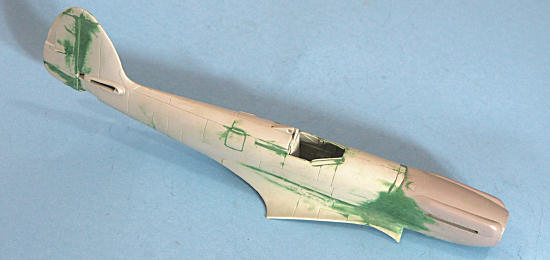
Be prepared to use a lot of
putty, cyanoacrylate glue, and Mr. Surfacer.
Haul out both big and little razor saws, and your Dremel.
Take a deep breath, major surgery commences with the first step. The one
good thing about this kit is that it is essentially outline-accurate for what
you're going to keep.
 piece of
the approximate size, cut down and test fit till it works, then make a second
one for the other wheel well. I did
not attach the wing fairing pieces to the upper wing, as the instructions would
have you do, but rather attached them to the respective fuselage halves.
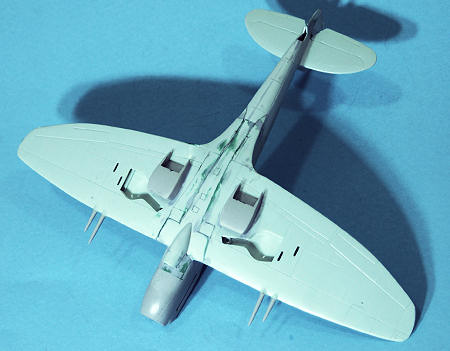
The gun bay covers fit the way you would expect of a kit from this
period, and after filling the gaps with cyanoacrylate, II sanded the area
smooth, then filled it again with Mr. Surfacer, sanded that smooth and then
rescribed the panel lines.
piece of
the approximate size, cut down and test fit till it works, then make a second
one for the other wheel well. I did
not attach the wing fairing pieces to the upper wing, as the instructions would
have you do, but rather attached them to the respective fuselage halves.
The gun bay covers fit the way you would expect of a kit from this
period, and after filling the gaps with cyanoacrylate, II sanded the area
smooth, then filled it again with Mr. Surfacer, sanded that smooth and then
rescribed the panel lines.
Fitting this to the fuselage
involved some “wing it” cutting to get the right angle to the firewall lines of
the fuselage. I also had to cut
away about half an inch of of the lower cowling part on the cowling, to make
room for the oil cooler intake to fit.
I glued the fuselage
together, then tubber-banded wing and fuselage together, and began test fitting
the nose and carvinr or sanding away where necessary to get the fit.
The nose is actually a bit narrow - this is due to the fact that the kit
fuselage is a hair too wide. After
it was glued in position, great green gobs of Squadron Putty were applied
liberally and allowed to set up for 24 hours.
 After
that, the nose was attacked with sanding stocks of various grits, until all was
nice and smooth. I then applied
several coats of Mr. Surfacer, sanding smooth between, then rescribed the panel
lines.
After
that, the nose was attacked with sanding stocks of various grits, until all was
nice and smooth. I then applied
several coats of Mr. Surfacer, sanding smooth between, then rescribed the panel
lines.
I then made a scratchbuilt
cockpit that is more an “approximation” of a Spitfire cockpit than a
re-creation. I used the Hasegawa
seat for this, with photoetch seatbelts, and decided that I would do the model
with the side flap closed, so I then attached that and applied a few more green
gobs, to be later attacked with sanding sticks.
Once the cockpit was
together - and I am really glad the kit comes with a good control panel decal -
I attached wing subassembly to fuselage.
When I attached the rudder to the vertical fin, I realized the fin was
not as thick as the rudder, so more green gobs were applied here, allowed to dry
overnight, and then sanded smooth with sanding sticks. I had to rescribe the
panel detail here and the rudder-fin hinge line.
I then attached the horizontal stabilizers and filled in the gaps there,
then sanded them smooth.
When it came to fitting a
correct windscreen, I found I had to build
up the area around the cockpit with Evergreen sheet to make the openings
smaller (since the canopy parts supplied in the kit are too wide, among their
other crimes). I did that, covered
it with putty, sanded smooth and rescribed again where necessary.
While there is a lot of
elbow grease involved here, and a willingness to cut things away that can't be
undone, this is really not difficult for anyone with any experience of old kits
that need extra effort with fit.
I also discovered that the landing gear legs are not that strong, and with the extra weight of the correction parts, I ended up reinforcing the attachment plug in the wheel well with lots of cyanoacrylate.
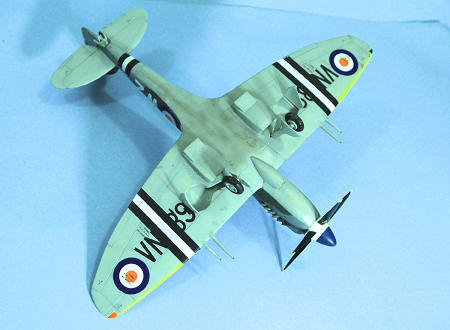
| COLORS & MARKINGS |
 The model
was painted with
The model
was painted with
Decals:
The kit decals went on under Micro-Sol without problem and settled down easily.
| FINAL CONSTRUCTION |
I did some “dings” with
Tamiya “Flat Aluminum” and exhaust and oil stains with Tamiya “Smoke”.
| CONCLUSIONS |
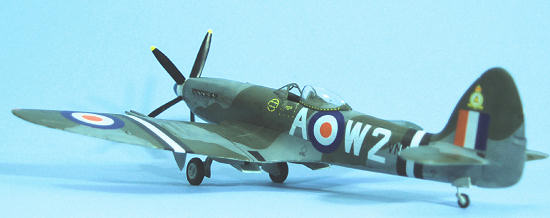 Using
the Greymatter Figures correction set, you'll end up with a great model of a
subject that is unlikely to ever be produced again in 1/32 scale. The
Greymatter Resins set is highly recommended.
Using
the Greymatter Figures correction set, you'll end up with a great model of a
subject that is unlikely to ever be produced again in 1/32 scale. The
Greymatter Resins set is highly recommended.
Tom Cleaver
September 2010
Copyright ModelingMadness.com. All rights reserved. No reproduction in any form without express permission from the editor.
If you would like your product reviewed fairly and quickly, please contact the editor or see other details in the Note to Contributors.