| KIT: | |
| KIT #: | ? |
| PRICE: | $165.00 MSRP |
| DECALS: | Four options |
| REVIEWER: | Tom Cleaver |
| NOTES: | Resin with photo etch and vacuform parts |
| HISTORY |
By the time Grumman’s F9F-2 Panther was entering fleet service in 1949, the
advantages of swept wings had already been proven by the North American
F-86 Sabre which had flown in prototype form within months of the XF9F-2.
The big question posed by this development for naval aviation was, could a
swept-wing jet - with all its low-speed control difficulties and need for a
higher landing speed - be tamed to the point it could be brought aboard an
aircraft carrier? There were those naysayers -as there have been at every
technological advance related to naval aviation - who thought otherwise and
predicted that the new developments in jets would make the aircraft carrier
obsolete. Most of these people wore black
 shoes with their
uniforms.
shoes with their
uniforms.
Grumman was of the belief that if a swept-wing Panther was to use the same low-speed control devices as the Panther used - leading edge slats and large flaps - that the problem could be overcome. In anticipation of the Navy agreeing with them, the company initiated initial design studies.
It didn’t take the Navy long to discover that their new Panther could only stay in the same sky with the MiG-15 by dint of superior pilot ability, when Panthers tangled with MiGs in the fall of 1950. The Navy suddenly wanted swept wings, and they wanted them fast. The Grumman proposal for a swept-wing Panther looked like a way to do that with minimum difficulty and maximum quick time frame.
By the time the Navy decided to proceed, the higher-powered F9F-5 Panther was in production. The XF9F-6 swept-wing prototype was an F9F-5 with minimal changes to put wings and horizontal stabilizers swept back 35 degrees on the Panther’s fuselage.
The prototype flew on September 20, 1951, and flew well. With the added kick of wartime, testing went forward and it was carrier-qualified in the early spring of 1952. By that time the Navy had ordered it into production and Grumman had given it the name “Cougar.” VF-32 became the first squadron declared operational with the Cougar in December 1952. Maximum speed at sea level was 650 m.p.h. - a very useful increase over the Panther - with 590 m.p.h. possible at 35,000 feet. Not only that, the Cougar could pierce the still-dangerous “sound barrier” in a dive - not by much, but still it did it. The most notable event in the history of the F9F-6 came on April 1, 1954, when VF-21 flew three Cougars from NAS North Island to Floyd Bennet Field, New York, with LCDR F.X. Brady setting a transcontinental speed record of 3 hours, 45 minutes and 30 seconds.
The definitive Cougar was the F9F-8, known to Grumman as the G-99. There
were many changes over the earlier airplane, the most noticeable of which
was the wing. Wing chord outboard of the fences was increased, giving the
leading edge a sawtooth that made the Cougar definitely supersonic in a
dive with better control. The leading edge slats were deleted while the
new leading edge had increased camber which improved stability and handling
at low spe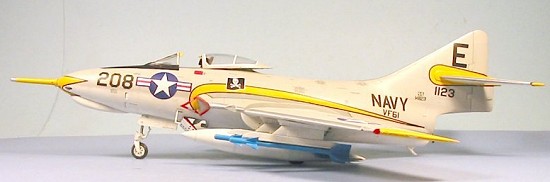 eds and high
angles of attack - important for “coming aboard.” The large trailing edge
fillet extended the length of the fuselage. The large wing increased
internal fuel capacity to 1,063 gallons, while new 150-gallon tanks could
be carried. The F9F-8 was also capable of in-flight refueling with a nose
probe installed at the factory. With similar gun armament, the F9F-8 could
also carry four new Sidewinder missiles, as well as a substantial underwing
bombload that eventually included a nuclear device. The Blue Angels
finally turned in their Panthers for good at the end of the 1955 season
(when I saw them) and converted on to the F9F-8 (which I also saw them fly)
that equipped the team until 1958.
eds and high
angles of attack - important for “coming aboard.” The large trailing edge
fillet extended the length of the fuselage. The large wing increased
internal fuel capacity to 1,063 gallons, while new 150-gallon tanks could
be carried. The F9F-8 was also capable of in-flight refueling with a nose
probe installed at the factory. With similar gun armament, the F9F-8 could
also carry four new Sidewinder missiles, as well as a substantial underwing
bombload that eventually included a nuclear device. The Blue Angels
finally turned in their Panthers for good at the end of the 1955 season
(when I saw them) and converted on to the F9F-8 (which I also saw them fly)
that equipped the team until 1958.
The prototype F9F-8 - an F9F-6 with the new wing - flew on December 18, 1953, and the first production airplane flew a month later, on January 18, 1954. Squadron service was initiated rapidly and more Cougars were on carrier decks in the late 1950s than any other type. After leaving first-line fleet service at the end of the 1950s, the F9F-8 flew on with the Reserves and as a single-seat fighter trainer in Naval Air Training Command until 1971, long after all its contemporaries - as well as its replacements, the F-11F-1 and F3H-2 - had been sent to the boneyard. Along with the F-14, it was Grumman’s most successful jet fighter.
| THE KIT |
Up to now, the most accurate kit of the F9F-8 Panther has been the 1/72 kit released by Hasegawa around 1977. I believe ID Models released a 1/32 Cougar vacuform, and Combat Models might have also, but those were companies whose products this aeronut learned early on to stay well away from.
This kit is without a doubt the finest model of the Cougar ever created.
Period. Hands-down. No competition. Like me, Paul Fisher grew up
watching Panthers and Cougars of the Blue Angels fly overhead, and he never
lost his love for them. Anyone who knows of Paul’s car models will know
that Fisher Productions has its own standard of e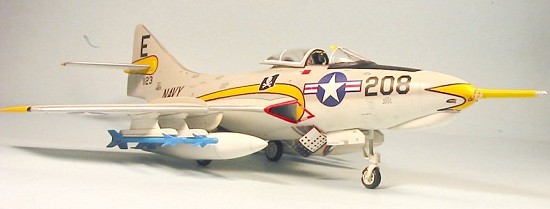 xcellence,
one that other resin kit manufacturers can dream about and aspire to, but
seldom achieve.
xcellence,
one that other resin kit manufacturers can dream about and aspire to, but
seldom achieve.
The design of this kit is the best I have ever seen in any model. A modeler who lacks opposable thumbs and a neocortex could successfully assemble this model! I don’t see how anyone could mis-assemble it, other than to perhaps get too much CA glue in the seams or something. Anyone who can touch their forefinger to their nose three times in succession will have absolutely no problem with this model.
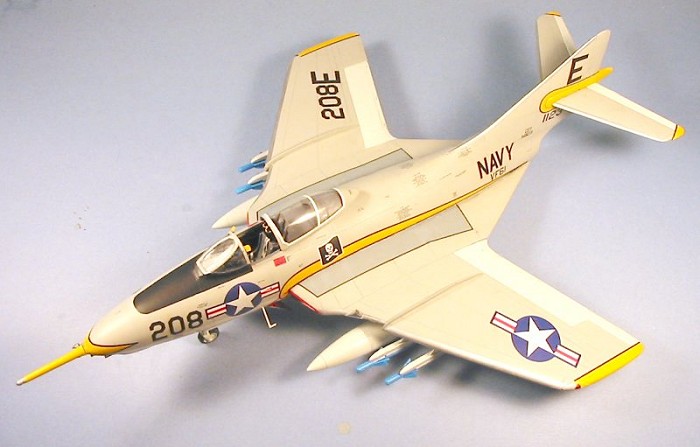
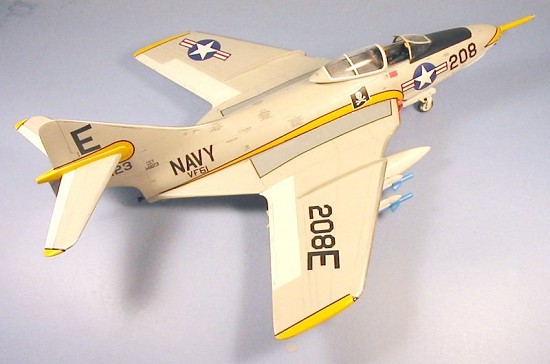
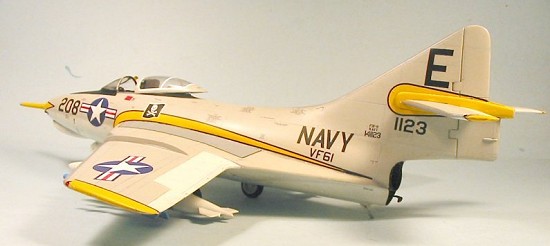
Decals are provided for the CAG airplane of VF-61 in Glossy Sea Blue, a later VF-61 airplane in gull-grey/white, a fighter-trainer from VT-24 (which could easily become even more colorful for the modeler with photos of this airplane later in its life), and the team leader’s airplane for the Blue Angels.
| CONSTRUCTION |
Construction turned out to be as easy as it first appeared. My only problem was figuring out what part was what for some of the smaller items that were not well-identified in the instructions. This is really a nitpick and may be more my problem than anything found in the box.
The majority of the time spent on construction went into the cockpit, which
was finished in about an hour after the paint
 had dried. A modeler
has to be careful in their choice of interior colors here, since the
cockpit colors differ between a Glossy Sea Blue Cougar and a
gull-grey/white Cougar. Having the Detail & Scale book for the Cougar
handy during construction is a good idea.
had dried. A modeler
has to be careful in their choice of interior colors here, since the
cockpit colors differ between a Glossy Sea Blue Cougar and a
gull-grey/white Cougar. Having the Detail & Scale book for the Cougar
handy during construction is a good idea.
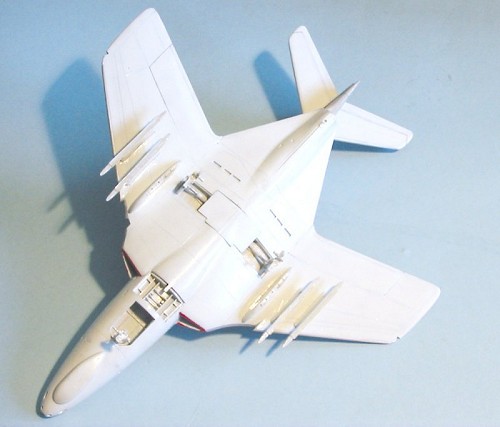
Once assembled and with the 11 pennies glued in position to provide the necessary nose weight, the cockpit slides into the one-piece fuselage without difficulty. Since I was going to build the model with the dive brakes down, I cut off the molded-in resin brakes before inserting the cockpit. Once in proper position, I glued it in with cyanoacrylate glue.
The wing sub-assembly was next. There is a small fit problem attaching the flaps to the wing, which requires some gap filling and later sanding-down to insure fit. This can be easily resolved by deciding to mount the flaps in a down position - which can range from slightly-down to full-down. As Paul Fisher notes in his instructions, most Cougars were seen sitting on the ground with their flaps fully raised, “but don’t let this stop you!” Once I had finished this, I polished the area I had sanded so the surface was as smooth as that of the surrounding resin.
The wing attaches in position easily. I ran cyanoacrylate glue along the upper wing-fuselage joint, and the seam disappeared. I then assembled the horizontal stabilizers and insured they fit easily into the vertical fin slot, then took them off since they would not be glued in position until after the decals had been applied.
I cleaned up the resin landing gear legs and dive brake interior, and checked the fit of the underwing pylons and cleaned them up to fit close.
| COLORS & MARKINGS |
Painting:
I
first painted the leading edges of the wings and tail with SNJ aluminum,
which I then masked off with Tamiya masking tape. Then I “pre-shaded” the
rest of the model. When that was complete I painted the white areas with
Gunze-Sangyo “Flat 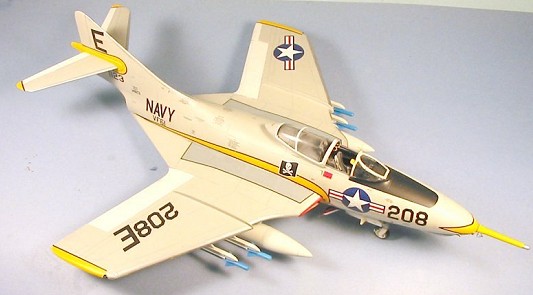 White,”
then applied a coat of Gunze-Sangyo “Gloss White - FS17875,” which is the
correct shade of white for US Navy airplanes. The upper surfaces were
painted with Gunze-Sangyo “Light Gull Grey.” When that was dry I masked
off the area of the anti-glare panel and painted that with Tamiya “Flat
Black.” I hand-painted the red edge of the intakes with Gunze-Sangyo
“Shine Red.” Once all was dry, I gave the model a coat of Future.
White,”
then applied a coat of Gunze-Sangyo “Gloss White - FS17875,” which is the
correct shade of white for US Navy airplanes. The upper surfaces were
painted with Gunze-Sangyo “Light Gull Grey.” When that was dry I masked
off the area of the anti-glare panel and painted that with Tamiya “Flat
Black.” I hand-painted the red edge of the intakes with Gunze-Sangyo
“Shine Red.” Once all was dry, I gave the model a coat of Future.
Decals:
Applying the decals turned out to be the longest and most difficult part of the entire project. I first applied the yellow squadron markings and applied a lot of Micro-Sol to the nose pieces and the markings on the vertical fin. When these had all set up, I proceeded to apply the rest of the markings. The decals are printed by MicroScale, and gave no problems. The instruction sheet has a diagram for applying the stencils. When all this was dry, I washed the model off, and applied another coat of Future.
| FINAL CONSTRUCTION |
When the Future was dry, I airbrushed the entire model overall with Xtracrylix “Satin” varnish, which brought down the glossiness of the Future. I then painted the upper surfaces with Xtracrylix “Flat” varnish. This was still not flat enough after a second coat, so I applied a thorough coat of Testor’s Dullcote, which got everything down to the proper finish.
 I attached the
landing gear so the model could sit in position, then attached the pylons.
I found I needed to run a line of white glue around the attachment base of
the pylons, which got rid of the slight seam each had on the wing. The
drop tanks are heavy since they are solid, so I didn’t spare the glue. Even
then, one was easily knocked off during the final assembly process - a good
idea is to never handle the model by the wings once it is finished.
I attached the
landing gear so the model could sit in position, then attached the pylons.
I found I needed to run a line of white glue around the attachment base of
the pylons, which got rid of the slight seam each had on the wing. The
drop tanks are heavy since they are solid, so I didn’t spare the glue. Even
then, one was easily knocked off during the final assembly process - a good
idea is to never handle the model by the wings once it is finished.
I found a photo of a Cougar carrying inert training round Sidewinders, and decided the blue gave a nice addition of color to the overall model, so the four Sidewinders were painted with Tamiya “Sky Blue” and attached when dry.
The final bit was to glue the rear cockpit armor and seat in place, and then attach the canopy in the open position.
| CONCLUSIONS |
I have been lusting for one of these models since I first saw the Panther kit, and what is in the box definitely does not disappoint. This is the kind of model that can make an average modeler look advanced modeler and an advanced modeler look like an expert. Out of the box, the finished model is beautiful. I have seen photos of other Cougar models done in each of the four schemes provided, and they look equally good. If you like Navy jets of the 50s and want a big model to impress people with, this Cougar will fill the bill. Yes, it’s expensive - but unlike other 1/32 kits in a similar price range, you won’t find anything to complain about when you open this box and dive into the project.
May 2005
Thanks to Paul Fisher for the review kit. Get yours from Fisher Productions at www.fishermodels.com
If you would like your product reviewed fairly and fairly quickly, please contact the editor or see other details in the Note to Contributors.