Hobbycraft 1/48 F8F-1 Bearcat
|
KIT # |
1440 (Blue Angels boxing) |
|
PRICE: |
$16.98 |
|
DECALS: |
See Review |
|
REVIEW : |
|
|
NOTES: |
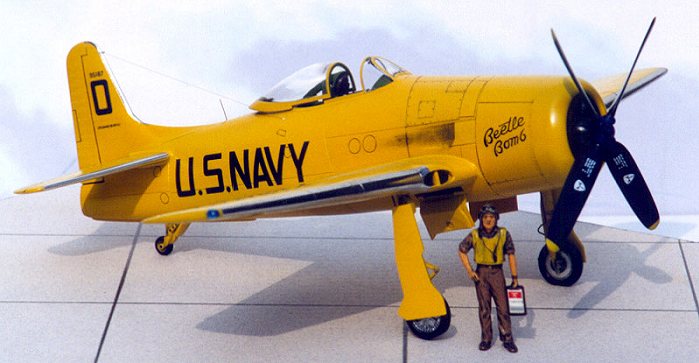
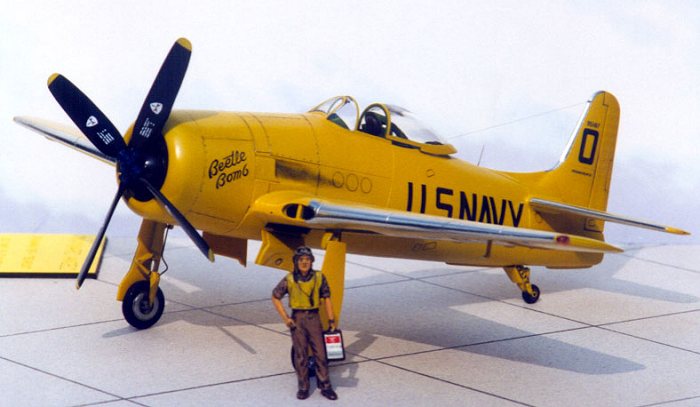
Photo from John M. Campbell collection |
" WAYWARD ANGEL"
|
HISTORY |
In the Blue Angels first years of air show demonstrations, a North American SNJ was painted overall orange-yellow and given the name "Beetle Bomb". "Beetle Bomb" was a target with a big "0" painted on it and was supposed to designate an enemy aircraft. The aircraft was equipped with smoke grenades under the belly, which would be tripped after a simulated firing pass from one of the regular Blue Angels. The airplane would start smoking and flopping around before hanging up in a steep bank, at which time the second man in the SNJ's rear seat would toss out a dummy with a parachute.
The SNJ was replaced in late January of 1949 with an all orange-yellow F8F-1 "Bearcat". A centerline pod was rigged to the F8F to hold the parachute-rigged dummy, smoke canisters were fitted to the tailhook well, and the show continued with the same routine. After the Blue Angels transitioned to F9F "Panther" jet in mid-1949, the parachute dummy pod and smoke canisters were removed and "Beetle Bomb" was used for advanced aerobatics before the main show. It performed this task until Lt. Bob Longworth tragically crashed attempting a roll on takeoff at a training show in Pensacola on April 24, 1950. This ended the Blue Angels use of "Beetle Bomb".
The model represents F8F-1, bureau number 95187, which served as "Beetle Bomb". Decals for a regular Blue Angels aircraft or "Beetle Bomb" were provided with the kit.
|
CONSTRUCTION |
Interior:
The cockpit area in the kit was quite adequate, with both side consoles and the instrument panel exhibiting correct instrument and control markings for a "Bearcat". I drilled out all of the recessed holes in the side consoles where a flip switch would go and inserted aluminum beading thread into these holes. I scratch-built the emergency hydraulic hand pump to the right of the seat bucket from copper wire and styrene tube. The seat bucket, part A4, seem to fit too far to the rear when inserted into its location hole in the cockpit tub. This was easily remedied by drilling a new location hole about 2-mm forward of the existing hole.
 Not so easily remedied was the fit of the cockpit tub. The tub fit well enough, but appeared to sit too low when inserted into the fuselage location keys. This would take an extremely careful cutting and sanding of the rear seatback to correct and I personally wasn't up to the time involved. I'm quite sure a cottage company will be soon releasing a resin cockpit for the HOBBYCRAFT kit and my hope will be that they will get it correct. The bend of the headrest on the seatback also appears to have a too far forward angle. I had to sand the headrest part slightly in order to clear the sliding canopy section.
Basic cockpit color was interior green, with the instrument panel and side consoles painted flat black. The seat bucket and backrest were painted flat aluminum. I added small sections of wire into predrilled holes above the backrest on the seatback for the shoulder harness retainers. Seat belts and shoulder harnesses were done with sanded masking tape painted dirty white. Buckles and such were cut from True Details photoetched belts and cemented to the masking tape after painting them flat aluminum.
Although the kit instructions would not have one include the rollover pylon, which was included in the kit, reference photos I have for "Beetle Bomb" show this feature to be present. I had to do a little sanding and dry fitting before I got it to fit properly. The rear-view mirror came from True Details photoetched mirrors.
I painted the wheel wells and weathered them prior to their assembly. Although the instructions would have one paint the wheel wells interior green, they should be painted orange-yellow and given a semi-gloss finish after weathering. "Beetle Bomb" was painted by Grumman and the Grumman painters had a surplus of orange-yellow paint and went a little nuts with it. The interior of the engine cowling was painted interior green, however.
 Engine:
HOBBYCRAFT consistently molds generic radial engines for all of their aircraft kits and this was no different. It was much too small for a Pratt & Whitney R-2800, but once painted and detailed, it makes for an acceptable replica. I added an ignition harness and ignition wiring from two sizes of small gauge solder. The engine was painted oxidized aluminum, with the gear case picked out in engine gray, pushrods black, and ignition wires insignia red.
I added a section of 1/16-inch brass tubing to the propeller for its mount rather than use the kit's method, which would not allow me to paint the engine to my liking. The Aeroproducts logo and stencil decals came from a sheet released a few years ago by IPMS Spruce Goose.
Exterior:
Other than adding brake lines from coated copper wire, an aerial attachment on the vertical tail from beading thread, and the small fuselage whip antenna from surgical thread, I build the exterior box stock. Fit was excellent and the kit went together rather quickly after dealing with the cockpit inconsistencies.
 It was necessary to install the clear landing light and wing navigation lights prior to painting, as dry fitting had revealed these to have rather poor fits. I painted the areas behind these clear pieces bright silver before attaching the clear pieces with super glue. They were then sanded and polished to match the wing's profile. In the end I didn't have to mask the landing light, as this item was removed and faired over on "Beetle Bomb", but I masked the nav lights using Elmers glue. Once painting was finished, I simply touched the lights with a piece of masking tape and the dried Elmers lifted right up, after which I painted the port light clear red and the starboard light clear blue. The four small clear pieces for the upper and lower wing navigation lights were left off until final assembly. In actuality these were deleted and faired over on "Beetle Bomb", but I left them as they added a little extra color to the monotone paint finish.
Care must be taken when attaching the main landing gear struts and retraction arms in order to get a correct stance. Fit of these items was very loose and I had to constantly monitor their locations until the glue set up, after which I applied a little super glue to the joints for strength. I had to trim about 2 mm from the lower part of the gear strut door attachment strips in order for the doors to cover the wheel centers as they appear in reference photos. The wheel doors were taped in place, cemented, and set as per reference.
|
PAINT & DECALS |
April 2001
Copyright ModelingMadness.com. All rights reserved. No reproduction in part or in whole without express permission.
If you would like your product reviewed fairly and quickly, please contact
the editor or see other details in the Note to
Contributors. The canopy and windshield were masked with Bare-metal foil and given a couple coats of interior green before attaching them to the main assembly. I temporarily attached the sliding section in the closed position using strips of two-side tape. Wheel wells were masked using card stock and masking tape strips and the cowling opening was masked with a circle cut from card stock.
The main assembly, landing gear doors, and horizontal tails were given three coats of AeroMaster Orange-Yellow to serve as primer, building up each coat to an even color consistency (yellow is probably the toughest paint one can use because of its translucent nature). After allowing the paint to dry for two days, I sanded out any imperfections and reshot. Once the finish was to my liking I gave the parts another two coats of Orange-Yellow to deepen the color. Once dry, I sprayed on two coats of Polly Scale Clear Gloss to prepare the surface for decals.
Decals for "Beetle Bomb" were supplied in the kit, but the blue looked a little more like Blue Angels Blue, whereas "Beetle Bomb's" lettering was done in a darker insignia blue. The kit decals appear correct in the linear size, but look a little short in their height. Since I had an unused SuperScale sheet for "Beetle Bomb", in which the lettering was printed in the correct shade of blue and the correct height, I decided to go with them. Needless to say, I was not sorry. Like all of SuperScale's past decals, these went on with no hassles and only required solvent in the wing and fuselage recesses. The polished metal leading edges on the wings, horizontal tails, and vertical tail were done using Bare-metal foil.
After letting the decals dry for a day or so, I cleaned up any residual adhesive and gave the model another two coats of clear gloss. The model was then given ink washes in all control and access recesses as well as the oil cooler and carburetor intakes on the wing's leading edges. Exhaust stains were done using three shades of powdered pastel: black, medium gray, and light gray. The aerial wire was done using smoke-colored invisible thread.