| KIT #: | 7557/8 |
| PRICE: | $16.98 |
| DECALS: | options |
| REVIEWER: | Torben & Nicolai Plesberg |
| NOTES: | It is possible to convert the Canadian Chipmunk into the small SAI KZ VIIIf single seat aerobatic plane. |
| HISTORY |
The Chipmunk was a two seat elementary trainer designed by the Canadian division of De Havilland Aircraft Ltd., Hatfield, UK. It was intended as a successor to the same company’s design, the Tiger Moth. It first flew on 22 May 1946 at Downsview, Toronto in Canada while the first British built Chipmunk flew in September 1949. It was an all metal monoque construction with the rear part of the wings (aft of the main spar) and all control surfaces fabric covered. The engine was a Gipsy Major Mk.8 in-line yielding 145 hp.
Canadian production included planes for Egypt, Thailand, Lebanon as well as Canada and constituted 217 planes. 66 were licence built by the OGMA (Officinas Gerais de Material Aeronático) in Portugal for the Portuguese Air Force. However, the largest production took place in the UK, as 1000 planes were licence built by the parent company at Hatfield Aerodrome, but was later moved to Hawarden Aerodrome near Chester.
 They included
export orders to a lot of countries including Denmark which took delivery of 27
Chipmunk T Mk.20 in several orders. The first of these were signed on November 8
1949 by the combined aerial leadership on behalf of the Army and Navy (the Royal
Danish Air Force were yet to be established at this time) on 10 Chipmunks to a
price of £44020. They were delivered the following spring and summer to the
flying school at Avnø. 5 more were delivered during 1952 and 12 in 1953 to a
combined price of £94163. They too were included to the flying school although
station flights and the mechanic school at Værløse took their requirements off
the trainable force.
They included
export orders to a lot of countries including Denmark which took delivery of 27
Chipmunk T Mk.20 in several orders. The first of these were signed on November 8
1949 by the combined aerial leadership on behalf of the Army and Navy (the Royal
Danish Air Force were yet to be established at this time) on 10 Chipmunks to a
price of £44020. They were delivered the following spring and summer to the
flying school at Avnø. 5 more were delivered during 1952 and 12 in 1953 to a
combined price of £94163. They too were included to the flying school although
station flights and the mechanic school at Værløse took their requirements off
the trainable force.
The T.Mk20 is a military export variant of the RAF’s T.Mk10 and the main difference (as far I have found out) is the engine. While British Chipmunks had the Mk.8 variant of the Gipsy Major engine, Danish aircraft were equipped with the Mk.10 series 2 variant.
The Chipmunk served for more than 25 years before being replaced by the Saab T-17 Supporter in 1976. The main reason for this may have been the fact that the Chipmunk is a tail wheeled aircraft, while the T-17 is a nose wheeled aircraft and they do require different handling techniques when taking off or landing.
Of the 27 Chipmunks 4 were written off in crashes and with approx 78000 flight hours logged and 2500 military pilots having their basic training on it, their flight career were far from over. Several are flying even to day with civilian registrations and the well known display team (at least in Denmark), the Chip-Chaps, are doing their displays at air shows all the time.
 SAI KZ VIII: In
the late forties Sylvest Jensen’s Air Circus ordered a special single seat
aerobatic plane with the SAI – Skandinavisk Aero Industri, meaning Scandinavian
Aero Industry. Björn Andreasson, the famous Swedish aircraft designer, was
responsible for the KZ VIII, a small plane powered by a De Havilland Gipsy Major
10 of 145 hp. Two kits were produced in an all- wood construction. One of the
kits was assembled at once by the SAI, and the aircraft delivered to Sylvest
Jensen in 1949, and got the registration OY-ACB. The all red aircraft was shown
performing aerobatics 50 times during 1950. However, The Air Circus did not make
enough money to continue for the 1951 season, and in 1952 the aircraft was sold
to a Swiss airline pilot, Arnold Wagner. In 1964, the KZ VIII performed at an
air show on a small airfield just outside Copenhagen. It had the registration
HB-EPB and was flown by Mr Eugen Seitz. Later, the aircraft was sold to UK,
where it got the registration G-AYKZ. From 2008 the British KZ VIII was stored,
no longer in flying condition.
SAI KZ VIII: In
the late forties Sylvest Jensen’s Air Circus ordered a special single seat
aerobatic plane with the SAI – Skandinavisk Aero Industri, meaning Scandinavian
Aero Industry. Björn Andreasson, the famous Swedish aircraft designer, was
responsible for the KZ VIII, a small plane powered by a De Havilland Gipsy Major
10 of 145 hp. Two kits were produced in an all- wood construction. One of the
kits was assembled at once by the SAI, and the aircraft delivered to Sylvest
Jensen in 1949, and got the registration OY-ACB. The all red aircraft was shown
performing aerobatics 50 times during 1950. However, The Air Circus did not make
enough money to continue for the 1951 season, and in 1952 the aircraft was sold
to a Swiss airline pilot, Arnold Wagner. In 1964, the KZ VIII performed at an
air show on a small airfield just outside Copenhagen. It had the registration
HB-EPB and was flown by Mr Eugen Seitz. Later, the aircraft was sold to UK,
where it got the registration G-AYKZ. From 2008 the British KZ VIII was stored,
no longer in flying condition.
A German aircraft engineer purchased the remaining kit, and in 1959 he built the second KZ VIII, which got the registration D-EBIZ. However, the interest in getting this unique plane back to Denmark was considerable, and the German owner was willing to sell his plane. It came to Denmark in 1972, and the KZ VIII got the registration OY-DRR. After several years of operation by its owners, it was handed over to the Danish Aviation Museum, where it is kept in flying condition, as the only original KZ VIII in the world.
There is, however, a third KZ VIII, a replica with a 180 hp boxer engine and constant speed propeller, and the registration is OY-KZS. Construction year for the replica was 1996, and the aircraft got its certificate of air in 1999. Therefore, it is now possible to see two KZ VIII simultaneously in the air in Denmark at air shows. Learn more about SAI and the KZ aircraft here: Stoppel 1/72 Kramme and Zeuthen KZ-VII Lark
| THE KIT |
The kit comes in an end opening box with an Iraqi machine taking off on the front while the back constitutes the four decal options available. One clear canopy and a single sprue tree in grey plastic is present; the lower wing part cut off (to make it fit the box!), and the decal sheet and instruction sheet included in a resealable bag.
The parts display finely engraved panel lines, while finely raised ones constitutes the fabric rendition. Some flash is present but some careful cleanup should present no issues with the average modeler. The fit of the parts is also quite good with the exception of the canopy which, due to its thickness, won’t fit over the instrument panel coaming for the instructor, but more on this later.
 The instruction
sheet is typical of AZ Model; easily understood and with painting guide for the
smaller details. Beware though, for you that may not be used to AZ’s instruction
sheets; there may be shown pieces that may not be included in the box you have
bought, but this is easy since it’s the same instruction sheet that are included
in all their different boxings, of the same subject, to save printing costs!
The instruction
sheet is typical of AZ Model; easily understood and with painting guide for the
smaller details. Beware though, for you that may not be used to AZ’s instruction
sheets; there may be shown pieces that may not be included in the box you have
bought, but this is easy since it’s the same instruction sheet that are included
in all their different boxings, of the same subject, to save printing costs!
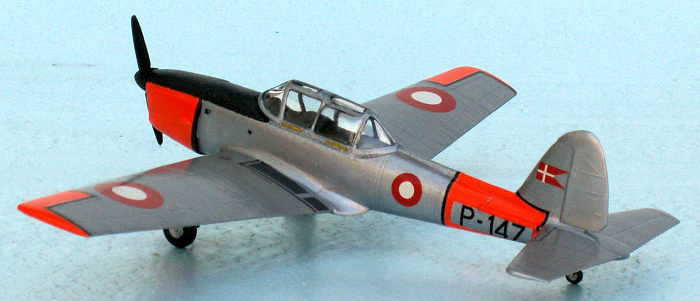
The four decal options include an Irish, Danish, Iraqi and Egyptian air force machines. Although nicely printed they do not appear to be opaque enough (especially the white areas) and, as usual I might add, the Danish national insignia are incorrect. In fact the Danish option is not; repeat NOT, a scheme that ever flew in Danish Air Force colors! The sharp eyed reader will notice that the Danish option also include a Danish civil registration, OY-ALD, that is to be attached beneath the cockpit. This is how ex P-147 looked like in 2007; my Dad had taken a picture of it at Roskilde Air Show that year and, after I having taken a good look at this, it seems to me that it has been AZ’s primary reference for the Danish option!
To finalize this tragedy the stencils also seems to have missing / wrongful elements, but also more on this later!
The kit needed for the KZ VIII conversion is # 7558, the Canadian version with the bubble hood, which is necessary for the conversion.
| CONSTRUCTION |
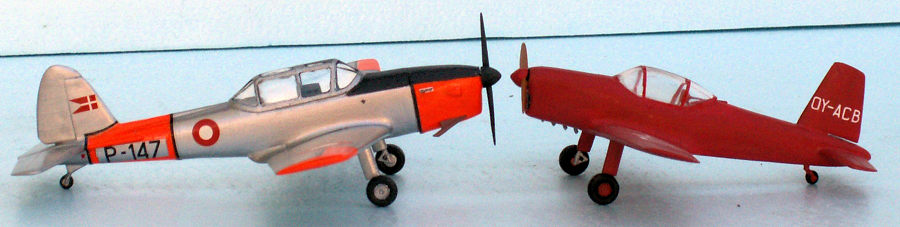
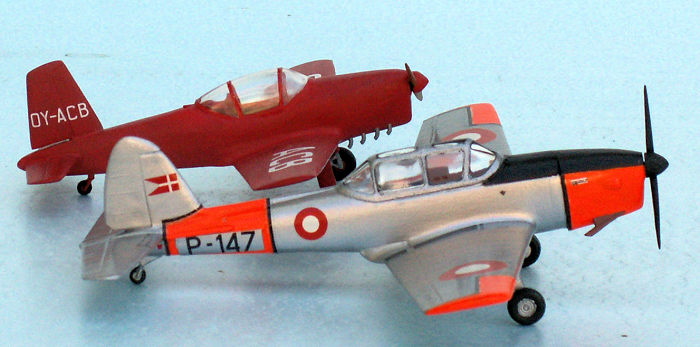
As my building spree continued I initially did not want to do this kit right now, but as a request of my Dad. He has just finished a KZ VIII, which he based on an AZ Model Chipmunk kit I gave him for Christmas some years back. Actually I had hoped I could have given him an Airfix Chipmunk instead (cheaper!), it seemed to have sold out, so I broke out and spent 140DKK for the AZ kit just for him to cut it up and turning a Chipmunk into a KZVIII!!
Anyway after having finished his KZVIII he turned to me and asked if he could buy my kit to build it. He wanted to make an interesting comparison between a Chipmunk and a KZVIII. “No way” I said, “he must be out of his mind” was my initial reaction! It then was reformulated by him to that he would like to build it and I could then finish it as I would like. Still I was a shaking my head at him and telling him: “what fun is there in that for me?” (and the reason for why modelers keep building models!!). Anyway I said to him that as soon as my current projects, which consisted of several Messerschmitt Bf110’s, I would go ahead with my Chipmunk.
The kit is actually easy assembled due to its parts breakdown but nevertheless it still requires caution and care to get a reasonable result. I began construction by assembling most of the interior (except rudder pedals and instrument panel for the instructor), propeller / spinner and the engine cowling together and painting it flat black concluded that step. The instrument panels also went black and rudder pedals went gun metal.
 While that dried
the wings were glued together and landing gear painted and assembled. As
interior and the student’s instrument panel were glued in the left fuselage half
the fuselage was glued together. This, however, as I forgot in the rush to place
the rudder pedals! The rear ones were easy, as the instrument panel had not been
glued in place yet, but the front ones were more of a problem, as the control
stick was in the way. By cutting them in half and wrinkling them around the
stick I got them to fit as intended.
While that dried
the wings were glued together and landing gear painted and assembled. As
interior and the student’s instrument panel were glued in the left fuselage half
the fuselage was glued together. This, however, as I forgot in the rush to place
the rudder pedals! The rear ones were easy, as the instrument panel had not been
glued in place yet, but the front ones were more of a problem, as the control
stick was in the way. By cutting them in half and wrinkling them around the
stick I got them to fit as intended.
After a bit of filler and sanding on the seams, the wings, rudder and tail planes were glued in place. They too needed slight sanding / filler to blend in but again no big deal. The cowling also fitted quite well, but some filler on the top is necessary to get the gap here disappear. The rear instrument panel plus the coaming was attached at this stage. The anti spin strakes were also attached, but the right one needed a slight correction as they were not the exact same shape! They too needed some sanding / filler to blend in.
The most difficult operation in this built was to get the canopy to fit as the panel coaming made the too thick canopy not fit without large gaps. I tried to sand the coaming smaller, but it did not seem to help much so I took my knife and scraped material off the inside of the canopy framing! Eventually I got a reasonable fit but still not perfect. A vac canopy would have been nice here! Alternatively a thinner injection molded one! The last to be glued in place was the landing gear before the usual cleaning process preceded the paint shop.
KZ VIII conversion: First thing to do is getting a reliable three view drawing of the KZ VIII to a 1/72 scale. In a Danish booklet “Flyvemaskiner over Danmark”, I found the wanted three view drawing. However, it was not to the right scale. My Epson printer was luckily able to enlarge the drawing to the right scale. Now it was possible to decide, how to modify the Chipmunk kit. Since the KZ VIII is much smaller than the Chipmunk, the fuselage had to be shortened considerably. The fuselage halves were stuffed with Plastic Padding behind the canopy. This measure would make it possible to reshape the assembled rear fuselage. The canopy is considerably shorter and can be made of the Canadian Chipmunk canopy. However, the canopy is far too thick and should be sanded thinner. The wings should have a shorter span and they are narrower than those of the Chipmunk. However, it is also possible to modify the Chipmunk wings to KZ VIII size and shape. The front of the fuselage is shorter, and it is necessary to cut a small piece off to get the right length of the fuselage. The greatest problem was to shape the forward part of the wing beneath the fuselage. The solution was to make a new part with the right shape and glue it in place. The undercarriage of the Chipmunk could also be modified for the KZ VIII. The tail planes should be smaller, and the fin and rudder are more angular. Chipmunk tail planes were useable, the fin and rudder had to be made from a small piece of 2 mm plastic board. The exhausts of the KZ VIII model consist of 4 x 1 mm brass tubing bent to the right shape. It was a good feeling, when the modification of the Chipmunk kit into a KZ VIII was finished. No other Danish modeller has taken the trouble to take up this challenge, i.e. to a 1/72 scale.
| COLORS & MARKINGS |
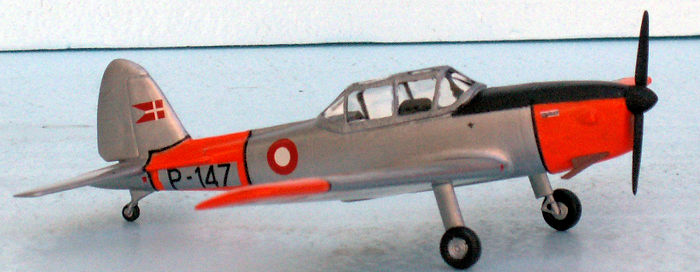
The canopy frames were painted flat black before the whole model (except the black antiglare panel in front of the cockpit) got several coats of flat white (Model Master 4769) acting as primer; both to the dayglo (Model Master 4703) as well as the aluminium (Model Master 4677) color the plane wore in Danish service. These were also applied in several coats to ensure good coverage. Finally a gloss coat was given to facilitate decal application.
 The decals were
applied over two sessions; first the black lines separating the dayglo from the
aluminium color were attached, then walkways and stencils were done. Also the
aluminum fields in the dayglo on the rear fuselage were applied. After drying
and being sealed in with clear gloss the remaining decals were applied; the P
numbers and the national insignia, which came from the dungeon. This was of
course also sealed in with clear gloss after drying.
The decals were
applied over two sessions; first the black lines separating the dayglo from the
aluminium color were attached, then walkways and stencils were done. Also the
aluminum fields in the dayglo on the rear fuselage were applied. After drying
and being sealed in with clear gloss the remaining decals were applied; the P
numbers and the national insignia, which came from the dungeon. This was of
course also sealed in with clear gloss after drying.
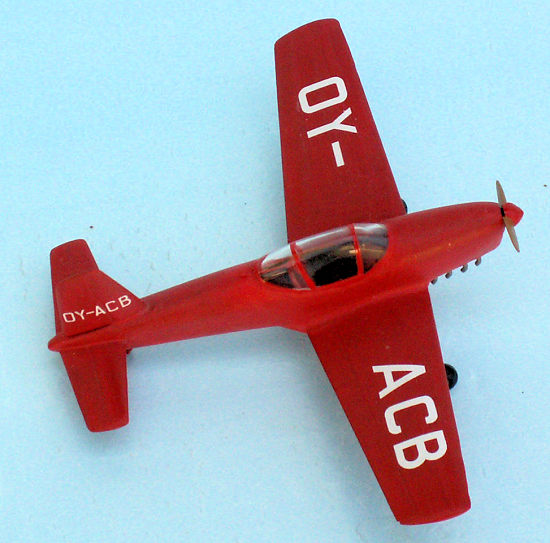
KZ VIII conversion: The overall color of the airframe is red, Revell Aqua 31 Feuerrot. Tires are mat black, undercarriage main legs are aluminium, and exhausts are gun metal. Propeller blades are wood, Revell Aqua Holzbraun 382.
The white letters for the registration were taken from Xtradecal sheets, RAF white code letters 24 inch and 8 inch.
The last few items was to painting flat clear over the anti glare panel in front of the cockpit, as the black paint I used seemed more satin than flat, and the walkways and gluing the exhaust pipe (painted red brown) and pushing the propeller in place my 1/72 scale Chipmunk from AZ Model was finished.
| CONCLUSIONS |
The AZ Model 1/72 scale kit of the Chipmunk is superior to the 50 year old kit from Airfix, but the only snag seem to be the bad fit of the canopy to the fuselage which Airfix don’t seem to have; but the Airfix doesn’t have that problem because of the missing interior! However, as Airfix just have released a 1/48 scale kit it wouldn’t be too much to ask: “Please mr. Airfix wouldn’t you be nice to scale it down to 1/72?” Because it could definitely raise the fit as well as buildability if that happens! The AZ Chipmunk kit has the extra quality, that it is possible to build a Danish KZ VIII from the parts.
| REFERENCES |
My Dad’s pictures of RDAF Chipmunks (as well as ex-RDAF in civilian guise)
I would also like to thank my Dad for the surplus black decal stripes, stencils, as well as the aluminum colored decal, even though I had to repaint it to match my chosen color.
Torben &
Nicolai Plesberg
October 2022
Copyright ModelingMadness.com. All rights reserved. No reproduction in part
or in whole without express permission. If you would like your product reviewed fairly and fairly quickly, please
contact
the editor or see other details in the
Note to
Contributors. Back to the Main Page
Back to the Review
Index Page
Back to the Previews Index Page