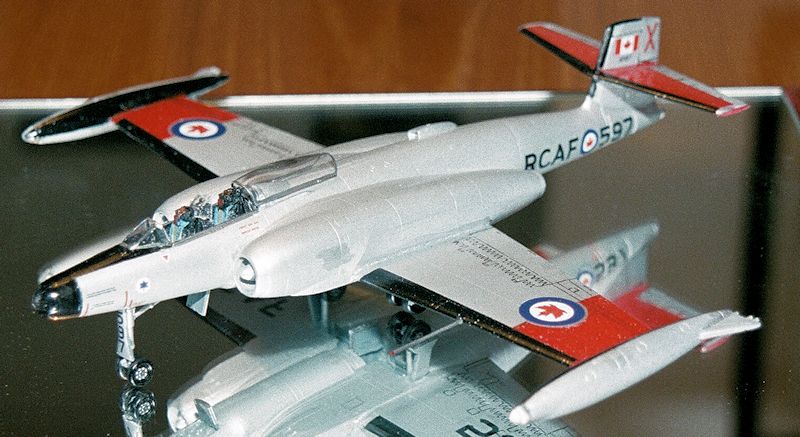
Hobbycraft 1/72 CF-100 Mk.5 'Canuck'
|
KIT # |
1391 |
|
PRICE: |
Less than $20.00 (2015) |
|
DECALS: |
One aircraft: Mk.4b |
|
REVIEW & |
|
|
NOTES: |
Aftermarket: Obscureco Detail Set (Mk.4/5) OBS72009 and CanMilAir
Decal Sheet (custom made for airframe 18597) |

|
HISTORY |
The CF-100 Canuck was the first fighter aircraft to be designed and built in
large quantities in Canada. Avro Canada started development in 1946 in response
to an RCAF requirement for a two seat, all weather fighter. The CF-100 first
flew from Malton (Toronto) in January 1950. Although not quite as fast as
smaller contemporary fighters, its excellent climb, fine radar and fire control
systems, twin engine reliability and all-weather capability made the CF-100
probably the best all-weather fighter of its time. It entered RCAF service with
No. 3 OTU, North Bay, in July 1952 and at its peak equipped nine interceptor
squadrons across Canada. In 1956, a further four squadrons were moved to Europe
to serve with NATO.
 The CF-100’s main role was interception of Soviet bombers that penetrated
Canadian and Western European airspace. Early versions were armed with machine
guns, while later versions were equipped with rockets. As an all-weather
fighter, it was considered second to none. When compared to its American
counterpart, the F-89 Scorpion, the CF-100 is considered to be superior in all
aspects. The Canuck also served in the Royal Belgium Air Force from 1957 to 1960
(Belgium purchased 53 Canucks).
When retired from their interceptor role by the RCAF, some aircraft were fitted
with electronic countermeasures (ECM) equipment. It was intended originally that
the CF-100 should be replaced with the Avro Canada CF-105 Arrow, but this
project was cancelled in 1959. The CF-100 was replaced eventually as an
interceptor by the McDonnell CF-101 Voodoo in 1962. The Canadian Forces
continued to operate the CF-100 until December 1981, when it was finally phased
out. A total of 692 CF-100s, spread over five marks, were produced between 1950
and 1958.
The Canuck was affectionately known in the RCAF as the ‘Clunk’ because of the
noise the front landing gear made as it retracted into its well after takeoff.
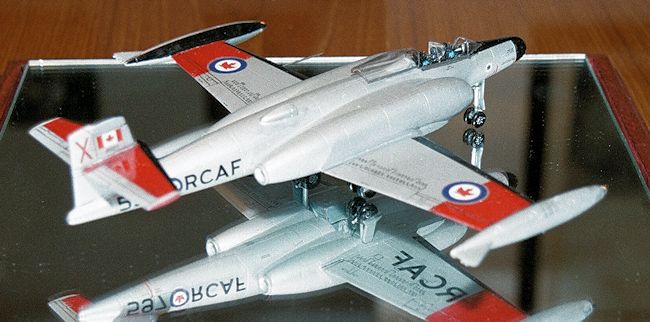
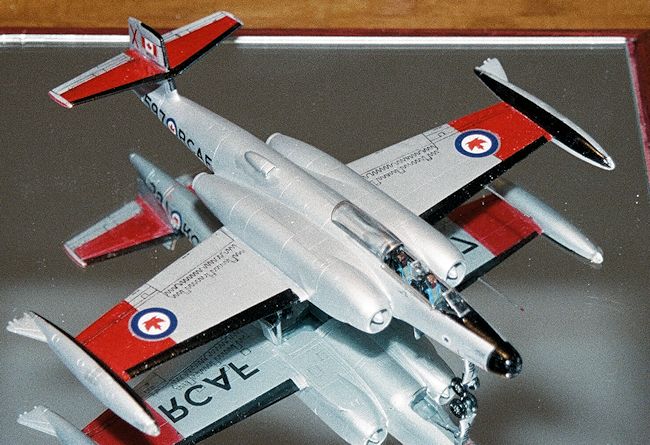
The aircraft depicted here is a Mk.5, airframe 18597, in service with 414 (EW)
Squadron and AETE (Aerospace
Engineering Test Establishment)
at RCAF Uplands (Ottawa), as flown by the current president of the
not-for-profit Canadian Aviation Heritage Centre (Montreal, Canada) and retired
RCAF pilot John Lawson (who also flew CF-101 Voodoos, …)
|
THE KIT |
|
CONSTRUCTION |
This being a Hobbycraft kit, forget Steps 1 and 2 (Interior assembly and Cockpit
assembly) of the rather vague instruction sheet. Obscureco
(OBS)
cockpit all the way. Remove the “shelf” between the front and rear cockpits.
Follow the OBS instructions for fitting, installing, and painting.
The Martin-Baker Mk.2B seats are terrific, but once painted should only be added
at final assembly, making masking of the cockpit during painting much easier.
Google MB MK2b images for clear paint guidelines. A word of caution: these OBS
resin parts will ALL require serious sanding; so a respirator mask is de
rigueur, as is a Dremel-type rotary tool with an 80 grade rotary sanding brush.
Keep fitting until just right. Use thick-gel CA to attach to the upper front
fuselage and some Milliput to fill in the gaps between the sidewalls and the
cockpit tub, and thin styrene to close the gap behind the rear cockpit seat
frame and the arch of part B1.
Step 3: install the OBS wheel well as instructed. Then follow the OBS
instructions for their excellent air intakes, again using thick-gel CA to
attach. Do not worry about outer fit; simply putty, sand, putty, well, you know
the routine. As I am modeling a Mk.5, I did not have to worry about the
anti-icing system; Mk.5s were not equipped with these. Then install the
kit-supplied engine exhausts as indicated.
Step 4: the small windscreen (dipped in Future) should only be attached at the
end. If building gear down, stuff as much lead/putty in the nose as will fit
(the weight of the OBS resin cockpit helps prevent tail-sitting).
Step 5: straightforward. Sand wing root joints of assembled wings.
Step 6: first, the empennage/rudder assembly: remove 1mm from inboard portion of
elevators, then cement horizontal stabilizers to rudder (be patient, as it is
time-consuming to get just both the correct location and angle). Then the
kit-supplied electronics cooling scoop: way too narrow for this particular
aircraft, but fine for all other Mks.; install it at this time.
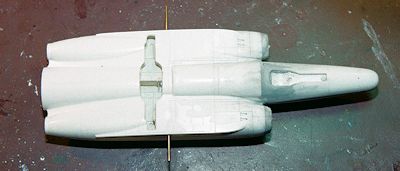 Wings/fuselage assembly: how in the world are the wings supposed to remain
attached to the engine nacelles for more than 6 minutes? Hmm… Hobbycraft at work
again. Resist using CA, as the wings will eventually snap off under pressure.
Use a 3” long brass rod, making sure you drill the two holes next to the engine
nacelle slits FORWARD of the wheel well, but aft of the nacelle slits, and
insert the rod (refer to photograph); carefully drill matching holes in the wing
roots. Cement the wings to the nacelles (putty, sand, putty, …). You can adjust
the dihedral much more accurately (not to mention easily) by using this homemade
spar method.
Leave the clear canopy aside for now (you can dip it in Future now, and let dry
vertically, with the forward end pointing down, for 24 hours). Last but not
least, attach the tail section to the fuselage (ignore the temptation to line up
the main fuselage and tail section side panel lines, as they do not line up
perfectly).
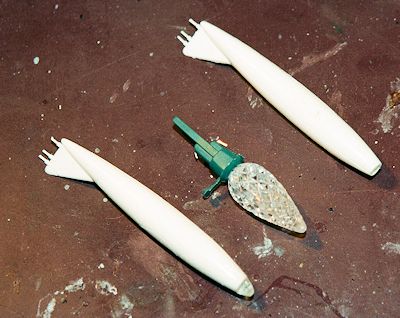 Step 7: the wingtip tanks. If you look very closely at the photograph of the
tanks, you will see that the light enclosures cover the entire tip of the
wingtip, are transparent, and that the upper inboard quadrant of each is painted
black, so as not to interfere with the crew’s night vision; my
Step 8: refer to Step 9.5.
Step 9: attach the 8-gun part A8 cemented in position (trick: use a toothpick:
the pointed end will fit in one of the gun holes, acting as a guidance tool).
Gear up: install. Gear down: secure them for primer/paint. From Step 10: attach
the wingtip fuel tanks (did I mention putty?), but not the pitot tube (you
should replace part B11 with hollow K&S Precision Metals 1/32 x .006, .79375mm
round brass tubing brass #815035).
Step 9.5 (while something is drying/curing): flat black, flat aluminum, getting
the landing gears ready for installation, using the OBS main landing wheels and
the kit-supplied nose wheels.
|
PAINT & DECALS |
Cover the cockpit well and prime the aircraft. I am painting “18597” flat
aluminum (Tamiya X-16), with the radome semi-gloss black (Tamiya X-18) and all
anti-glare surfaces flat black (Tamiya XF-1). Wheel wells and inner landing gear
doors are done in light grey (Tamiya XF-66). Seal with many airbrushed coats of
Future. Washes for wheel wells, engine intakes and exhausts and whatever else
works for you come next.
 I highlighted the air brake lines and
flap/ailerons/trim tabs … with a Sigma Micron 005 pen, as I have a love-hate
(mostly hate) relationship with washes and other weathering solutions (they turn
out to be more of a problem than their name implies). Once the ink is perfectly
dry, tone the lines down with a fresh pencil eraser; the excess ink not in the
engraved lines came off like a charm. Refer to photographs.
CanMilAir
custom decals, complete with positioning instructions, were next. These decals
are custom-printed using solid resin “inks”; the images are transferred from the
colour ribbons onto the decal paper using a thermal print head; you will need a
hair dryer, liquid decal film, and setting solutions; follow the very clear
instructions. A word of caution: these superb decals are THIN, so if you are
positioning, for example, an RCAF roundel over a split-colour pattern as I did
for the upper wings, you will have to paint the surface that will be covered by
the white portion of the decal the lighter colour of the split (in this case
flat aluminum, recoated with a light application of Future). Then seal the
aircraft with Future.
|
DETAILS |
Add kit-supplied control column and ejector seats to cockpit and touch up
cockpit details with dry-brushed silver. Attach landing gear sub-assemblies,
landing gear doors, brass pitot tube (in sanded down and drilled out port wing
pitot stub hole), and dressed-up canopy in fully “slid back” position (note the
proper angle on the first photograph), once you have separated (and attached)
the front windscreen from the sliding portion of the canopy (I use a fine metal
Dremel saw at high speed). Attach the small windscreen from Step 4 now, creating
a slit between the back of the pilot seat and the radar console, using the same
Dremel saw. Do not forget to paint the windscreen deck flat black. Et voila!
|
CONCLUSIONS |
For many of us Canucks wishing to build Canucks, Arrows, Norseman, …, Hobbycraft
and Modelcraft are the only games in town in any scale. These kits all suffer
from the same deficiencies, a normal consequence of their relatively short-run
nature: “Coke crate” cockpits and infuriatingly generic landing gears. The
confinement of cockpit tubs, “seats”, and assorted items to your “unused” parts
stash is inevitable; the Obscureco detail set for this CF-100 is an absolute
must; the kit-supplied decals are, hmm,
 Hobbycraft, so aftermarket decals are a
must; the CanMilAir decals are prototypically accurate and available in any
configurations/scales; consult their web site for any of your RCAF models.
An excellent model can be achieved from these “Kanuk Kits”. The end result of
this build is now on display at the Canadian Aviation Heritage Centre (www.cahc/ccpa.com
).
Gilles Pepin is a retired investment banker and is the researcher/model builder
for CAHC
|
REFERENCES |
·
The Avro CF-100
by Larry Milberry (CANAV Books, Toronto, Canada)
·
William Burns, proprietor, CanMilAir Decals
·
Canadian Aviation Heritage Centre (we have nearly 6,000 publications in our
library)
·
Canadian Warplane Heritage Museum - Avro Canada CF-100 Canuck
If you would like your product reviewed fairly and fairly quickly, please contact the editor or see other details in the Note to Contributors.