Minicraft 1/144 Douglas DC-8-71
| KIT #: | 14521 |
| PRICE: | $44.00 MSRP |
| DECALS: | One option |
| REVIEWER: | Kevin Thompson |
| NOTES: | Latest CAD-CAM technology from Minicraft |
| HISTORY |
To understand the history of the Douglas DC-8, one needs to first look at the state of civil air transport from the mid-1930s through the 1950s. During this period, Douglas was the leader in civil transport aircraft in the United States, and possibly worldwide. The DC-3, DC-4, DC-6 and DC-7 piston-engine airliners were produced and sold in large quantities, were being flown in every corner of the globe, and had the lion’s share of airline contracts for even a decade after the end of World War II. Boeing had only a small stake in civil transport up to that time, with the pre-war 247, the 314 Clipper flying boat, and the 377 Stratocruiser, the latter based on the B-50 Superfortress with an enlarged fuselage cross-section. Douglas’ only other competition came from the Lockheed Constellation, an elegant four-engine design spawned from the minds of Howard Hughes, Bob Gross, Kelly Johnson and Hall Hibbard. The “Connies” were in service with TWA and a few other airlines, both foreign and domestic, but never achieved the volume or success of the Douglas DC-6 and DC-7.
In late 1947, Boeing’s brand new
XB-47 jet bomber made its first flight. This new six-engine aircraft featured a
thin wing with 35 degrees of sweep, the speed of contemporary jet fighter
aircraft, the ability to deliver nuclear weapons, and was capable of in-flight
refueling, giving it the global reach required to be the Strategic Air Command’s
newest weapons delivery system. Only five
 years later, the massive XB-52 Stratofortress intercontinental bomber made its first flight. With its new
eight-engine “big stick”, SAC now had the jet-powered “1-2 punch” it needed to
be a global deterrent. It was about this time that the US Air Force realized the
limitations of its fleet of piston-engine KC-97 Stratotankers. Based on the
Boeing 377 Stratocruiser civil transport, these flying gas stations were the
backbone of the intercontinental SAC mission, but were considerably slower than
the jet-powered bombers they were refueling. The speed difference made it
difficult for both the jet bomber crew and the tanker crew to find a comfortable
speed to perform the refueling, which can take several minutes in most cases,
and would need to be performed several times during an intercontinental mission.
The KC-97 had to keep its speed at the upper end of the range, while the B-47
would be at a critically low speed while getting progressively heavier with the
increasing fuel load. Clearly, a new jet-powered tanker aircraft would be
needed.
years later, the massive XB-52 Stratofortress intercontinental bomber made its first flight. With its new
eight-engine “big stick”, SAC now had the jet-powered “1-2 punch” it needed to
be a global deterrent. It was about this time that the US Air Force realized the
limitations of its fleet of piston-engine KC-97 Stratotankers. Based on the
Boeing 377 Stratocruiser civil transport, these flying gas stations were the
backbone of the intercontinental SAC mission, but were considerably slower than
the jet-powered bombers they were refueling. The speed difference made it
difficult for both the jet bomber crew and the tanker crew to find a comfortable
speed to perform the refueling, which can take several minutes in most cases,
and would need to be performed several times during an intercontinental mission.
The KC-97 had to keep its speed at the upper end of the range, while the B-47
would be at a critically low speed while getting progressively heavier with the
increasing fuel load. Clearly, a new jet-powered tanker aircraft would be
needed.
Meanwhile, in 1949 Great Britain became the first nation to launch into the age of civil jet travel with the new DeHavilland Comet. Being the first came with its set of problems, however, and two structural failures causing fatal crashes led to the grounding of the initial batch of Comet 1s. In 1952, Boeing had a new design in the works. Designated 367-80, the new jet was designed as a four-engine jet tanker to fill the need for SAC’s jet bomber fleet. Boeing bet the entire company’s future against an Air Force contract, funding the “Dash 80” program entirely on its own. The “Dash 80” first flew in 1954, and the Air Force was immediately impressed with the new jet’s performance. With the new B-52 now entering service, the USAF immediately awarded a contract to Boeing to put the 367-80 into production as the KC-135A Stratotanker. Not long after this, Boeing realized that this basic design, with a redesigning of the fuselage cross-section, could be made into a civil jetliner, and so the Boeing 707 was born. As Boeing thrust itself into the jet age with both military and civilian projects, Douglas had apparently taken a very conservative and cautious approach to their own entry into jet-powered transport. Meanwhile, in the Soviet Union, state airline Aeroflot had begun the world’s first regular jet passenger service with the new twin-engine Tupolev Tu-104. The clock was ticking and it was time for Douglas to enter into the jetliner market.
In June 1955, a full year after the
367-80’s first flight, Douglas finally announced their new DC-8 jetliner. It was
almost three years later, in May 1958, when the DC-8 made its first flight,
while the Boeing 707 was just entering service with Pan American Airways.
Douglas still lagged a year behind Boeing, but had firm orders for 133 of the
new aircraft, and went on an intensified program to get the DC-8 certified. On
September 18, 1959, the first DC-8s went into service with launch customers
United Air Lines and Delta Air Lines. The DC-8 was similar in layout to the
Boeing airplane, being a four-engine jet with swept wing. Initially powered by
the Pratt & Whitney JT3C and JT4A turbojets, emerging turbofan technology (which
Boeing was also phasing in to the 707 and 720 fleets) found its way to the DC-8
with the JT3D fan engines of 18,000 pounds thrust each. The early “dash-10”
through “dash-50” 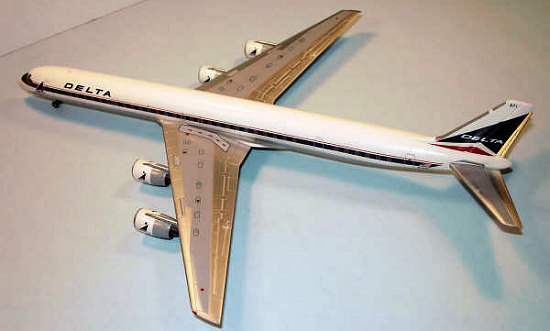 series DC-8s, of which 295 were ultimately built, had a span
of 142 feet and a length of 150 feet. Because the 707 had a head start on the
DC-8, the Boeing enjoyed better sales, although Douglas was finding customers
for the DC-8. There was an advantage to this, though. Douglas was able to learn
from the complaints of the early Boeing planes, and phase into production the
necessary improvements. Douglas was, in essence, able to learn from Boeing’s
mistakes.
series DC-8s, of which 295 were ultimately built, had a span
of 142 feet and a length of 150 feet. Because the 707 had a head start on the
DC-8, the Boeing enjoyed better sales, although Douglas was finding customers
for the DC-8. There was an advantage to this, though. Douglas was able to learn
from the complaints of the early Boeing planes, and phase into production the
necessary improvements. Douglas was, in essence, able to learn from Boeing’s
mistakes.
Boeing took the next step by building a larger 707, intended to fly international over-water routes. The 707-300 series, also known as the “Intercontinental” had a significant fuselage stretch and a totally new, much larger wing, needed for the extended range and payload. Douglas found that, by design, the DC-8 lent itself well to modifications, and it too had potential for growth. In 1965, engineering began on the longer-range, higher payload DC-8 “Super 60” series.
The Super 61 had a fuselage stretch of 36 feet over the original dash-10 through dash-50 series, and was now able to accommodate up to 258 passengers. With a fuselage length of 187 feet and 5 inches, the Super 61 earned the honors of being the largest and highest capacity airliner in the world, just edging out the massive Tupolev TU-114’s fuselage length by ten feet. It was not until the advent of the Boeing 747 two years later that a larger, higher capacity jet was to go into service. The Super 61 was sometimes referred to as the “DC-8 Stretch”. In 1967, United Air Lines began Super 61 service to Hawaii, with the new aircraft bearing the words “Super 8 To The Aloha State” on their fuselage sides. Delta, Eastern and United were the main domestic operators of the Super 60 series, and Japan Air Lines was a major international user. The aircraft, with its long and spacious fuselage also proved to be an excellent freight carrier. Series 62 and 63 variants were also produced, having aerodynamic and power plant enhancements along the way. By the time the last of 556 DC-8s rolled off the Long Beach, California assembly line in May 1972, the DC-8 had been in production for 15 years, and was used by 48 operators in 28 nations.
By the early 1980s, turbofan
technology was making huge leaps forward, and new environmental regulations for
noise and fuel efficiency dictated this. By 1982, the Boeing 707 was reaching
the end of its of its airline career, with newer, more efficient designs in the
form of the Boeing “second generation” 737-300, McDonnell Douglas MD-80 and
MD-90, and Airbus A320 series all ready to fill new airline orders. It was at
this time that the new CFM-56 turbofan was being used on the newest Boeing and
Airbus designs, and this high-efficiency engine was powerful, quiet, and
extremely fuel-efficient. Both Delta and United were pleased with their DC-8
Super 61s and Super 63s, and the new CFM-56 engines were adapted and fitted to
these airframes, giving them a new lease on life (at the same time, the USAF re-engined
its fleet of KC-135 tankers with this same engine, giving these aircraft the
designation 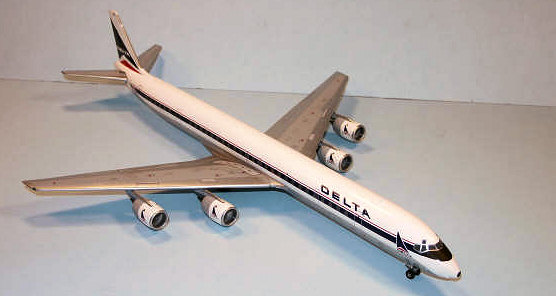 KC-135R). Better thrust and fuel efficiency meant that higher
payloads and ranges were attainable, and operating costs were ultimately
reduced. The re-engined Super 60s became “Super 70s”, now designated DC-8-71 and
DC-8-73, respectively. Both Delta and United operated these Series 70 planes
well into the late 1980s.
KC-135R). Better thrust and fuel efficiency meant that higher
payloads and ranges were attainable, and operating costs were ultimately
reduced. The re-engined Super 60s became “Super 70s”, now designated DC-8-71 and
DC-8-73, respectively. Both Delta and United operated these Series 70 planes
well into the late 1980s.
Eventually, these aircraft were phased out of passenger service, but their duties were far from over. Shipping firms, notably UPS, and other freight carriers worldwide took delivery of these ex-airliners. With ultra-reliable and maintenance-friendly engine technology, it is unknown when these aircraft will be retired. There are several DC-8s with over 100,000 documented hours on their airframes. This is a milestone in itself, as most commercial aircraft never see such in-service longevity. It is estimated that roughly one half of the total production of DC-8s are still flying today. Although the DC-8 had a slow start compared to its Boeing competitor, its service life in civil use, as of the end of 2006, is still active and has outlasted the 707 by over two decades.
| THE KIT |
Since the early 1960s, the Revell DC-8 kits were the “only game in town” in 1/144 scale. For their day, they were generally accurate in outline shape and had reasonable surface detail, but that’s about the extent of it. Thicknesses were off, and fit was less than desirable. In 1969, Revell introduced a United DC-8 Super 61 that was basically the original kit with a stretched fuselage. As a kid in the 60s and early 70s I remember building several of these Revell airliner kits, and by doing chores I actually scraped up the big two dollars needed to purchase the Super 61. I started to put it together and went outside in the garage to spray the wings silver. The spray can of silver paint I reached for was an automotive grade of silver lacquer and after a couple of passes, much to my surprise, the plastic started to craze and the wings literally melted. Whoops! One Revell Super 61 in the trash. About five years ago that old Revell kit crossed my mind, and it was time to relive my childhood and take a walk down nostalgia lane. So I paid $60.00 for one on ebay. The kit sat in my stash for two years, and then in 2003, the good and bad news comes. Minicraft is doing an all-new tool DC-8 Super 61. Good news, because it will be far superior to the old Revell kit, but bad news because my $60.00 Revell kit will now be rendered worthless!
 Minicraft has definitely done more
1/144th scale airliner kits than any other manufacturer, hands down.
With both propliners and jetliners in their catalog, just about every major
people mover, both past and present, can be accurately modeled. Some of the
earlier offerings had a few quality issues here and there, but most everything
they have done in the past five years is good, and getting better all the time.
The DC-8 kit, as mentioned above, is announced in 2003. I wait and wait and
wait, and finally in late 2005 it is released. It is the first of four DC-8 kits
Minicraft is slated to produce. The first to be released is kit number 14521,
the Delta DC-8-71. On the box, Minicraft proudly advertises that this is “the
most detailed model kit we’ve ever produced”, and “state-of-the-art CAD/CAM
tooling for extreme accuracy”. With all the “corporate hoopla” on the box, let’s
open it up and see what this kit looks like. Was the two-year wait worth it?
Minicraft has definitely done more
1/144th scale airliner kits than any other manufacturer, hands down.
With both propliners and jetliners in their catalog, just about every major
people mover, both past and present, can be accurately modeled. Some of the
earlier offerings had a few quality issues here and there, but most everything
they have done in the past five years is good, and getting better all the time.
The DC-8 kit, as mentioned above, is announced in 2003. I wait and wait and
wait, and finally in late 2005 it is released. It is the first of four DC-8 kits
Minicraft is slated to produce. The first to be released is kit number 14521,
the Delta DC-8-71. On the box, Minicraft proudly advertises that this is “the
most detailed model kit we’ve ever produced”, and “state-of-the-art CAD/CAM
tooling for extreme accuracy”. With all the “corporate hoopla” on the box, let’s
open it up and see what this kit looks like. Was the two-year wait worth it?
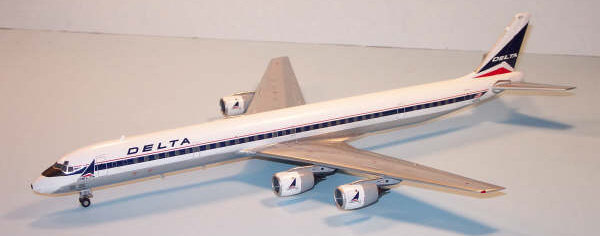
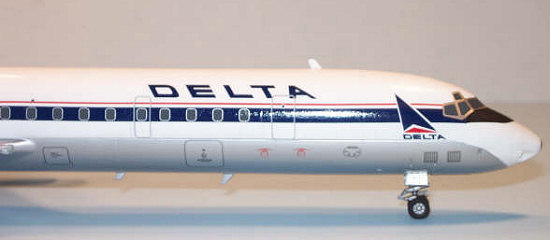
This is a beautiful kit. The shapes and thickness are right on the money, and the surface detail is nice recessed panel lines of the appropriate thickness. The CFM engines are well detailed, and the fuselage nose shape is correct; much better than the old Revell kit and looking “very DC-8”. What Minicraft is doing correctly, Revell Germany needs to learn. Minicraft does not mold fuselage side window openings in their kits. The fuselage is molded solid, like a cargo version, with no windows. This allows any fuselage to lend itself to either a cargo or passenger version with no modifications. If you want windows, they are on the decal sheet. This is the simplest “no-brainer” there is. ARE YOU LISTENING REVELL GERMANY? No more windows on the fuselage! Keine Fenster am die Rumpf seiten! Another great idea implemented into this kit is cutout guides inside the fuselage. This allows the modeler to build one of the short-fuselage DC-8s if desired. These guides are vertical grooves inside the fuselage halves that are in the right place for modification. It should be noted here that all CFM-engined DC-8s were of the stretched fuselage (Super 61 or 63) variety. However, subsequent versions of this kit will be released with the earlier JT3D engines, making it possible to build the short fuselage “dash-10 through dash-50” or the intermediate-fuselage Super 62. Kit # 14543 is an Eastern Airlines DC-8-63, and # 14514 will be the United Airlines DC-8-61, though as of this writing the UAL version is not yet released. There is also #14544 “Southern Air Transport” (CIA) DC-8-71. With the choice of wingtips and nose cones, any DC-8 variant can be modeled from these four kits. The cockpit window piece is molded in clear, giving the modeler a choice of doing the windows transparent or with a decal. And speaking of the decals, this is probably one of the most beautiful sheets I have ever seen. Delta titling and cheat line (with windows) are correct, and fleet numbers are available for any of twelve aircraft. The detail decals are impressive, including inspection panel and escape walks, as well as cargo doors, etc. The decal sheet is designed by F-DCAL and printed by Cartograph. It all looks good, so let’s put it together…
| CONSTRUCTION |
Dry-fitting of parts was great
overall, although fuselage halves have slight bow or warp to them. First step is
to put some nose weight in the kit. I put 1 ounce of lead weights in the nose, ½
oz. each side. After that, install the nose gear well in the right fuselage
half. Cement the fuselage halves together and secure with rubber bands or tape
to keep clamped while drying. While the fuselage
 dries, paint the engine exhaust
cones and inner nacelle walls with Testors exhaust metalizer, and cement the
main engine nacelle halves together, making four sets. The front fan assemblies
can be done in aluminum or dull silver. Once these have dried, install the front
fans and front intake rings. With fuselage now dried, the cockpit windshield and
nose cone can be installed. Modeler has choice of leaving windows clear, or
painting this piece and using decal windshield. I opted for the latter, painting
the inside of this transparency white, so no contrast is visible prior to
fuselage painting. The fuselage nose may need to be spread open ever so slightly
to accommodate the nose cone. After all fuselage parts are dry, smooth out all
seams with sanding and wet sanding. It may be necessary to use some filler
around where the cockpit windshield transparency meets the fuselage. I masked
off the fuselage wing root section to avoid getting paint in wing root joints.
Precision dry-fit was very tight, and paint would aggravate this issue. The
entire fuselage was then sprayed with Model Master Gloss Insignia White, with
several light coats, and allowed to dry for five days to a week before handling.
dries, paint the engine exhaust
cones and inner nacelle walls with Testors exhaust metalizer, and cement the
main engine nacelle halves together, making four sets. The front fan assemblies
can be done in aluminum or dull silver. Once these have dried, install the front
fans and front intake rings. With fuselage now dried, the cockpit windshield and
nose cone can be installed. Modeler has choice of leaving windows clear, or
painting this piece and using decal windshield. I opted for the latter, painting
the inside of this transparency white, so no contrast is visible prior to
fuselage painting. The fuselage nose may need to be spread open ever so slightly
to accommodate the nose cone. After all fuselage parts are dry, smooth out all
seams with sanding and wet sanding. It may be necessary to use some filler
around where the cockpit windshield transparency meets the fuselage. I masked
off the fuselage wing root section to avoid getting paint in wing root joints.
Precision dry-fit was very tight, and paint would aggravate this issue. The
entire fuselage was then sprayed with Model Master Gloss Insignia White, with
several light coats, and allowed to dry for five days to a week before handling.
The wings came next. I cemented each upper and lower wing half together, making left and right assemblies. After the cement dried, I smoothed all the seams on both wings. I then took the two horizontal stabilizers and smoothed out their edges (although they are each one-piece).
| COLORS & MARKINGS |
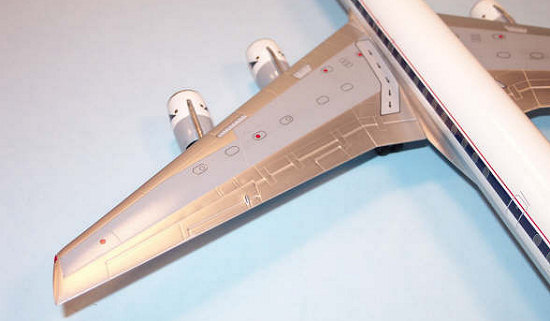
Corroguard is a protective anti-corrosive coating used on wing and stabilizer spars and critical areas on all modern passenger aircraft. It is a medium gray color, and I mixed this color using Testors gloss white and Testors gloss gray, just out of the clear square little ¼ oz. bottle. Once this color was mixed and thinned, I masked off the wing root locator tabs and sprayed several coats of this gray on the wings and horizontal stabilizers, and allowed several days drying time to eliminate tackiness or fingerprints caused by premature handling of gloss paint that is “drying” but not fully dry.
 With the fuselage, wings and
horizontal stabilizers dry, it was time to mask the appropriate areas and apply
the natural metal. Photos of these aircraft after the engine conversion, around
1982, show mostly shiny, polished natural metal surfaces. The kit instructions
also recommended “polished aluminum” for all the natural metal. Several light
coats of model master Aluminum Buffing Metalizer were applied, and allowed to
dry. After buffing to the desired shine, a coat of Metalizer Sealer was applied.
This was a mistake, because the metalizer slightly dulls the gray corroguard
(which is desired), but caused the upper wing decals to siver slightly. It would
have been better to apply the decals over the gloss gray, and then seal it. It’s
OK, though, because it is not terribly noticeable. It was at this time that
these beautiful decals were applied. No surprises here; nice thin decals that
require just a bit of TLC when applied. Hats off to F-DCAL, Cartograph and
Minicraft themselves for making such a precise sheet that lines up well all
around, especially around the nose and anti-glare panel. There is a choice of
twelve registration and fleet numbers to choose from, and the featured aircraft
is N1305L, also known as fleet number 871. With this aircraft type being a
DC-8-71, the fleet number was a fun and obvious choice. This actual real
aircraft is now registered as N722UP, and is still in service with UPS (it is
probably one of those “100,000 hour” aircraft). Remember that I am decaling the
fuselage and wings separately; the flying surfaces have not yet been joined to
the fuselage. It is much easier to handle the parts this way. Once the wings and
fuselage were all decaled, the wings and horizontal stabs were glued to the
fuselage. Remember that this is a precision molding, and that the
wing-to-fuselage fit requires that there is no paint on the wing locator tabs or
inside the wing root joint at the fuselage.
With the fuselage, wings and
horizontal stabilizers dry, it was time to mask the appropriate areas and apply
the natural metal. Photos of these aircraft after the engine conversion, around
1982, show mostly shiny, polished natural metal surfaces. The kit instructions
also recommended “polished aluminum” for all the natural metal. Several light
coats of model master Aluminum Buffing Metalizer were applied, and allowed to
dry. After buffing to the desired shine, a coat of Metalizer Sealer was applied.
This was a mistake, because the metalizer slightly dulls the gray corroguard
(which is desired), but caused the upper wing decals to siver slightly. It would
have been better to apply the decals over the gloss gray, and then seal it. It’s
OK, though, because it is not terribly noticeable. It was at this time that
these beautiful decals were applied. No surprises here; nice thin decals that
require just a bit of TLC when applied. Hats off to F-DCAL, Cartograph and
Minicraft themselves for making such a precise sheet that lines up well all
around, especially around the nose and anti-glare panel. There is a choice of
twelve registration and fleet numbers to choose from, and the featured aircraft
is N1305L, also known as fleet number 871. With this aircraft type being a
DC-8-71, the fleet number was a fun and obvious choice. This actual real
aircraft is now registered as N722UP, and is still in service with UPS (it is
probably one of those “100,000 hour” aircraft). Remember that I am decaling the
fuselage and wings separately; the flying surfaces have not yet been joined to
the fuselage. It is much easier to handle the parts this way. Once the wings and
fuselage were all decaled, the wings and horizontal stabs were glued to the
fuselage. Remember that this is a precision molding, and that the
wing-to-fuselage fit requires that there is no paint on the wing locator tabs or
inside the wing root joint at the fuselage.
| FINAL CONSTRUCTION |
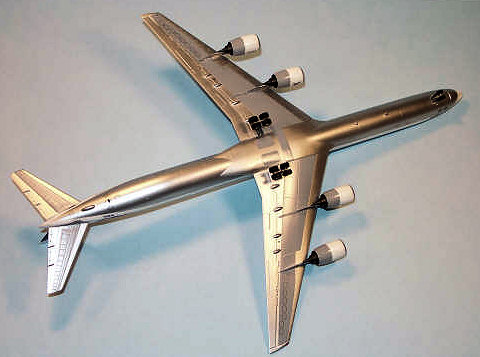 Pretty straightforward finish
to this model, with painting and installing the landing gear, and finishing off
the engine details. Gear was basic: black tires with flat aluminum hubs and gear
struts. The small gear doors on the outboard side of the gear legs should be
installed before the outboard tires, as it is much easier on the fingers. I
found out the hard way, but got it done OK. Once the gear was done, the little
wingtip light and landing light transparencies were installed. All that is left
is the engines. The main front fan housing is white, with the aft portion gray,
and polished metal accents on the intake rings and mounting pylons. Delta
“widgets” and other decals finish out the engine details. The engines are also a
great fit into the wings, so only a small dab of cement was needed. Make sure to
check the engine pylon angles when viewed from the front and sides before cement
dries. Last touches were the front radome spot in flat black (the provided decal
doesn’t work that well as the nose is a compound curve), the red and blue/green
for the wingtip lights, aluminum leading edge on the vertical fin and we’ve got
a finished DC-8.
Pretty straightforward finish
to this model, with painting and installing the landing gear, and finishing off
the engine details. Gear was basic: black tires with flat aluminum hubs and gear
struts. The small gear doors on the outboard side of the gear legs should be
installed before the outboard tires, as it is much easier on the fingers. I
found out the hard way, but got it done OK. Once the gear was done, the little
wingtip light and landing light transparencies were installed. All that is left
is the engines. The main front fan housing is white, with the aft portion gray,
and polished metal accents on the intake rings and mounting pylons. Delta
“widgets” and other decals finish out the engine details. The engines are also a
great fit into the wings, so only a small dab of cement was needed. Make sure to
check the engine pylon angles when viewed from the front and sides before cement
dries. Last touches were the front radome spot in flat black (the provided decal
doesn’t work that well as the nose is a compound curve), the red and blue/green
for the wingtip lights, aluminum leading edge on the vertical fin and we’ve got
a finished DC-8.
| CONCLUSIONS |
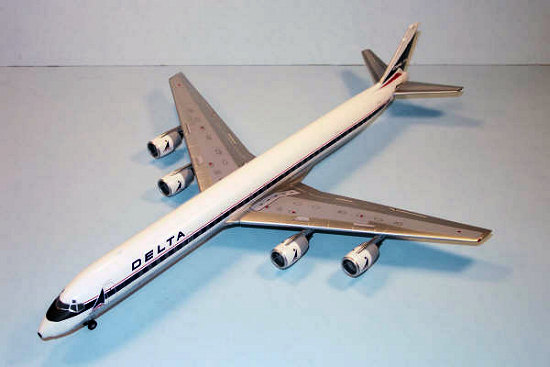
The kit was satisfying for me in many
ways. First of all, it is such a great tooling that it does real justice to the
DC-8. Secondly, Minicraft made these kits very versatile, as all the kits have
the wingtips for the -61/71 and the -62/63/73, as well as the different nose
cones. The only differences in the kits are the engines and decals. With the
early engines and the fuselage “cut outs” (I can’t say enough how smart an idea
that was), the modeler can make any DC-8 h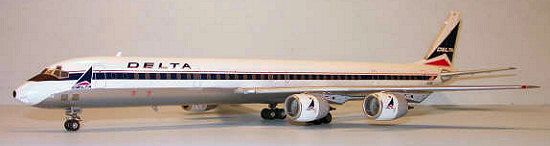 e or she desires. One could even mount
the early engines to this kit and still use the Delta fleet provided in this
decal sheet, making one of these Delta planes before they got the engine upgrade
(when they were still -61s). A well engineered kit, and a satisfying build. If Minicraft continues tooling kits like this, I think it is now time for them to
consider doing the Boeing 707-100/B, Boeing 720/B, and Convair 880/990 series.
Heck, they’ve done just about everything else…Good job, Minicraft. The “DC-8 was
worth the wait”.
e or she desires. One could even mount
the early engines to this kit and still use the Delta fleet provided in this
decal sheet, making one of these Delta planes before they got the engine upgrade
(when they were still -61s). A well engineered kit, and a satisfying build. If Minicraft continues tooling kits like this, I think it is now time for them to
consider doing the Boeing 707-100/B, Boeing 720/B, and Convair 880/990 series.
Heck, they’ve done just about everything else…Good job, Minicraft. The “DC-8 was
worth the wait”.
| REFERENCES |
http://airliners.net for history and photo reference.
January 2007
Copyright ModelingMadness.Com. All rights reserved.
If you would like your product reviewed fairly and fairly quickly, please contact the editor or see other details in the Note to Contributors.