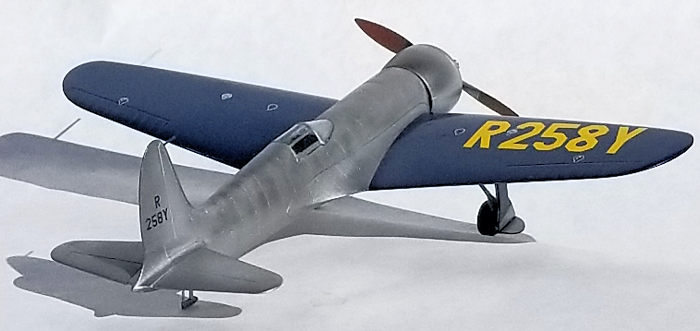
Planet Models 1/48 Hughes H-1
| KIT #: | 168 |
| PRICE: | $ |
| DECALS: | One option |
| REVIEWER: | John Summerford |
| NOTES: | Pitot tube, fin probe, and cowl braces supplied from the parts bin. |
| BACKGROUND |
Late last millennium I was fortunate enough to be awarded a fellowship at the Smithsonian Institution and I used that status to gain access to the H-1 on display at the National Air and Space Museum. Before the museum opened, I was allowed to go over the barrier to photograph the plane. I wasn’t allowed to touch the plane, so I had to aim my trusty instamatic camera as best I could. I’ve kept the photos all these years and they proved to be a big help with this build.
| CONSTRUCTION |
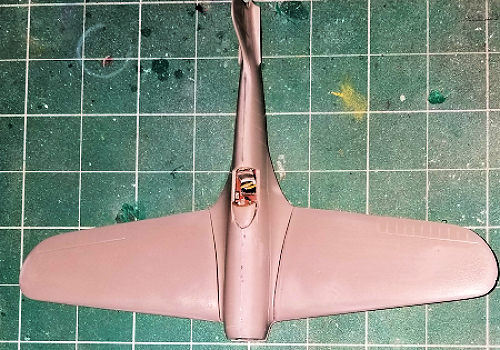
The build started by cleaning off the mold release agent on all the parts by soaking them overnight in water with detergent and baking soda. Once dry, I cleaned up the edges of the wing and fuselage halves.
I whittled down the edges of the pour stub of
the seat/floor piece and drilled the indent for the control stick
deeper. I then painted the cockpit. The floor was painted wood brown
while the sides and frame behind the seat painted zinc chromate
 yellow.
The disc on the frame was painted black. The seat is aluminum with the
cushion black and the belts light tan. Boxes were painted aluminum with
black dials. The instrument panel is gray with black instruments. The
coaming has three cushions, and they were painted brown leather. I
finished painting by brushing on a wash of thinned black ink around the
ribs and stringers.
yellow.
The disc on the frame was painted black. The seat is aluminum with the
cushion black and the belts light tan. Boxes were painted aluminum with
black dials. The instrument panel is gray with black instruments. The
coaming has three cushions, and they were painted brown leather. I
finished painting by brushing on a wash of thinned black ink around the
ribs and stringers.
The control stick was glued into place and the assembly glued into the right fuselage half. The legs of the frame piece buts onto the ledge on the back of the seat and tilts backwards to fit into the top of the fuselage. The instrument panel glues onto the underside of the coaming. There is a three-step block molded onto the piece and the instructions are not clear as to which one to glue the panel to. I determined that it’s the rear most step at the apex of the concavity. I glued the halves together and then tacked glued the coaming/panel in place by maneuvering the unit into the cockpit at about the 10 O’clock position (when viewed from above) and rotating it clockwise. I added more glue from underneath and then cleaned up the tack spot.
 I
cleaned up the seam of the fuselage and re-scribed the lost rivet
detail. I’m not sure that was worth it as the rivets are hard to see on
the real aircraft. I also drilled holes for the pitot tube and also for
another probe on the fin, neither is supplied in the kit
I
cleaned up the seam of the fuselage and re-scribed the lost rivet
detail. I’m not sure that was worth it as the rivets are hard to see on
the real aircraft. I also drilled holes for the pitot tube and also for
another probe on the fin, neither is supplied in the kit
Before mating the wings to the fuselage, I again cleaned them—this time with Goof Off. There is a gap on both sides and on my example a step on the right wing and bottom rear. After a couple of sessions of scraping, filling, and sanding, I got everything to look right.
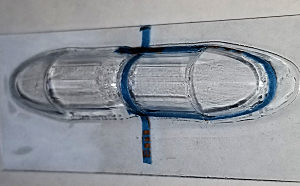 I
decided to glue the canopy on at this time. Strips of tape were laid
down as cutting guides. After removing the excess plastic, the canopy
was masked off and glued in place. The fit is quite good.
I
decided to glue the canopy on at this time. Strips of tape were laid
down as cutting guides. After removing the excess plastic, the canopy
was masked off and glued in place. The fit is quite good.
The tail planes were added next. These are a butt joint and it took me several attempts to get them lined up correctly. A short session of filling and sanding ensued and the airframe was ready for paint.
| COLORS & MARKINGS |
 I
decided to paint the wings first. The instructions and other sources say
that the wings are “dark blue”. That’s a little vague. I once read that
the source of the blue was from the corporate color for Hughes Tool
Company. I’ve been unable to confirm this. I opted for a color a shade
lighter than “insignia blue”, about one drop of white to ten drops of
blue. Before painting, I laid the landing gear doors in place to
determine where the blue paint ends and the exposed aluminum begins. You
can use the panel line between the wing and fuselage as a guide. The
wheel wells were masked off. The fuselage was masked and the wings given
a coat of primer from a rattle can and then enamel paint sprayed on.
I
decided to paint the wings first. The instructions and other sources say
that the wings are “dark blue”. That’s a little vague. I once read that
the source of the blue was from the corporate color for Hughes Tool
Company. I’ve been unable to confirm this. I opted for a color a shade
lighter than “insignia blue”, about one drop of white to ten drops of
blue. Before painting, I laid the landing gear doors in place to
determine where the blue paint ends and the exposed aluminum begins. You
can use the panel line between the wing and fuselage as a guide. The
wheel wells were masked off. The fuselage was masked and the wings given
a coat of primer from a rattle can and then enamel paint sprayed on.
While that was curing, I assembled the engine. The crankcase is nicely
detailed, but the cylinder heads are not, lacking pushrod tubes. They
are also too large. I had to sand down the back side of the front
cylinders and the front of the back cylinders. I cut 14 overlong pieces
of .030 styrene rod, and glued them in place to represent the tub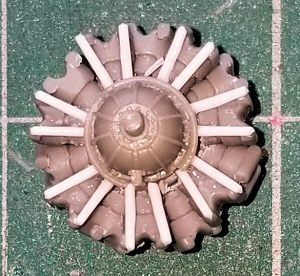 es
and trimmed them to size. I drilled the holes in the crankcase for the
cowl mounting rods.
es
and trimmed them to size. I drilled the holes in the crankcase for the
cowl mounting rods.
Getting back to the airframe, the wings were masked and the fuselage and engine were sprayed with Alclad II black primer. The primer coat revealed that more work was needed on the seams. Filling and sanding progressed and another coat of Alclad II aluminum sprayed on. This revealed yet more work to do on the seams and other surfaces.
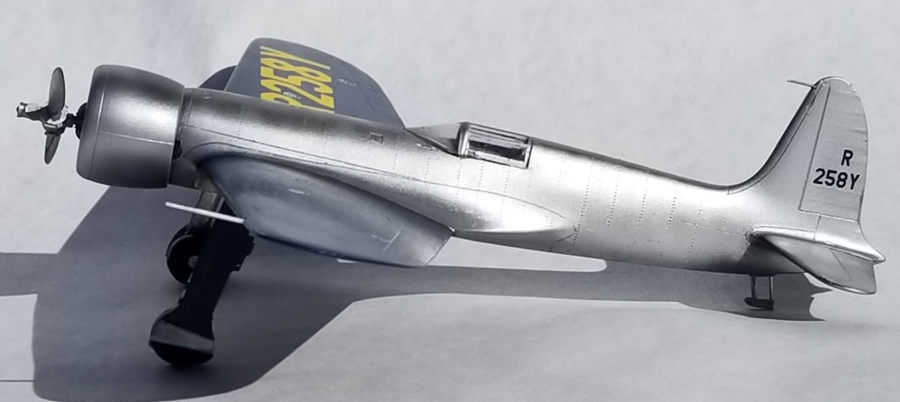
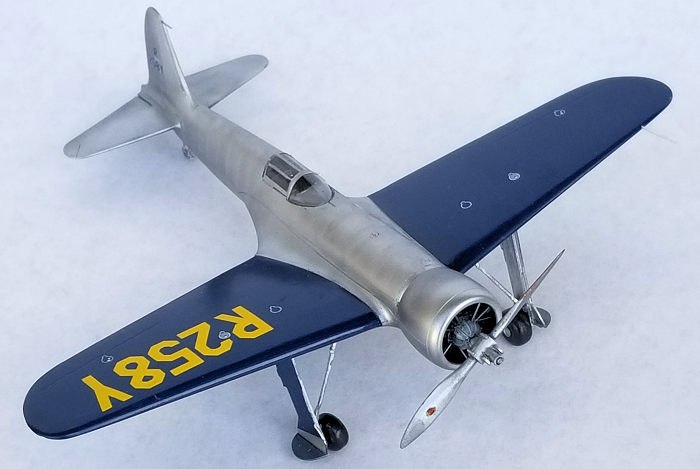
Various photos taken under different lighting conditions and after different flights reveal different polished metal appearances. That means you can add as much or as little variations to the tone of the finish as you wish and nobody can say that you did it wrong! When the next coat of aluminum was sprayed on, I also sprayed white aluminum on the middle of the cowl panels, plus the fin, stabilizer, and wing fillet. Chrome was sprayed over the rivet lines and dark aluminum in the areas between the rivet lines--all in one session. This left the fuselage with a poly-tone finish that changes with the light and view. The fillets around the stabilizer and the leading edge of the fin and the front of the fuselage were masked and sprayed steel—for greater contrast. Lastly, the spinner hub was sprayed flat aluminum and the blades chrome.
Being as there are only 16 decals, it was a short session applying them. They behaved well and here and there I used some decal solvent. The instructions show two #8 decals and one #9 decal to place on the fuselage. Their numbers are transposed. There are two #9s and one #8.
| FINAL CONSTRUCTION |
 The
engine was filed down and glued into the cowl. Then lengths of .020
diameter steel wire was glued in in place to represent the cowl braces.
This was the most tedious part of the build. That assembly was glued to
the fuselage.
The
engine was filed down and glued into the cowl. Then lengths of .020
diameter steel wire was glued in in place to represent the cowl braces.
This was the most tedious part of the build. That assembly was glued to
the fuselage.
One unique design feature of the aircraft is that the gear doors double as the struts. An axle peg is molded to the door and all one does is paint the wheels and glue them on. These and the braces were glued into place along with the folding doors and then the tail skid.
Turning the model over, and taking time to admire the stance, a half inch length of .030 plastic rod was narrowed at one end, painted, and glued into place as a pitot tube. I used a small length of .020 wire as the probe on the fin. Lastly, the prop was assembled, decaled, and a wash of thinned black ink applied to the hub and glued in place.
| CONCLUSIONS |
This is one of the shiniest models in my collection and I finally have an H-1 to put on the shelf! The kit was fun to build and I think is good one to build for a first-time resin model and/or first time using Alclad II paints. Were I to do it again, I would fill the panel line that runs from the fire wall to the cockpit and spray and sand several coats of rattle can primer on the fuselage to tone down the rivet detail, then apply the black primer. Most of my builds take between 20 to 25 hours to finish and this one was no exception.
14 May 2019
Copyright ModelingMadness.com
If you would like your product reviewed fairly and fairly quickly, please contact the editor or see other details in the Note to Contributors.
Back to the Main Page Back to the Review Index Page Back to the Previews Index Page