Greenbank 1/72 Ryan M-1
| KIT #: | 31 |
| PRICE: | $20.00 or so second hand |
| DECALS: | Two options |
| REVIEWER: | Chris Peachment |
| NOTES: | Two options. A radial engined Pacific Air Transport or a Hisso inline engined Colorado Airlines version. |
| HISTORY |
The Ryan M-1 was the first Ryan aircraft and was designed as a two seat
open tandem cockpit mailplane with fixed undercarriage and tailskid. Pacific Air
Transport operated it on their Seattle via San Francisco
 to LA route. A
passenger could be carried in the front cockpit, though he would have had to be
intrepid. Five M-1s crashed in the first year of operation.
to LA route. A
passenger could be carried in the front cockpit, though he would have had to be
intrepid. Five M-1s crashed in the first year of operation.
It was followed by the similar M-2, which was designed to have an enclosed cabin and which Charles Lindbergh chose for his solo transatlantic flight. Although when he made his requirements known, the aircraft was redesigned to be the Ryan NYP Spirit of St Louis. There is an M-1 prototype which has been restored to airworthy condition by the Seattle Museum of Flight.
| THE KIT |
I found this second hand under a table at an IPMS model meeting at
RAF Hendon in North London. The kit dates from the early 1970s and is similar to
an Airfix product of that period. It comes in a clear plastic bag, with a
printed black and white header. The instructions are basic, with an exploded
view and brief notes, and a list of magazine and book references, though most
will be out of date now and unavailable. The plastic is white and medium soft
and has plenty of flash and moulding seams.
 There is an option to build the inline Hisso engine version for the
Colorado Airways aircraft. But the two inline cowling halves were badly moulded,
on a separate silver sprue of hard plastic with large sink marks. So I settled
for the radial engine of Pacific Air Transport.
There is an option to build the inline Hisso engine version for the
Colorado Airways aircraft. But the two inline cowling halves were badly moulded,
on a separate silver sprue of hard plastic with large sink marks. So I settled
for the radial engine of Pacific Air Transport.
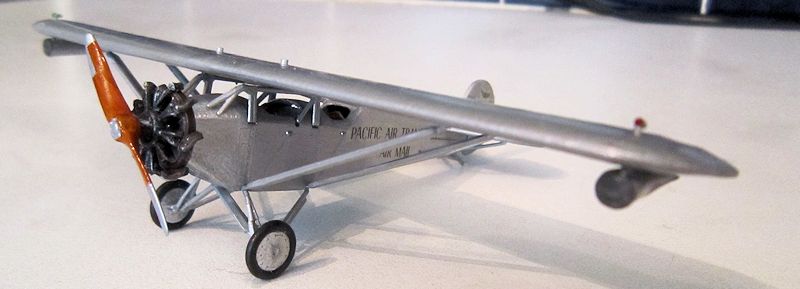
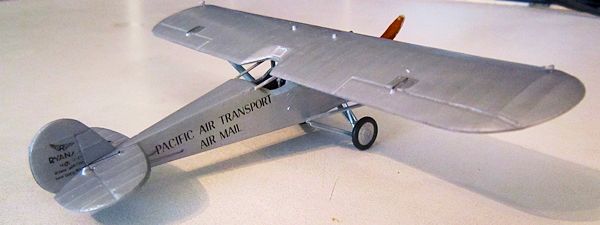
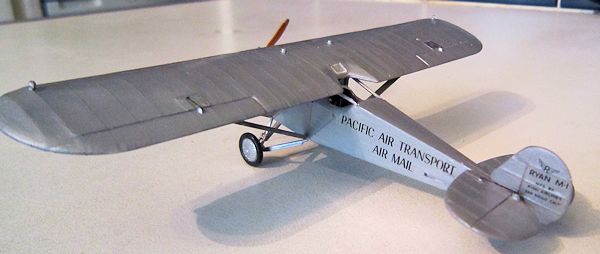
Two decal options: 1. Pacific Air Transport Air Mail. 2. Colorado Airways US Mail. There are no etched parts and no windscreens, as the aircraft had none. Travel must have been windy. The engine-turned metal of the cowling and wheels has been represented by swirls in the plastic. The wheels are in two halves with rubber o-rings for tires. The two large landing light cones for under the wings are in clear plastic.
| CONSTRUCTION |
Construction began as usual with the interior, which has a seat for the
back cockpit, and an instrument panel frame with joystick attached. The frame
need to be sanded down to fit. I painted the interior matt silver and the seat
leather with a metal frame. The seat will need extra supports as the two
mounting stubs moulded into each fuselage half don't meet the seat on both
sides. Once the seat was dried, the two fuselage halves were cemented and, when
dried, the seams were sanded smooth. No filler was needed. Fitting of the cabane
struts is a little complex as they will need to have the forward ends twisted
through a 45 degree angle and then chamfered so that they they rest flush
against the forward fuselage. Care must be taken here.
The wing is moulded in one piece and the surfaces are slightly wavy here
and there. They ought to be sanded down but I didn't notice until too late and
would have lost a lot of surface detail anyway. There are a couple of areas on
the upper surface of the wings which are turned metal. The area at the front of
the leading edge centre, and the two panels in front of the control horns. These
were sprayed with Humbrol chrome silver. I painted the front of the fuselage the
same colour too. This must all be allowed to dry thoroughly before being masked
off and the rest painted in matt silver. The underwing decals are best added at
this stage.
Once dried the wings can be mounted on the cabane struts. The wing
support struts can then be put in place, after sanding to remove the seams.
 The tail and elevators are moulded to fit on top of the fuselage, but
would have sat too high, so I separated each side carefully with a razor saw,
and sanded the mating surfaces, then glued them either side of the fuselage, so
they were flush with the top surface. The four struts were badly moulded with
seams that would have taken a lot of work, and so I replaced them with plastic
rod, which looks much better.
The tail and elevators are moulded to fit on top of the fuselage, but
would have sat too high, so I separated each side carefully with a razor saw,
and sanded the mating surfaces, then glued them either side of the fuselage, so
they were flush with the top surface. The four struts were badly moulded with
seams that would have taken a lot of work, and so I replaced them with plastic
rod, which looks much better.
I then painted what I had done so far using Matt silver (more of that
later) and added decals to the fuselage sides and fin.
For some reason the exhaust collector ring for the engine was missing.
So I made one from plastic card, which I
taped around a pen of the right diameter, and plunged
into hot water in a mug to hold its shape. This was glued to the back if the
engine cylinders, and the exhaust stubs from each cylinder was glued to the
exhaust port in each cylinder and onto the collector ring. I then painted the
whole thing in matt black, the collector ring in dark rust and then dry brushed
gunmetal all over to pick out engine detail and to weather the exhausts. A final
exhaust pipe was cut from plastic rod and added to one end of the collector.
The undercarriage went together well, though I managed to snap one of
the legs. Take care, the plastic is old and brittle.
The propeller needs cleaning up with a knife edge and sandpaper, painted
a medium sand brown then given a coat of Tamiya clear orange. To judge by the
photos I found on the internet the leading edges of the tips had a metal edge
and this was masked off and painted with gunmetal.
The rubber o-rings for tires are nice touch, which make for a very good
line between tire and metal hub, something which often eludes me even when using
masks. The instructions suggest using a hot screwdriver to melt the end of the
axles, presumably so the wheels can rotate. I clipped the axles and glued the
wheels in place, since I have no desire to watch the kit roll around on the
shelf.
For control lines I used elastic thread which had been pre-coloured black from a felt tip marker, and secured in place using a tiny drop of superglue gel, placed with a sharpened toothpick. Finally there are two small navigation lights on top of the wingtips, which were glued in place and painted green (pilot's right hand side) and red.
| COLORS & MARKINGS |
The
paint used was Humbrol Chrome Silver for the engine-turned areas, including the
wheels which were evidently highly polished. The rest of the aircraft was done
in Xtracolour silver XA 1216, which is RLM 01 for Luftwa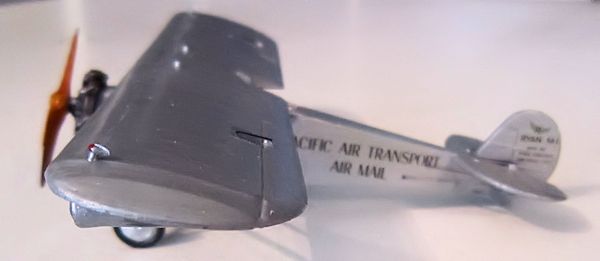 ffe aircraft. I usually
use this for silver painted canvas or metal which isn't polished, on aircraft of
the 1920s and 30s, since it gives a pleasing matt finish which looks right to
me. No other colours were needed, apart from the seat leather and the engine
details (above).
ffe aircraft. I usually
use this for silver painted canvas or metal which isn't polished, on aircraft of
the 1920s and 30s, since it gives a pleasing matt finish which looks right to
me. No other colours were needed, apart from the seat leather and the engine
details (above).
The decals were old, and a little yellowed, so I taped them to a window
pane for a couple of days to let the sunlight renew them. I handled them very
carefully, as I was afraid that they were so old they might break up, but they
went on in one piece without trouble, and settled well with some Micro Sol
setting solution. I gave the whole thing a quick blast of satin varnish to take
off their shine and blend them in, after carefully masking off the polished
nose.
| CONCLUSIONS |
I wanted this kit because I had never heard of Greenbank, who look like
they might have been a small garage manufacturer of kits. And secondly because I
didn't know about the Ryan M-1. And now that I do, I am very pleased with it.
There are crudities about it, which you would expect from a kit of that period,
but nothing that the relatively experienced modeller can't handle. Most of the
small parts need sanding and s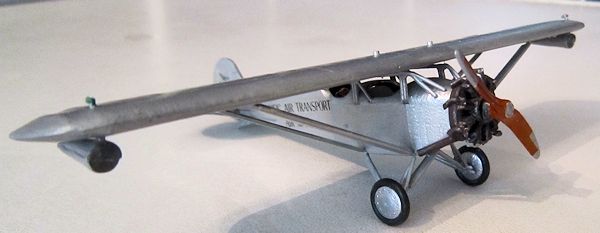 eams removed. With hindsight the one thing that I
would go back and do differently would be the wings, which need sanding level.
One possibility might even be to scratch build them, as they are a simple shape
and you could use the kit wings as a plan. Nonetheless I am happy with the
result as I now have a model of a plane I knew nothing about. I have made enough
Spitfires and Hurricanes to last a lifetime and so now seek out aircraft that
are new to me. You can clearly see the lineage to Lindbergh's Spirit of St
Louis, which looks very similar but for the forward fuselage filled with extra
fuel tanks. If you want a Ryan M-1, then this is the only injection kit I know
of. If you can find it, and it appears on eBay from time to time, I would
recommend it to all, although if you are a beginner I would get a few dozen
easier kits under your belt first.
eams removed. With hindsight the one thing that I
would go back and do differently would be the wings, which need sanding level.
One possibility might even be to scratch build them, as they are a simple shape
and you could use the kit wings as a plan. Nonetheless I am happy with the
result as I now have a model of a plane I knew nothing about. I have made enough
Spitfires and Hurricanes to last a lifetime and so now seek out aircraft that
are new to me. You can clearly see the lineage to Lindbergh's Spirit of St
Louis, which looks very similar but for the forward fuselage filled with extra
fuel tanks. If you want a Ryan M-1, then this is the only injection kit I know
of. If you can find it, and it appears on eBay from time to time, I would
recommend it to all, although if you are a beginner I would get a few dozen
easier kits under your belt first.
| REFERENCES |
Surviving aircraft seem to vary a little especially with reference to
the exhaust set-up. Some seem to have no collector ring, and the stub exhausts
just protrude to the rear.
http://www.museumofflight.org/aircraft/ryan-m-1
http://www.airminded.net/ryanm1/ryanm1.html
http://www.flugzeuginfo.net/acdata_php/acdata_ryan_m1_en.php
http://wanderingphotolog.com/?page_id=2526#jp-carousel-2532
Back to the Previews Index Page