Minicraft 1/144 C-143 'Dixie Clipper'
| KIT #: | 14486 |
| PRICE: | $69.99 (part of a boxed set) |
| DECALS: | One option |
| REVIEWER: | John Kauck |
| NOTES: | Part of 'Aircraft of the Presidency' boxed set |
| HISTORY |
While
Theodore Roosevelt was the first President to fly, taking a four minute flight
in a Wright Brothers built plane in October, 1910, he did so almost a year after
he left office. Some 33 years later, his fifth cousin, President Franklin D.
Roosevelt would 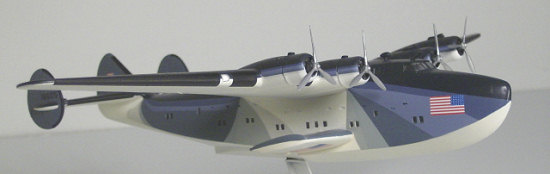 become the
first President to utilize air transportation while in office, as has every
President since.
become the
first President to utilize air transportation while in office, as has every
President since.
That first Presidential flight on January 11, 1943, FDR’s 61st birthday, was aboard the “Dixie Clipper,” a commercial Boeing B-314 flying boat transferred to the U.S. Navy and designated C-143. The flight, deemed safer than a journey by ship due to German submarines, was from Miami, Florida to Bathurst, British Gambia as part of a trip to Casablanca, Morocco to meet with Winston Churchill to plan the Allied European invasion.
Specifications:
Length: 106 ft 0 in (32.31 m)
Wingspan: 152 ft 0 in (46.33 m)
Tail Height: 27 ft 7 in (8.41 m)
Engines: Four Wright GR-2600 Twin Cyclone, 1,600 hp (1,192 kw), 14 cylinder, air-cooled, radial engines
Takeoff Weight: 82,500 lb (37,422 kg)
Normal Range: 3,500 miles (5,633 km)
Ceiling: 13,400 ft (4,085 m)
Speed: Cruising: 183 mph (294 km/h)
Max: 199 mph (320 km/h)
| THE KIT |
 This model is part of the
discontinued Minicraft presidential themed boxed-set kit #14486, ‘Aircraft of
the Presidency’ which also contains Truman’s C-118 Independence, Eisenhower’s
VC-121E Columbine III, and the VC -137C Air Force One. Each of the four models
is individually bagged within the box, with their own instructions and decals.
This model is part of the
discontinued Minicraft presidential themed boxed-set kit #14486, ‘Aircraft of
the Presidency’ which also contains Truman’s C-118 Independence, Eisenhower’s
VC-121E Columbine III, and the VC -137C Air Force One. Each of the four models
is individually bagged within the box, with their own instructions and decals.
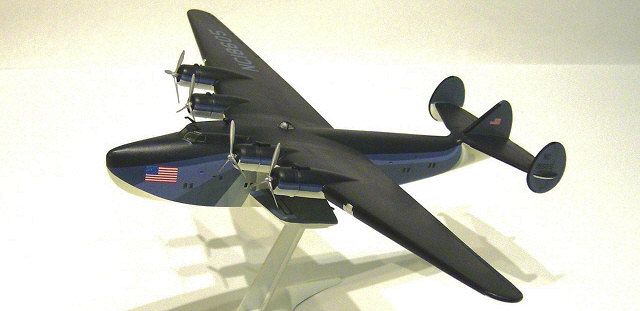
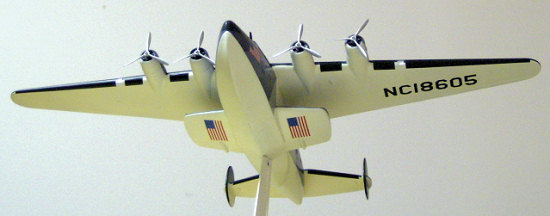
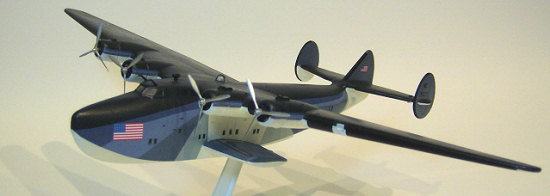
This C-143 is a model of the first plane to carry a sitting president, FDR, in 1943. It is the Boeing B-314 “Dixie Clipper” boat plane, but commandeered and redesignated as C-143 by the U.S. Navy, and repainted in a dazzle-like camouflage paint scheme. This C-143 kit contains the decals for this specific historic plane, which are different from the Dixie Clipper in its B-314 commercial markings. Furthermore, while the other three models/decals in the boxed-set are available in separate Minicraft kits, as is the commercial “Pan Am” B-314 Clipper, the C-143 decal sheet is unique and only available in this special boxed-set. I’ve seen this boxed-set still on the shelves of hobby shops and on EBay as well (and for way less than the $70 - $90 retail price!)
Overall, I like Minicraft airliner kits. The parts generally have minimal flash and fit well together. The kits are generally good, albeit simple, renditions of their subject aircraft, with no interiors.
Best of all, Minicraft has excellent decals. The subjects are well rendered. The decals are thick, unquestionably opaque, and hold up very well under Micro Sol setting solution making it easy to get them to nestle down into and around complex curves.
The C-143
kit has four parts sprues (I think they cut them down to fit in the box with the
other three kits) containing the left and right rear wing halves, left and right
sponson halves, two outer tail section fins molded as single pieces, and all the
other smaller 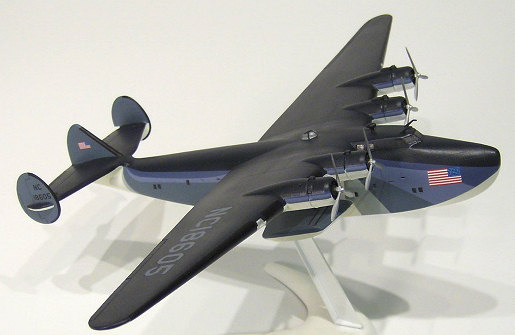 parts to
construct the engines, etc. There is a clear parts sprue with 28 clear parts
including 24 cabin windows, 2 wing lights, a single cockpit window piece, and
single observation bubble piece. The fuselage halves and left and right front
wing halves were free floating in the bag. And finally, a sprue with a
two-piece display stand is included because this is a boat plane with no landing
gear to stand on. Again, some parts had minor flash to be lightly sanded, but
nothing out of the ordinary.
parts to
construct the engines, etc. There is a clear parts sprue with 28 clear parts
including 24 cabin windows, 2 wing lights, a single cockpit window piece, and
single observation bubble piece. The fuselage halves and left and right front
wing halves were free floating in the bag. And finally, a sprue with a
two-piece display stand is included because this is a boat plane with no landing
gear to stand on. Again, some parts had minor flash to be lightly sanded, but
nothing out of the ordinary.
The instructions are simple, yet thorough, with two large construction diagrams on one page, and a page and a half dedicated to painting and decaling. One construction diagram is of the fuselage, noting where all those windows go, as well as the tail section. The other is how to construct the engines, indicating when not to glue, and how to attach them to the wings, and then the wings to the fuselage.
While my rule of thumb is to always check references for proper markings as painting/decal diagrams may have minor inaccuracies, I could not find any for this specific plane. I did find references for the B-314 Dixie Clipper, but not in this paint scheme. The only picture I’ve seen of the actual plane is on the cover of the instructions and it’s a grainy black & white. Therefore, I relied on the instructions’ diagrams. Painting/decal diagrams for the sides of the aircraft are provided on the back page, with a diagram for the top and bottom of the aircraft on the front page.
| CONSTRUCTION |
After attaching all those windows with toothpick applied white glue, then the cabin doors with droplets of super clue, the two fuselage halves went together very well with a few touches of Zap CA super thin glue via capillary action. The left and right tail wing halves went together with super glue as well and then were attached to the fuselage with thick super glue to fill minor gaps and the joints were sanded smooth with progressively finer flex-i-file sanding bands to get into those complex curves. I left the outer tail fins off the plane until just before priming, masking and painting.
N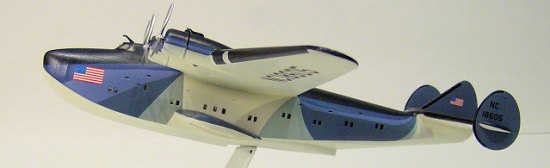 ext,
the clear cockpit window piece was attached into the fuselage opening with more
white glue. While that dried, I constructed the left and right front wings
halves and left and right sponson halves with thin super glue and cleaned up the
seams. I then attached the wings to the fuselage with thick super glue and
again sanded the joints smooth with progressively finer flex-i-file sanding
sticks. I left the clear wing-light pieces out of the wings until after
painting. I also left the sponsons off until after painting as I thought it
would be too hard to get at them under the wing with the airbrush if attached.
ext,
the clear cockpit window piece was attached into the fuselage opening with more
white glue. While that dried, I constructed the left and right front wings
halves and left and right sponson halves with thin super glue and cleaned up the
seams. I then attached the wings to the fuselage with thick super glue and
again sanded the joints smooth with progressively finer flex-i-file sanding
sticks. I left the clear wing-light pieces out of the wings until after
painting. I also left the sponsons off until after painting as I thought it
would be too hard to get at them under the wing with the airbrush if attached.
NOTE: I wish I would have hit the sponsons with Future while still off the plane as well! My painting assumption proved correct when it came to the Future coat and the decals on top of the sponsons silvered from lack of a sufficient Future gloss coat because I couldn’t get at them properly once attached under the wings! Learn from my mistake! Completely finish the sponsons, i.e., paint, Future, and decal them, before attaching them to the plane. Or apply the Future with a brush.
Checking for any remaining gaps with my silver Sharpie pen along the seams, I spot filled any imperfections with thick or thin super glue as necessary and final sanded the fuselage and wings. I then re-scribed all the panel lines across the entire top of the fuselage/wings with my #11 blade and a flexible straight edge. This took some time, but really is necessary to a good looking finished plane.
Next, I cut and cleaned all the engine parts and propellers from the sprue. I built the piston sections only. Then I dry fit all the engine parts/propellers to each other and to the aircraft and left these pieces off the aircraft and wings for painting separately and attachment later.
| COLORS & MARKINGS |
The
instructions indicate some basic colors and specific colors. For the flat
white, aluminum, and black, I used Testors enamel Gloss White #1145, Silver
#1146, and Flat Black #1149. I used Model Master FS#35042 Flat Sea Blue, (the
kit called for FS# 25042 Semi-gloss Sea Blue) and FS#35164 Intermediate Blue as
instructed. I didn’t worry about the finish of the paints (flat or gloss) as I
planned to finish the entire plane with a layer of Dullcoat.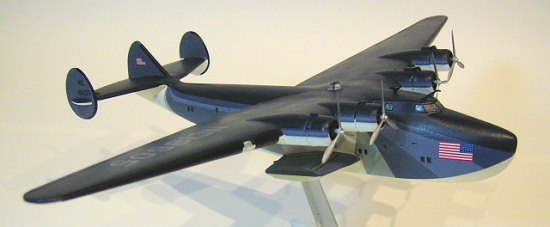
The painting instruction diagram is very accurate. You must follow it exactly to get the separation lines between the white and blue painted sections of the camouflage pattern to line up with the gray decal portions of that pattern to look right when finished.
After masking all the cabin windows (what a pain!) and attaching the tail fins, I primed the whole plane in white primer. I then painted Testors #1145 Gloss White on the bottom and sides of the fuselage and bottom of the wings and sponsons (practically the whole plane.) I also painted the bottom half of the engines and the display stand white as well. While the white dried, I painted the propellers #1146 Silver and the piston assemblies #1149 Flat Black.
When dry, I lined up my masking tape to the various cabin window openings as shown on the instruction diagrams and painted Sea Blue on the top of the plane and wings as well as the antennae, masked engine bottoms, and masked navigator’s observation bubble. When dry, I then masked the sides using the cabin windows again as my guilds according to the instructions, as well as the tail fins and sponsons, and painted them Intermediate Blue as instructed.
| FINAL CONSTRUCTION |
I built/attached the four engines which are not specific to any particular positions on the wings. I attached the antennae, wing lights, observation bubble, and sponsons (big mistake, see NOTE above) and covered the whole plane in Future in preparation for decals.
Markings/Decals:
As mentioned, the kit provides excellent decals. I started with the black “ice boot” decals on the leading edges of the wings and tail fins. My B-314 references showed that they extended further in some spots then the kit decals covered so I extended them with a bit of black stock decal. But, if you don’t, it won’t be the end of the world.
 Next I did the fuselage and
engine decals covering the separation between blue and white painted sections,
and because these decals are so thick and opaque there was nowhere that the
separation lines showed through. (Man, I love Minicraft decals!) While
placement is a bit tricky, strictly following the instruction diagrams will
yield excellent results. The key to getting the proper alignment of the “dazzle
pattern” decals is to start at the top under the wing and rotate them to line up
with the bottom edge.
Next I did the fuselage and
engine decals covering the separation between blue and white painted sections,
and because these decals are so thick and opaque there was nowhere that the
separation lines showed through. (Man, I love Minicraft decals!) While
placement is a bit tricky, strictly following the instruction diagrams will
yield excellent results. The key to getting the proper alignment of the “dazzle
pattern” decals is to start at the top under the wing and rotate them to line up
with the bottom edge.
I finished with the wing numbers, sponson decals, tail flag decals, and tail number decals on each side of the outer tail fins after trimming away as much of the clear carrier film around them as possible.
After letting the decals dry over night (and horrified to find the upper sponson decals silvered and couldn’t be fixed – gggrrrrrr!), I gave the decaled areas another coat of Future to “seal” them in. When dry, I gave the entire model a coat of Testors Dullcoat sprayed from a can to give it a semi-gloss/not quite flat finish.
Finally, because if was kind of wobbly, I super glued the plane to the display stand and placed it on my shelf.
| REFERENCES |
· Planes of the Presidents: An Illustrated History of Air Force One; Bill Holder; Schiffer Military History Books, Atglen, PA, 2000
· Various web sites for reference photos of the B-314.
| CONCLUSIONS |
FYI, this was the first kit in a little theme build I’ve done of the history of presidential aircraft, of a total of eight planes and one helicopter.
I enjoyed the kit and learned from it. It’s a medium difficulty kit to build (especially all those windows and scribing) with some slightly tricky masking, painting, and decal placement. I think it would be quite challenging for a beginner, while a good challenge for the intermediate modeler (me) and a fun build for the expert modeler.
Happy Modeling!
November 2007
Copyright ModelingMadness.com. All rights reserved.
If you would like your product reviewed fairly and fairly quickly, please contact the editor or see other details in the Note to Contributors.