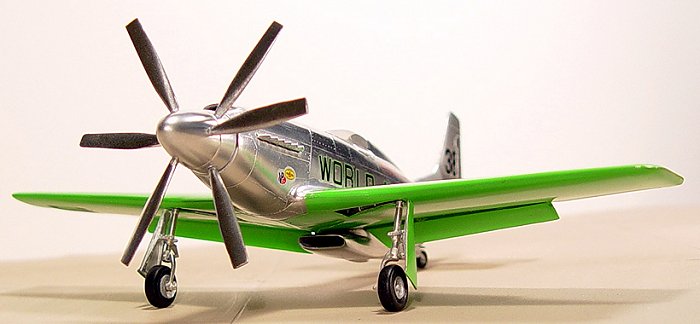
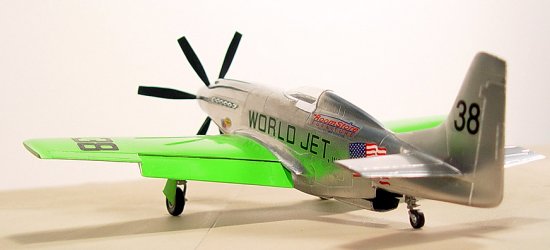
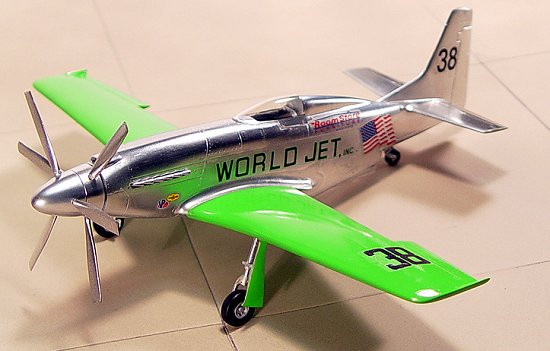
High Planes 1/48 'World Jet' Mustang
|
KIT # |
48001 |
|
PRICE: |
$22.50 |
|
DECALS: |
one option |
|
REVIEWER: |
Kelly Jamison |
|
NOTES: |
Time to build: 35 hours. Camera Sony DSC-707F |
|
HISTORY |
This aircraft
has had many owners in its past including the likes of the famous Warbird
owner, Pete Regina, who was its first owner. Mr. John Travolta was next
but was smart enough to know he did not have the skills to race it. Don
Whittington had it next then sold it to its present owner Ron Buccarelli
after racing it for a few years.
The genesis of the “World Jet, Inc.” Reno Air Racer with its
counter rotating Griffon engine was spawned from an unlikely place. The
idea came to the Wittington brothers after they acquired the Budweiser
Race Boat teams’ engine and spare parts after they
 converted to turbine
engines. The extra Griffon Mk74’s were just what the “World Jet” team
needed in the ever increasing speeds of Reno. The aircraft underwent
major modifications to the canopy, wing and a new P-51H tail unit to tame
the torque of the counter rotating prop. (Ed query; wasn't the
counter-rotating prop developed to get rid of torque effects?)
converted to turbine
engines. The extra Griffon Mk74’s were just what the “World Jet” team
needed in the ever increasing speeds of Reno. The aircraft underwent
major modifications to the canopy, wing and a new P-51H tail unit to tame
the torque of the counter rotating prop. (Ed query; wasn't the
counter-rotating prop developed to get rid of torque effects?)
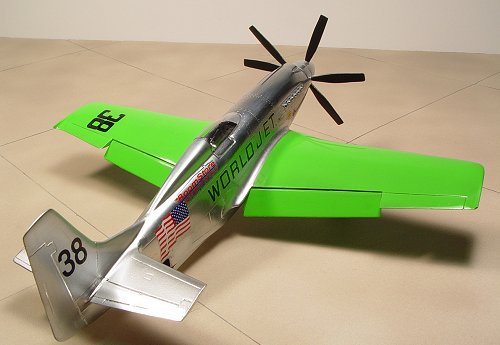
On its first Reno outing, Don Wittington turned in a respectable 453.078 under the Precious Metal #9 livery. The Gold heat started with Bob Hoover’s famous “Gentlemen, You have a race”, Don Wittington put the coals to it and was immediately rewarded with the propeller governor going out of control. He did an excellent job of a wheels-up landing in Lemon Valley with major but repairable damage. The Wittingtons rebuilt the highly modified P-51 once again. More work was done to the aft fuselage and a new engine/propeller combo was installed. The plane emerged as #38 and under the name of a new sponsor, “WORLD JET. INC”.
The racer was put to work numerous times all with varying results over the years. In-flight emergencies followed Don Wittington. Fed up with the cost and upkeep Don sold the airplane to Ron Buccarelli who took the plane to Reno in 2001. The plane continues to be plagued with technical problems that keep it from seeing top speeds. With speeds at Reno going above 500 miles per hour in the year 2003, it is doubtful those speeds can be squeezed out of this airframe. Ron won the Bronze event for 2003 but did not place well in the silver and gold races. This is not a bad thing. Under Ron’s own admission, he claims he is still learning the art of air racing and is taking it slow learning his lessons. He and Don Wittington remain very good friends. World Jet is now back and under the Precious Metal paint and with a new sponsor, Ron Buccarelli’s company “Lake Air, inc.” and retains the #38 in honor of Gary Levitz. Ron plans to campaign the plane promising not to put it in a museum. The battle for speed continues.
|
THE KIT |
Right from the top I will
tell you that this is not a shake-and-bake kit. You will need to use some
of those modeling skills you have been working on for years to complete
this one. Some cutting and modifications need to be made so get out your
razor saw, sand paper and a new pack of #11 blades. I will tell you that
it was a very challenging kit but the payoff is well worth it. Research
is very important and the Internet is one of your best resources. There
are some great books out there
 too but they tend to be more expensive
than the run of the mill Me-109 or Mustang book. Reno air racers go
through many variations in the quest for speed so you need to pick the
year and the exact version and year you want to model before starting.
too but they tend to be more expensive
than the run of the mill Me-109 or Mustang book. Reno air racers go
through many variations in the quest for speed so you need to pick the
year and the exact version and year you want to model before starting.
The kit comes in one of the strongest boxes out there. The metal parts are bagged to keep them from scratching the plastic. It is molded in a low pressure injected light blue plastic with no locator tabs and large injection ports common on low pressure short run molds. I was surprised that the landing gear is cast in metal and is very well done. The “World Jet” racer’s landing gear is not a stock pair of struts but are hand polished works of art in themselves. The canopy is a crystal clear vac-u-formed shell and is dead on perfect in shape. The decals are for the 1999 colors of World Jet, Inc but give you the choice of building the older stock tail version if you wish to do the major surgery of putting a stock P-51D tail on. (Rumors are out there the gang at High Planes are going to do “Precious Metal” colors for a future release.)
After doing some research to get information on the World Jet racer, decided on which paint job and version I wanted to do. Start with a good washing of all the pieces in soapy water to remove the mold release agents used in the molding process. Due to the low pressure injection molding process the filler ports are large. You can remove the parts from the trees with a hot knife or razor saw for a clean cut. If you try to break the pieces off the trees, you might bend or break the part instead. Although there is little to no flash at all, you still need to clean up the seams on a few parts.
|
CONSTRUCTION |
 One of the first places to
start this build is on the cockpit area which had all the original WWII
stock P-51 details molded to the side of the fuselage. It is up to you
but I sanded off the side panels that were molded in and used Evergreen
plastic to replicate the framework in the cockpit. I dug through some old
spare parts and found an old P-51D by Revell. It became the donor kit for
my racer. I used the backrest and seat along with the control stick and
floorboard. I chose to paint the seat padding flat black but you could
paint it just about any color you want. It is just padding and changes
color all the time. A set of Edward photo-etched seat belts finished off
the seat.
One of the first places to
start this build is on the cockpit area which had all the original WWII
stock P-51 details molded to the side of the fuselage. It is up to you
but I sanded off the side panels that were molded in and used Evergreen
plastic to replicate the framework in the cockpit. I dug through some old
spare parts and found an old P-51D by Revell. It became the donor kit for
my racer. I used the backrest and seat along with the control stick and
floorboard. I chose to paint the seat padding flat black but you could
paint it just about any color you want. It is just padding and changes
color all the time. A set of Edward photo-etched seat belts finished off
the seat.
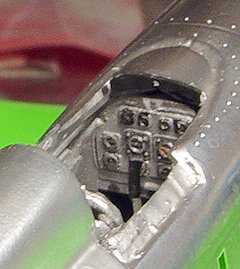
The instrument panel out of the Revell kit is terrible for a WWII era P-51D but matched perfectly for the highly modified World Jet Racer. A few extra knobs and some modern radio panels were added per the picture of the cockpit I have. The panel was painted silver with the instrument dials painted black and highlighted with white to bring out the detail. Then a small dab of epoxy completed the glass look of each instrument.
Take your time fitting and
shaping the interior. You can build a small throttle quadrant and linkage
in the same fashion. I used the legs off an old computer chip to
replicate the throttle and a small dab of thick
 Testors Red paint for the
throttle handle. The same process was used for the flap lever with a dab
of yellow for the knob. There is a bank angle indicator that runs the
length of the top edge of the instrument panel. A small strip of curved
plastic painted black with a small dab of white in the center replicated
the look in my research pictures. A couple of small pieces of plastic
replicated the rudder pedals and the control stick from an old Monogram
P-51D kit finished off the cockpit.
Testors Red paint for the
throttle handle. The same process was used for the flap lever with a dab
of yellow for the knob. There is a bank angle indicator that runs the
length of the top edge of the instrument panel. A small strip of curved
plastic painted black with a small dab of white in the center replicated
the look in my research pictures. A couple of small pieces of plastic
replicated the rudder pedals and the control stick from an old Monogram
P-51D kit finished off the cockpit.
Digging through my spares box I came across a set of spare exhaust stacks from an Airfix Spitfire Mk24 kit. Rather than trying to drill out the stock pieces, I decided to use the spares instead. They fit real well into the stock openings that I carved out from the back side of the fuselage. It was merely a time saver not having to drill out all those exhaust pipes. Take the time to fit all the cockpit components and instrument panel prior to gluing the fuselage halves together. This is how I found that the hood that goes over the instrument panel extends too far back. You need to trim about a quarter inch of the visor out. I used plastic card to replicate a new headrest area and fair in the back of the cockpit.
I used some wire mesh screen to replicate a radiator and a small tab of black painted plastic to block off light showing through the lower scoop. Take your time gluing the fuselage halves together. If you are not careful you can “banana” the fuselage because there are no locating pins. I also had to build a small bracket in the tail to support the tail wheel. I glued the carburetor scoop on to the nose and used superglue to fare it in. It will take some work and you might want to cut a slot into the top of the cowl to replicate the intake path to the carburetor. Your eyes are naturally drawn to the counter rotating prop and the nose of the plane so take your time and make this area nice and smooth.
You can now turn your attention to the wings. I had to file off the top of the landing gear wheel wells so they would fit properly without hitting the bottom of the fuselage. Glue the bottom of the wing to the fuselage so you can get the shape of the top wing to match the fuselage fillet properly. I had to do a lot of trimming to get the underside of the wing to fit the underside of the engine cowling area. Use a filler of your choice to wipe out any gun bay panel lines and gas filler caps or seams. The wings are completely smooth on this racer. I cut the wing tips off and added the upturned airfoil tips. Some putty and sanding is required to finish off the wings. Fill in and sand the flaps smooth too. I had to do some trimming in length and add the small notch which helps the flap tuck under part of the fuselage next to the belly scoop.
I took the radiator scoop from the Revell kit and sanded it to fit. You need to sand and clean up the radiator outlet ramp too. It is a bit blocky but cleans up well. It needs some fitting to get it to sit right in the bottom of the fuselage. There is an older version of this Mustang that has a low drag radiator intake that is very different from the kit. This goes back to checking out your research as to what you want to do.
Next comes the tail planes. You need to cut off the tips to the counter weights of the horizontal stabilizers and sand them flat. I used a 90 degree piece of card board to get the tail plane completely flat. This goes a long way to making it look like a stream line racer. The seam got a coat of Mr. Surfacer 500 and was blended in and sanded smooth. Everything got sanded again and buffed to a very smooth finish. This is a must when painting a silver paint job. Every little seam and scratch will stand out if neglected.
|
COLORS & MARKINGS |
 There are many different
ways to paint the silver and green on this plane and many different
paints to use. I found that Tamiya had a light green that matched my
reference photos perfectly so painted the wings Tamiya X-15 Light Green
and let it dry for a day or so. Don’t forget the flaps and the outside of
both the landing gear covers and wheel doors while you have the airbrush
loaded. Then mask off all the lime green areas with Tamiya low adhesive
tape. I used a new #11 blade and carefully cut out the tape around the
landing gear wells that need to be painted silver. It took a lot of work
getting the tape around the lower radiator scoop but you got to do it.
The fuselage and tail section got painted Alclad gloss black primer. It
took a long time for this primer to dry. You can use another type of
primer or silver paints if you choose. I have heard automotive primer
works just fine with Alclad but have never tried it. The gloss black
primer is used mainly if you are using the chrome line of Alclad paints
to give the chrome a depth of reflection. I happen to use the gloss black
recommended by the company to get that extra bright chrome look of a
polished air racer. If you use Alclad, make sure you mix the paint
occasionally to keep the metal flakes from sinking to the bottom of the
airbrush cup. I use a little back pressure to send air into the cup and
mix it back up every now and then.
There are many different
ways to paint the silver and green on this plane and many different
paints to use. I found that Tamiya had a light green that matched my
reference photos perfectly so painted the wings Tamiya X-15 Light Green
and let it dry for a day or so. Don’t forget the flaps and the outside of
both the landing gear covers and wheel doors while you have the airbrush
loaded. Then mask off all the lime green areas with Tamiya low adhesive
tape. I used a new #11 blade and carefully cut out the tape around the
landing gear wells that need to be painted silver. It took a lot of work
getting the tape around the lower radiator scoop but you got to do it.
The fuselage and tail section got painted Alclad gloss black primer. It
took a long time for this primer to dry. You can use another type of
primer or silver paints if you choose. I have heard automotive primer
works just fine with Alclad but have never tried it. The gloss black
primer is used mainly if you are using the chrome line of Alclad paints
to give the chrome a depth of reflection. I happen to use the gloss black
recommended by the company to get that extra bright chrome look of a
polished air racer. If you use Alclad, make sure you mix the paint
occasionally to keep the metal flakes from sinking to the bottom of the
airbrush cup. I use a little back pressure to send air into the cup and
mix it back up every now and then.
The fuselage and tail got a coat of Alclad Chrome lacquer and was allowed to dry in a dust free environment. After it was fully dry, I used SNJ metal powder polish to help bring out the details. Leave the tape on the wings if you use this metal polishing dust. It gets everywhere. Wash your hands often or you will leave silver fingerprints all over the place. The fin fillet going to the rudder should be painted a dull aluminum. It is one of the few fiberglass pieces on the aircraft.
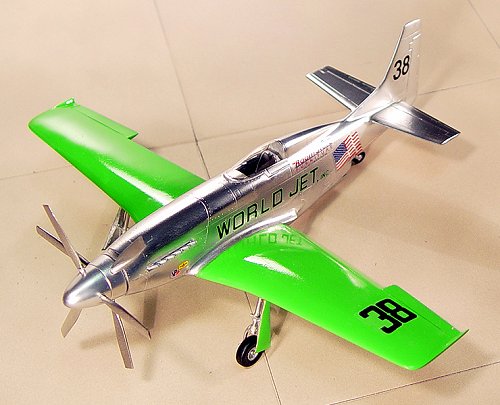
I used a small pin to reapply all the screw slots around the front cowling that got sanded off during the assembly process. It is a small detail but really helps in replicating the look of the real plane. Next in line is the spinner and prop blades. The front sides of the blades are silver and the back sides are black. Also the front blades are a bit longer than the back sets. I drilled out the holes for the prop blades. The blades and spinner got a coat of silver. While I had the brush loaded up I got the tail wheel and the landing gear wells and inside of the landing gear covers.
It was time to remove all the Tamiya low adhesive masking tape from the wings. Be very careful at this point not to pull any of the green paint off. The wings got a coat of Future to give it a real smooth glassy look. You can use any clear you are comfortable with. Some use Floquil Crystal Clear and some use Tamiya Clear or Model Master Clear.
I finished out the tail wheel and glued it to the bracket in the tail that I had made during the assembly of the fuselage earlier. A small pin vice drill was used to cut new holes in the landing gear wells for the struts. I polished the struts with Tamiya polishing compound to give it that chrome metal look of the real thing. I glued the wheel halves together and painted the brake disc dull aluminum. The brake calipers got a coat of gloss white. This is where I made a mistake. Knowing something about airplanes, I glued the wheels onto the struts with the brake calipers on the backside of the strut. This is to give better braking leverage against the strut. Well all my reference photos show the calipers on the front side of the struts. I didn’t notice this until the superglue had already set. I tried to pry it loose but started to bend the gear axle so I just left it and struck it up to lesson learned for the next one.
All got put to the side for drying and I worked on trimming out the vac-u-formed canopy. It got dipped in future floor wax 3 times and allowed to dry inside a small glass jar with a lid. This keeps all dust away and makes a big difference in my book. Mask off the outer edges of the canopy only. There is no metal structure where the canopy meets the front windscreen so don’t paint any of the canopy there. My glue of choice for gluing canopies on is Microscale Krystal-Klear. But good old Elmer’s Glue works just fine.
Next thing on the list is the decals. I found the decals to be very delicate. I recommend a coat of decal film to help strengthen them up a bit. You really need a picture in front of you as to which “World Jet. Inc” you want to do. Place the decals very carefully. You will see a dull film where the carrier film is. You can make some of this go away with a coat of clear. But the clear coat will dull the silver just a bit. That is the trade-off. The number 38 goes on the top of the left wing and bottom of the right wing but they are oriented so that the Reno crowd can read the number when the plane makes its knife edge passes around the pylons. I broke off the pitot tube and lost it. One day I will get back to putting another one on. It looks like any stock P-51 pitot tube in the same place on the right wing.
|
FINAL CONSTRUCTION |
Finally assembly began. Small details like a pitot tube on the lower right wing and the wheel well cover doors. I used a bit of Tamiya clear blue to give the exhaust stacks that heated metal look. Just a touch of Tamiya clear amber changed the tint of the stacks a bit more. I took my time gluing the flaps on making sure they were perfectly aligned and dropped to the same angle.
|
CONCLUSIONS |
This was not a slap together model. It took some work, some patience and some innovations to complete but was well worth it in the end. I still have some mistakes here and there like I didn’t use my reference to get the #38 in its proper place and I know I could have done better on the front carburetor intake. Am I going to build another one? YOU BET. That Griffon counter-rotating prop just wreaks horsepower and the lime green reflecting off the silver fuselage looks too mean.
|
REFERENCES |
http://www.preciousmetalairracing.com/
http://www.corryongcec.net.au/~hiplanes
Reno Air Racing by Michael O’Leary Motorbooks ISBN 0-7603-0084-4
Griffon-Powered MUSTANGS Grantham/Veronico Raceplane Tech ISBN 1-58007-034-5
Speedsters-Today’s Air Racers in Action Airlife unknown
Reno Gold-The Unlimited Elite-Philip Wallick Osprey unknown
Unlimited Air Racers by Don Berliner Motorbooks unknown
Copyright ModelingMadness.com. All rights reserved. No reproduction without
permission.
If you would like your product reviewed fairly and fairly quickly, please
contact
the editor or see other details in the Note to
Contributors.