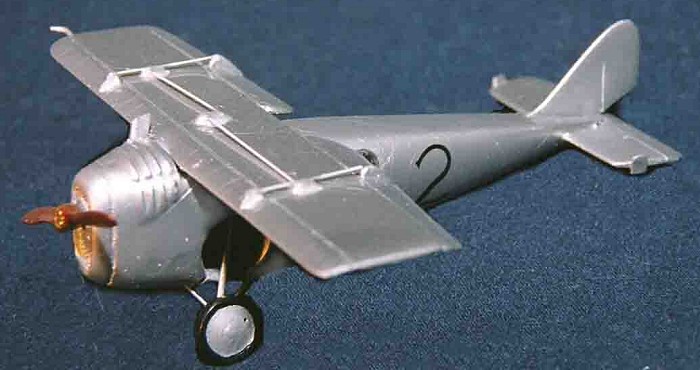
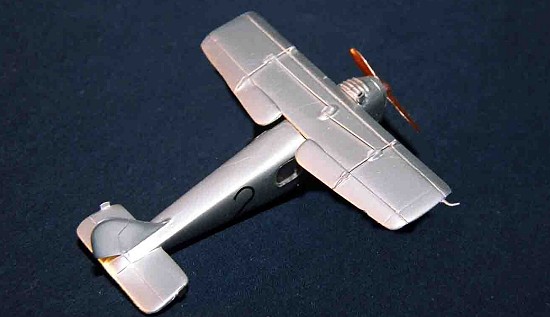
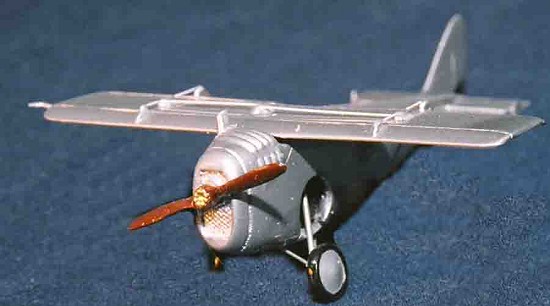
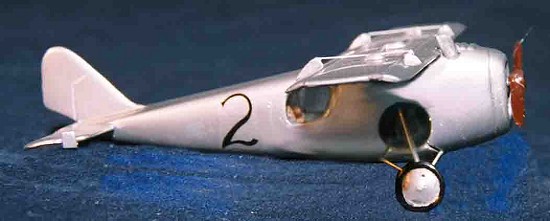
Twelve-Squared 1/72 Dayton Wright Racer
| KIT #: | ? |
| PRICE: | $ Company long out of business |
| DECALS: | One option |
| REVIEWER: | Joel Hamm |
| NOTES: | Semi-early period cottage industry kit |
| HISTORY |
The cottage industry kit companies that sprang up a score or so years ago cashed in on the concept of offering out-of-the-ordinary subjects that the major league molders wouldn’t touch. Twelve Squared carried this a bit too far. They started normally enough with variants of the X-1 rocket plane (before Hasemiya or whoever it was released one) but toward the end of their commercial existence were peddling models of the Hiroshima and Nagasaki A-bombs (non-working models, we must assume). Midway through this spectrum they turned out a couple or three racing planes from the 1920’s. The Dayton Wright RB Racer was one.
 The
kit instruction sheet includes a long and detailed history of the aircraft.
Unfortunately, it seems to have vanished, so this is from memory. The
plane was a civilian endeavor, financed by a consortium of big-buck
businessmen, designed to win the 1920 Gordon Bennet Race. It dared to
employ avant- garde aeronautics in an era of biplane box kites: liquid
cooled engine, plywood monocouque construction, enclosed cockpit,
retractable landing gear, and a single, fully cantilevered, variable camber
wing. Variable-ness was achieved by full span leading edge slats and
trailing edge flaps that deployed when the landing gear was extended – by
means of a large hand crank protruding from the instrument panel.
The
kit instruction sheet includes a long and detailed history of the aircraft.
Unfortunately, it seems to have vanished, so this is from memory. The
plane was a civilian endeavor, financed by a consortium of big-buck
businessmen, designed to win the 1920 Gordon Bennet Race. It dared to
employ avant- garde aeronautics in an era of biplane box kites: liquid
cooled engine, plywood monocouque construction, enclosed cockpit,
retractable landing gear, and a single, fully cantilevered, variable camber
wing. Variable-ness was achieved by full span leading edge slats and
trailing edge flaps that deployed when the landing gear was extended – by
means of a large hand crank protruding from the instrument panel.
Because the wing was constructed over a solid balsa core, the linkage mechanism of push-rods and bell cranks was left exposed sitting in the slip stream just above the wing. The deleterious effects of all that ironmongery burbling in the boundary layer were proved by the loss of the race to a French entry (actually the RB had to withdraw because of a mechanical problem). That failure may partially explain why the advanced construction and design features did not see production status for at least another decade, and why the variable camber concept slept until the arrival of jet airliners in the 1950’s.
| THE KIT |
Most “limited edition” model manufacturers evidenced a steady quality improvement trend, but Twelve Squared seemed stuck in stasis through their several years. Parts were molded in a gray waxy plastic that mimicked the consistency of ripe gorgonzola cheese. Happily it did not share the odor, but as for accepting fillers and reacting to abrasives, the two substances might have been indistinguishable. Even super-fine grits lubricated with soapy water simply clogged and raised a fuzzy knap. Solvent and epoxy based fillers would adhere, but because the plastic was softer, could not be feathered to a “seamless” joint. The solution was to coat everything with sandable automotive primer which somewhat obscured the sparse surface detail. The mold maker’s aspirations over-reached his technical capabilities, as several parts, such as landing rear struts and engines, were included, which could better be scratched or scrounged.
| CONSTRUCTION |
 The cockpit featured an
instrument panel bulkhead with raised instrument dots. These were painted
white and received a gear retraction crank fashioned from a paper
fastening staple, unbent and embellished with a brown-painted glob of glue
to represent a handle. A snippet of stretched sprue made an acceptable
control stick to sit forward of a bucket seat scrounged from a crashed WWI
plane. The results of these efforts are clearly visible when viewed through
the side windows with the aid of a scanning electron microscope.
The cockpit featured an
instrument panel bulkhead with raised instrument dots. These were painted
white and received a gear retraction crank fashioned from a paper
fastening staple, unbent and embellished with a brown-painted glob of glue
to represent a handle. A snippet of stretched sprue made an acceptable
control stick to sit forward of a bucket seat scrounged from a crashed WWI
plane. The results of these efforts are clearly visible when viewed through
the side windows with the aid of a scanning electron microscope.
The open wheel wells permit view of the fuselage innards – primarily a half-barrel fuel tank sprouting a peg to which is fastened the splayed gear legs. The latter were best scratch built and inserted after fuselage closure. A blob representing the engine is included, but neither its location nor manner of affixment could be ascertained; so a less indeterminate part from the spares bin was substituted to fill the void.
The fuselage halves went together with the usual fussing, cussing, and flailing about. The tail feathers needed just minor cleaning, but the three wing parts required derm-abrasion to cure an extensive case of acne. As mentioned, sanding alone did little to smooth the pimples and pock marks, so several coats of auto primer were laid on . The center section at least would better have been cut from thick card stock, since the raised nubbin push-rod fairings had to be ground away, replaced later by globs of epoxy.
| COLORS & MARKINGS |
Pretty simple: primer smoothed and burnished with Soft-Scrub cleanser, covered with a heavy coat of Model Master silver enamel. Decals consisted of four “2” numerals, one for each flank and two for the wing undersides. They were thin, delicate, and recalcitrant, giving some anxious moments, as the font is reproducible only by hand painting. Future Floor Wax sealed everything for posterity and dulled the metallics to a sheen suitable for silver dope sprayed on plywood. One caution – when relying to hide flaws on heavy paint layers, particularly silver, allow about a month (no foolin’ – a month!) at room temperature for curing. Otherwise, differential shrinking of the paint and overcoat will cause alligator cracking, which this model mildly suffered.
| FINAL CONSTRUCTION |
 The scratch built gear legs
had to be threaded through the open wells and glued to the fuel tank peg.
Retraction links came from stretched sprue and the wheels from the spares
box. The kit propeller was OK after cleaning up. The exhaust stack was made
from a quarter inch of aluminum tube, squashed into an airfoil shape and
mitered on at the approximately appropriate angle. A shard of card stock
took careful shaping to morph into the club-shaped tail skid.
The scratch built gear legs
had to be threaded through the open wells and glued to the fuel tank peg.
Retraction links came from stretched sprue and the wheels from the spares
box. The kit propeller was OK after cleaning up. The exhaust stack was made
from a quarter inch of aluminum tube, squashed into an airfoil shape and
mitered on at the approximately appropriate angle. A shard of card stock
took careful shaping to morph into the club-shaped tail skid.
The supplied cabin windows were useless, except as rough templates for tracing new ones from acetate sheet. After receiving a bit of curvature over an Exacto handle, and a careful edge beveling, they fit well enough to be caulked and faired in with a liberal dribbling of Future.
The wing top push-rod fairings were replaced with drops of quick-set epoxy. After these set (not at quickly as advertised), rods were cut from stainless wire and further faired in with white glue and paint.
August 2005
| CONCLUSIONS |
It’s a colorless, pug-nosed, clip-winged ugly little thing , but there’s no reason to remove it from its squat on a bottom shelf, where it draws from visitors a stream of curious, finger-pointing “Whuzzat’s”.
Copyright ModelingMadness.com
IIf you would like your product reviewed fairly and fairly quickly, please contact the editor or see other details in the Note to Contributors.