
Dora Wings 1/48 Vega Gull
| KIT #: | 48014 |
| PRICE: | $59.49 |
| DECALS: | options |
| REVIEWER: | John Summerford |
| NOTES: | Built out of the box |
| HISTORY |
Built by Percival Aircraft of Gravesend and Luton (after 1936 when Percival Aircraft became a Limited Company), the 'K-Series' Vega Gull was a development of their earlier 'D-Series' Gull. The main changes from the earlier design were the provision of an additional fourth seat, dual controls and flaps. The fuselage was widened and the wingspan increased. Increases in drag were compensated for by reducing parasitic drag from exterior fittings such as hinges and actuation horns. This work was largely attributable to the arrival at Percivals of the talented aircraft designer Arthur Bage. Thus, the Vega Gull was very nearly as fast as the more svelte Gull Six. Payload, range and utility were all much improved. The prototype G-AEAB first flew from Gravesend in November 1935.
 The Vega
Gull retained the de Havilland Gipsy Six air-cooled inline engine introduced
in the D.3 Gull Six of 1934. Most examples were fitted with the optional DH
Gipsy Six Series II engine in conjunction with the DH-PD30 VP airscrew. The
final Mk II examples were fitted with a curved windscreen (the earlier
examples had a multi-faceted windscreen of flat panels) similar in
appearance to the early marks of the Proctor.
The Vega
Gull retained the de Havilland Gipsy Six air-cooled inline engine introduced
in the D.3 Gull Six of 1934. Most examples were fitted with the optional DH
Gipsy Six Series II engine in conjunction with the DH-PD30 VP airscrew. The
final Mk II examples were fitted with a curved windscreen (the earlier
examples had a multi-faceted windscreen of flat panels) similar in
appearance to the early marks of the Proctor.
A Vega Gull named "Messenger" was used by Beryl Markham on her transatlantic flight 4–5 September 1936, the first solo east-to-west crossing by a woman.
Two early production Vega Gulls were entered into the Schlesinger Race from England to Johannesburg, South Africa. C.W.A. Scott and Giles Guthrie flying Vega Gull G-AEKE was the only finisher landing at Rand Airport on 1 October 1936. The aircraft had left Portsmouth 52 hours 56 minutes 48 seconds earlier. With the publicity of the win, Percival set up a production line at larger premises at Luton. The new type was an immediate success with production running to 90, the last production aircraft having its maiden flight on 27 July 1939.
The Vega Gull was widely used by British and Commonwealth aviators during the later years of the "Golden Age" of record-setting aviation during the 1930s. Alex Henshaw, Jim Mollison, Amy Johnson, Beryl Markham, C.W.A. Scott and others, won races and broke records to South Africa, South America, Australia and New Zealand, to name but a few.
| THE KIT |
 Upon opening the box lid, I found five gray plastic sprues, a
sprue of clear parts, a fret of photo-etch, masks for the clear parts, two decal
sheets and instructions, all wedged into a zip-top bag. Molded details are crisp
and I’m delighted with the fabric over rib rendering on the wings and tail. A
closer look reveals that this not a “add glue, shake box” type of build.
Upon opening the box lid, I found five gray plastic sprues, a
sprue of clear parts, a fret of photo-etch, masks for the clear parts, two decal
sheets and instructions, all wedged into a zip-top bag. Molded details are crisp
and I’m delighted with the fabric over rib rendering on the wings and tail. A
closer look reveals that this not a “add glue, shake box” type of build.
There are 108 injected and etched parts, not all to be used, plus masks. The breakdown includes a 6-part wing, 5-part canopy, 4-part landing lights, 3-part fuselage, 3-part spats, a 2-part pitot tube, and two wing blanking plates to glue inside the fuselage. (Perhaps you could glue the wings to the fuselage from inside, then the plates, and then glue the fuselage together.) There are also three different nose cowls, but no indication as to which one goes to which aircraft. Only the flat windscreen option is available. Etched parts include a wiring harness for the engine, but you need to cut the cowl apart to display the detail. It is possible to pose the cockpit doors open, but the clear pieces are over thick. Folded wings are not an option. Some mold seams are very prominent.
| CONSTRUCTION |
The instructions have you start with building several subassemblies. I prefer to leave the parts on the sprues as long as possible so that they don’t become lost. Being as the wing to fuselage join is unusual with a blanking plate attached from inside the fuselage, I decided to start the build by assembling a wing and test the join. After removing and trimming two wing halves, I discovered that they are misidentified in the instructions. No big deal, but I kept my guard up during the rest of the build. Be sure to trap parts E-30 and E-31(the landing light housings) between the wing halves. I had to retrofit a back plate on the first wing assembled. Parts C-5 and C-6 are also misidentified, they go on the bottom of the opposite wing that the instructions indicate. Fit of the landing light lenses is poor. Some sanding and polishing was required.
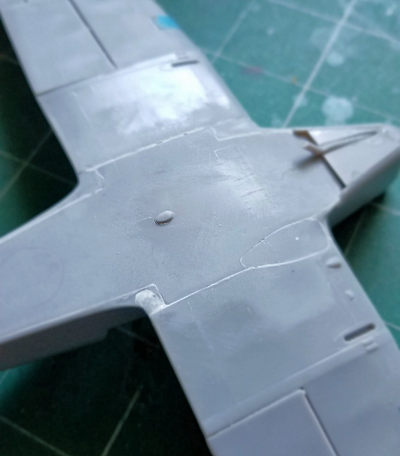
 With the wings assembled, (without the landing gear) I did a
test fit with the three-part fuselage. After cleaning up the sprue gates, I
taped the fuselage together and discovered a section missing from the bottom.
There is no mention a part to add to the bottom in the instructions, but I did
locate the piece on the “D” sprue and the parts map identifies it as #5. The
test reveals that you can indeed glue the wings from the inside.
With the wings assembled, (without the landing gear) I did a
test fit with the three-part fuselage. After cleaning up the sprue gates, I
taped the fuselage together and discovered a section missing from the bottom.
There is no mention a part to add to the bottom in the instructions, but I did
locate the piece on the “D” sprue and the parts map identifies it as #5. The
test reveals that you can indeed glue the wings from the inside.
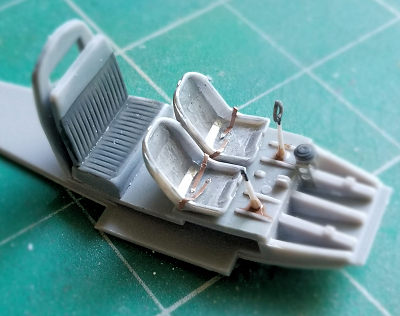
I assembled the engine plus painted the interior bits and
glued them to the floor piece. The front seats as supplied are aluminum buckets.
I suspect that for the civilian version they were upholstered. I painted them
aluminum and glued them to the floor. Make sure the rear bulkhead glues to the
end of the floor, not to the top. That was glued to the fuselage bottom, making
sure to leave a lip to mate with sides. My experience with three-piece fuselages
is that everything needs to happen at once. I chose this sequence in order to go
slowly and I think it worked well: Glue the engine into right side followed by
the firewall behind the engine—notches up and facing rearward. Check alignment
by taping the sides together. I tweaked the firewall while the glue was setting
and removed the
 mounting tab on the engine left side plus bent the exhaust
manifold inward a fraction of an inch. With the glue still pliable, dry fit the
bottom. With the sides still taped together, the wings and blanking plates were
glued in place. I use liquid cement and I was able to achieve a better fit than
I thought I would, just a little cleaning up needed. Glue the sides together.
The nose needed a lot of coaxing to come together. Offer up the bottom and clean
up all of the seams. Finish the cockpit from above.
mounting tab on the engine left side plus bent the exhaust
manifold inward a fraction of an inch. With the glue still pliable, dry fit the
bottom. With the sides still taped together, the wings and blanking plates were
glued in place. I use liquid cement and I was able to achieve a better fit than
I thought I would, just a little cleaning up needed. Glue the sides together.
The nose needed a lot of coaxing to come together. Offer up the bottom and clean
up all of the seams. Finish the cockpit from above.
There is supposed to be a decal for the instrument panel, but it doesn’t appear in my kit. Being as the panel is hard to see through the glazing, I painted the plastic part gloss black and the photoetch part flat interior black. After gluing them together, I highlighted the bezels with a white artist’s pencil and dusted it with white pastel. Good enough.
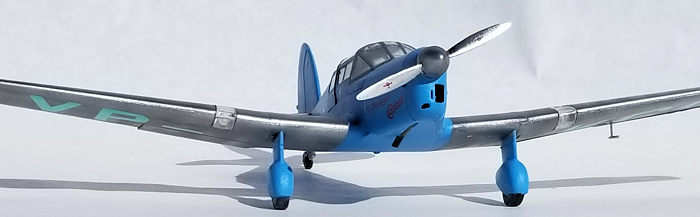
The instructions would have you glue all of the clear cockpit pieces together and then mate them as one unit to the fuselage. I opted to glue the rear pieces plus the dome light to the fuselage first, then the windshield, and the doors last. This allowed me to trim the pieces at each stage. The doors are hung from a lip at the top (on the real aircraft, they’re car door style.) and it wasn’t until I painted the under color that I could see that the doors hung proud. Some combination of chamfering the inside of the door frames and filing the lip will result in a better fit.
For me, the empennage assembled without any problems. Part E-8, the bottom of the cowl, is too long. I trimmed about 3/16” off of the front and it fit perfectly. I assembled the landing gear and prop and set them aside for painting separately. Pay attention as to which prop/spinner combination to use. I applied the kit supplied masks and was ready for paint.
| COLORS & MARKINGS |
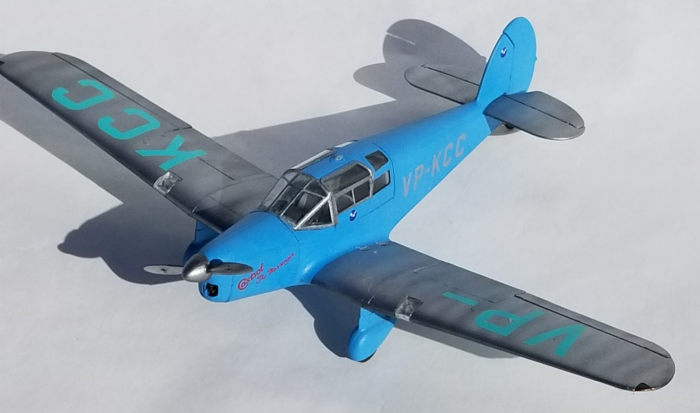
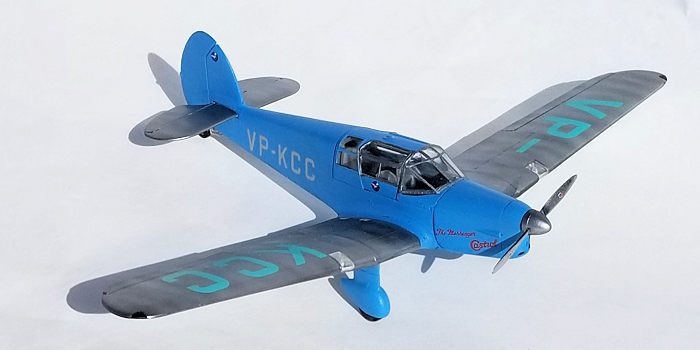
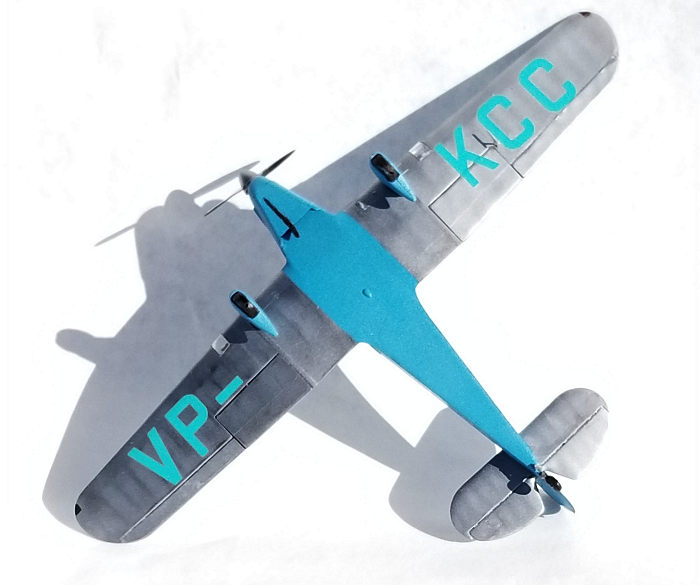
My sweetheart likes that I could model a plane flown by a
woman pilot, so I chose to use Beryl Markham’s plane. My sweetheart also likes
the “Wedgewood Blue” color. (Or colour for the Brits) I had some custom mixed
light blue enamel paint in the rack, so I added a couple of drops of yellow and
I achieved a perfect match. The fuselage and spats were painted first and I
discovered that more filling and sanding was needed. Once done with the
fuselage, it was masked and
 the wings plus the spinner were painted aluminum
using the Alclad II system. The prop blades were painted chrome on the front and
flat black on the back.
the wings plus the spinner were painted aluminum
using the Alclad II system. The prop blades were painted chrome on the front and
flat black on the back.
With the painting completed, the next step was the one I was most concerned about; decaling. I started with the underside of the wings first to see if the color of the letters was close to the color of the fuselage. As it turned out, my fears were well founded, the color is more like teal. I now have a future project in creating decals with my printer. The decals resisted moving into the final position but did get there. Decal solvent got them to snuggle down nicely.
A gloss coat was applied and the last bits were added.
All the clear parts were unmasked and a bit of touching up was done. At the last moment, I discovered that there is a choice of pitot to use, all plastic or a combination of plastic and photo etch. The instructions only show the two-part option. I chose the single part option. The landing gear and prop were the last pieces glued on. The wing tip light lenses were painted and the model was complete.
| CONCLUSIONS |
 This kit builds more like a short-run production than a mainstream kit. A
lot of parts had to be cleaned up and alignment needed to be constantly checked.
Errors in the instructions didn’t help. I enjoyed building this model, but I’m
annoyed at the wrong color on the decals. I also think the kit is somewhat over
engineered. I spent about 26 hours on this model—perhaps a bit more than usual.
Through it all however, the result is a handsome model of a handsome plane.
This kit builds more like a short-run production than a mainstream kit. A
lot of parts had to be cleaned up and alignment needed to be constantly checked.
Errors in the instructions didn’t help. I enjoyed building this model, but I’m
annoyed at the wrong color on the decals. I also think the kit is somewhat over
engineered. I spent about 26 hours on this model—perhaps a bit more than usual.
Through it all however, the result is a handsome model of a handsome plane.
29 July 2019
Copyright ModelingMadness.com
If you would like your product reviewed fairly and fairly quickly, please contact the editor or see other details in the Note to Contributors.
Back to the Main Page Back to the Review Index Page Back to the Previews Index Page