
Roden 1/48 UC-43 Staggerwing
| KIT #: | 442 |
| PRICE: | $45.00 |
| DECALS: | Three options |
| REVIEWER: | John Summerford |
| NOTES: | Markings used are from Iliad Design Decals |
| HISTORY |
Courtesy of Wikipedia:
The United States Antarctic Service Expedition (1939–1941), often referred to as Byrd’s Third Antarctic Expedition, was an expedition jointly sponsored by the United States Navy, State Department, Department of the Interior and The Treasury. Although a U.S.-government sponsored expedition, additional support came from donations and gifts by private citizens, corporations and institutions.
Background, orders and goals
 Rear
Admiral Richard Evelyn Byrd donated
many of the supplies that he had gathered for his own expedition, the largest
item being the Bear of Oakland,
commissioned the USS Bear.
A second ship, the USMS North Star,
a 1434-ton wooden ice ship built for the Bureau
of Indian Affairs was supplied by the Department of the
Interior.
Rear
Admiral Richard Evelyn Byrd donated
many of the supplies that he had gathered for his own expedition, the largest
item being the Bear of Oakland,
commissioned the USS Bear.
A second ship, the USMS North Star,
a 1434-ton wooden ice ship built for the Bureau
of Indian Affairs was supplied by the Department of the
Interior.
A total of 125 men departed from the United States in the two ships of the United States Antarctic Service Expedition. Most of the men who made up the expedition were solicited from the military ranks, civilian agencies of government and scientific institutions. A few volunteers were employed by the Department of the Interior for $10 per month, food and clothing included. A total of 59 men, divided initially into three groups, wintered in Antarctica.
The objectives of the expedition were outlined in an order from President Franklin D. Roosevelt dated November 25, 1939. The President wanted two bases to be established: East Base, in the vicinity of Charcot Island or Alexander I Land, or on Marguerite Bay if no accessible site could be found on either of the specified islands; and West Base, in the vicinity of King Edward VII Land, but if this proved impossible, a site on the Bay of Whales at or near Little America was to be investigated, and delineation of the continental coast line between the meridians 72 degrees W., and 148 degrees W. In view of the broad scope of the objectives and the unpredictable circumstances that always arise in Antarctica, it is remarkable that most of the objectives set for them were met.
Mission termination and aftermath
 With
international tensions on the rise, it was considered wise to evacuate the two
bases rather than relieve the present personnel with new men who would continue
to occupy the bases. It was hoped that one day this base would be reoccupied, so
much of the equipment and supplies were left behind as the two ships sailed from
West Base on February 1, 1941. The evacuation of East Base was concluded on
March 22 and both ships sailed immediately. The USMS North
Star arrived in Boston
May 5 and the USS Bear on
May 18.
With
international tensions on the rise, it was considered wise to evacuate the two
bases rather than relieve the present personnel with new men who would continue
to occupy the bases. It was hoped that one day this base would be reoccupied, so
much of the equipment and supplies were left behind as the two ships sailed from
West Base on February 1, 1941. The evacuation of East Base was concluded on
March 22 and both ships sailed immediately. The USMS North
Star arrived in Boston
May 5 and the USS Bear on
May 18.
On September 24, 1945, Congress directed (Public Law 79-185, 59 Stat. 536) that such number of gold, silver, and bronze medals—at the discretion of the Secretary of the Navy—be presented to members of the United States Antarctic Expedition of 1939-1941, in recognition of their valuable services to the nation in the field of polar exploration and science.
| THE KIT |
Inside the top opening box is a bag of five gray plastic sprues and a clear sprue totaling 61 parts. The styrene is well molded but a bit grainy. Rounding out the kit is a decal sheet for three aircraft and eight pages of history, assembly instructions, and painting plus decaling guides.
| CONSTRUCTION |
The first thing that I did was
drill out the holes for the cross wires. The second thing was to fabricate two
sets of seatbelts. The third thing was to check the fit of the windshield. Other
reviewers have indicated that windshield is too wide. After taping the fuselage
sides together, I found the width was fine, but some material needed to be
trimmed from the panel and the roof. I was able to get a good fit without much
fuss. I polished
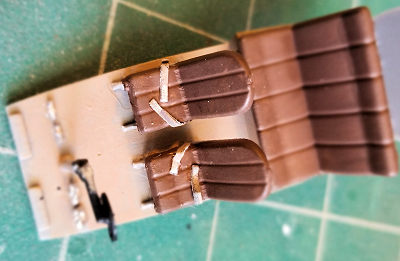 the part
with 8000 cloth followed by a cotton swab coated with toothpaste. (It leaves a
minty fresh scent!) I dipped it in Future floor polish and set it aside.
the part
with 8000 cloth followed by a cotton swab coated with toothpaste. (It leaves a
minty fresh scent!) I dipped it in Future floor polish and set it aside.
Next I looked at the instructions and decided to start with the interior. Rudder pedals and the control column were glued to the floor and then all of the interior bits were painted and the instrument panel decal applied. The seatbelts were added to the front seats and they were assembled and glued to the floor. The Instrument panel was glued into place and the assembly was set aside.
Moving on to the fuselage, a test
fit of the door reveals that some trim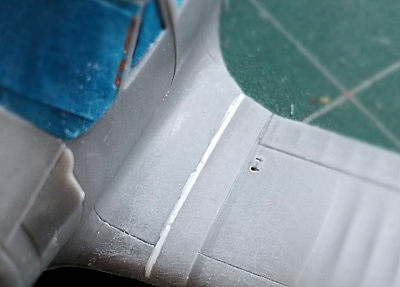 ming
was in order plus it’s window. The other windows were glued in place. The tail
wheel and cockpit assembly were glued into the right fuselage half and the left
half attached. When that set up, the front frame piece was glued in place and
then the windshield. To keep the glazing from getting scratched, I masked it at
this point.
ming
was in order plus it’s window. The other windows were glued in place. The tail
wheel and cockpit assembly were glued into the right fuselage half and the left
half attached. When that set up, the front frame piece was glued in place and
then the windshield. To keep the glazing from getting scratched, I masked it at
this point.
The wings were glued together and the lower set glued to the fuselage. Fit at the nose required a lot of filing before and after attaching. There was a gap at the left wing join that was addressed with a shim of .010 plastic. The upper wings were left off to be painted separately and attached later. After gluing the fuselage bottom on, the horizontal tail surfaces were glue in place and the seams cleaned up. The cowl was assembled and it was time to paint.
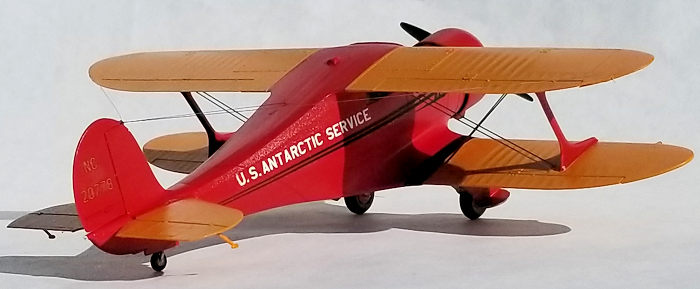
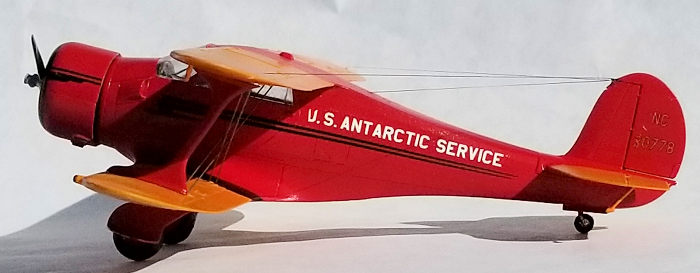
| COLORS & MARKINGS |
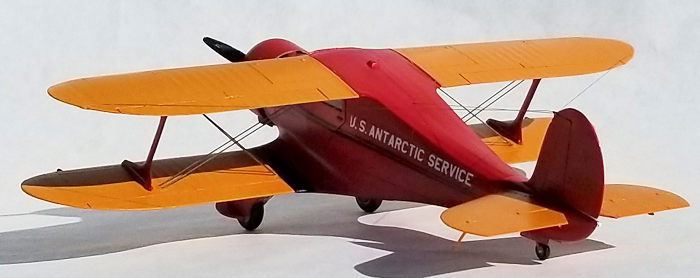
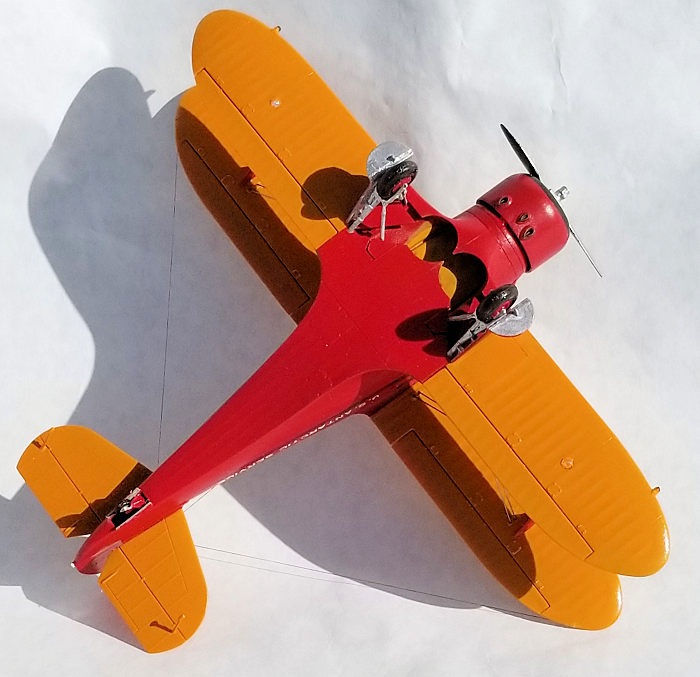 Iliad
Design has produced a sheet of six options for the Beechcraft 17 (UC-43)
Staggerwing. The most colorful is a red and orange U.S. Antarctic Service and
this is the option I decided to model. The wings and horizontal tail were first
sprayed orange using enamel paint. The areas around the walkways were masked and
black applied. Iliad Design’s instructions say to paint the fuselage “Stearman
Vermilion” and list an approximate FS color. I used Chrysler Engine Red enamel.
While the paint was drying, I assembled the engine, then glued it in place. I
had to do some trimming with a roto tool on the engine and cowl assembly to get
a good fit before gluing it on to get ready for the decals.
Iliad
Design has produced a sheet of six options for the Beechcraft 17 (UC-43)
Staggerwing. The most colorful is a red and orange U.S. Antarctic Service and
this is the option I decided to model. The wings and horizontal tail were first
sprayed orange using enamel paint. The areas around the walkways were masked and
black applied. Iliad Design’s instructions say to paint the fuselage “Stearman
Vermilion” and list an approximate FS color. I used Chrysler Engine Red enamel.
While the paint was drying, I assembled the engine, then glued it in place. I
had to do some trimming with a roto tool on the engine and cowl assembly to get
a good fit before gluing it on to get ready for the decals.
There are only eight decals to apply for this scheme and I had a difficult time. The first decal applied was on the rudder and it tore into several pieces while nudging into place. I did the fuselage stripes next and that decal broke into several pieces when it became loose from the backing paper. I used what I could and it is about 1/4th of an inch shorter than it should be. At that point I stopped the session and brushed on liquid decal film over the rest of decals. When I resumed, the front of the “U”s in “U.S.” wouldn’t release from the paper so I cut off the offending segments and applied the rest. I didn’t find any white “U”s in my decal dungeon so I brush painted on the missing legs of the letters. I needed setting solution to get the cowl decals to lay flat. Once dry, a clear gloss overcoat was applied.
| FINAL CONSTRUCTION |
The windows were unmasked and the upper wings glued on. The tabs and slots for the wings work well and it was easy to wedge the struts in place and use some rubber bands to hold everything in place while the glue cured. I like to use real steel for rigging the wings, so I used .015 piano wire cut to length with the aid of drafting dividers.
 Little
bits to glue on are a pair of venturi tubes on the bottom of the lower left wing
and the pitot on the underside of the top left wing. Tail wheel doors and the
mass balances on the undersides of the elevators were also glued into place.
Roden’s instructions have the main gear put together as sub-assemblies. I did it
that way for the right gear and had to fiddle with it to be properly attached. I
found that it was easier, using liquid cement, to glue the front strut in place
quickly followed by the rear strut, (after bending the brace) then the wheel,
and finely the door. (Whether or not this aircraft was fitted with skis I was
unable to determine.)
Little
bits to glue on are a pair of venturi tubes on the bottom of the lower left wing
and the pitot on the underside of the top left wing. Tail wheel doors and the
mass balances on the undersides of the elevators were also glued into place.
Roden’s instructions have the main gear put together as sub-assemblies. I did it
that way for the right gear and had to fiddle with it to be properly attached. I
found that it was easier, using liquid cement, to glue the front strut in place
quickly followed by the rear strut, (after bending the brace) then the wheel,
and finely the door. (Whether or not this aircraft was fitted with skis I was
unable to determine.)
Turning the model over, the radio aerial made from monofilament line run between a felt tip pen and some paper. Each segment was glued in place after making notches in the wings and fin and trimmed after gluing. The last part to glue on was the propeller.
| CONCLUSIONS |
This is perhaps the easiest bi-plane to assemble and rig. Roden’s rendition is a straight forward build that requires some easily accomplished extra work. I spent about 22 hours on the project and have another colorful plane on the shelf.
4 October 2019
Copyright ModelingMadness.com
If you would like your product reviewed fairly and fairly quickly, please contact the editor or see other details in the Note to Contributors.
Back to the Main Page Back to the Review Index Page Back to the Previews Index Page