
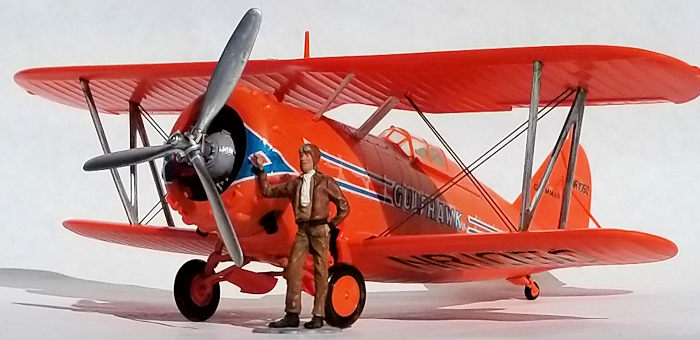
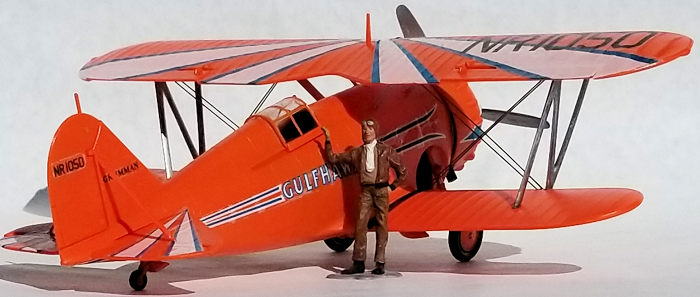
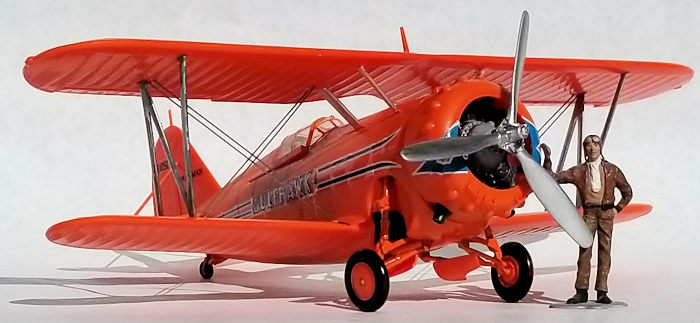
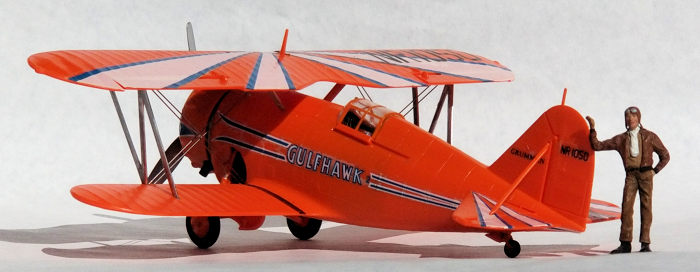
Monogram 1/32 Gulfhawk 2
| KIT #: | 6053 |
| PRICE: | $ |
| DECALS: | One option |
| REVIEWER: | John Summerford |
| NOTES: | Resin engine from Engines and Things plus metal landing gear from Scale Aircraft Conversions |
| HISTORY |
 One of the most exciting aerobatic aircraft of the 1930s and
'40s, the Grumman Gulfhawk II was built for retired naval aviator and
air show pilot Al Williams. As head of the Gulf Oil Company's aviation
department, Williams flew in military and civilian air shows around the
country, performing precision aerobatics and dive-bombing maneuvers to
promote military aviation during the interwar years.
One of the most exciting aerobatic aircraft of the 1930s and
'40s, the Grumman Gulfhawk II was built for retired naval aviator and
air show pilot Al Williams. As head of the Gulf Oil Company's aviation
department, Williams flew in military and civilian air shows around the
country, performing precision aerobatics and dive-bombing maneuvers to
promote military aviation during the interwar years.
The sturdy civilian biplane, with its strong aluminum monocoque fuselage and Wright Cyclone engine, nearly matched the Grumman F3F standard Navy fighter, which was operational at the time. It took its orange paint scheme from Williams' Curtiss 1A Gulfhawk, also in the Smithsonian's collection. Williams personally piloted the Gulfhawk II on its last flight in 1948 to Washington's National Airport.
| THE KIT |
Monogram first
released this kit in 1960 and again in 1983 as part of its Heritage Edition
series. The main components are on three sprues of hard orange plastic with
another sprue in silver and the windshield/canopy on a clear sprue. The
parts count totals up to 74 for the airframe and two for a standing
 pilot
figure. Panel lines on the fuselage are raised as is the rivet detail. Rib
detail on the wings is too sharp. I’ve observed more flash and mold lines on
current short run kits. The decals are intended to go onto the bare plastic.
The instructions are printed in blue on a both sides of a 22-inch by 17-inch
sheet of paper and includes a brief history, exploded parts diagram, paint
color chart and 37 steps. The kit is engineered so that one can retract or
extend the landing gear by rotating the propeller. Cleats are molded on so
that the wire braces can be represented by wrapping thread around them.
pilot
figure. Panel lines on the fuselage are raised as is the rivet detail. Rib
detail on the wings is too sharp. I’ve observed more flash and mold lines on
current short run kits. The decals are intended to go onto the bare plastic.
The instructions are printed in blue on a both sides of a 22-inch by 17-inch
sheet of paper and includes a brief history, exploded parts diagram, paint
color chart and 37 steps. The kit is engineered so that one can retract or
extend the landing gear by rotating the propeller. Cleats are molded on so
that the wire braces can be represented by wrapping thread around them.
I purchased the kit off of the “Used” table at my local hobby shop in the early 90’s. I stumbled upon the resin engine recently in a clearance sale on-line as well the landing gear and decided it’s about time to build this kit.
| CONSTRUCTION |
It seems that at almost every step, one must decide how much detail, if any, to add. In order to avoid obliterating the raised panel detail on the fuselage, I swiped a file along the mating edges and that improved the seam a lot. I sanded down the ribs on the upper wing and decided to leave the lower wings alone. I think my method of rigging with piano wire is more accurate than thread, so I removed the cleats.
Construction, for a change, starts with the landing gear. The
aftermarket parts are a direct replacement, with the exception that bracing
arms are molded onto the
 struts instead of separate parts to be glued on.
The gear is very accurate, however, since it is designed to be retractable,
it’s very fiddly. Once I got it in place, I glued the joints together. I
also found that the pliability of the metal was a benefit.
struts instead of separate parts to be glued on.
The gear is very accurate, however, since it is designed to be retractable,
it’s very fiddly. Once I got it in place, I glued the joints together. I
also found that the pliability of the metal was a benefit.
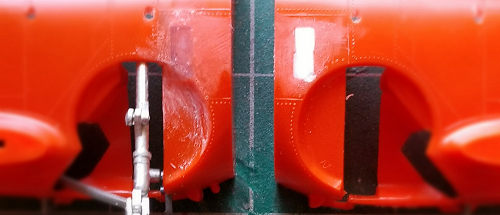
When I got the first set in place within the fuselage half, I discovered that the teeth in one of the cogs protrude through the fuselage. I ground the teeth down and filled the slot with cyano glue and sanded to shape. On the other half, I used bits of styrene to fill the slot, then glued the gear in place.
Moving on to the cockpit, I had to decide how much detail to add to the otherwise basic layout. The Smithsonian’s National Air and Space museum (NASM) has a great interactive view of the cockpit at: https://airandspace.si.edu/multimedia-gallery/10102pjpg (you can copy and paste the ling into your browser.) At times I wished that I hadn’t found this view because it made my detailing choices harder. In the end, I took the path of least resistance and decided to add extra detail with only paint and a white artist’s pencil. I glued the side consoles in place along with the floor into the slots on the right fuselage half and taped the left half in place to make sure it lined up properly. I painted all of the cockpit components neutral gray and the details black.
The instrument panel is a decal that has the bezels overdone. I
toyed with the notion of fabricating a panel, but I settled on using the
decal to see how viable it (and by inference the whole sheet) is. I found it
to be robust and a little difficult to maneuver into position. While the
decal dried, I added seatbelts to the seat and glued it and the control
stick to the floor. Before gluing the fuselage halves together, I masked
around the metal landing gear and sprayed it with a white rattle can primer.
The tail wheel and rudder were put in place
 and the fuselage halves were
closed up.
and the fuselage halves were
closed up.
After cleaning up the seam, the rudder pedals were glued to the back of the instrument panel and that assembly glued to the fuselage panel that holds the molded in cabane struts. That assembly, in turn, was glued to the fuselage. The corners of the top piece by the windshield were a little short shot, so those areas were filled in and smoothed over, including the oversized canopy stop.
Behind the seat is a partial bulkhead with a ledge for a loop antenna. Ejector pin marks on it were filled, sanded, painted, and the piece was glue into place and them the antenna. The windshield was masked and glued into place. The canopy comes as three pieces—the clear unit and oversized rails to fit into the guide slots molded in the fuselage. This assembly was masked and also glued in place.
Ejector pin marks were filled and sanded on the ailerons before they were trapped between the upper wing halves. The lower wings were glued together next and then glued to the fuselage. The single piece elevator is slotted into place, then the single piece upper stabilizer. The lower stabilizer is in two pieces and they capture the elevator. The fit here was not very good, requiring some filler and careful sanding.
There is a seam that needs to be sanded down on the single piece cowl. after that was attended to, the tail braces were given a streamlined shape and it was off to the paint booth.
| COLORS & MARKINGS |
 Using enamels, I mixed a light orange color with a red color to get
something like a pumpkin orange and sprayed the various subassemblies and
parts. The struts were painted silver.
Using enamels, I mixed a light orange color with a red color to get
something like a pumpkin orange and sprayed the various subassemblies and
parts. The struts were painted silver.
Various age problems affected the decals. The most difficult part to deal with was not being able to move them easily into the final position. Globs of glue appeared and were wiped up. The white is a little translucent and the blue trim is much too light in hue. They are also oversized with the fuselage stripes too long, especially for the cowl. Several millimeters had to be trimmed off of the wings and elevator. I used Solvaset to get the decals to settle down--repeatedly. By far they are the biggest weakness of the kit.
While the paint on the engine was drying, I unmasked the clear parts
and painted the wheels. The tail braces and landing gear doors were then
glued into place. As I prepared to attach the upper wing into place, the
wind wa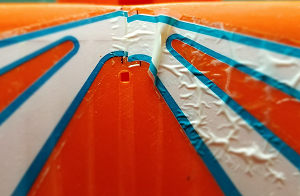 s taken out of my sails. One of the wing decals bubbled up.
(Editor's note: This phenomenon is common with old Monogram decals.) I
continued on, pouting for the rest of the session. Sockets for the struts
are deeply molded in the wings and it was fairly easy to attach the upper
wing. I started with the cabane struts and then glued the “N” struts. The
rigging was replicated with .020” wire. Eventually, the decal settled down,
but out of alignment.
s taken out of my sails. One of the wing decals bubbled up.
(Editor's note: This phenomenon is common with old Monogram decals.) I
continued on, pouting for the rest of the session. Sockets for the struts
are deeply molded in the wings and it was fairly easy to attach the upper
wing. I started with the cabane struts and then glued the “N” struts. The
rigging was replicated with .020” wire. Eventually, the decal settled down,
but out of alignment.
Some fiddling was needed to mount the engine to the plane. An exhaust collector ring comes with the engine and I sanded it down in order to use it to press the engine into the cowl and as the mounting interface. I added exhaust stubs from tube stock. The airframe was completed by adding the main wheels and prop. Painting the pilot figure proved to be a pleasant diversion and completed the project.
| CONCLUSIONS |
When I told several people that I was building this kit, they all furrowed their brow and asked “Why?” Given the technology of the time, it seems this kit adequate, if a bit toy like. The parts fit together well. The overall shape is accurate and the detail save for the single piece engine is OK. There is a LOT room for adding detail if one wishes. The decals are a disaster and not just because of their age. Thanks to an explosion of after-market parts, adding detail is relatively easy to do, however to build a nice model it would take 2-4 times the 25 hours it took for me to complete this project. Applying the paint scheme and lettering is the greatest challenge to this build. If you want to see what modeling was like 60 years ago, this kit is a good example.
January 2020
Copyright ModelingMadness.com
If you would like your product reviewed fairly and fairly quickly, please contact the editor or see other details in the Note to Contributors.
Back to the Main Page Back to the Review Index Page Back to the Previews Index Page