Minicraft 1/48 Beechcraft Bonanza
| KIT #: | 11676 |
| PRICE: | $30.00 |
| DECALS: | Four options |
| REVIEWER: | John Summerford |
| NOTES: |
| HISTORY |
The Beechcraft Bonanza is an American general aviation aircraft introduced in 1947 by Beech Aircraft Corporation of Wichita, Kansas. More than 17,000 Bonanzas of all variants have been built, produced in both distinctive V-tail and conventional tail configurations; early conventional-tail versions were marketed as the Debonair.
Designed by a team led by Ralph Harmon, the model 35 Bonanza was a relatively fast, low-wing, all-aluminum design, at a time when most light aircraft were still made of wood and fabric. The Model 35 featured retractable landing gear, and its signature V-tail combination elevator-rudders called "ruddervators". The prototype 35 Bonanza made its first flight on December 22, 1945, with the type receiving an airworthiness certificate on March 25, 1947. Production began thereafter.
The Bonanza family eventually comprised three major variants: Model 35 Bonanza V-tail 1947–1982, Model 33 Debonair or Bonanza conventional tail 1960–1995, Model 36 Bonanza, a stretched Model 33 1968–2020 with production resuming in 2022.
 The V-tail design gained a reputation as the
"forked-tail doctor killer", due to crashes by overconfident pilots,
fatal accidents, and inflight breakups. However, a detailed analysis by
the Aircraft Owners and Pilots Association of accident records for
common single-engine retractable-gear airplanes in the United States
between 1982 and 1989 demonstrated that the Bonanza had a slightly lower
accident rate than other types in the study. Pilot error was cited in
73% of V-tail crashes and 83% of conventional-tail crashes, with
aircraft-related causes accounting for 15% and 11% of crashes
respectively
The V-tail design gained a reputation as the
"forked-tail doctor killer", due to crashes by overconfident pilots,
fatal accidents, and inflight breakups. However, a detailed analysis by
the Aircraft Owners and Pilots Association of accident records for
common single-engine retractable-gear airplanes in the United States
between 1982 and 1989 demonstrated that the Bonanza had a slightly lower
accident rate than other types in the study. Pilot error was cited in
73% of V-tail crashes and 83% of conventional-tail crashes, with
aircraft-related causes accounting for 15% and 11% of crashes
respectively
In the late 1980s, repeated V-tail structural failures prompted the United States Department of Transportation and Federal Aviation Administration (FAA) to conduct extensive wind tunnel and flight tests, which proved that the V-tail did not meet type certification standards under certain conditions; the effort culminated with the issuance of an airworthiness directive to strengthen the tail, which significantly reduced the incidence of in-flight breakups. Despite this, Beech has long contended that most V-tail failures involve operations well beyond the aircraft's intended flight envelope. Subsequent analysis of National Transportation Safety Board (NTSB) accident records between 1962 and 2007 revealed an average of three V-tail structural failures per year, while the conventional-tailed Bonanza 33 and 36 suffered only eleven such failures in total during the same 45 years. Most V-tail failures involved flight under visual flight rules into instrument meteorological conditions, flight into thunderstorms, or airframe icing.
In addition to the structural issues, the Bonanza 35 has a relatively narrow center of gravity envelope, and the tail design is intolerant of imbalances caused by damage, improper maintenance, or repainting. Such imbalances may induce dangerous aeroelastic flutter. Despite these issues, many Bonanza 35 owners, such as my neighbors, insist that the aircraft is safe.
Notable Flights
In January 1949, the fourth Bonanza to come off the production line was piloted by Captain William Odom from Honolulu, Hawaii, to the continental United States (2,900 statute miles), the first light airplane to do so. The airplane was called Waikiki Beech, and its 40-gallon (150 L) fuel capacity was increased (using fuselage and wing tanks) to 268 gallons (1010 L), which gave a still-air range of nearly 5,000 statute miles.
In March 1949, Captain Odom piloted Waikiki
Beech a distance of 5,273 miles (8,486 km) from Honolulu t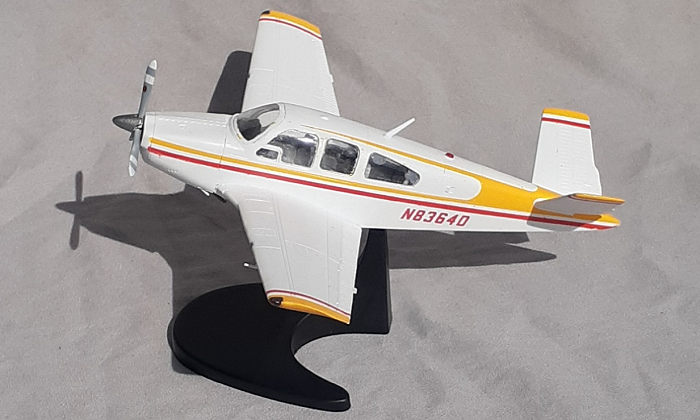 o Teterboro,
New Jersey, setting a nonstop record. The flight time was 36:01 hours,
at an average speed of 146.3 miles per hour (235.4 km/h), consuming
272.25 US gallons (1,030.6 l; 226.70 imp gal) of fuel. After that
flight, the airplane was donated to the Smithsonian Institution's
National Air Museum, as the National Air and Space Museum was then
called.
o Teterboro,
New Jersey, setting a nonstop record. The flight time was 36:01 hours,
at an average speed of 146.3 miles per hour (235.4 km/h), consuming
272.25 US gallons (1,030.6 l; 226.70 imp gal) of fuel. After that
flight, the airplane was donated to the Smithsonian Institution's
National Air Museum, as the National Air and Space Museum was then
called.
On October 7, 1951, an American congressman from Illinois, Peter F. Mack, Jr., began an around-the-world trip in Waikiki Beech, on loan from the museum and reconditioned at the Beech factory, and renamed Friendship Flame. He spent 15 weeks traveling through 30 countries (223 hours flight time). The plane was again refurbished in 1975 and returned to the National Air and Space Museum. It is still on display there, with both names painted on its sides.
On May 31, 2014, 19-year-old MIT student Matt Guthmiller from Aberdeen, South Dakota, departed Gillespie Field in El Cajon, California, in a 1981 A36 Bonanza on a 44-day-12-hour solo circumnavigation, making him the Guinness World Record holder as the youngest person to fly solo around the world when he landed back in El Cajon on July 14, 2014, at 19 years, 7 months, and 15 days of age. During 170 hours of flight time, he made 23 stops in 15 countries on five continents, and covered about 30,500 miles (49,100 km), while raising awareness for computer science education and supporting Code.org.
| THE KIT |
 A quick search on the internet revealed that
Minicraft’s plastic kit is the only game in town. (There is also a
stick-and-tissue kit available.) A top opening box holds four bags of parts.
Inside the largest bag is a white sprue of detail parts plus the fuselage
halves
A quick search on the internet revealed that
Minicraft’s plastic kit is the only game in town. (There is also a
stick-and-tissue kit available.) A top opening box holds four bags of parts.
Inside the largest bag is a white sprue of detail parts plus the fuselage
halves
The wings (also molded in white) are in their own bag, as are the clear parts. The final bag holds parts for a display stand. The model is constructed of 49 white styrene parts and seven clear parts. Panel lines are heavy as are the sprue gates. In addition to some mating surfaces being rough, flash is also present.
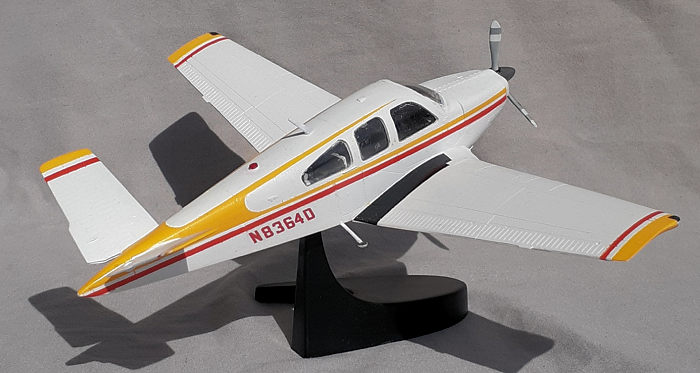
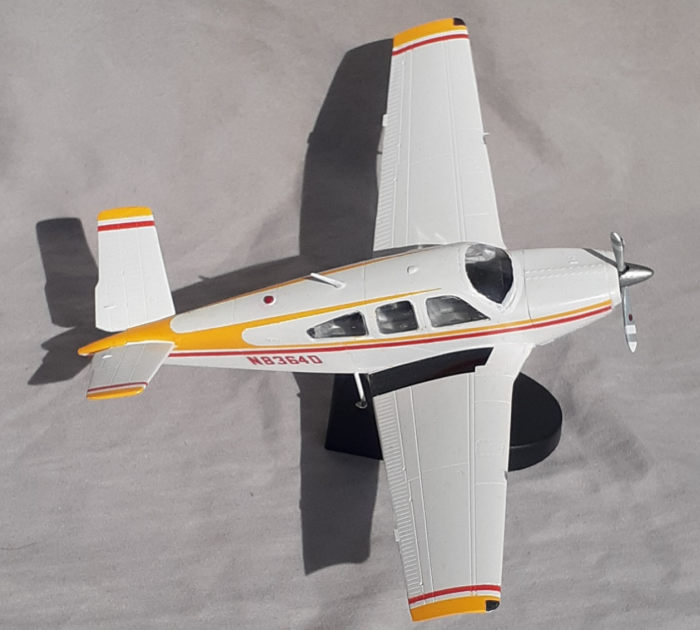
Inside the instructions is a parts map, two pages showing the build sequence through seven steps, then two pages of paint and decal diagrams illustrating two US registered aircraft, a Canadian, and a German/Great Britain plane. Color call-outs are by generic name and do not refer to any paint brand. All of the aircraft are white and the decals provide the colors for the fuselage and tail, but not the wing leading edge.
| CONSTRUCTION |
This was a project modeling an aircraft that my neighbors own. Their V-tail has slight differences that the kit’s representation, so a few modifications were done. Using a rattle can of gray, the fuselage interior and seats were sprayed while still on the sprue. The seats were glued to the cabin floor and set aside. The instrument panel is the following sub-assembly.
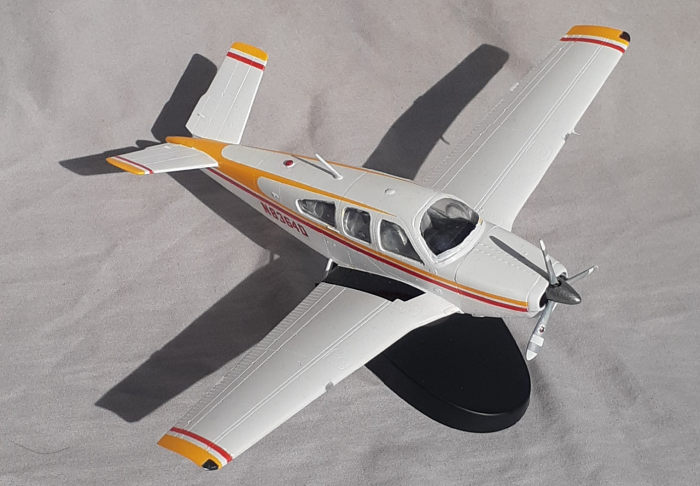
In the next step, the wings are brought together and the floor assembly added to the one-piece lower wing. The subject aircraft has lights in the wing leading edges, so notches were cut in the appropriate locations and painted chrome. The notches were filled with cyano glue, filed, sanded, polished, then masked. Again, this was set aside.
 Returning to the fuselage halves, the windows
were glued in place from the inside. The clear parts have a nice step around
their edges, but the openings for them are too small. Being as the plastic
is the same color as the paint around the windows, I opted to leave the
openings alone and allowed liquid latex masking to cover the clear parts.
After gluing the instrument panel to the right fuselage half, the left half
was taped to its mate and the wings offered up. Careful gluing around the
airframe left little for seam clean up. The ruddervators were final
additions in the step.
Returning to the fuselage halves, the windows
were glued in place from the inside. The clear parts have a nice step around
their edges, but the openings for them are too small. Being as the plastic
is the same color as the paint around the windows, I opted to leave the
openings alone and allowed liquid latex masking to cover the clear parts.
After gluing the instrument panel to the right fuselage half, the left half
was taped to its mate and the wings offered up. Careful gluing around the
airframe left little for seam clean up. The ruddervators were final
additions in the step.
In order to build up the nose, the engine has to be assembled so that the exhausts and prop shaft have a mounting point. The engine looks like it’s a Conticoming, meaning that the detail is vague enough to pass for either a Continental or a Lycoming. Thankfully, Minicraft includes a mounting bar to reinforce the fragile engine mount. The windshield was installed and masked. Unfortunately, the dual cowl panels piece didn’t fit well and needed work to look good.
Since this is a desk-top model on a stand, the landing gear doors were glued shut. These were the worst fitting pieces in the kit and time saved from not dealing with the gear was lost filling and sanding, especially for the nose gear doors. After achieving a presentable look, the model went to the paint booth.
| PAINTING & THE REST |
 A rattle can of white automotive primer started
the painting process. That was followed by gloss white paint. The challenge
painting this scheme is masking for the yellow on the fuselage. I cut a pair
of ovals and a circle to get the curves correct, then it was just a matter
of getting the stripes lined up properly.
A rattle can of white automotive primer started
the painting process. That was followed by gloss white paint. The challenge
painting this scheme is masking for the yellow on the fuselage. I cut a pair
of ovals and a circle to get the curves correct, then it was just a matter
of getting the stripes lined up properly.
The ID decals were custom printed with an ALPS printer, given a coat of fixative and applied. The following day, another coat of gloss was laid down. Unmasking revealed where a few touch-ups were needed and dealt with.
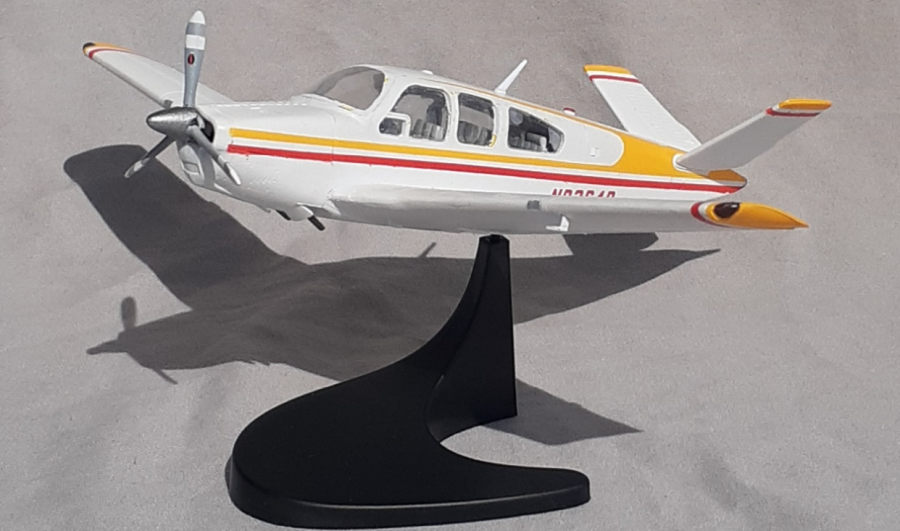
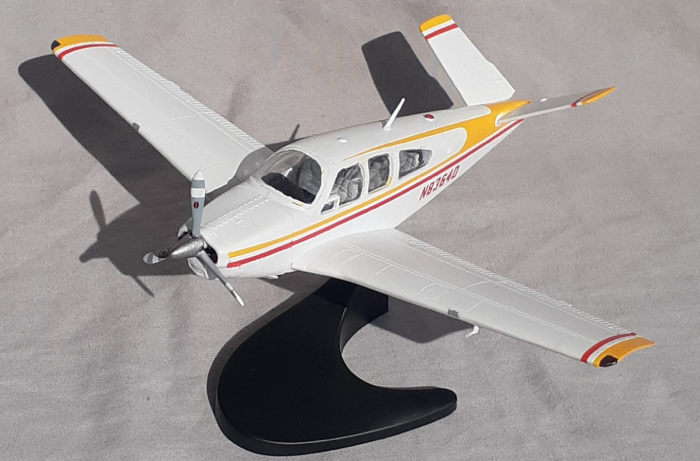
N8364D has a three-bladed prop and chrome spinner, instead of the standard two-blade prop and white spinner supplied in the kit. Coming from the parts bin was the prop and a spinner was fabricated from the nose of a jet plane drop tank. While the paint on those parts was curing, the ball for the stand was glued to the underside, as were the foot step and pitot tube.
Only the antenna was the part to install on the top side. The new prop came next. Lead ballast was glued to the bottom of the stand, then offered up to the model’s ball mount, completing the project.
| CONCLUSIONS |
This kit is Oh Kaaay. The fit of the clear parts is the biggest issue to overcome. What makes this worthwhile is the colorful paint scheme. This is the second time I’ve built one and I can attest that the decals work very well, simplifying painting. The poor fit of the landing gear doors means it’s best to model the plane sitting on the tarmac. If I recall correctly, a bit ballast was installed in the nose of the first model to make sure that it wouldn’t sit on the tail.
I’m pleased to report that my neighbors are delighted with the model.
15 May 2023 Copyright ModelingMadness.com. All rights reserved. No
reproduction in part or in whole without express permission from the editor.
If you would like your product reviewed fairly and fairly quickly, please contact the editor or see other details in the Note to Contributors.