Dora Wings 1/48 DHC-2 Beaver
| KIT #: | DW48059 |
| PRICE: | $60.00 |
| DECALS: | Five options |
| REVIEWER: | John Summerford |
| NOTES: | Custom Decals |
| HISTORY |
Courtesy of Canada’s National Aviation and Space Museum
The Beaver was designed and built in response to the demands of Canadian bush operators. With its all-metal construction, high-lift wing, and flap configuration, the Beaver was a robust aircraft with excellent short take-off-and-landing capability even with heavy loads. In addition to its success in Canada, the Beaver found acceptance in as many as 60 other countries all over the world. Although not ordered by the RCAF, some 980 served with distinction in the US Army and US Air Force. About 1600 were made.
The Beaver was such a success that more were built than any other aircraft designed and manufactured in Canada. In 1951 it won both the US Air Force and US Army competitions for a utility aircraft. Many were used in Korea, where it was known as the “general’s jeep”.
 Built
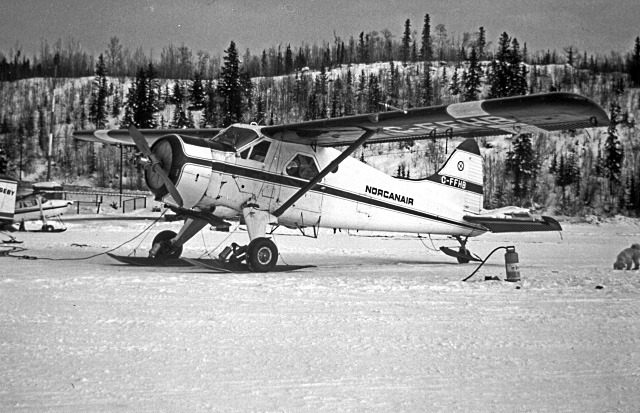
in 1947, this aircraft is the prototype, or first, Beaver to be built. Used
as a bush plane in Western Canada for thirty-two years, it was purchased by
the Museum from Norcanair in 1980. Its registration number, C-FFHB,
incorporates the initials of Frederick Howard Buller, one of the Beaver’s
two designers. Buller was a naval architect turned aeronautical engineer and
is a member of Canada’s Aviation Hall of Fame.
Built
in 1947, this aircraft is the prototype, or first, Beaver to be built. Used
as a bush plane in Western Canada for thirty-two years, it was purchased by
the Museum from Norcanair in 1980. Its registration number, C-FFHB,
incorporates the initials of Frederick Howard Buller, one of the Beaver’s
two designers. Buller was a naval architect turned aeronautical engineer and
is a member of Canada’s Aviation Hall of Fame.
Remarkably, during its final flight, between Lac la Ronge and Rockcliffe airport, this aircraft crossed paths in Sault Ste. Marie with the second Beaver built, CF-OBS. Russ Bannock, who flew C-FFHB for a portion of its last flight, had also been its test pilot. The preservation of Canada’s first Beaver has been made possible by donations from the Molson Foundation and from de Havilland Canada.
The DHC-2 was the first all-metal bush plane designed and built in Canada; still used in many countries around the world. It is one of several de Havilland Canada aircraft named after North American wildlife. It outnumbers, to date, any other Canadian-built aircraft: 1692 Beavers were manufactured between 1947 and 1968. It is a short-take-off-and-landing (STOL) aircraft (requires minimal space to take off and touch down on land, water or snow), along with de Havilland Canada’s Otter, Caribou, Buffalo, Twin Otter and Dash 7. The first flight was on August 16th, 1947
| THE KIT |
Rob Hart previewed this kit earlier on this website and it can be found here:
It should be noted that, despite the inclusion of skis in the kit, there are not any instructions regarding their installation. I sent an email to Dora Wings for information and received a cheerful email in response with a PDF of the instructions a couple of days later.
| CONSTRUCTION |
While waiting for the kit to arrive on my doorstep, online research found the information quoted above along with a couple of photos of the subject aircraft. Further research found a copy of the logo for purchase and that was ordered too. When the kit was in hand, measurements were taken to determine the correct size of the decals, and an order was placed for them.
Finally, gluing could begin.
 Actually,
painting and decaling the instrument panel is where the instructions start.
Experience has taught me that it is very difficult to see the panel and rudder
pedals, so the various knobs on the panel were left off, as well as the two-part
pedals. The coaming piece was glued to the back of the panel and that assembly
glued to the floor, then the control yoke.
Actually,
painting and decaling the instrument panel is where the instructions start.
Experience has taught me that it is very difficult to see the panel and rudder
pedals, so the various knobs on the panel were left off, as well as the two-part
pedals. The coaming piece was glued to the back of the panel and that assembly
glued to the floor, then the control yoke.
Five parts make up the support for the pilot’s seat and four for the co-pilot. After assembling the base for the pilot, it became clear that the details were unnecessary and strips of styrene were used for the copilot seat and cabin seats. Photo-etch seatbelts were installed on the flight crew seats. After the seats were anchored to floor, fore and aft bulkheads were added. A slot is molded in the aft bulkhead, but this example did not have a corresponding tab to join with. The piece was aligned by viewing through the slot. The interior assembly was glued to bottom fuselage piece.
Before adding the fuselage sides, small spacer pieces must be added to the interior faces, above the doors. Why these pieces are not part of side molds are beyond me. If they do not fit properly, they will create problems later on. Test fitting the sides revealed that the aft bulkhead was too tall. A couple of snips with the sprue cutter took care of that. The edges of the fuselage pieces are nicely beveled and results in a tight seam. A stub of a wing spar is trapped between the cabin roof and fuselage top. Unfortunately, it is easy to install it misaligned, so great care is needed.
Instead of adding clear windows to the door frames, the doors are molded as one clear piece, so the interior faces must be painted before installation. The only clear part that fit well was the windshield. The rest of clear parts needed slight beveling of their edges and the mating holes that accept them. Once the clear parts were in place, the greatly appreciated vinyl masks were applied to protect the clear parts from scratches.
 Moving to
the tail, the instructions show how to assemble the horizontal pieces, but
neglect to show them mating to the fuselage. Fortunately, it was easy to figure
that out and the fit is very good.
Moving to
the tail, the instructions show how to assemble the horizontal pieces, but
neglect to show them mating to the fuselage. Fortunately, it was easy to figure
that out and the fit is very good.
Assembly moved on to the engine. Knowing that a canvass cover was going on the finished model, only enough parts were glued together to hold the cowling and prop.
However, before installing the engine/cowling, the instructions call for assembling the landing gear struts. Each main strut is composed of five pieces. The major pieces consist of an outer, inner, and ball-like cap to mate with the fuselage. I found this to be awkward. The illustrations are not clear if the cap should be concave or convex. I settled on convex, as it seemed to fit better with inner/outer assembly. It would have been very helpful if the ball had a tab on it to slot into a socket in the fuselage. As it is, the ball floats in the fuselage opening and there is not a key to ensure that the legs are installed symmetrically. I compared the stance with the stabilizer, which was aligned with the grid of my work mat.
The other two pieces per leg are toeholds. Again, I am mystified why these are not molded on the part. Each piece sits on the leg differently than its sisters. One piece is a bit of scrap sprue that replaced the kit part after it pinged off into another dimension.
Next, the illustrations return to the engine/cowling. Once again, a key would be helpful with the engine mount so that it is aligned properly along all three axes. The fin and rudder complete the fuselage assembly.
Assembling the wings was straight forward. I got the spar stub and a landing gear cap out of alignment, so that meant that the wing struts need some tweaking to get the proper dihedral and incidence. Referring to the mat grid and tail unit, everything was lined up.
Jumping ahead in the instructions to ease painting, the tail wheel was assembled and installed. Four photoetch and six styrene pieces make up the subassembly. The photo etch was dispensed with. The rest of the assembly proved to be fragile and was reinforced with a music wire pin running into the fuselage plus daubs of cyano around each joint. Since the model could now sit on three points, it was time for paint.
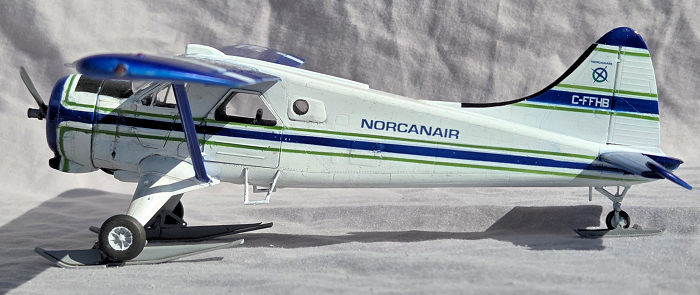
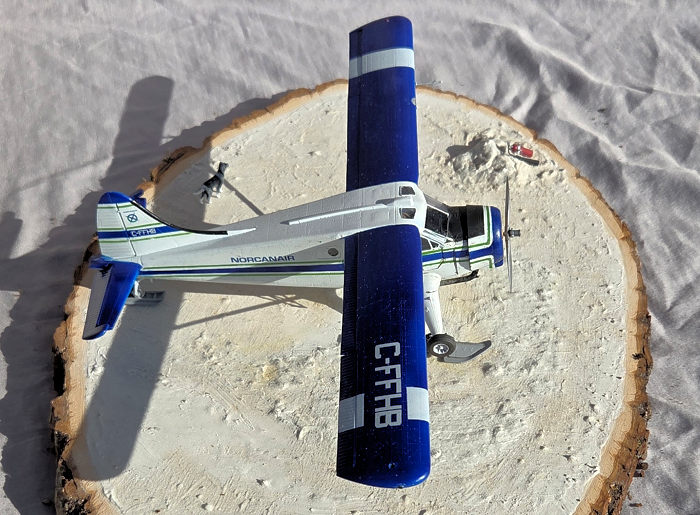
| COLORS & MARKINGS |
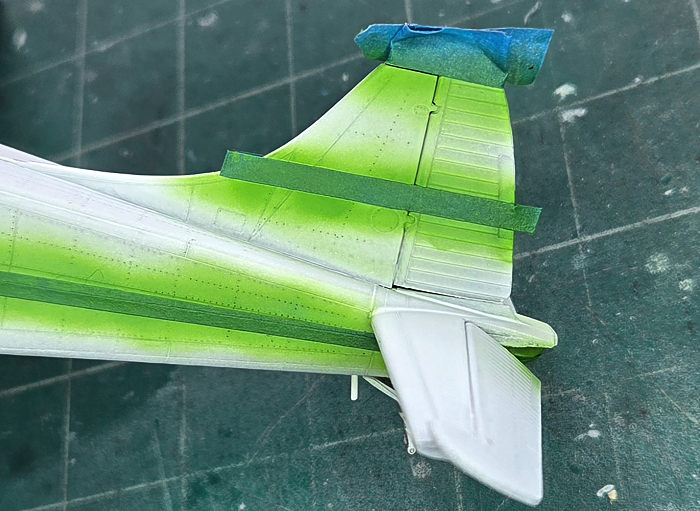 A coat
of white rattle-can automotive primer revealed areas that needed more attention.
After a couple more sessions of filling and sanding another coat of primer went
down. The areas for the blue fuselage stripes, fin, and cowl nose were blanked
off with tape then the areas for the green accent stripes were sprayed. The
green stripes were masked. Getting the curve for the green to wrap around the
cowl with arcs of tape was a challenge. The fuselage was painted white.
A coat
of white rattle-can automotive primer revealed areas that needed more attention.
After a couple more sessions of filling and sanding another coat of primer went
down. The areas for the blue fuselage stripes, fin, and cowl nose were blanked
off with tape then the areas for the green accent stripes were sprayed. The
green stripes were masked. Getting the curve for the green to wrap around the
cowl with arcs of tape was a challenge. The fuselage was painted white.
A couple of days later, the blue blanking was removed, and the white areas were masked in preparation for the blue stripes plus the wings. Two coats of blue paint were laid down to get good saturation.
The grand moment of unmasking everything except the windows revealed results worthy of a video about how NOT to apply masks. No need to go into details, but it took over a week to clean everything up.
During this time, when paint was curing, the propeller was assembled. It is composed of five pieces; one pair of blades, a hub, a shaft, and two counterweights. I don’t understand why it is so complex when Monogram produced detailed single-piece props over 50 years ago.
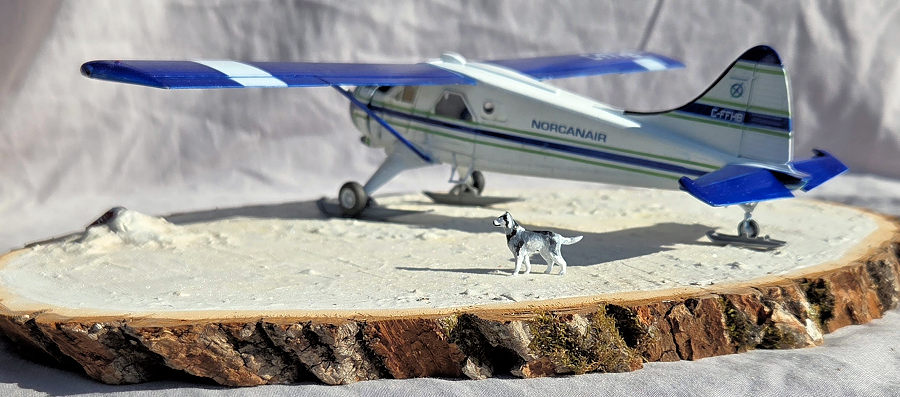
Time was also available to work on the dog figure. It was sourced from an ICM Spitfire kit that includes ground personnel. That figure is an Irish Setter, so it had to be modified into a Husky using a grinding bit and a couple of blobs of cyano for ears. The eye pupils are drilled holes.
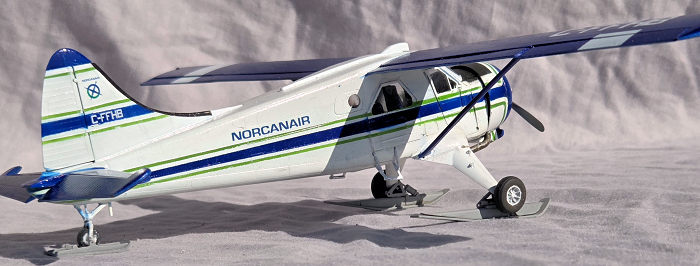
Returning to the model, two coats of clear gloss were sprayed on in preparation for the decals. The decals were custom printed by Bedlam Creations and are ALPS printed. They worked perfectly. Using the photo as guide, Flory Thick Grime wash was brushed over the lower front of the model. This helped greatly by hiding the paint touch-ups. Another coat of clear sealed everything and the clear parts were unmasked.
| CONSTRUCTION CONTINUES |
Focusing on the engine, a disk of tissue was cut to size and given a wash of thinned white glue. When that dried, it was painted light tan and a hole for the prop shaft was punched out, then stuffed into the cowling.
The exhaust tube was installed then rungs to the passenger doors were added. The illustrations show each three-part rung assembled upside up, but installed, correctly, upside down when mated to the illustrated upside-down fuselage. I found that confusing. The cover illustration proved very helpful. A much easier way to install the rungs is to do it one piece at a time. Start with drilling holes in the fuselage for the main pieces and brackets. The main pieces are mounted at the corners of the fuselage and handed. Be sure that the rung will be parallel to the ground when the model sits on the wheels. Before the glue cures, add the brackets. The pieces will self-align. Despite my whining about there being more parts than needed to make up subassemblies, this is an exception. I don’t see any other way to model the rungs.
 As the
rungs were curing, the wheels and skies were assembled. The axles are fragile
and one broke when installing it to the strut. I’m not sure that I got the
mounting points correct for the skis, but I did get solid contacts. As the glue
was curing, the model was placed on the grid to make sure the skis were all
pointed in the same direction. After the glued cured, the joints were reinforced
with daubs of cyano.
As the
rungs were curing, the wheels and skies were assembled. The axles are fragile
and one broke when installing it to the strut. I’m not sure that I got the
mounting points correct for the skis, but I did get solid contacts. As the glue
was curing, the model was placed on the grid to make sure the skis were all
pointed in the same direction. After the glued cured, the joints were reinforced
with daubs of cyano.
Navigation lights were painted, the pitot added, and, finally, the prop completed the model.
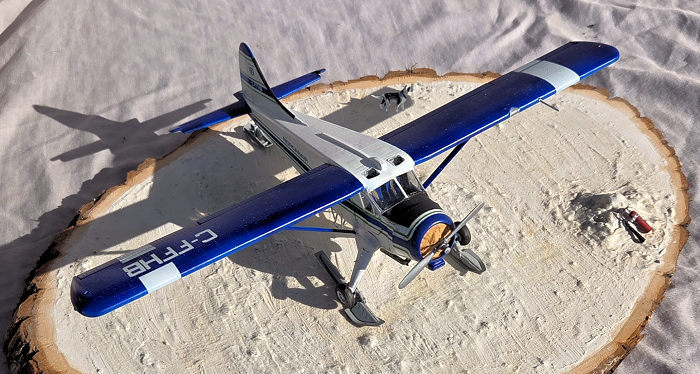
For the vignette, the base is a slice from a balsa tree. Smears of white glue was applied and sand sprinkled over them. Two coats of acrylic modeling paste were brushed on; each coat being over-sprayed with water to knock down the brush strokes. A final coat of Snow Sprinkles from AK Interactive gave the base a nice patina.
Aires’ Aero-Bonus line of resin parts supplied the fire extinguisher. Parts for four extinguishers come in the set. Each one is assembled from four resin parts and a length of copper wire, plus decals. The extinguisher and dog were glued to the base. The model is unattached.
| CONCLUSIONS |
I enjoy researching subjects and get inspired when finding unique stories. I am grateful that Dora Wings produces kits of subjects that are out of the mainstream. This is my eighth kit from them that I have built, and I’m so delighted with this model that I bought the float version too. (I have three other kits in the stash.) The last one from them that I built earned me a 1st place trophy in a contest.
 Dora
Wings’ kits are not for beginners. They can be more complicated than they need
to be, and one can expect to do some filing and sanding to get parts to fit. It
behooves the modeler to examine the instructions to formulate a build sequence
that deviates from the illustrations. Looking ahead to determine which holes to
drill in the fuselage is required.
Dora
Wings’ kits are not for beginners. They can be more complicated than they need
to be, and one can expect to do some filing and sanding to get parts to fit. It
behooves the modeler to examine the instructions to formulate a build sequence
that deviates from the illustrations. Looking ahead to determine which holes to
drill in the fuselage is required.
As for the nits that I have picked here, given the wartime conditions that Dora Wings operate, they deserve a pass. I usually spend 20 to 25 hours on a 48th scale single-engine plane, but I am well over 40 hours on this one due to painting and creating the vignette.
Here is a suggestion for the after-market decal printers: markings for the De Havilland DHC-2 Beaver aircraft from the RNZAF Antarctic Flight on display at the Air Force Museum of New Zealand in Christchurch, might make for a good subject. There are also attractive float plane schemes out there too.
7 April 2026
Back to the Previews Index Page
Back to the Previews Index Page