Dora Wings 1/48 Caudron C.630 Simoun
| KIT #: | DW 48028 |
| PRICE: | $45.00 |
| DECALS: | Four options |
| REVIEWER: | John Summerford |
| NOTES: | I |
| HISTORY |
The C.630 Simoun (desert dust storm) was an elegant low-wing cantilever monoplane of wooden construction. The wings were plywood plus fabric covered and incorporated flaps from inboard of the ailerons to the wing root. The slab-sided fuselage had light alloy covering for the carefully streamlined curved underside and roof. The non-retractable landing gear had legs with oleo-pneumatic shock absorbers. The tail wheel castored and all three wheels were spatted. Differential brakes were standard.
In mid-1935, deliveries began of the C.630 sporting a 180 hp (134 kW) Renault 6Pri (or 6Q-07) driving a Ratier variable-pitch metal propeller. The new type quickly gained orders from 70 private owners. Air Bleu, the air-mail subsidiary of Air France, ordered 12 airframes and established France's first regular air mail service, each in an elegant royal blue finish with a silver arrow along the fuselage side. They delivered 45 million letters prior to WWII. Other Simouns flew air mail routes in Madagascar.
Antoine de Saint-Exupéry
 Antoine
Marie Jean-Baptiste Roger, comte de Saint-Exupéry, simply known as de Saint-Exupéry
was born on 29 June 1900. He was a French writer, poet, aristocrat,
journalist and pioneering aviator. He became a laureate of several of
France's highest literary awards and also won the United States National
Book Award. He is best remembered for his novella The Little Prince (Le
Petit Prince) and for his lyrical aviation writings, including Wind, Sand
and Stars and Night Flight.
Antoine
Marie Jean-Baptiste Roger, comte de Saint-Exupéry, simply known as de Saint-Exupéry
was born on 29 June 1900. He was a French writer, poet, aristocrat,
journalist and pioneering aviator. He became a laureate of several of
France's highest literary awards and also won the United States National
Book Award. He is best remembered for his novella The Little Prince (Le
Petit Prince) and for his lyrical aviation writings, including Wind, Sand
and Stars and Night Flight.
Saint-Exupéry was a commercial pilot before World War II, working airmail routes in Europe, Africa, and South America. In September 1935, he took ownership of Simoun serial number 7042. After several trips in Africa, he decided at the end of December to fly from Paris to Saigon to establish a new record. After 19 hours and 38 minutes of flight, while cruising by night over the Libyan desert, the crew encountered poor weather conditions with heavy rain falls. The crew decided first to climb to 2,500 meters but the cumulus clouds were still there so he reduced his altitude to 1,000 meters then 400 meters and lower until the aircraft struck the sandy ground. Both occupants were uninjured but walked four days without water or food before being rescued. The aircraft was written off.
At the start of WWII, Saint-Exupéry joined the French Air Force, flying reconnaissance missions until France's armistice with Germany in 1940. After being demobilized from the French Air Force, he travelled to the United States to help persuade its government to enter the war against Nazi Germany. Saint-Exupéry spent 28 months in America, during which he wrote three of his most important works, then joined the Free French Air Force in North Africa—although he was far past the maximum age for such pilots and in declining health. He disappeared on a reconnaissance mission piloting a P-38 from Corsica over the Mediterranean on 31 July 1944.
| THE KIT |
A single bag holds all the goodies. Two more bags are enclosed with the five spues of light gray plastic. One bag holds the decal sheet, photo-etch fret and vinyl masks. The second bag has the clear parts and yet another bag holding a resin rudder. My example has some flash on some of the parts, the first time I have encountered that in a Dora Wings Kit. Surface detail on the exterior parts is very nice.
 Total
parts count of styrene and photo-etch is 142, but not all are called for to
complete the model. Two sets of main landing gear are included as well as
two different instrument panels. If you don’t like the raised instrument
detail on the panels, you can build one with the photo-etch pieces. A
complete engine is included, but the access panels are molded into the
fuselage.
Total
parts count of styrene and photo-etch is 142, but not all are called for to
complete the model. Two sets of main landing gear are included as well as
two different instrument panels. If you don’t like the raised instrument
detail on the panels, you can build one with the photo-etch pieces. A
complete engine is included, but the access panels are molded into the
fuselage.
The instructions are in a 12-page booklet, including the front and back cover. There is not a narrative about the history of the C.630, or technical information or a reference to Saint-Exupéry, even though there is a portrait of him on the box lid. Assembly is broken down to 28 steps over five pages.
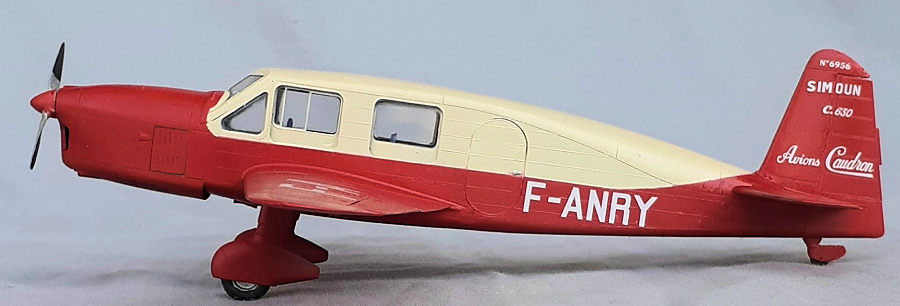
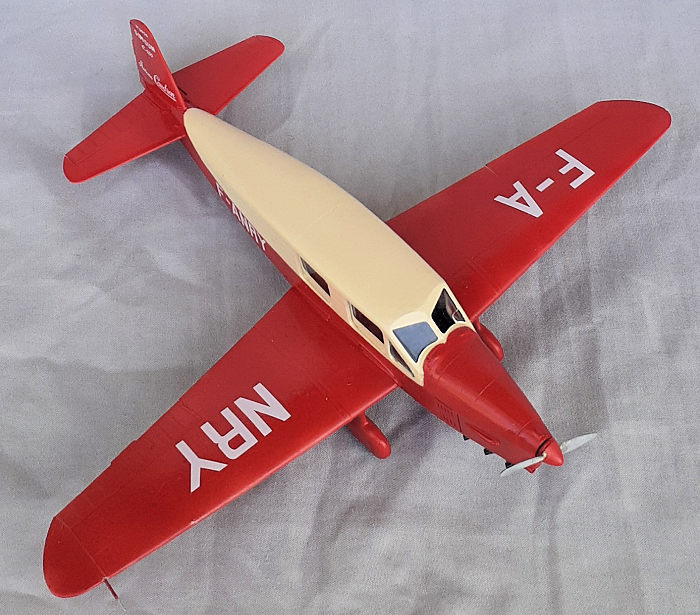
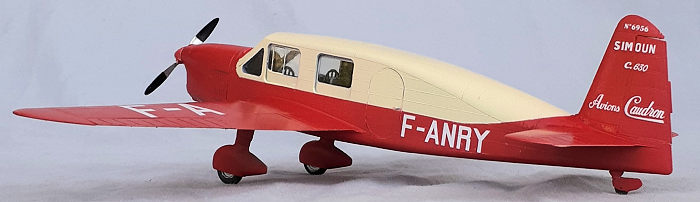
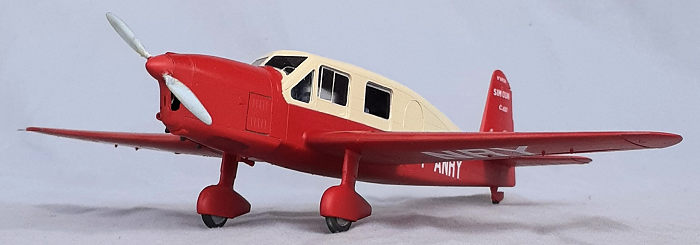
The next four pages cover color painting and decaling options. Again, no explanation about the aircraft is supplied. After searching the internet, I found that Saint-Exupéry’s aircraft (F-ANRY) in an ivory over red scheme is the first option. The second option is silver over green (F-ANCF) flown by Philippe Tréchot and M. Monteil, who were taking part in an air race from Antananarivo, the capital of Madagascar, to Paris to establish a new record. Unfortunately, the pair were killed when the plane crashed near Zanzibar. (I wonder about modeling crashed aircraft.) The last two options are all-blue airmail planes. The back cover has a paint color chart listing Mr. Hobby, Tamia, Ammo Mig, Hataka, and Life Color brands.
| CONSTRUCTION |
I decided that I wasn’t going to “sweat the details” on this model and just enjoy a simple process. When I realized that almost everything in the interior is painted dark blue, I could skip some of the detail parts and apply highlights where needed. With that in mind, I started by removing the right fuselage half, floor and firewall pieces from the sprues and cleaned up their mating surfaces. Test fitting the three parts gave me an idea how much detail to bring out in the seats and instrument panel.
Step 2 was followed first and glued the spars pieces to the floor. Pedestals for the seats were cut from strip stock and glued in place instead of using the tiny legs supplied. Step 7 is the assembly of the rudder pedals, which are installed in step13. I built them from the floor up, then installed the seats, which is part of step 3. Circling back to step 1, the seats were assembled and glued to the pedestals. The rear bulkhead was glued to the floor along with the combination compass stand and wobble pump handle and some other rectangular doo-dad that I don’t recognize noted as part F-9. This completed the interior assembly, so that and fuselage interior was painted French interior blue.
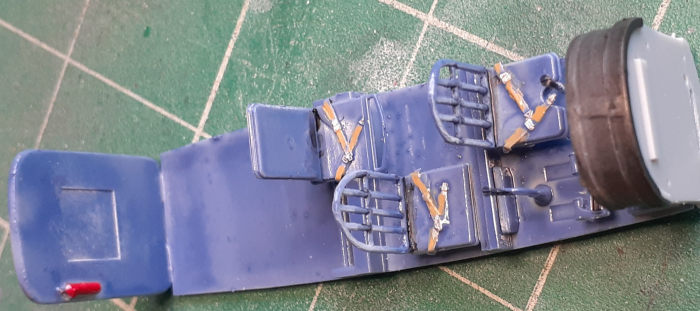
Instead of fussing with the photo-etch instrument panel, the raised detail panel was painted black, swiped with a white pencil and dusted with powdered pigment.
Steps 8 through 12 involve assembling the engine. I shortened that process by gluing part F-37, which is essentially a prop shaft bushing, to the nose piece and front engine piece, part F-30 to the front inside of the left fuselage half. This piece was painted steel and masked with a piece of tape, making sure that the tape could be pulled out with tweezers after painting.
The door and windows were installed and the fuselage halves taped together to clean up the edges where the windshield fits as well as the wings. This was done so that debris wouldn’t cling to the windows later. With that done the interior was placed in the right fuselage half and a test fit conducted.
Up to this point, once parts edges were cleaned up, fit was pretty good. Getting the fuselage together around the instrument panel/firewall assembly required using the rotary tool to remove the alignment ridges on the inside of both halves plus a couple of millimeters from the sides and top of the firewall. Thinking I was in for a battle to get the wings to mate easily with the fuselage, I did a test fit with the lower wing piece. That went very well, so the upper wings were given a test fit too and they needed just a couple of passes with file to get a tight seam. I’m left wondering why the fit around the instrument panel was so poor.
After all of that test fitting, the interior was spot glued in place to let it float as much as possible but stay put. The fuselage was glued together from the tail to the windshield and the lower wing added while the glue was still curing. Panel lines on the roof and underside were deepened with a fine saw (easier to do that first) and dabs of putty smeared on at the seams around the lower wing. The seams were cleaned up and the nose assembled. With a little bit of pressure, all of the nose pieces lined up without needing any filler.
 The
windshield part sits proud of the cabin roof. And a step up from the cowl,
so carful filling and sanding followed. Two small pieces fit flush in the
roof. It would be easier to glue them into one of the fuselage halves first
so that they won’t fall in.
The
windshield part sits proud of the cabin roof. And a step up from the cowl,
so carful filling and sanding followed. Two small pieces fit flush in the
roof. It would be easier to glue them into one of the fuselage halves first
so that they won’t fall in.
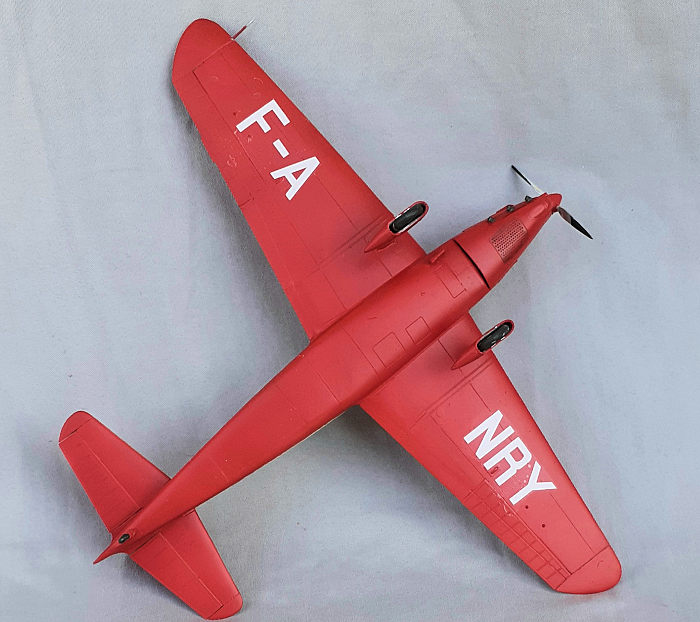
I thought I was being clever by gluing the upper wing panels in place at this point. A nice fit at the fuselage was achieved, but at the expense of fit elsewhere. The wrong pairings are identified for the ailerons. The correct pairings are 1 to 3 and 2 to 4. The engineering of the wing parts leaves a seam across the underside of the flaps and ailerons that needs filling. So that surface detail wouldn’t be ruined, a cotton swab soaked in lacquer thinner was used to clean the excess putty before it dried. That worked fairly well.
Attention turned to the stabilizers. Again, the pieces should be paired by odd and even numbers, not as the instructions indicate. A little bit of filing and they glue into place well with just a touch of filler. When the glue set, the elevators were glued in place, followed by the resin rudder piece.
Not bothering with the tiny axles that are provided to mount the wheels inside the spats, all three wheels were assembled and glued into place. The vinyl masks fit precisely and proved to be a nice time saver.
| COLORS & MARKINGS |
 Looking
way in the back of the paint rack, I found a jar of enamel Light Ivory. That
was sprayed over the entire model, acting as the roof color and tinted
primer for the red paint. After more work on seams and another coat, masking
was applied for the next color. The red pint was sprayed on in two sessions,
upper side then lower side. After unmasking the roof, I found that some
bleeding occurred. The worst of that was scraped off then the red masked and
more light ivory sprayed on.
Looking
way in the back of the paint rack, I found a jar of enamel Light Ivory. That
was sprayed over the entire model, acting as the roof color and tinted
primer for the red paint. After more work on seams and another coat, masking
was applied for the next color. The red pint was sprayed on in two sessions,
upper side then lower side. After unmasking the roof, I found that some
bleeding occurred. The worst of that was scraped off then the red masked and
more light ivory sprayed on.
White is the color of the decals and I wonder if they should be light ivory. They are acceptable as they are. They are thin and care must be taken to prevent the carrier film from curling. I was able to use a razor blade to slice off a portion that curled while it was still wet. Some Micro Sol got the decals to settle down nicely.
A clear coat sealed everything in place.
The windows were unmasked and the model was completed when the pitot and propeller were glued on.
| CONCLUSIONS |
Another interesting aircraft from Dora Wings. Also, another slow-building kit that requires some forethought and carful cleaning up of the parts. It seems to me that the molding process let the engineering down. Once the parts were cleaned up, the fit is actually very good and the detail is petite and crisp. About 25hours were spent on this project, including masking and painting.
I bought another kit and I’ll paint it in the silver over green scheme. What I’ll do differently is chamfer the windows and their openings in the fuselage to get a better fit and increased gluing surface area. Some material should be removed from the underside of the windshield so that it rests lower on the coaming, so it won’t need as much filler. I’ll also build the wings according to the instructions.
16 November 2021
Copyright ModelingMadness.com. All rights reserved. No reproduction in part or in whole without express permission.
Back to the Previews Index Page
Back to the Previews Index Page