
| KIT #: | 48025 |
| PRICE: | $35.00 |
| DECALS: | Three options |
| REVIEWER: | John Summerford |
| NOTES: | Home made decals |
| HISTORY |
The Bellanca CH-400 Skyrocket is a
six-seat utility aircraft built in the United States in the 1930s, a
continuation of the design lineage that had started with the Bellanca WB-2.
Retaining the same basic airframe of the preceding CH-200 and CH-300, t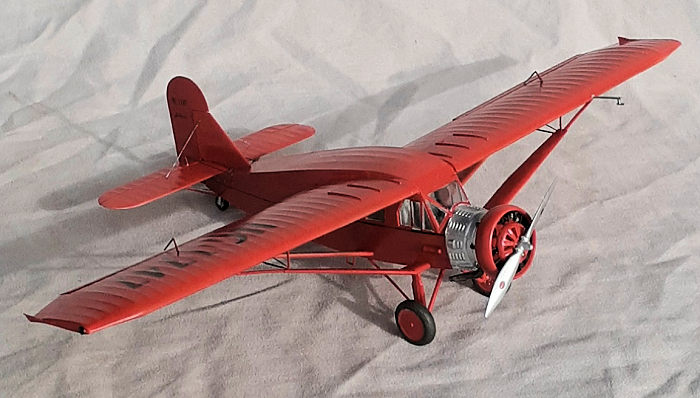 he
CH-400 was fitted with a more powerful Pratt & Whitney Wasp radial engine.
he
CH-400 was fitted with a more powerful Pratt & Whitney Wasp radial engine.
Upgrading of the design was done by Robert Noorduyn, who went on to found his own company and create, arguably, the best bush plane ever, the Norseman.
Three examples were purchased by the U.S. Navy under the designation RE. Two were used for radio research, and one as an air ambulance for the U.S. Marine Corps. This latter aircraft was reconfigured to carry two stretchers.
A deluxe version was also available for private pilot owners, fitted with a more powerful Wasp variant providing 450 hp (336 kW) and detail enhancements.
Perhaps the most significant variant of the Skyrocket is the Miss Veedol, which was the first plane, piloted by Clyde Pangborn, to fly non-stop across the Pacific. Flying from Tokyo, Japan he landed in, of all places, Wenatchee, WA. (The airport is named after him.) For the flight, an additional fuel tank was imbedded in a fairing on the underside of the fuselage, giving the plane a pregnant look. Also, the landing gear was jettisonable.
| THE KIT |
 Seven light
gray sprues, one clear sprue, plus a small bag with a fret of photo-etch, vinyl
masks, and decals come in a single bag wrapped in bubble wrap. A 12-page booklet
of a parts map, instructions, paint and decal diagrams, period photos, and color
codes rests atop the bag. The assembly sequence is conventional and calls out
114 styrene parts and 25 photo-etch parts. Some flash is present on this
example, but easily dealt with.
Seven light
gray sprues, one clear sprue, plus a small bag with a fret of photo-etch, vinyl
masks, and decals come in a single bag wrapped in bubble wrap. A 12-page booklet
of a parts map, instructions, paint and decal diagrams, period photos, and color
codes rests atop the bag. The assembly sequence is conventional and calls out
114 styrene parts and 25 photo-etch parts. Some flash is present on this
example, but easily dealt with.
Options are available for rudder shape and landing gear. Dora Wings missed an opportunity to produce a Miss Veedol option.
Decals are for the Navy and Marine Corps aircraft.
| CONSTRUCTION |
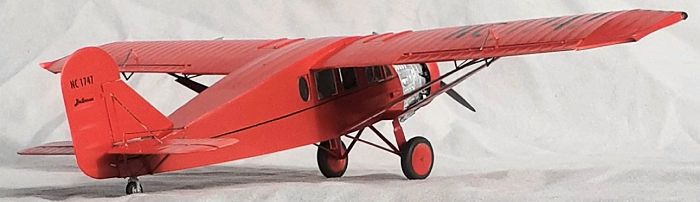
Having no enthusiasm for the military examples, and wanting to keep this project simple, I didn’t bother looking for drawings and decals for a Miss Veedol. Instead, I settled on making a fictitious civilian aircraft inspired by a photo of a restored Skyrocket found on Wikipedia.
Seats were assembled and glued to the cabin floor. With no color call-outs for the cabin, I sprayed the interior parts with rattle-can mid-gray. Seat belts, control sticks, and instrument panel were added in place.
Before installing the interior, the windows were pressed from the inside. The edges were given a slight chamfer to increase the gluing surface. After the glue cured, the windows were masked. A test fit was done to determine how the rear bulkhead fits to the floor and fuselage. With that done, the entire interior was installed and the fuselage closed up.
Once the seams were sanded down, I deviated from the instructions and installed the windshield and the stab/elevator.
 Backtracking
in the instructions, the engine was assembled and put aside. In the next step,
the nose section is built up and added to the fuselage. The illustration is not
clear on the proper sequence. I settled on using the front ring part as the
starting paint. There is a small locating tab at the bottom that keys the lower
nose part. As the glue was still curing, the side pieces were attached, followed
by the top. I found that it was easy to align the five parts, The engine mount
ring came next, while the exhaust pipes were left for post painting
installation. Also left for later was the engine and ring cowl.
Backtracking
in the instructions, the engine was assembled and put aside. In the next step,
the nose section is built up and added to the fuselage. The illustration is not
clear on the proper sequence. I settled on using the front ring part as the
starting paint. There is a small locating tab at the bottom that keys the lower
nose part. As the glue was still curing, the side pieces were attached, followed
by the top. I found that it was easy to align the five parts, The engine mount
ring came next, while the exhaust pipes were left for post painting
installation. Also left for later was the engine and ring cowl.
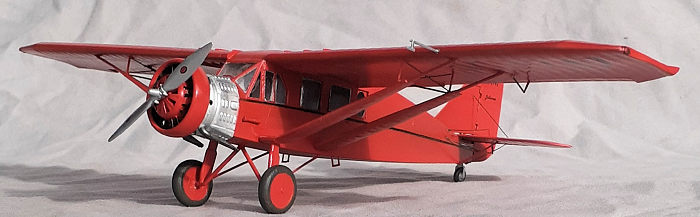
Next to be added were the wings and their struts, plus the landing gear struts. At this point, I was planning on adding the photo-etch wing strut rigging after painting, but I feared that I’d make a mess of it. So, I changed my mind and decided to glue the pieces in place at this time. It took me about half-an-hour to figure out how to position the model and use the tweezers to maneuver the pieces between the wings and struts and then apply the cyano glue. I did mess up the first one a bit, but the second one went on in a couple of minutes
I’m glad I waited until that rigging was in place before to gluing on the fin and rudder. It was easier to position the model flat on its back when dealing with the photo-etch. With all of the main parts in place, it was time for paint.
| COLORS & MARKINGS |
White rattle-can primer was applied as a base for the colors. Acrylic aluminum was sprayed onto the nose, then masked. Normally, I apply my colors lightest to darkest, but this time, a thin line of black was sprayed over the raised stripe detail on the fuselage sides. These were masked with strips of .70mm wide tape before the rest of the model was sprayed orange-red.
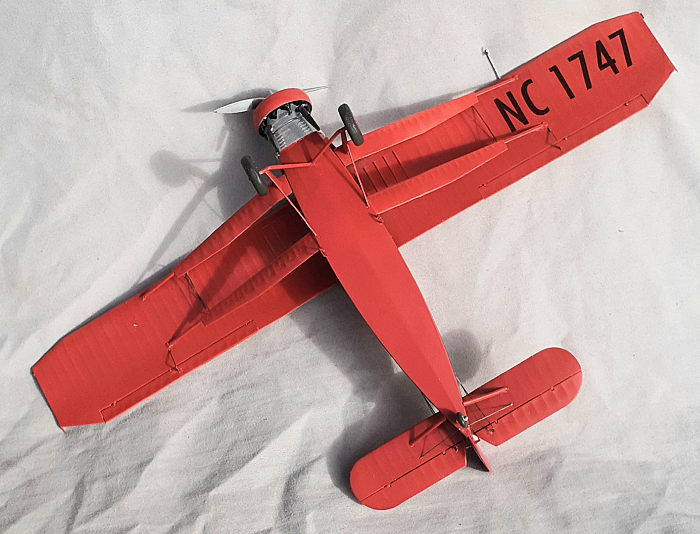
A light coat of clear gloss prepared the wings and rudder for the decals that were printed at home. Another gloss coat went over the decals.
| FINAL CONSTRUCTION |
 After
unmasking the windows, the exhaust stubs that lead to the collector ring hidden
inside the nose (not included in the kit) were installed. Thankfully, Dora Wings
provides several extra stubs in case any become a snack for the carpet monster.
Next came the exhaust pipes on the underside.
After
unmasking the windows, the exhaust stubs that lead to the collector ring hidden
inside the nose (not included in the kit) were installed. Thankfully, Dora Wings
provides several extra stubs in case any become a snack for the carpet monster.
Next came the exhaust pipes on the underside.
Pressing from the backside, the engine was glued into the cowl ring, then the nose piece over the gear box. It’s easy to attach the engine to the nose, there isn’t a designated top cylinder, so the glue was spread evenly around the mating surfaces and it was pressed into place.
What followed was my least favorite part of the build: adding the photo-etch control horns/wires. Despite my best efforts, I managed to smear cyano in several areas. After the horns were added on the underside, the wheels were glued in place plus the boarding steps.
With the model resting on its wheels, the rest of the horns were attached. That left the pitot and prop to conclude the build.
| CONCLUSIONS |
I found this kit to be one of Dora Wings’ simpler builds, so I think it’s a good one as a first-time build from them. Note that some filing is needed in some areas, particularly the windows, but there aren’t any vices. I spent a typical amount of time on this kit, somewhere around 20 hours.
The military versions available in the kit are obscure subjects, so they may not be interesting. A bush plane rendering might be more attractive. Even though the Miss Veedol is a one-off, its history is important and I’d be first in line to get one of those kits.
28 February 2023
Copyright ModelingMadness.com. All rights reserved. No reproduction in part or in whole without express permission.
If you would like your product reviewed fairly and fairly quickly, please contact the editor or see other details in the Note to Contributors.